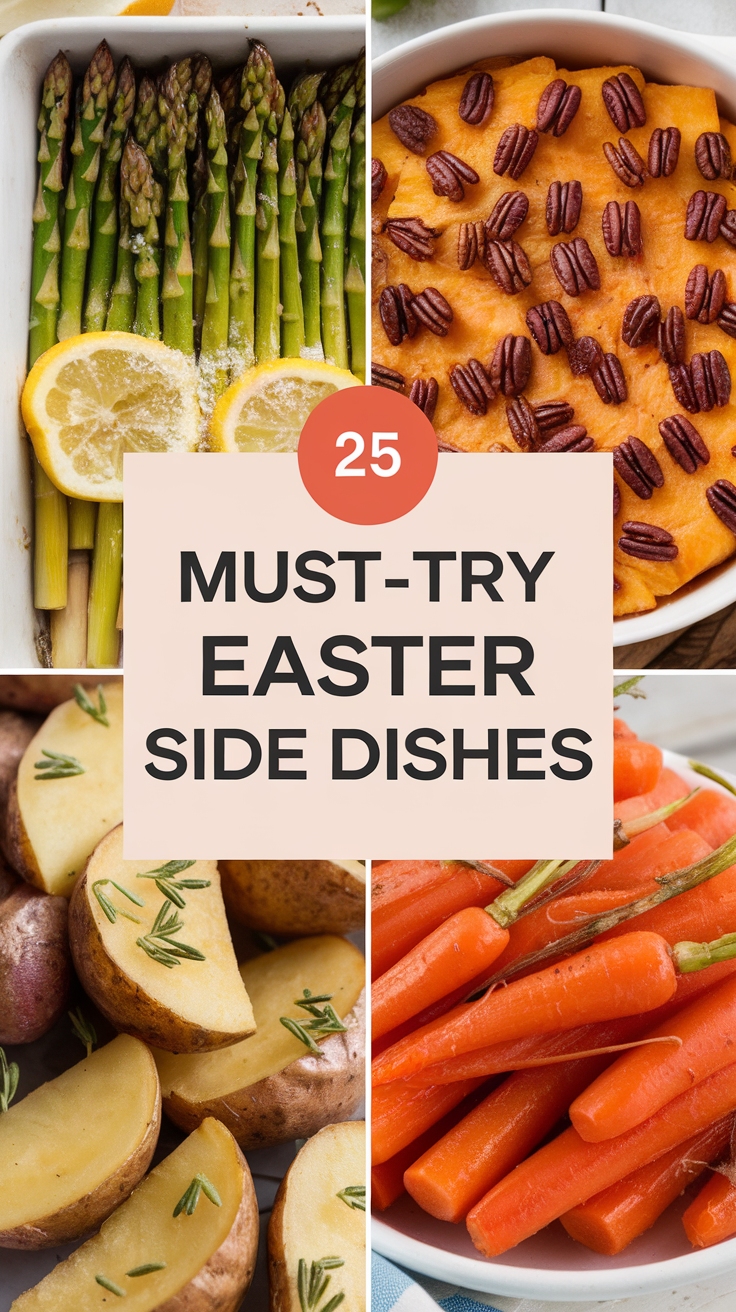
25 Easter Side Dishes Everyone Loves
Easter is just around the corner, and you might be wondering what delicious side dishes will wow your guests. You want to make your holiday meal extra special, but planning can feel overwhelming. Don’t worry! You’ll discover 25 amazing Easter side dishes that will delight everyone at your table. Whether it’s creamy, crunchy, or colorful, there’s something here for every taste!
Shop Our Must-Haves

1 Honey Glazed Carrots with Thyme
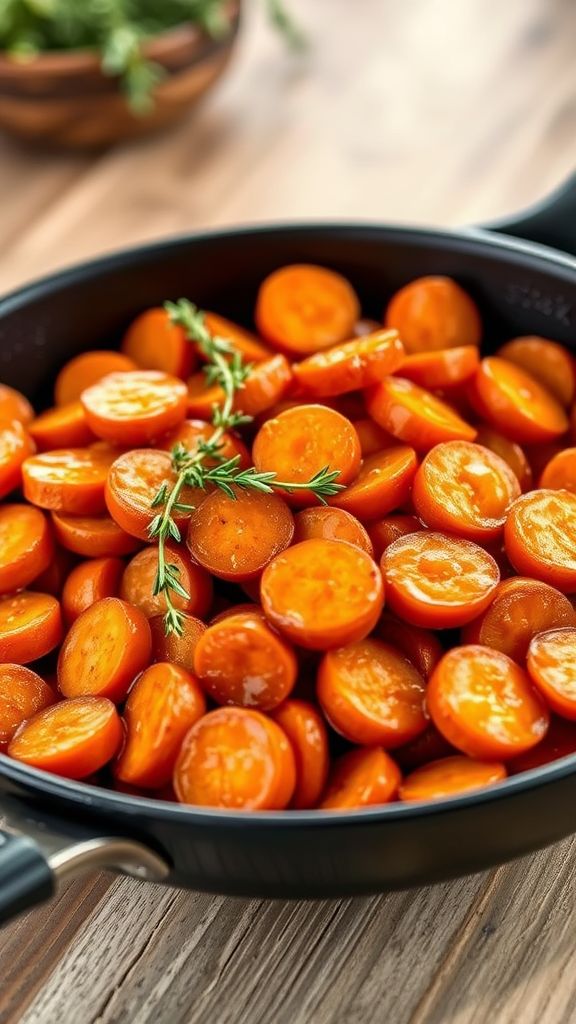
Honey Glazed Carrots with Thyme are a deliciously sweet and savory side dish that’s perfect for any meal. The combination of honey and thyme complements the natural sweetness of the carrots, making them a favorite for Easter or any festive gathering. This quick and easy recipe will have everyone reaching for seconds!
Prep Time: 10 minutes
Cook Time: 15 minutes
Total Time: 25 minutes
Servings: 4
Ingredients:
- 1 lb fresh carrots, peeled and sliced into thin rounds
- 2 tbsp honey
- 1 tbsp olive oil
- 1 tsp chopped fresh thyme (or 1/2 tsp dried thyme)
- Salt, to taste
- Pepper, to taste
Instructions:
Start by heating olive oil in a large skillet over medium heat. Once the oil is hot, add the sliced carrots to the skillet. Stir them occasionally to ensure they cook evenly.
Cook the carrots for about 5 minutes until they begin to soften. Then, drizzle the honey over the carrots and sprinkle with thyme, salt, and pepper. Stir everything together gently to coat the carrots in the honey and seasoning.
Continue cooking for another 10 minutes, stirring often. The honey will caramelize and the carrots will become tender and shiny. Once cooked, remove the skillet from heat.
Serve the Honey Glazed Carrots warm, and enjoy the wonderful blend of flavors!
Tips:
- For extra flavor, try adding a squeeze of lemon juice before serving.
- You can substitute maple syrup for honey if you prefer a different sweetness.
- Use baby carrots for a quicker prep time and a fun presentation.
Nutrition Facts:
- Calories: 140
- Total Fat: 4g
- Sodium: 60mg
- Total Carbohydrates: 25g
- Dietary Fiber: 4g
- Sugars: 12g
- Protein: 1g
2 Creamy Garlic Mashed Potatoes
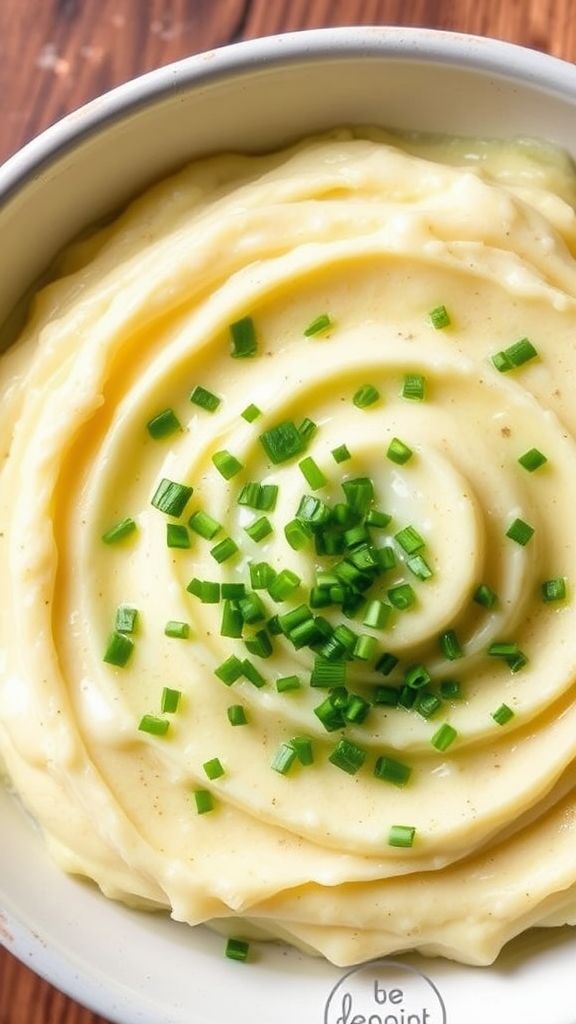
Creamy Garlic Mashed Potatoes are the perfect side dish for any meal. They are smooth, rich, and packed with flavor from the garlic. This recipe is simple to follow and will surely impress your family and friends!
Prep Time: 15 minutes
Cook Time: 20 minutes
Total Time: 35 minutes
Servings: 4
Ingredients:
- 2 pounds of potatoes (Yukon Gold or Russet)
- 4 cloves of garlic, minced
- ½ cup of milk (or heavy cream for extra creaminess)
- ¼ cup of unsalted butter
- Salt to taste
- Pepper to taste
- Chopped chives or parsley for garnish (optional)
Instructions:
Start by peeling the potatoes and cutting them into chunks. Make sure they are about the same size for even cooking.
Place the potato chunks in a large pot and cover them with water. Add a pinch of salt and bring the water to a boil over medium-high heat. Once boiling, reduce the heat and let them simmer for about 15-20 minutes or until they are fork-tender.
While the potatoes are cooking, melt the butter in a small saucepan over low heat. Add the minced garlic to the melted butter and sauté for about 2-3 minutes, but do not let it burn. Remove it from heat and set aside.
Once the potatoes are done, drain them in a colander and return them to the pot. Pour in the garlic butter mixture and milk. Mash everything together until the potatoes are smooth and creamy. Adjust the consistency with more milk if needed.
Finally, season with salt and pepper to taste. Transfer the mashed potatoes to a serving bowl and garnish with chopped chives or parsley if desired.
Tips:
- For even creamier mashed potatoes, use a potato ricer instead of a masher.
- If you love garlic, try roasting the garlic before adding it for a sweeter flavor.
- These mashed potatoes can be made ahead of time and reheated in the oven or microwave before serving.
Nutrition Facts:
- Calories: 250 per serving
- Carbohydrates: 36g
- Protein: 4g
- Fat: 11g
- Saturated Fat: 7g
- Fiber: 3g
- Sugar: 1g
3 Lemon Herb Roasted Asparagus
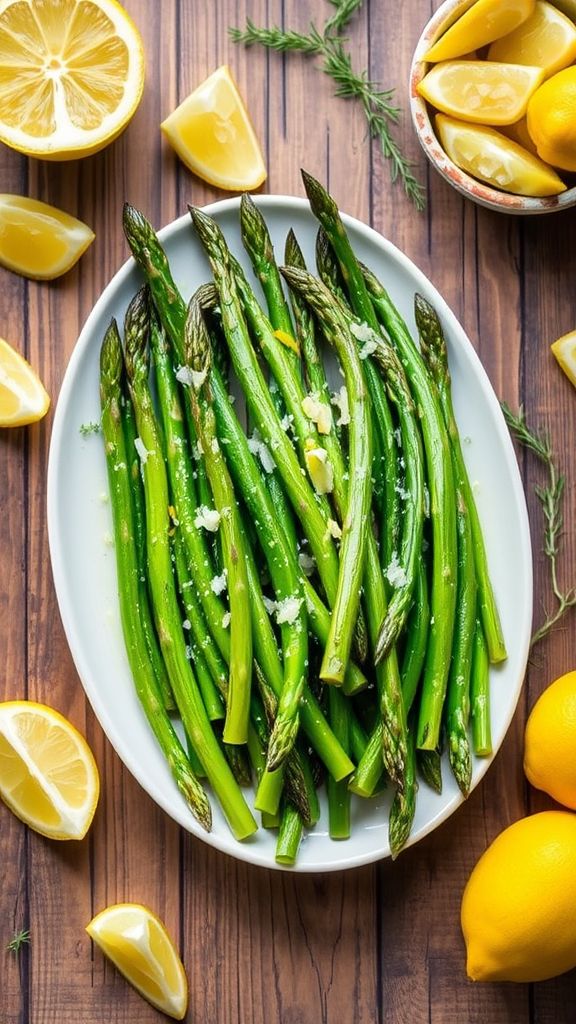
Lemon Herb Roasted Asparagus is a bright and flavorful side dish that will brighten up any meal. This dish combines the fresh taste of asparagus with zesty lemon and herbs for an easy yet impressive addition to your table. Perfect for Easter or any spring gathering, this recipe is sure to please everyone!
Prep Time: 10 minutes
Total Time: 25 minutes
Servings: 4
Ingredients:
- 1 pound fresh asparagus, trimmed
- 2 tablespoons olive oil
- 1 lemon, juiced and zested
- 2 cloves garlic, minced
- 1 teaspoon dried thyme
- 1 teaspoon dried oregano
- Salt and pepper, to taste
- Parmesan cheese, for garnish (optional)
Instructions:
Start by preheating your oven to 425°F (220°C). This will ensure that the asparagus roasts properly and becomes tender.
Next, wash the asparagus under cool water and trim off the tough ends. It’s essential to have tender asparagus for the best taste.
In a large bowl, whisk together the olive oil, lemon juice, lemon zest, garlic, thyme, oregano, and salt and pepper. This mixture will be the flavorful base for our asparagus.
Add the trimmed asparagus to the bowl and toss well until all the asparagus is evenly coated with the lemon herb mixture. Make sure every piece gets some love!
Spread the coated asparagus out in a single layer on a baking sheet. This allows them to roast evenly and get that nice, crispy texture.
Roast the asparagus in the preheated oven for about 15 minutes, or until they are tender and slightly crispy. Keep an eye on them so they don’t overcook!
Once done, remove the baking sheet from the oven and let the asparagus cool for a couple of minutes. If you like, sprinkle some Parmesan cheese on top for a delicious finish.
Serve the Lemon Herb Roasted Asparagus warm and enjoy its fresh, vibrant flavors!
Tips:
- For extra flavor, try adding a sprinkle of crushed red pepper flakes for a bit of heat.
- You can use fresh herbs like thyme and oregano instead of dried for an even fresher taste.
- Pair this dish with grilled chicken or fish for a complete meal.
Nutrition Facts:
- Calories: 120
- Protein: 3g
- Fat: 10g
- Carbohydrates: 7g
- Fiber: 4g
- Sugar: 2g
4 Honey Mustard Roasted Brussels Sprouts
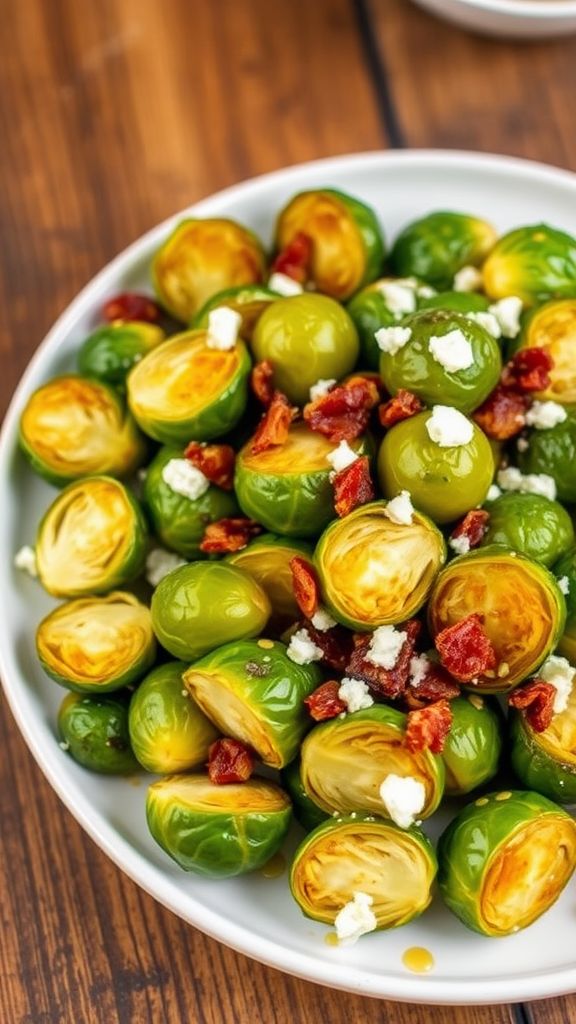
These Honey Mustard Roasted Brussels Sprouts are a delightful side dish that adds a sweet and tangy twist to your meal. Perfect for any occasion, these little green gems are crispy on the outside and tender on the inside. Let’s transform this humble vegetable into a flavorful dish that everyone will love!
Prep Time: 10 minutes
Cook Time: 25 minutes
Total Time: 35 minutes
Servings: 4
Ingredients:
- 1 lb Brussels sprouts, trimmed and halved
- 3 tbsp olive oil
- 2 tbsp honey
- 2 tbsp Dijon mustard
- 1 tsp garlic powder
- Salt and pepper, to taste
- Optional: ¼ cup bacon bits or crumbled feta cheese for topping
Instructions:
Start by preheating your oven to 400°F (200°C). This will ensure that your Brussels sprouts roast perfectly.
Next, in a large bowl, combine olive oil, honey, Dijon mustard, and garlic powder. Stir until the mixture is well-blended. It should have a deliciously sweet and tangy aroma.
Now, add the halved Brussels sprouts into the bowl. Toss them in the honey mustard mixture until they are all coated evenly. Don’t forget to add a pinch of salt and pepper to enhance the flavors.
Spread the Brussels sprouts on a baking sheet in a single layer. This helps them roast evenly and get that nice crispy edge.
Place the baking sheet in the oven and roast for about 25 minutes. Make sure to toss the sprouts halfway through for even cooking. They should be golden brown and crisp when done.
If you want to add an extra touch, sprinkle some bacon bits or crumbled feta cheese on top right before serving. This will give your dish a delicious finish!
Tips:
- For extra crispy Brussels sprouts, try using a convection oven if you have one.
- You can make the honey mustard mixture ahead of time and store it in the fridge until you’re ready to use it.
- If you like a bit of heat, consider adding a pinch of crushed red pepper flakes to the mixture.
Nutrition Facts:
- Calories: 180 kcal
- Carbohydrates: 12 g
- Protein: 3 g
- Fat: 15 g
- Fiber: 4 g
- Sugar: 5 g
Enjoy your tasty Honey Mustard Roasted Brussels Sprouts! They’re sure to impress your family and friends at the dinner table.
5 Scalloped Potatoes with Gruyere

Scalloped Potatoes with Gruyere are a rich and creamy dish perfect for any occasion. This comforting side dish will take your taste buds on a delightful journey with layers of thinly sliced potatoes, cheese, and a creamy sauce. It’s simple to make and will surely impress your friends and family!
Prep Time: 20 minutes
Cook Time: 1 hour
Total Time: 1 hour 20 minutes
Servings: 6
Ingredients:
- 2 pounds of potatoes (Yukon Gold or Russet), peeled and thinly sliced
- 2 cups of heavy cream
- 1 cup of Gruyere cheese, grated
- 1 cup of sharp cheddar cheese, grated
- 3 tablespoons of unsalted butter
- 2 cloves of garlic, minced
- 1 teaspoon of salt
- 1/2 teaspoon of black pepper
- 1/4 teaspoon of nutmeg (optional)
- 1/4 cup of Parmesan cheese, grated (for topping)
Instructions:
Start by preheating your oven to 375°F (190°C). This ensures that the scalloped potatoes will cook evenly.
Next, take a large pot and melt the butter over medium heat. Add the minced garlic and sauté it for about a minute until it becomes fragrant. Then, stir in the heavy cream, salt, black pepper, and nutmeg. Keep stirring until everything is well mixed and heated through.
Now, it’s time to layer the potatoes. In a greased baking dish, place a layer of the sliced potatoes at the bottom. Pour a little bit of the cream mixture over them and sprinkle a portion of the Gruyere and cheddar cheese on top. Repeat this layering process until you’ve used all the potatoes, cream mixture, and cheese.
Once you finish layering, sprinkle the Parmesan cheese on top for an extra crunchy flavor. Cover the baking dish with aluminum foil to keep the moisture in.
Place the dish in the preheated oven and bake for 45 minutes. After that, remove the foil and bake for an additional 15 minutes or until the top is golden and bubbly.
Let the scalloped potatoes cool for about 5-10 minutes before serving. This will help set the layers and make it easier to serve.
Tips:
- For extra flavor, try adding your favorite herbs like thyme or rosemary in between the layers.
- If you want a crispier top, broil the dish for 2-3 minutes after baking to get a nice golden crust.
- Use a mandoline slicer for perfectly even potato slices to ensure even cooking.
Nutrition Facts:
- Calories: 450 per serving
- Total Fat: 30g
- Saturated Fat: 18g
- Cholesterol: 90mg
- Sodium: 600mg
- Total Carbohydrates: 36g
- Dietary Fiber: 3g
- Sugars: 2g
- Protein: 12g
6 Spring Pea Salad with Feta
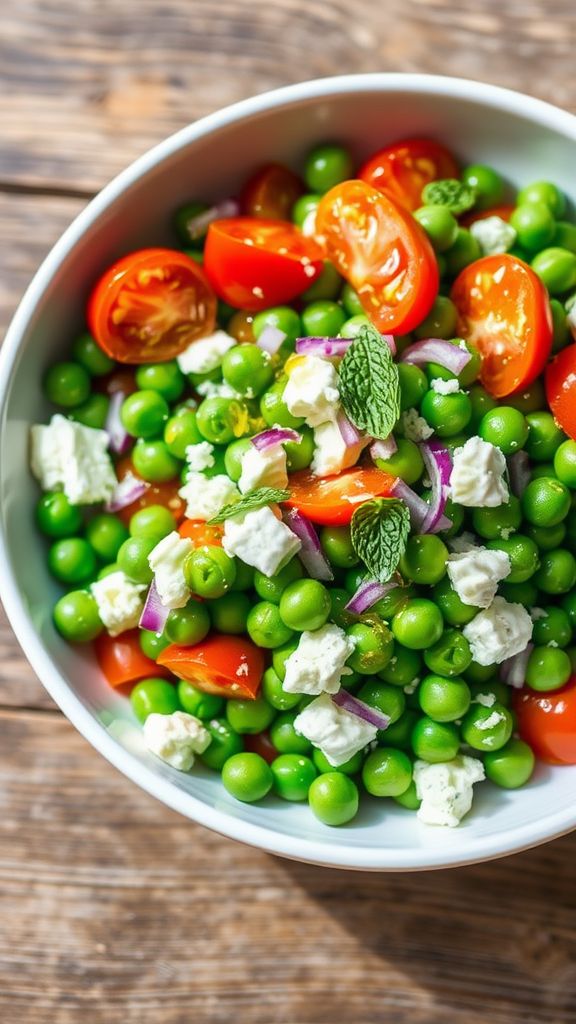
This Spring Pea Salad with Feta is a fresh and vibrant dish that’s perfect for celebrating the season. It’s simple to make and combines the sweetness of peas with the saltiness of feta cheese. Serve it as a side dish or enjoy it as a light meal!
Prep Time: 10 minutes
Total Time: 10 minutes
Servings: 4
Ingredients:
- 2 cups fresh or frozen peas (thawed if frozen)
- 1 cup cherry tomatoes, halved
- 1/2 cup crumbled feta cheese
- 1/4 cup red onion, finely chopped
- 1/4 cup fresh mint leaves, chopped
- 3 tablespoons olive oil
- 2 tablespoons lemon juice
- Salt and pepper to taste
Instructions:
Start by rinsing the peas and placing them in a large bowl. If you’re using frozen peas, ensure they are properly thawed beforehand.
Next, add the cherry tomatoes, feta cheese, red onion, and mint leaves to the bowl with the peas. Gently mix all the ingredients, making sure everything is evenly distributed.
In a small bowl, whisk together the olive oil and lemon juice. Pour this dressing over the salad. Season it with salt and pepper to your liking.
Carefully toss the salad to coat all the ingredients in the dressing. Make sure not to break apart the feta too much.
Serve the salad immediately, or let it sit for a few minutes to allow the flavors to meld together. Enjoy this colorful dish at your next gathering!
Tips:
- For added crunch, consider adding some toasted almonds or walnuts.
- To make it more filling, you can add cooked quinoa or chickpeas.
- This salad can be made ahead of time; just dress it right before serving to keep it fresh.
Nutrition Facts:
- Calories: 150
- Protein: 7g
- Carbohydrates: 12g
- Fat: 10g
- Fiber: 4g
7 Balsamic Roasted Vegetable Medley
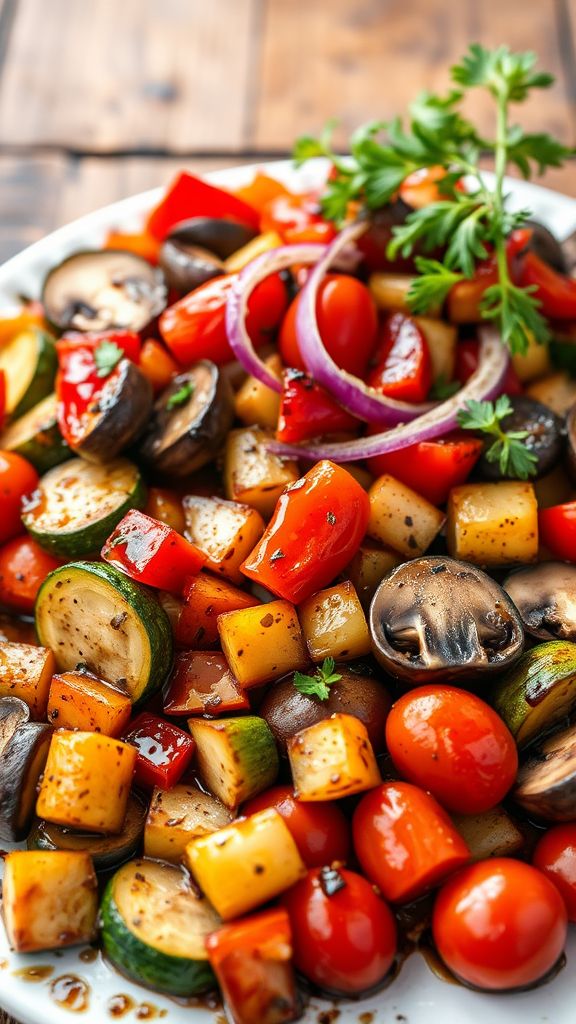
Balsamic Roasted Vegetable Medley is a delicious and colorful side dish that’s perfect for any occasion. It combines a variety of vegetables tossed in a tangy balsamic glaze and roasted to perfection. This dish is not only tasty but also healthy and easy to prepare.
Prep Time: 15 minutes
Cook Time: 25 minutes
Total Time: 40 minutes
Servings: 4
Ingredients:
- 1 zucchini, sliced
- 1 bell pepper, diced
- 1 red onion, chopped
- 1 cup cherry tomatoes
- 1 cup mushrooms, halved
- 3 tablespoons olive oil
- 3 tablespoons balsamic vinegar
- 1 teaspoon dried oregano
- Salt and pepper to taste
Instructions:
Start by preheating your oven to 425°F (220°C). While the oven heats up, prepare your vegetables by washing and cutting them into bite-sized pieces. This will ensure they roast evenly.
Next, take a large mixing bowl and combine the zucchini, bell pepper, red onion, cherry tomatoes, and mushrooms. Drizzle in the olive oil and balsamic vinegar. Then, sprinkle in the dried oregano, salt, and pepper. Toss everything together until the vegetables are well coated in the mixture.
Spread the vegetables out on a large baking sheet in a single layer. Make sure they aren’t crowded, as this will help them roast instead of steam. Place the baking sheet in the preheated oven.
Roast the vegetables for about 25 minutes, or until they are tender and slightly caramelized. Stir once halfway through the cooking time to ensure even roasting.
Once the vegetables are done, remove them from the oven and let them cool for a few minutes. They are now ready to be served as a tasty side dish!
Tips:
- Feel free to mix and match your favorite vegetables. Broccoli, carrots, and asparagus work well too!
- For an extra burst of flavor, add fresh herbs like basil or thyme before serving.
- Don’t forget to watch the vegetables closely towards the end of cooking to prevent burning.
Nutrition Facts:
- Calories: 150
- Total Fat: 8g
- Sodium: 45mg
- Total Carbohydrates: 18g
- Dietary Fiber: 5g
- Protein: 3g
8 Cheesy Broccoli and Rice Casserole
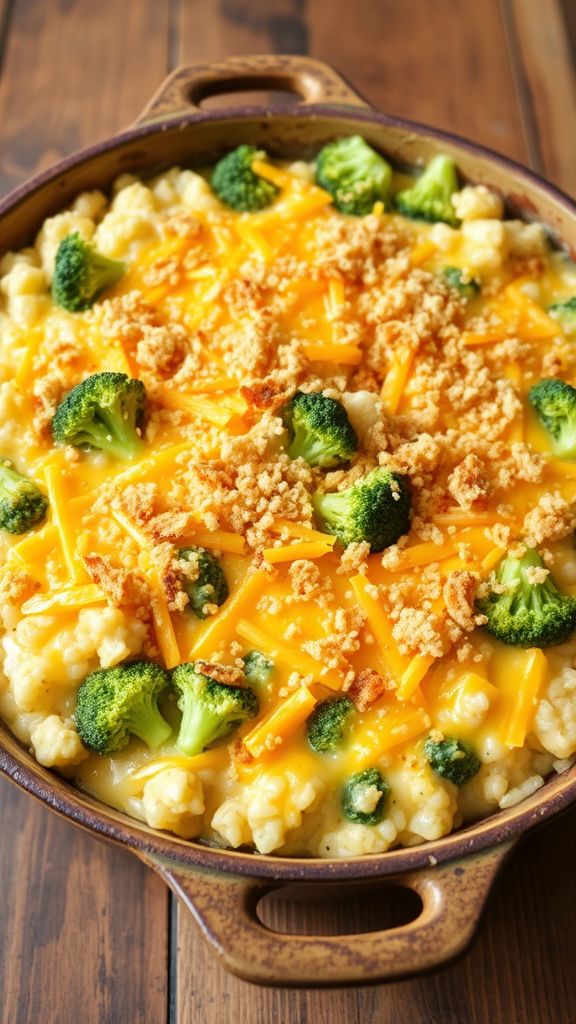
This Cheesy Broccoli and Rice Casserole is a delightful dish that combines creamy cheese and tender broccoli with fluffy rice. It’s perfect as a side dish for special occasions or family dinners. Your loved ones will adore this comforting and tasty casserole!
Prep Time: 15 minutes
Cook Time: 30 minutes
Additional Time: 10 minutes
Total Time: 55 minutes
Servings: 6
Ingredients:
- 2 cups cooked rice (white or brown)
- 2 cups chopped broccoli (fresh or frozen)
- 1 cup shredded cheddar cheese
- 1 cup cream of mushroom soup (or cream of broccoli soup)
- 1/2 cup milk
- 1/2 teaspoon garlic powder
- 1/2 teaspoon onion powder
- Salt and pepper to taste
- 1/2 cup breadcrumbs (optional for topping)
- 1 tablespoon butter (optional for topping)
Instructions:
Start by preheating your oven to 350°F (175°C). This will ensure that the casserole cooks evenly.
In a large mixing bowl, combine the cooked rice, chopped broccoli, shredded cheddar cheese, cream of mushroom soup, and milk. Stir everything together until well mixed. This creates a creamy base for your casserole.
Next, add the garlic powder, onion powder, and season with salt and pepper. Mix well again. The spices will enhance the flavors of the dish, making it even more delicious.
Pour the mixture into a greased 9×13 inch baking dish. If you want a crunchy topping, mix the optional breadcrumbs with the melted butter and sprinkle it on top of the casserole.
Bake in the preheated oven for about 30 minutes, or until the casserole is hot and bubbly. If you used breadcrumbs, they should be golden brown by now.
Once done, remove it from the oven and allow it to cool for about 10 minutes. This will make it easier to serve and will help the flavors settle.
Tips:
- For extra cheese goodness, add an extra cup of shredded cheese on top before baking.
- You can add cooked chicken or ham for a heartier meal.
- Try using different vegetables like cauliflower or carrots for added nutrition and flavor.
Nutrition Facts:
- Calories: 320 per serving
- Protein: 12g
- Carbohydrates: 39g
- Fat: 15g
- Saturated Fat: 7g
- Fiber: 3g
- Sugar: 2g
9 Deviled Eggs with a Twist

These Deviled Eggs with a Twist are not your ordinary deviled eggs! With an exciting combination of flavors, they’ll impress your friends and family at any gathering or holiday. Let’s get started on this fun and tasty treat!
Prep Time: 15 minutes
Total Time: 30 minutes
Servings: 12 halves
Ingredients:
- 6 large eggs
- 3 tablespoons mayonnaise
- 1 teaspoon Dijon mustard
- 1 teaspoon hot sauce (or to taste)
- 1 tablespoon pickle relish
- 2 tablespoons crushed bacon
- 1 tablespoon fresh chives (chopped)
- Salt and pepper to taste
- Smoked paprika for garnish
Instructions:
First, start by boiling the eggs. Place them in a saucepan, cover them with cold water, and bring it to a boil. Once boiling, cover the pan and remove it from heat. Let the eggs sit for about 12 minutes.
After 12 minutes, carefully remove the eggs from the hot water and place them in a bowl of cold water. This will help cool them down quickly and make peeling easier.
Once the eggs are cool, peel them and slice each egg in half lengthwise. Gently remove the yolks and place them in a mixing bowl. Set the egg whites aside.
In the bowl with the yolks, add mayonnaise, Dijon mustard, hot sauce, pickle relish, crushed bacon, and chives. Mix everything together until it becomes a smooth and creamy consistency. Don’t forget to season with salt and pepper to taste.
Now it’s time to fill the egg whites! Use a spoon or a piping bag to place the yolk mixture back into each egg white half.
Finally, sprinkle a little smoked paprika on top for that delicious garnish. Your Deviled Eggs with a Twist are now ready to serve!
Tips:
- For a healthier version, you can replace mayonnaise with Greek yogurt.
- Add some avocado to the yolk filling for a creamy texture and extra flavor!
- If you like it spicy, try adding jalapeños or any hot sauce of your choice.
Nutrition Facts:
- Calories: 70 per half egg
- Protein: 4g
- Fat: 5g
- Carbohydrates: 1g
- Fiber: 0g
- Cholesterol: 186mg
10 Parmesan Crusted Cauliflower
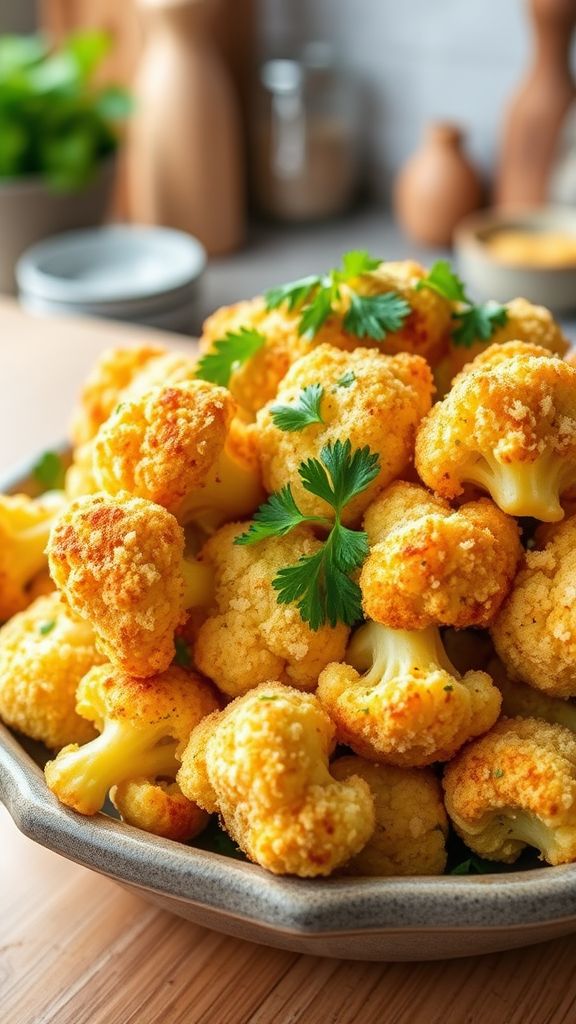
Parmesan Crusted Cauliflower is a delicious and healthy side dish that everyone will love. This dish combines the nutty flavor of cauliflower with the rich taste of Parmesan cheese, creating a crispy and satisfying experience. It’s perfect for holidays or any family dinner.
Prep Time: 15 minutes
Cook Time: 25 minutes
Additional Time: 0 minutes
Total Time: 40 minutes
Servings: 4
Ingredients:
- 1 medium head of cauliflower
- 1 cup of grated Parmesan cheese
- 1/2 cup of breadcrumbs (Italian seasoned preferred)
- 1 teaspoon of garlic powder
- 1 teaspoon of onion powder
- 1 teaspoon of salt
- 1/2 teaspoon of black pepper
- 1/4 cup of olive oil
- 2 tablespoons of chopped fresh parsley (for garnish)
Instructions:
First, preheat your oven to 425°F (220°C). This high temperature will help create that nice golden crust on the cauliflower.
Next, wash the cauliflower and remove the leaves. Cut the cauliflower into small florets. Make sure they are all about the same size so they cook evenly.
In a large bowl, mix the grated Parmesan cheese, breadcrumbs, garlic powder, onion powder, salt, and black pepper. Make sure all the dry ingredients are well combined.
Now, add the olive oil to the cauliflower florets. Toss them around to coat them evenly with the oil. This will help the coating stick later on.
Next, sprinkle the cheese and breadcrumb mixture on the cauliflower. Toss everything around again until the florets are fully covered with the cheesy mixture.
Place the coated florets in a single layer on a baking sheet. You may want to line the sheet with parchment paper for easier cleaning.
Bake in the preheated oven for about 25 minutes, or until the cauliflower is tender and the outer layer is crispy and golden brown. Keep an eye on it to avoid burning.
Once done, remove from the oven and let it cool for a couple of minutes. Lastly, drizzle with some chopped fresh parsley before serving for a pop of color!
Tips:
- For extra crunch, try using panko breadcrumbs instead of regular breadcrumbs.
- Experiment with different seasonings, like paprika or Italian herbs, to customize the flavor.
- Serve immediately for the best texture and flavor.
Nutrition Facts:
- Calories: 180 per serving
- Protein: 8g
- Carbohydrates: 12g
- Fat: 12g
- Fiber: 4g
- Sugar: 2g
11 Loaded Potato Salad
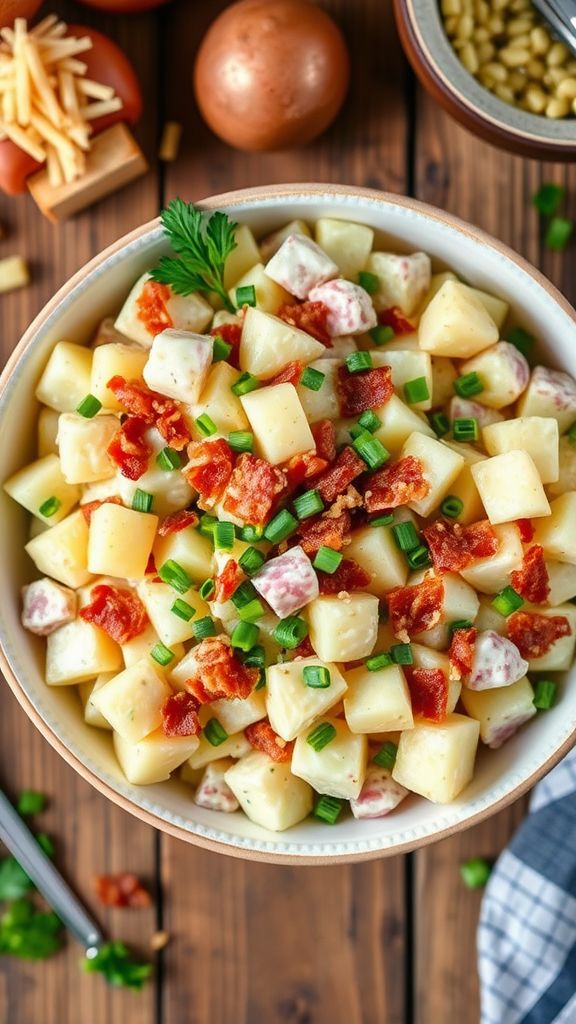
This Loaded Potato Salad is a delicious twist on the classic dish. With creamy potatoes, crispy bacon, and tangy dressing, it’s perfect for any gathering or holiday table. Everyone will love this tasty treat, especially with a hint of cheddar cheese and fresh green onions!
Prep Time: 20 minutes
Additional Time: 2 hours
Total Time: 2 hours 20 minutes
Servings: 8
Ingredients:
- 2 pounds of baby potatoes
- 1 cup mayonnaise
- 1/2 cup sour cream
- 1 tablespoon Dijon mustard
- 1 teaspoon garlic powder
- 1 teaspoon onion powder
- 1/2 teaspoon salt
- 1/4 teaspoon black pepper
- 1 cup cooked bacon, chopped
- 1 cup shredded cheddar cheese
- 1/2 cup green onions, chopped (plus extra for garnish)
- 1/4 cup fresh parsley, chopped
Instructions:
Start by washing the baby potatoes under cold water. Then, place them in a large pot filled with water and bring it to a boil. Cook for about 15-20 minutes or until the potatoes are fork-tender. Once done, drain them and let them cool completely.
While the potatoes are cooling, prepare the dressing. In a mixing bowl, combine mayonnaise, sour cream, Dijon mustard, garlic powder, onion powder, salt, and black pepper. Whisk everything together until it’s nice and smooth.
Once the potatoes have cooled, chop them into bite-sized pieces. In a large mixing bowl, add the chopped potatoes, chopped bacon, shredded cheddar cheese, green onions, and parsley. Pour the dressing over the potato mixture and gently fold everything together until well coated.
Cover the salad and place it in the refrigerator for at least 2 hours to chill. This helps all the flavors blend perfectly. When you are ready to serve, give it a good stir, garnish with extra green onions, and enjoy!
Tips:
- For a creamier texture, add a splash of milk or more sour cream to the dressing.
- You can substitute turkey bacon for a lighter option if you prefer.
- Make it a day ahead for even better flavor; it allows the potatoes to soak in the dressing overnight!
Nutrition Facts:
- Calories: 320 per serving
- Total Fat: 24g
- Saturated Fat: 8g
- Cholesterol: 40mg
- Sodium: 470mg
- Total Carbohydrates: 24g
- Dietary Fiber: 3g
- Sugars: 1g
- Protein: 9g
12 Spinach and Artichoke Dip

This delicious Spinach and Artichoke Dip is perfect for any gathering. Creamy, cheesy, and packed with flavor, it’s sure to be a hit at your next party. Serve it warm with tortilla chips or bread for the ultimate snack!
Prep Time: 15 minutes
Cook Time: 25 minutes
Total Time: 40 minutes
Servings: 8
Ingredients:
- 1 cup chopped fresh spinach
- 1 cup canned artichoke hearts, drained and chopped
- 1 cup cream cheese, softened
- ½ cup sour cream
- ½ cup mayonnaise
- 1 cup shredded mozzarella cheese
- ½ cup grated Parmesan cheese
- 2 cloves garlic, minced
- ½ teaspoon red pepper flakes (optional)
- Salt and pepper to taste
Instructions:
Start by preheating your oven to 350°F (175°C). While the oven heats, gather all your ingredients. In a large mixing bowl, combine the cream cheese, sour cream, and mayonnaise. Mix them well until smooth and creamy.
Next, add the chopped spinach, artichoke hearts, and minced garlic to the bowl. Stir until everything is nicely mixed. Then, fold in the shredded mozzarella cheese and Parmesan cheese. Be sure to mix thoroughly so the cheese is evenly distributed.
Add red pepper flakes for a kick if you like. Season the mixture with salt and pepper to your taste. Once everything is well combined, transfer the mixture into a baking dish. Spread it out evenly.
Place the dish in the oven and bake for about 25 minutes, or until the dip is bubbling and golden on top. When done, remove it from the oven and let it cool for a few minutes before serving. Enjoy your warm dip with chips or bread!
Tips:
- For a healthier option, use Greek yogurt instead of sour cream and mayonnaise.
- You can prepare this dip a day in advance. Just cover and refrigerate it before baking!
- Try adding some extra cheeses like cheddar or using different herbs like thyme for added flavor.
Nutrition Facts:
- Calories: 240 per serving
- Fat: 18g
- Carbohydrates: 7g
- Protein: 7g
- Fiber: 1g
13 Roasted Beet and Goat Cheese Salad

Roasted Beet and Goat Cheese Salad is a colorful and delicious dish that’s perfect for any occasion. The sweet roasted beets pair wonderfully with creamy goat cheese, creating a delightful balance of flavors. This salad is not only tasty but also visually stunning!
Prep Time: 15 minutes
Cook Time: 45 minutes
Additional Time: 15 minutes (cooling)
Total Time: 1 hour 15 minutes
Servings: 4
Ingredients:
- 4 medium beets
- 2 tablespoons olive oil
- Salt to taste
- Pepper to taste
- 4 cups mixed greens (such as arugula, spinach, or romaine)
- 4 ounces goat cheese, crumbled
- 1/4 cup walnuts, chopped
- 2 tablespoons balsamic vinegar
- 1 tablespoon honey
Instructions:
Start by preheating your oven to 400°F (200°C). Wash the beets thoroughly to remove any dirt. Then, wrap each beet in aluminum foil, drizzle them with 1 tablespoon of olive oil, and sprinkle with salt and pepper.
Place the wrapped beets on a baking sheet and roast in the preheated oven for about 45 minutes. You’ll know they are done when a fork can easily go through them. Once cooked, remove them from the oven and let them cool for about 15 minutes.
After they cool, carefully unwrap the beets and peel off the skins. The skin should come off easily. Cut the beets into 1/2-inch slices or cubes, depending on your preference.
In a large salad bowl, combine the mixed greens, roasted beets, and crumbled goat cheese. Add the chopped walnuts on top. In a small bowl, whisk together the remaining 1 tablespoon of olive oil, balsamic vinegar, and honey. Drizzle this dressing over the salad right before serving.
Toss the salad gently to combine all the ingredients, making sure the goat cheese doesn’t get too mushy. Serve fresh and enjoy the burst of flavors!
Tips:
- To save time, roast the beets a day in advance and store them in the refrigerator.
- For added flavor, sprinkle some fresh herbs like basil or parsley on top.
- You can substitute walnuts with pecans or pine nuts for a different nutty taste.
Nutrition Facts:
- Calories: 200
- Protein: 6g
- Carbohydrates: 18g
- Fat: 12g
- Fiber: 4g
- Sugar: 5g
14 Classic Coleslaw with Apple

This Classic Coleslaw with Apple is a refreshing twist on the traditional coleslaw. The crunchy cabbage and sweet apples go perfectly together, making it a great side dish for any meal. It’s easy to prepare and will be loved by kids and adults alike!
Prep Time: 15 minutes
Total Time: 15 minutes
Servings: 6
Ingredients:
- 4 cups green cabbage, finely shredded
- 1 cup red cabbage, finely shredded
- 1 large apple, cored and julienned (like Granny Smith or Honeycrisp)
- 1 medium carrot, shredded
- 1/2 cup mayonnaise
- 2 tablespoons apple cider vinegar
- 2 tablespoons honey
- Salt and pepper to taste
Instructions:
Start by preparing the cabbages. Finely shred the green and red cabbage using a sharp knife or a mandoline. Place them in a large mixing bowl.
Next, core and julienne your apple. Make sure to choose a sweet and crisp variety to add a nice crunch. Add the sliced apple to the bowl with the cabbage.
Then, shred the carrot and throw it into the mix. Now you have all your crunchy ingredients ready!
In a separate smaller bowl, create the dressing. Combine the mayonnaise, apple cider vinegar, and honey. Whisk until everything is smooth and well blended.
Pour the dressing over the cabbage and apple mixture. Toss everything together until all the veggies and apples are well coated in the dressing.
Finally, season with salt and pepper to taste. Mix one last time, and your coleslaw is ready to serve!
Tips:
- For added flavor, you can mix in a handful of raisins or nuts like walnuts or pecans.
- Let the coleslaw sit in the fridge for about 30 minutes before serving. This helps the flavors blend nicely!
- If you’re preparing this for a gathering, toss in some fresh herbs like parsley for a pop of color and freshness.
Nutrition Facts:
- Calories: 150 per serving
- Total Fat: 10g
- Saturated Fat: 1g
- Cholesterol: 5mg
- Sodium: 150mg
- Total Carbohydrates: 15g
- Dietary Fiber: 2g
- Sugars: 6g
- Protein: 1g
15 Mediterranean Quinoa Salad

Mediterranean Quinoa Salad is a fresh and tasty dish that’s perfect for any meal. Packed with colorful veggies and protein-rich quinoa, this salad is not only healthy but also super satisfying. You can eat it as a side dish or enjoy it as a light meal on its own!
Prep Time: 15 minutes
Total Time: 15 minutes
Servings: 4
Ingredients:
- 1 cup quinoa, rinsed
- 2 cups water
- 1 cup cherry tomatoes, halved
- 1 cucumber, diced
- 1 bell pepper, diced (red or yellow)
- ¼ cup red onion, finely chopped
- ½ cup Kalamata olives, pitted and sliced
- ½ cup feta cheese, crumbled
- ¼ cup fresh parsley, chopped
- 3 tablespoons olive oil
- 2 tablespoons red wine vinegar
- 1 teaspoon lemon juice
- 1 teaspoon dried oregano
- **Salt and pepper to taste
Instructions:
Start by cooking the quinoa. In a medium saucepan, combine 1 cup of rinsed quinoa with 2 cups of water. Bring it to a boil over medium-high heat. Once it’s boiling, reduce the heat to low, cover, and let it simmer for about 15 minutes, or until the water is absorbed. Once cooked, fluff the quinoa with a fork and let it cool.
While the quinoa is cooling, chop the vegetables. Dice the cucumber, bell pepper, and finely chop the red onion. Halve the cherry tomatoes and slice the olives. Place all the chopped veggies in a large mixing bowl.
When the quinoa is cool, add it to the bowl with the vegetables. Next, sprinkle in the ½ cup of crumbled feta cheese and ¼ cup of chopped parsley.
In a small bowl, whisk together the 3 tablespoons of olive oil, 2 tablespoons of red wine vinegar, 1 teaspoon of lemon juice, and 1 teaspoon of dried oregano. Pour the dressing over the quinoa salad and mix everything well. Season with salt and pepper to taste.
Serve immediately or let it chill in the fridge for about 30 minutes to let the flavors blend together. Enjoy your Mediterranean Quinoa Salad!
Tips:
- For extra protein, consider adding chickpeas or grilled chicken.
- You can substitute the feta cheese with vegan cheese for a dairy-free option.
- This salad keeps well in the fridge, so feel free to make it ahead of time for a quick meal!
Nutrition Facts:
- Calories: 280
- Protein: 10g
- Fat: 14g
- Carbohydrates: 30g
- Fiber: 5g
- Sugars: 2g
16 Zesty Corn on the Cob
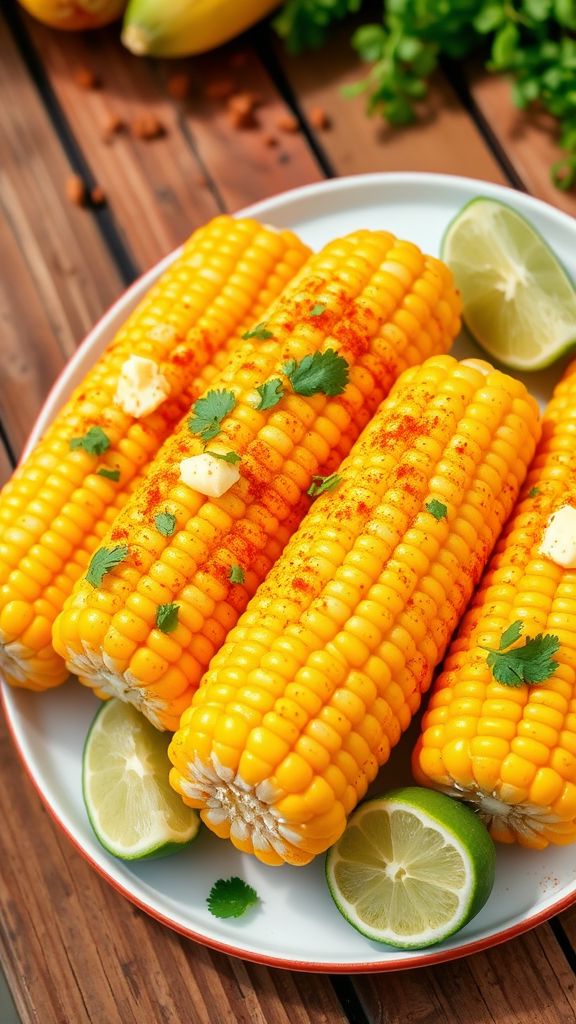
Zesty Corn on the Cob is a vibrant and delicious side dish perfect for any gathering. The combination of zesty flavors and sweetness from the corn makes this recipe a hit at barbecues or family dinners. It’s easy to make and sure to impress your guests!
Prep Time: 10 minutes
Total Time: 20 minutes
Servings: 4
Ingredients:
- 4 ears of fresh corn on the cob
- 1/4 cup of unsalted butter, softened
- 1 tablespoon of lime juice
- 1 teaspoon of chili powder
- 1/2 teaspoon of garlic powder
- 1/4 teaspoon of salt
- 1/4 teaspoon of black pepper
- 2 tablespoons of chopped fresh cilantro (optional)
- Lime wedges for serving
Instructions:
Start by bringing a large pot of salted water to a boil. Once the water is boiling, carefully add the corn cobs to the pot. Boil the corn for about 5-7 minutes until it is tender and bright yellow.
While the corn is cooking, make your zesty butter. In a small bowl, mix together the softened butter, lime juice, chili powder, garlic powder, salt, and black pepper. Stir well until all the ingredients are combined.
Once the corn is done cooking, use tongs to remove it from the pot and let it cool for a minute. Place the corn on a serving platter.
Spread the zesty butter mixture evenly over each ear of corn. If you like, sprinkle some fresh cilantro on top for an extra burst of flavor.
Serve your Zesty Corn on the Cob with lime wedges on the side for extra zing. Enjoy this flavorful treat with your favorite summer dishes!
Tips:
- For added flavor, try grilling the corn instead of boiling it. Just wrap the cobs in foil and grill for 15-20 minutes.
- If you prefer a milder flavor, reduce the amount of chili powder in the butter mixture.
- Feel free to play around with spices! You can add paprika, cumin, or even Parmesan cheese for a different flavor profile.
Nutrition Facts:
- Calories: 210 per serving
- Total Fat: 20g
- Saturated Fat: 10g
- Cholesterol: 30mg
- Sodium: 180mg
- Total Carbohydrates: 16g
- Dietary Fiber: 2g
- Sugars: 3g
- Protein: 2g
17 Sweet Potato Mash with Maple
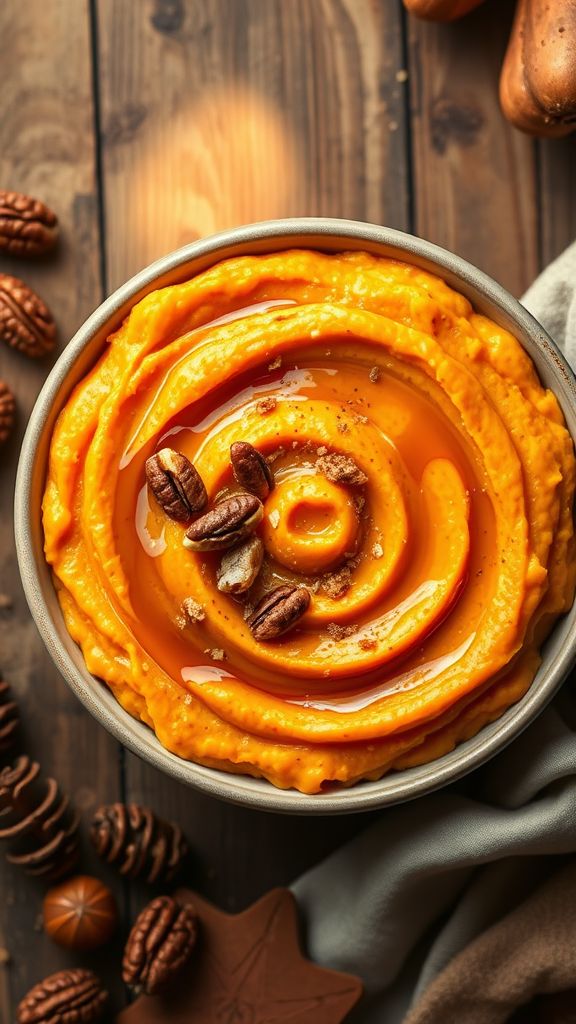
Sweet Potato Mash with Maple is a wonderfully creamy and sweet side dish. The natural sweetness of sweet potatoes pairs perfectly with the rich flavor of maple syrup, making it a delightful addition to any holiday meal. This easy recipe will impress your guests and is simple enough to whip up on a busy day.
Prep Time: 15 minutes
Cook Time: 25 minutes
Total Time: 40 minutes
Servings: 4
Ingredients:
- 2 medium sweet potatoes
- 2 tablespoons butter
- 1/4 cup milk (or more for a creamier texture)
- 2 tablespoons maple syrup
- 1/2 teaspoon cinnamon
- Salt and pepper to taste
Instructions:
Peel and chop the sweet potatoes into even chunks. This helps them cook faster and more evenly. Place the chunks in a large pot and fill it with enough water to cover them.
Bring the pot of water to a boil over high heat. Cook the sweet potatoes for about 20-25 minutes, or until they are tender and can be easily pierced with a fork. Once cooked, drain the water.
In the same pot, add the butter, milk, maple syrup, and cinnamon to the drained sweet potatoes. Use a potato masher or a fork to mash the mixture until it’s smooth and creamy. If you like it creamier, add a bit more milk.
Finally, season with salt and pepper to taste. Give it a good mix to ensure everything is combined well. Serve warm, and enjoy your flavorful Sweet Potato Mash with Maple!
Tips:
- For added texture, try folding in some chopped pecans or walnuts.
- You can also substitute the milk with almond milk for a dairy-free option.
- Make it ahead of time and simply reheat it before serving.
Nutrition Facts:
- Calories: 180
- Protein: 2g
- Carbohydrates: 36g
- Fat: 6g
- Fiber: 5g
- Sugar: 8g
18 Garlic Butter Green Beans
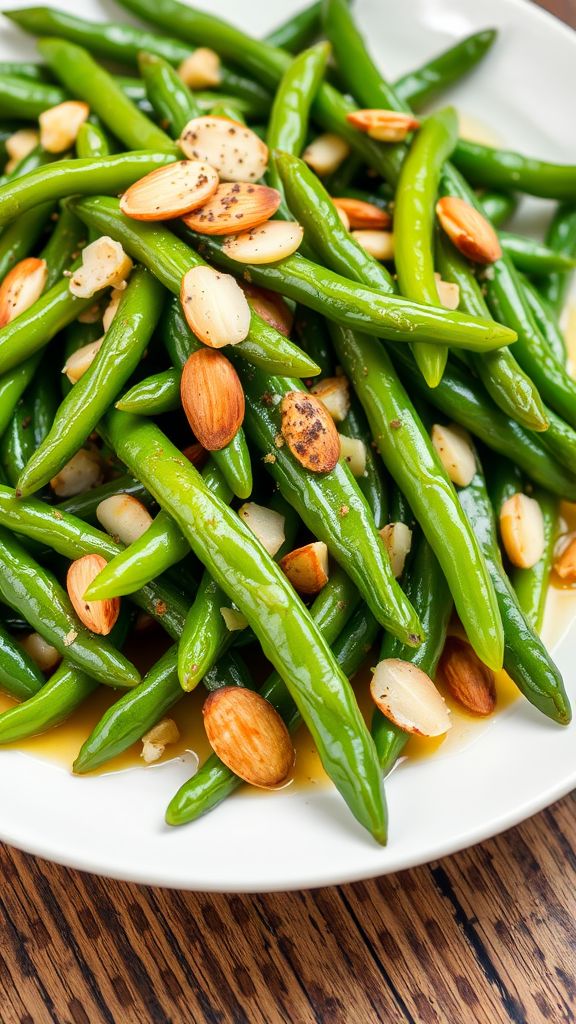
Garlic Butter Green Beans are a delicious and vibrant side dish that bring a burst of flavor to any meal. With just a few simple ingredients, you can create a dish that pairs perfectly with your Easter feast or any dinner. This recipe is easy to make and will surely impress your family and friends.
Prep Time: 10 minutes
Cook Time: 5 minutes
Total Time: 15 minutes
Servings: 4
Ingredients:
- 1 pound fresh green beans, trimmed
- 3 tablespoons butter
- 4 cloves garlic, minced
- Salt, to taste
- Black pepper, to taste
- 1 tablespoon lemon juice (optional)
- 1 tablespoon sliced almonds (optional, for garnish)
Instructions:
Start by washing the green beans thoroughly and trimming the ends. This ensures they are clean and ready to cook.
Next, fill a large pot with water and bring it to a boil over high heat. Once boiling, add the green beans and cook for about 3-4 minutes until they are bright green and tender-crisp.
After boiling, quickly drain the beans and rinse them under cold water to stop the cooking process. This helps keep their vibrant color and crunchy texture.
In a large skillet, melt the 3 tablespoons of butter over medium heat. Once melted, add the minced garlic and sauté for about 1 minute until fragrant, being careful not to burn it.
Now, add the drained green beans to the skillet. Toss them well to coat in the garlic butter. Season with salt and black pepper to taste. If you like a little zing, squeeze in 1 tablespoon of lemon juice for extra flavor.
Cook everything together for another 1-2 minutes until the green beans are heated through. If using, sprinkle the sliced almonds on top for a nice crunch before serving.
Tips:
- For added flavor, consider adding a pinch of red pepper flakes for some heat.
- If you don’t have fresh green beans, you can use frozen ones but adjust the cooking time accordingly.
- Feel free to try adding other herbs like thyme or parsley for a different taste.
Nutrition Facts:
- Calories: 120
- Total Fat: 9g
- Saturated Fat: 5g
- Cholesterol: 20mg
- Sodium: 150mg
- Total Carbohydrates: 8g
- Dietary Fiber: 4g
- Sugars: 2g
- Protein: 2g
19 Fresh Caprese Salad Skewers
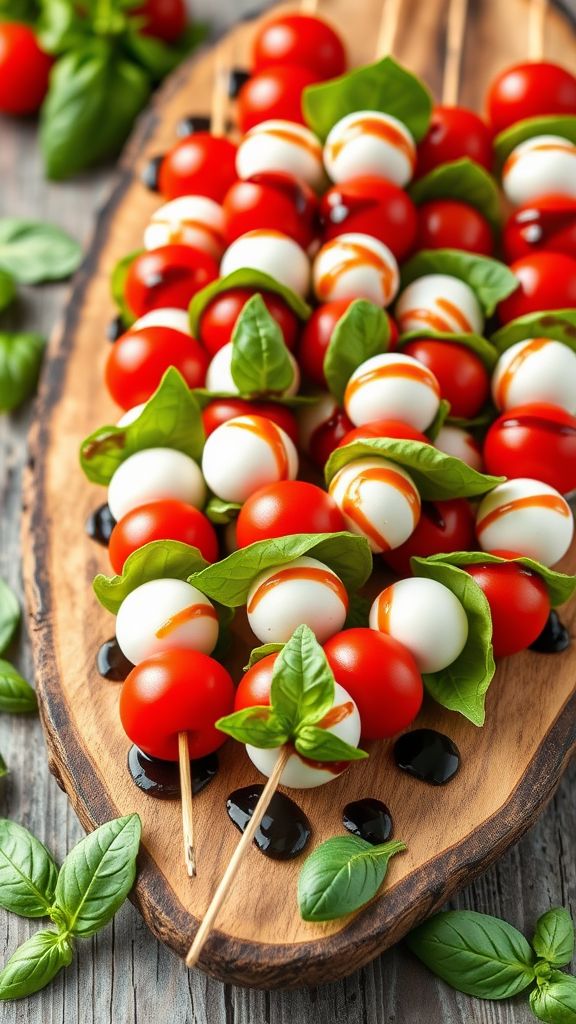
Fresh Caprese Salad Skewers are a fun and tasty way to enjoy the classic combination of flavors found in a traditional Caprese salad. These colorful skewers are perfect for any gathering and are super easy to make!
Prep Time: 15 minutes
Total Time: 15 minutes
Servings: 6
Ingredients:
- 12 cherry tomatoes
- 12 fresh basil leaves
- 12 small mozzarella balls (bocconcini)
- 1 tablespoon balsamic glaze
- 1 tablespoon extra virgin olive oil
- Salt and pepper to taste
- 12 small skewers or toothpicks
Instructions:
Start by rinsing the cherry tomatoes and the fresh basil leaves under cold water. Pat them dry gently with a paper towel. This helps remove any dirt and keeps everything fresh and clean.
Next, take the small mozzarella balls and drain them if they are stored in water. You want them nice and dry so they don’t make the skewers soggy.
Now, it’s time to assemble the skewers! Take a skewer or toothpick and slide on one cherry tomato, followed by a basil leaf, then a mozzarella ball. Repeat this step until you have all your ingredients used up, and make sure each skewer has one of each item.
Once all the skewers are assembled, lay them out on a serving platter. Drizzle with balsamic glaze and extra virgin olive oil. Add a sprinkle of salt and pepper for extra flavor!
Finally, serve the skewers fresh and enjoy!
Tips:
- For extra flavor, try adding a thin slice of fresh mozzarella or substituting the mozzarella balls with feta cheese.
- These skewers can be made ahead of time. Just keep them in the refrigerator until you’re ready to serve.
- Experiment with different types of herbs, like mint or oregano, for a unique twist!
Nutrition Facts:
- Calories: 80
- Fat: 5g
- Carbohydrates: 3g
- Protein: 5g
- Fiber: 0g
- Sugar: 2g
20 Italian Pasta Salad
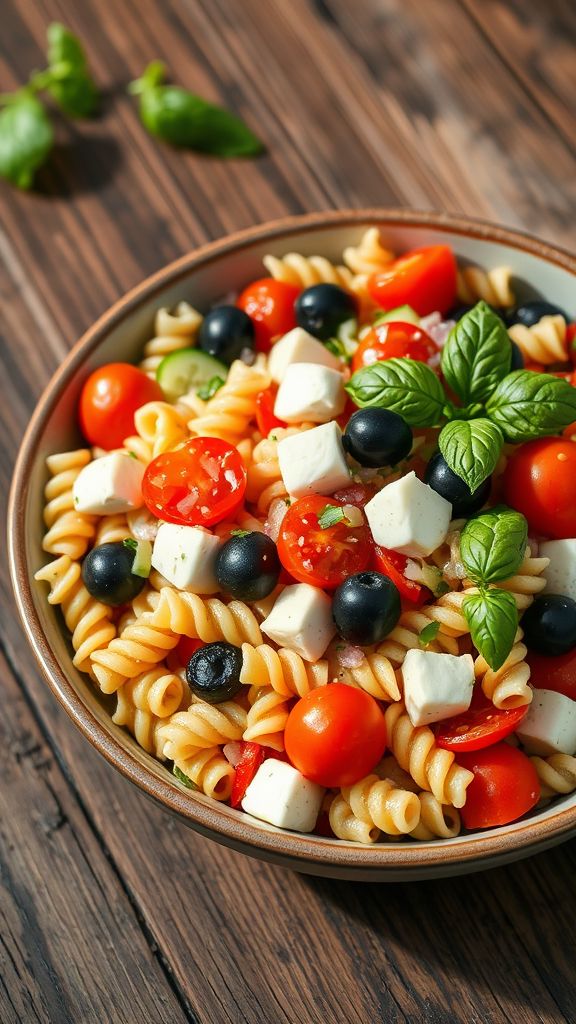
Italian Pasta Salad is a colorful and tasty dish that is perfect for any gathering, especially during Easter! With fresh vegetables, flavorful herbs, and a light dressing, this pasta salad is sure to please everyone at your table.
Prep Time: 15 minutes
Additional Time: 1 hour
Total Time: 1 hour 15 minutes
Servings: 6
Ingredients:
- 8 ounces of rotini or penne pasta
- 1 cup cherry tomatoes, halved
- 1 cup diced cucumber
- 1/2 cup black olives, sliced
- 1/2 cup mozzarella cheese, cubed
- 1/4 cup red onion, finely chopped
- 1/4 cup fresh basil, chopped
- 1/4 cup olive oil
- 2 tablespoons red wine vinegar
- 1 teaspoon Italian seasoning
- Salt and pepper to taste
Instructions:
First, start by cooking the pasta according to package instructions. Once al dente, drain it and rinse with cold water to cool it down. This will stop the cooking and keep your pasta firm.
In a large bowl, combine the cooled pasta with the cherry tomatoes, cucumber, black olives, mozzarella cheese, and red onion. Use a big spoon to gently mix everything together.
Next, in a small bowl, whisk together the olive oil, red wine vinegar, Italian seasoning, and a pinch of salt and pepper. This is your dressing. Pour it over the pasta mixture and stir well to coat all the ingredients evenly.
Now, add the freshly chopped basil and give it one last gentle stir. Cover the salad with plastic wrap and place it in the refrigerator for at least 1 hour. This chilling time helps the flavors blend together nicely.
Before serving, taste the salad and adjust the seasoning with a little more salt or pepper if needed. Your delicious Italian Pasta Salad is ready to enjoy!
Tips:
- For extra crunch and flavor, consider adding chopped bell peppers or artichoke hearts.
- You can make the salad a day in advance; just keep it covered in the fridge.
- Feel free to substitute or add any of your favorite vegetables.
Nutrition Facts:
- Calories: 250
- Total Fat: 16g
- Saturated Fat: 4g
- Cholesterol: 15mg
- Sodium: 180mg
- Total Carbohydrates: 24g
- Dietary Fiber: 3g
- Sugars: 2g
- Protein: 7g
21 Honey Balsamic Glazed Radishes
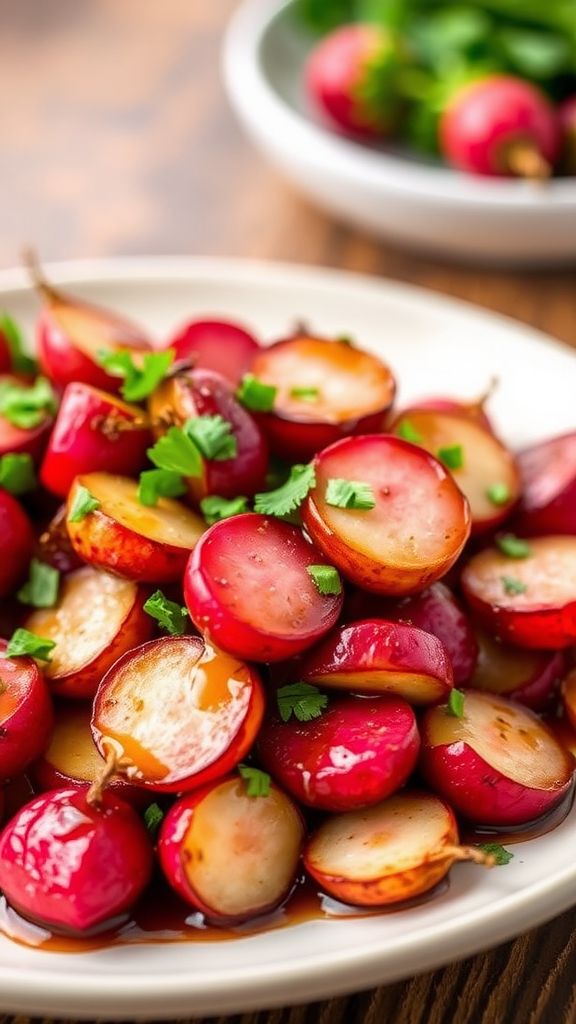
Honey Balsamic Glazed Radishes are a delicious way to enjoy this often-overlooked vegetable. The sweetness of honey and the tanginess of balsamic vinegar create a beautiful glaze that elevates the simple radish into a delightful side dish. Perfect for spring gatherings or as a colorful addition to your dinner plate!
Prep Time: 10 minutes
Cook Time: 20 minutes
Total Time: 30 minutes
Servings: 4
Ingredients:
- 1 bunch of radishes, trimmed and halved
- 2 tablespoons of honey
- 2 tablespoons of balsamic vinegar
- 1 tablespoon of olive oil
- Salt and pepper to taste
- Fresh parsley for garnish (optional)
Instructions:
Start by preheating your oven to 400°F (200°C). This helps to get the radishes crispy while they cook.
Next, wash and trim the radishes. Cut them in half to help them cook evenly. Place them in a mixing bowl and drizzle with olive oil, then sprinkle with salt and pepper. Toss them gently until all the radishes are coated.
Spread the seasoned radishes on a baking sheet in a single layer. Make sure they aren’t crowded so they can roast properly. Put them in the preheated oven and let them roast for about 20 minutes, or until they are tender and slightly golden.
While the radishes are roasting, prepare the glaze. In a small bowl, mix together the honey and balsamic vinegar. Stir until well combined.
Once the radishes are done, take them out of the oven and pour the honey balsamic mixture over them while they’re still hot. Toss them gently to coat all the radishes with the glaze.
If you like, sprinkle some fresh parsley on top for a pop of color before serving. Enjoy your delicious Honey Balsamic Glazed Radishes!
Tips:
- For extra flavor, try adding minced garlic to the radishes before roasting.
- If you prefer a sweeter glaze, feel free to add a bit more honey.
- These radishes pair well with grilled meats or can be enjoyed on their own.
Nutrition Facts:
- Calories: 120
- Fat: 7g
- Carbohydrates: 15g
- Fiber: 3g
- Sugar: 8g
- Protein: 2g
22 Sautéed Lemon Spinach
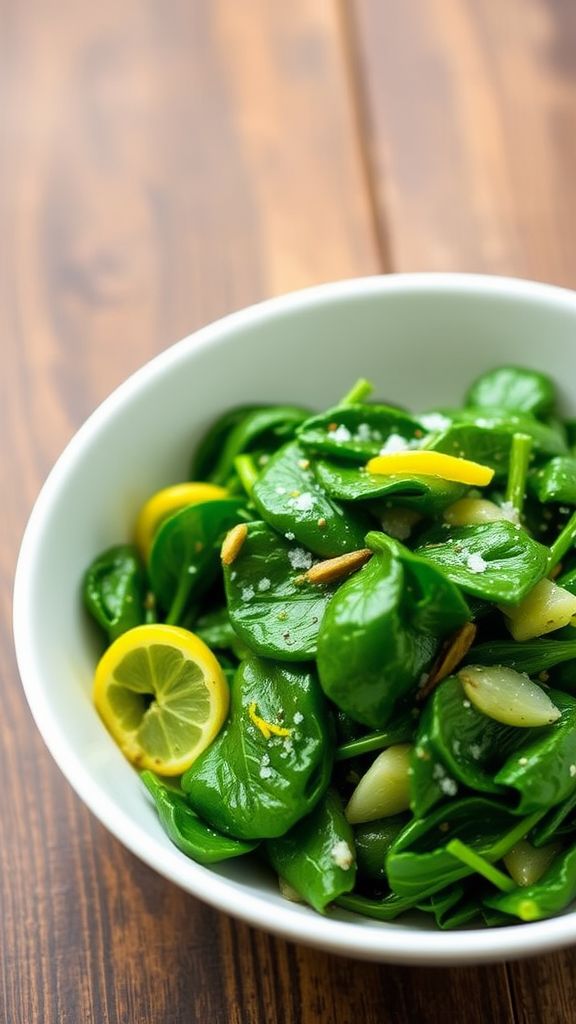
Sautéed Lemon Spinach is a quick and delicious side dish that brightens up any meal. With its fresh flavors of lemon and garlic, it pairs wonderfully with a variety of main courses. This recipe is not only easy to make but also a great way to add some greens to your plate!
Prep Time: 5 minutes
Cook Time: 5 minutes
Total Time: 10 minutes
Servings: 4
Ingredients:
- 2 tablespoons of olive oil
- 3 cloves of garlic, minced
- 1 pound of fresh spinach, washed and rinsed
- Zest and juice of 1 lemon
- Salt and pepper to taste
Instructions:
Heat olive oil in a large skillet over medium heat. Once hot, add the minced garlic and sauté for about 30 seconds until fragrant. Be careful not to let it burn.
Next, add the fresh spinach to the skillet. It might seem like a lot, but it will wilt down quickly. Stir it gently for about 2-3 minutes until the spinach is bright green and tender.
Now, add the lemon zest and juice to the spinach, stirring until everything is well combined. Sprinkle with salt and pepper to taste, adjusting according to your preference. Cook for another minute and then remove from heat.
Serve the sautéed spinach warm as a delightful side dish that will complement your meal perfectly!
Tips:
- For an extra kick, add a pinch of red pepper flakes while sautéing the garlic.
- You can substitute lemon juice with lime juice for a different flavor twist.
- If you like a richer flavor, try adding a sprinkle of Parmesan cheese before serving.
Nutrition Facts:
- Calories: 70
- Protein: 3g
- Carbohydrates: 7g
- Fat: 4g
- Fiber: 4g
- Sodium: 50mg
23 Wild Rice and Mushroom Pilaf
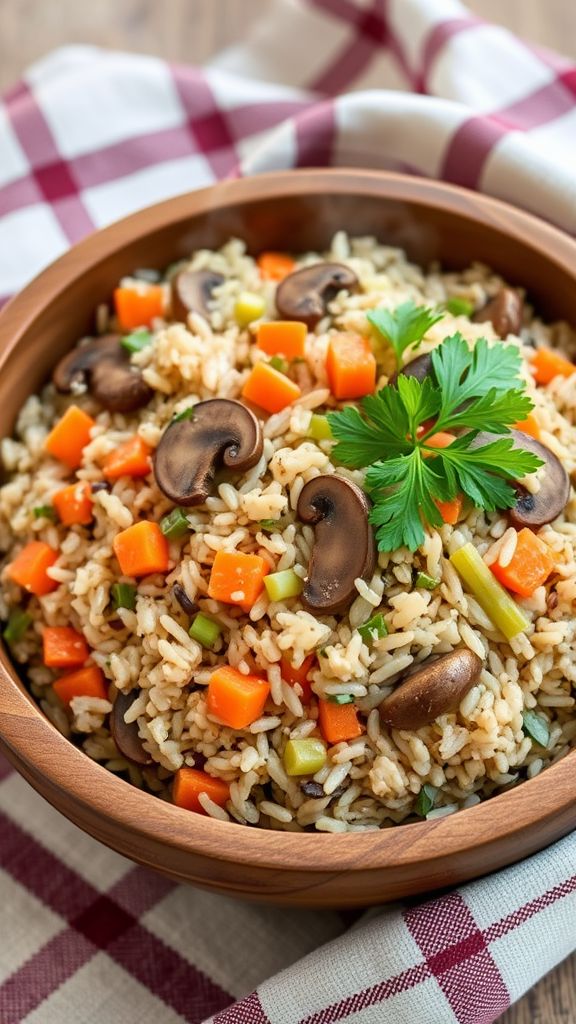
Wild Rice and Mushroom Pilaf is a delicious and hearty side dish that’s perfect for any special occasion. The combination of nutty wild rice and earthy mushrooms creates a flavorful blend that pairs well with any main dish. Plus, it’s easy to make and packed with nutrients!
Prep Time: 15 minutes
Cook Time: 45 minutes
Total Time: 1 hour
Servings: 6
Ingredients:
- 1 cup wild rice
- 2 cups vegetable broth
- 1 tablespoon olive oil
- 1 medium onion, diced
- 2 cloves garlic, minced
- 8 ounces button mushrooms, sliced
- 1 teaspoon thyme, dried
- 1/2 cup carrots, diced
- 1/2 cup celery, diced
- Salt and pepper to taste
- 2 tablespoons fresh parsley, chopped (for garnish)
Instructions:
Begin by rinsing the wild rice under cold water. This step helps remove any impurities. Drain it well and set it aside.
In a large pot, heat olive oil over medium heat. Add the onion and sauté for about 5 minutes until it becomes translucent. Next, stir in the minced garlic and sauté for another minute until fragrant.
Add the sliced mushrooms into the pot. Cook them for about 5 to 7 minutes, stirring occasionally. The mushrooms should soften and release their moisture.
Now, add the rinsed wild rice, vegetable broth, thyme, diced carrots, and diced celery to the pot. Mix everything well and bring it to a boil.
Once boiling, reduce the heat to low and cover the pot. Let it simmer for 40 to 45 minutes, or until the wild rice is tender and the liquid is absorbed. Make sure to avoid lifting the lid too often, as this can let steam escape.
Once cooked, remove the pot from the heat. Fluff the rice gently with a fork, and season with salt and pepper to taste. Finally, garnish with chopped fresh parsley before serving.
Tips:
- For extra flavor, try adding a splash of soy sauce or worcestershire sauce during cooking.
- You can substitute the button mushrooms with other types, such as cremini or shiitake, for a different flavor.
- This pilaf can be made ahead of time and reheated in the oven or microwave.
Nutrition Facts:
- Calories: 250 per serving
- Protein: 6g
- Carbohydrates: 50g
- Fat: 5g
- Fiber: 5g
- Sodium: 320mg
24 Apricot Glazed Glazed Carrot Salad
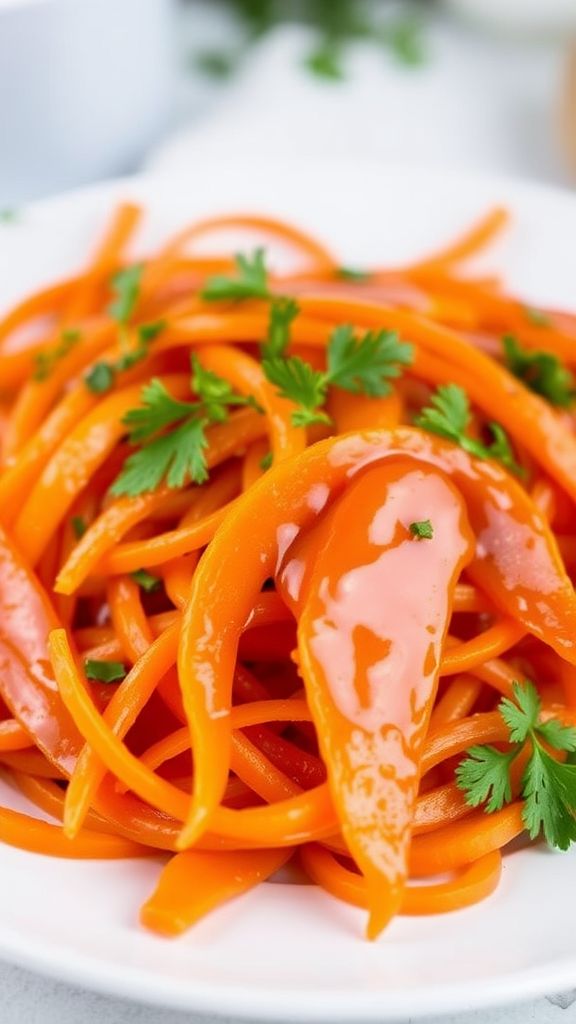
This Apricot Glazed Carrot Salad is a delightful mix of flavors and colors that makes a perfect side dish for any meal. The sweet apricot glaze adds a unique twist to crisp carrots, making it refreshing and tasty. It’s a simple recipe that everyone will love!
Prep Time: 10 minutes
Total Time: 10 minutes
Servings: 4
Ingredients:
- 4 cups of carrots, peeled and sliced into thin rounds
- 1/2 cup of apricot preserves
- 2 tablespoons of apple cider vinegar
- 1 tablespoon of olive oil
- 1 teaspoon of Dijon mustard
- Salt and pepper to taste
- 1/4 cup of chopped fresh parsley for garnish
Instructions:
Start by boiling a pot of water. Add the sliced carrots and cook them for about 3-5 minutes until they are tender but still crisp. Once done, drain the carrots and run them under cold water to stop the cooking process.
In a separate bowl, mix together the apricot preserves, apple cider vinegar, olive oil, and Dijon mustard. Whisk until the mixture is smooth and well-blended. Add a pinch of salt and pepper to taste.
Now, combine the cooked carrots with the apricot glaze in a large mixing bowl. Toss everything together until the carrots are well-coated.
Let the salad sit for a few minutes to allow the flavors to meld. Before serving, sprinkle the chopped parsley on top for a fresh touch. Enjoy your tasty salad!
Tips:
- For an extra crunch, add some toasted nuts like almonds or walnuts.
- You can replace apricot preserves with other fruit preserves like peach or mango for different flavors.
- Serve chilled or at room temperature for the best taste.
Nutrition Facts:
- Calories: 120
- Total Fat: 4g
- Sodium: 130mg
- Total Carbohydrates: 22g
- Dietary Fiber: 3g
- Sugars: 12g
- Protein: 1g
25 Cucumber and Dill Salad
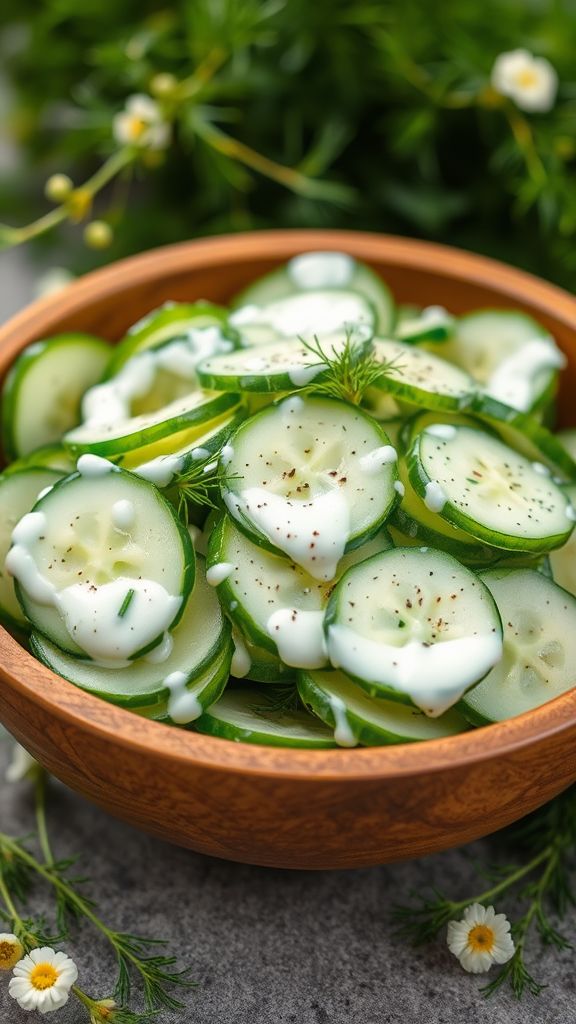
Cucumber and Dill Salad is a refreshing dish that combines the cool crunch of cucumbers with the fresh flavor of dill. It’s perfect for adding a light touch to any meal, especially during springtime celebrations. This salad is quick and easy to make, making it a go-to side dish for gatherings.
Prep Time: 10 minutes
Additional Time: 30 minutes
Total Time: 40 minutes
Servings: 4
Ingredients:
- 2 large cucumbers, thinly sliced
- 1/2 cup plain Greek yogurt
- 1 tablespoon fresh dill, chopped
- 1 tablespoon apple cider vinegar
- 1 teaspoon garlic powder
- Salt and pepper to taste
Instructions:
Start by washing the cucumbers thoroughly. Once cleaned, slice them into thin rounds and place them in a large mixing bowl. The thinner the slices, the better they soak in the flavors.
In a separate bowl, combine the Greek yogurt, dill, apple cider vinegar, and garlic powder. Mix these ingredients together until they are smooth and well blended. This will create a creamy dressing that adds a tangy flavor to the cucumber.
Pour the dressing over the sliced cucumbers. Gently toss the cucumbers in the dressing, ensuring they are fully coated. Be careful not to mash the cucumbers; you want them to stay crisp.
After mixing, cover the bowl and refrigerate for at least 30 minutes. This chilling time allows the flavors to meld and the salad to become even more refreshing.
Before serving, give the salad a final stir. Taste and add salt and pepper as needed. Serve cold and enjoy this easy and delightful dish!
Tips:
- For extra flavor, you can add chopped green onions or fresh parsley.
- If you prefer a bit of spice, consider adding a pinch of red pepper flakes to the dressing.
- Use English cucumbers for a milder taste and less watery texture.
Nutrition Facts:
- Calories: 120
- Fat: 4g
- Carbohydrates: 15g
- Protein: 6g
- Fiber: 2g