25 Best St. Patrick’s Day Desserts
Did you know that over 30 million people in the U.S. celebrate St. Patrick’s Day every year? This means an abundance of joyful feasting, especially when it comes to delicious desserts!
Whether you’re hosting a festive party or looking to indulge yourself, these 25 Best St. Patrick’s Day Desserts will bring a touch of magic to your celebration.
From Lucky Leprechaun Cupcakes to Minty Grasshopper Pie, this collection has something for every sweet tooth.
Get ready to discover delightful recipes that incorporate flavors like Irish cream, mint, and vibrant shades of green to create stunning treats.
Dive into this round-up and prepare to impress your friends and family with your culinary skills this St. Paddy’s Day!
Shop Our Must-Haves


1 Lucky Leprechaun Cupcakes

These Lucky Leprechaun Cupcakes are the perfect treat to celebrate St. Patrick’s Day! With their vibrant green color and delicious vanilla flavor, these cupcakes will bring a touch of magic to your festivities. Topped with creamy frosting and fun sprinkles, they are sure to delight both kids and adults alike.
Prep Time: 20 minutes
Cook Time: 20 minutes
Additional Time: 30 minutes
Total Time: 1 hour 10 minutes
Servings: 12
Ingredients:
- 1 ½ cups all-purpose flour
- 1 cup granulated sugar
- ½ cup unsalted butter, softened
- 2 large eggs
- 1/2 cup milk
- 1 tsp vanilla extract
- 1 ½ tsp baking powder
- ½ tsp salt
- Green food coloring
- Whipped cream or buttercream frosting
- Green sprinkles for decoration
- Optional: Gold foil chocolate coins for garnish
Instructions:
Begin by preheating your oven to 350°F (175°C) and lining a muffin tin with cupcake liners.
In a large mixing bowl, cream together the softened butter and granulated sugar until light and fluffy. This should take about 2-3 minutes. Then, add the eggs one at a time, mixing well after each addition.
Stir in the vanilla extract and milk until fully combined. In a separate bowl, mix together the flour, baking powder, and salt. Gradually add the dry ingredients to the wet mixture, stirring until just combined.
Now it’s time to add the magic! Mix in the green food coloring until you achieve your desired shade of green.
Fill each cupcake liner about two-thirds full with the batter. Bake in the preheated oven for 18-20 minutes, or until a toothpick inserted in the center comes out clean.
Once baked, remove from the oven and allow the cupcakes to cool in the pan for about 5 minutes before transferring them to a wire rack to cool completely.
Once cooled, top each cupcake with generous dollops of whipped cream or buttercream frosting. Finish with a sprinkle of green sprinkles and, if you like, place a gold foil chocolate coin on top for that extra festive flair!
Extra Tips:
- For an added flavor, you can incorporate a few drops of almond extract into the batter.
- Use a piping bag to frost your cupcakes for a professional look.
- If you have time, let the frosted cupcakes chill in the refrigerator for a short period; this will help the frosting set nicely.
Nutrition Facts:
- Calories: 210 per cupcake
- Total Fat: 9g
- Saturated Fat: 5g
- Cholesterol: 45mg
- Sodium: 150mg
- Total Carbohydrates: 31g
- Dietary Fiber: 0g
- Sugars: 15g
- Protein: 2g
2 Shamrock Shake Cheesecake
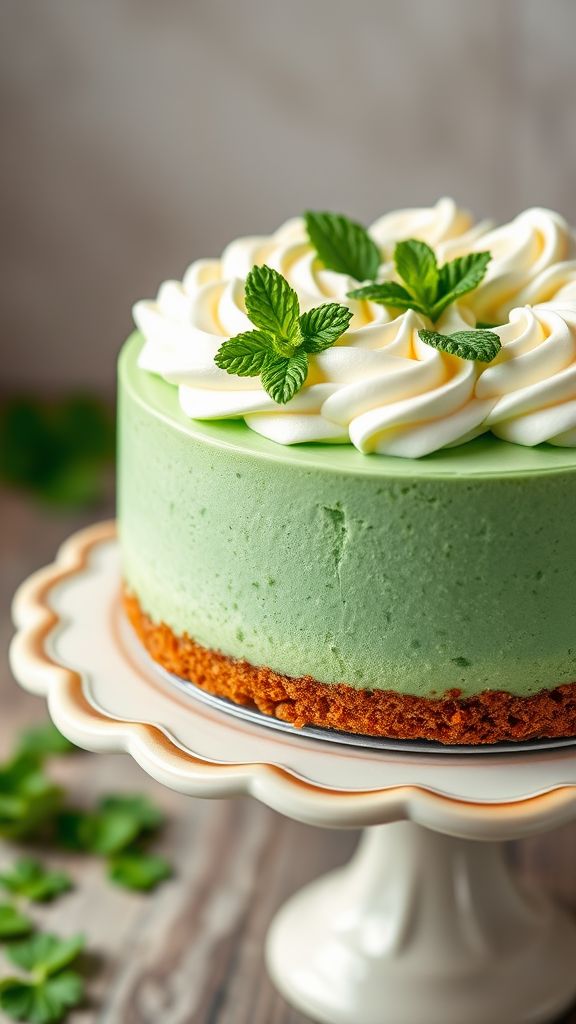
This Shamrock Shake Cheesecake is a delightful twist on the classic dessert, merging the creamy texture of cheesecake with the refreshing flavors of mint and vanilla. Perfect for celebrating St. Patrick’s Day, this festive cheesecake features a luscious green color and a delicious whipped cream topping that will impress your guests.
Prep Time: 20 minutes
Additional Time: 4 hours
Total Time: 4 hours 20 minutes
Servings: 12
Ingredients:
-
For the crust:
- 1 ½ cups of graham cracker crumbs
- ½ cup of unsalted butter, melted
- ¼ cup of granulated sugar
-
For the filling:
- 24 oz of cream cheese, softened
- 1 cup of granulated sugar
- 1 tsp of vanilla extract
- 3 large eggs
- 1 tsp of peppermint extract
- ½ cup of heavy cream
- 2-3 drops of green food coloring (optional)
-
For the topping:
- 1 cup of heavy whipping cream
- 2 tbsp of powdered sugar
- ½ tsp of vanilla extract
- Mint leaves for garnish (optional)
Instructions:
Start by preheating your oven to 325°F (160°C). In a medium bowl, combine the graham cracker crumbs, melted butter, and granulated sugar to form the crust. Press this mixture evenly into the bottom of a 9-inch springform pan and set aside.
In a large mixing bowl, beat the cream cheese until smooth. Gradually add the granulated sugar and mix until well combined. Then, add the vanilla extract, peppermint extract, and ensure everything is mixed together.
Next, add the eggs one at a time, mixing on low speed until just combined. Be careful not to overmix. If desired, add green food coloring to achieve the desired shade of green. Carefully fold in the heavy cream until combined, giving the filling a silky texture.
Pour the cheesecake filling into the prepared crust and smooth the top. Bake in the preheated oven for about 1 hour, or until the edges are set but the center has a slight jiggle. Once done, turn off the oven and let the cheesecake cool in the oven for another hour with the door slightly open.
Remove the cheesecake from the oven and refrigerate it for at least 4 hours, or overnight for best results. Once chilled, beat together heavy whipping cream, powdered sugar, and vanilla extract until stiff peaks form. Spread or pipe the whipped cream on top of the cheesecake and garnish with mint leaves if desired.
Extra Tips:
- For a more intense mint flavor, consider adding a few extra drops of peppermint extract.
- Use a water bath during baking to prevent cracking in the cheesecake.
- This cheesecake can be made a day in advance; it tastes even better after resting in the fridge overnight.
Nutrition Facts:
- Calories: 330
- Total Fat: 24g
- Saturated Fat: 14g
- Cholesterol: 79mg
- Sodium: 210mg
- Total Carbohydrates: 28g
- Dietary Fiber: 1g
- Sugars: 18g
- Protein: 5g
3 Irish Cream Brownies

Indulge in the rich and decadent delight of Irish Cream Brownies! These fudgy brownies are infused with the smooth flavors of Irish cream liqueur, making them a perfect treat for any occasion, especially around St. Patrick’s Day. They are easy to whip up and will surely impress your guests with their luscious texture and flavor.
Prep Time: 15 minutes
Cook Time: 25 minutes
Additional Time: 30 minutes
Total Time: 1 hour 10 minutes
Servings: 12
Ingredients:
- 1 cup unsalted butter
- 2 cups granulated sugar
- 4 large eggs
- 1 tablespoon vanilla extract
- 1 cup all-purpose flour
- 1 cup unsweetened cocoa powder
- 1/2 teaspoon salt
- 1/2 cup Irish cream liqueur
- 1 cup chocolate chips
Instructions:
Start by preheating your oven to 350°F (175°C) and greasing a 9×13-inch baking pan. This will ensure your brownies won’t stick and have clean edges once baked.
In a medium saucepan, melt the butter over low heat. Once melted, remove from heat and stir in the sugar until well combined. Let the mixture cool for a few minutes before whisking in the eggs one at a time, followed by the vanilla extract.
In a separate bowl, sift together the flour, cocoa powder, and salt. Gradually fold the dry ingredients into the wet mixture until just combined. Be careful not to overmix; this keeps your brownies fudgy.
Next, pour in the Irish cream liqueur and mix until evenly distributed. Fold in the chocolate chips for that extra level of chocolaty goodness.
Pour the brownie batter into your prepared baking pan and spread it evenly. Bake for 25-30 minutes, or until a toothpick inserted into the center comes out with a few moist crumbs. Avoid overbaking for the best texture.
Once done, remove from the oven and let the brownies cool in the pan for about 30 minutes. After cooling, cut them into squares and serve. Enjoy the delightful combination of chocolate and Irish cream!
Extra Tips:
- For a richer flavor, you can add an additional 1/4 cup of Irish cream liqueur to the batter.
- Serve with a scoop of vanilla ice cream to elevate the dessert experience.
- Store leftovers in an airtight container in the fridge for up to 5 days.
Nutrition Facts:
- Calories: 290 per serving
- Total Fat: 15g
- Saturated Fat: 9g
- Cholesterol: 80mg
- Sodium: 120mg
- Total Carbohydrates: 34g
- Dietary Fiber: 3g
- Sugars: 20g
- Protein: 4g
4 Mint Chocolate Chip Cookies
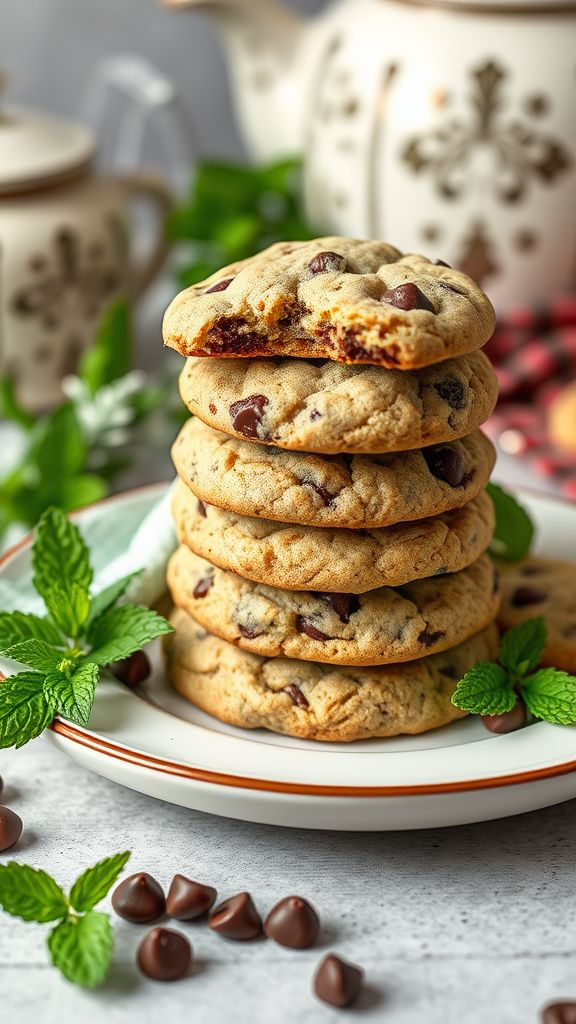
These Mint Chocolate Chip Cookies are a delightful treat that combine the refreshing flavor of mint with rich chocolate chips. Perfect for any occasion, these cookies are soft, chewy, and bursting with flavor.
Prep Time: 15 minutes
Cook Time: 10 minutes
Additional Time: 5 minutes
Total Time: 30 minutes
Servings: 24 cookies
Ingredients:
- 1 cup unsalted butter, softened
- 1 cup granulated sugar
- 1 cup packed brown sugar
- 2 large eggs
- 2 teaspoons peppermint extract
- 3 cups all-purpose flour
- 1 teaspoon baking soda
- 1/2 teaspoon salt
- 1 cup semi-sweet chocolate chips
- 1 cup mint chocolate chips
- Green food coloring (optional, for a festive touch)
Instructions:
Start by preheating your oven to 350°F (175°C). Prepare a baking sheet by lining it with parchment paper to prevent sticking.
In a large mixing bowl, cream together the softened butter, granulated sugar, and brown sugar until the mixture is light and fluffy. This should take about 2-3 minutes with an electric mixer.
Next, beat in the eggs, one at a time, making sure each egg is fully incorporated before adding the next. Follow this by adding the peppermint extract and a few drops of green food coloring if desired, mixing well.
In another bowl, whisk together the all-purpose flour, baking soda, and salt. Gradually add this dry mixture to the wet ingredients, stirring just until combined to avoid overmixing.
Now, fold in the semi-sweet chocolate chips and mint chocolate chips with a spatula, ensuring they are evenly distributed throughout the dough.
Using a cookie scoop or tablespoon, drop rounded balls of dough onto the prepared baking sheet, leaving enough space between each cookie to allow for spreading.
Bake in the preheated oven for 10-12 minutes or until the edges start to turn golden brown. Remove from the oven and let them cool on the baking sheet for about 5 minutes before transferring to a wire rack to cool completely.
Extra Tips:
- For an even mintier flavor, consider adding 1-2 teaspoons of finely chopped fresh mint leaves.
- Store any leftover cookies in an airtight container to keep them fresh for up to a week.
- If you prefer thicker cookies, chill the dough in the refrigerator for 30 minutes before baking.
Nutrition Facts:
- Calories: 150 per cookie
- Total Fat: 7g
- Saturated Fat: 4g
- Cholesterol: 30mg
- Sodium: 75mg
- Total Carbohydrates: 20g
- Dietary Fiber: 0g
- Sugars: 10g
- Protein: 2g
5 Green Velvet Cake
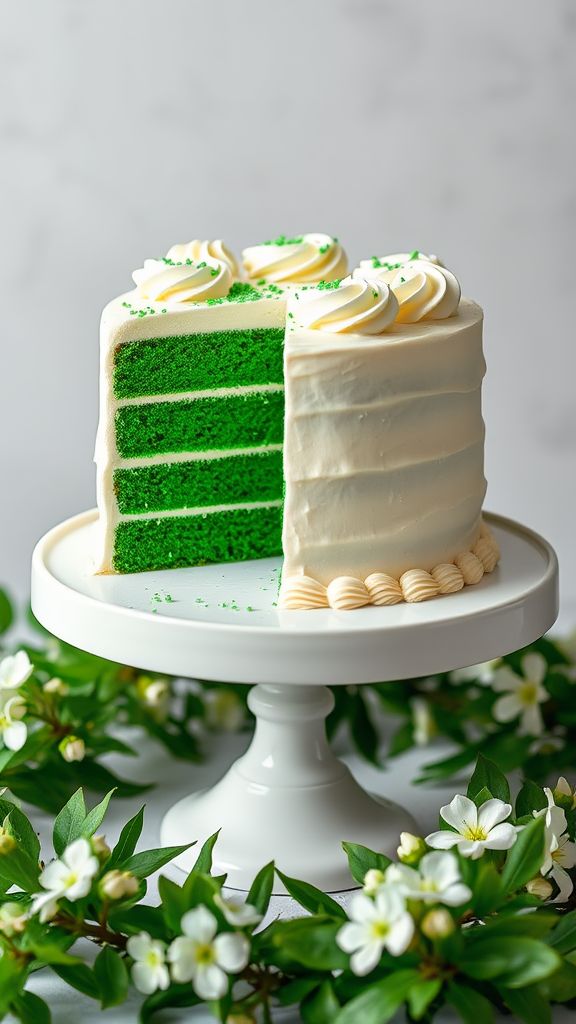
This vibrant Green Velvet Cake is not only visually stunning but also deliciously moist, making it a perfect dessert for celebrating St. Patrick’s Day or any festive occasion. With its rich cream cheese frosting, this cake is sure to be a hit at any gathering. Let’s dive into the recipe!
Prep Time: 20 minutes
Cook Time: 30 minutes
Additional Time: 1 hour (for cooling and frosting)
Total Time: 1 hour 50 minutes
Servings: 12
Ingredients:
- 2 ½ cups all-purpose flour
- 1 ½ cups granulated sugar
- 1 teaspoon baking soda
- 1 teaspoon baking powder
- 1 teaspoon salt
- 1 cup vegetable oil
- 1 cup buttermilk, at room temperature
- 3 large eggs, at room temperature
- 2 tablespoons green food coloring
- 1 teaspoon vanilla extract
- 1 teaspoon white vinegar
Instructions:
Preheat your oven to 350°F (175°C) and prepare two 9-inch round cake pans by greasing them and lining the bottoms with parchment paper.
In a large mixing bowl, whisk together the flour, sugar, baking soda, baking powder, and salt until well combined. This dry mixture will provide the foundation of your cake.
Next, in another bowl, combine the vegetable oil, buttermilk, eggs, green food coloring, vanilla extract, and vinegar. Whisk thoroughly until all the wet ingredients are smooth and fully integrated.
Gradually add the wet mixture into the dry ingredients, stirring gently with a spatula until just combined. Be careful not to over-mix, as this can lead to a dense cake.
Once your batter is ready, evenly pour it into the prepared cake pans. Bake in the preheated oven for about 30 minutes, or until a toothpick inserted into the center comes out clean.
After baking, allow the cakes to cool in the pans for about 10 minutes before transferring them to a wire rack to cool completely. This step is crucial, as it prevents the cakes from becoming soggy.
While the cakes are cooling, prepare your favorite cream cheese frosting. Once the cakes are completely cooled, place one layer on a serving platter and spread a generous amount of frosting on top. Layer the second cake on top and frost the top and sides of the cake as desired.
Extra Tips:
- For a more vibrant green color, add extra drops of green food coloring until you achieve your desired shade.
- Make sure all your ingredients are at room temperature for the best texture.
- Decorate with edible gold glitter or shamrock-shaped sprinkles for an extra festive look.
Nutrition Facts:
- Calories: 400 per serving
- Total Fat: 22g
- Saturated Fat: 5g
- Cholesterol: 65mg
- Sodium: 320mg
- Total Carbohydrates: 48g
- Dietary Fiber: 1g
- Sugars: 28g
- Protein: 4g
6 Pistachio Pudding Parfaits
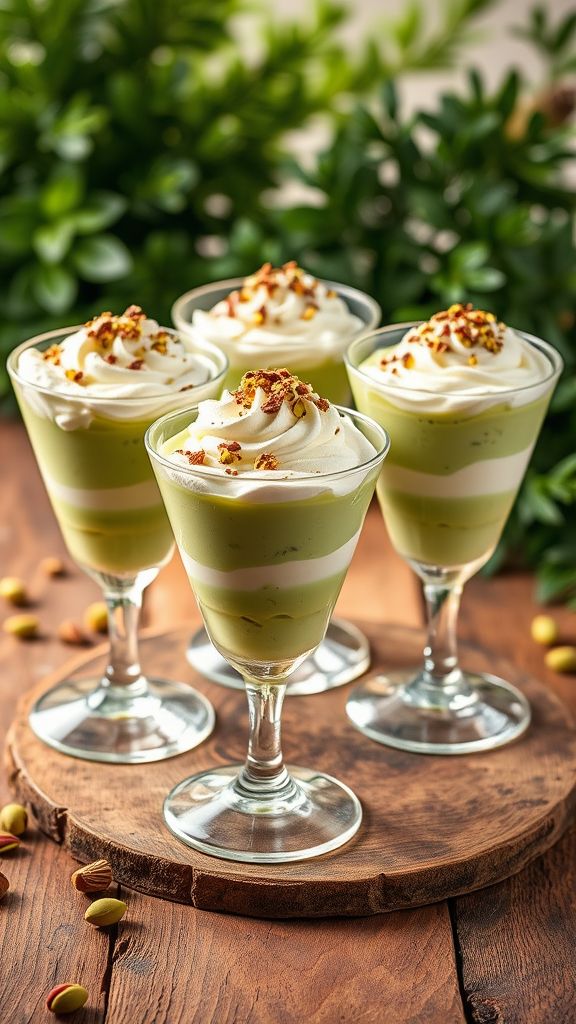
Indulge in the creamy and vibrant flavors of Pistachio Pudding Parfaits. These delightful desserts are perfect for celebrating St. Patrick’s Day or any festive occasion. Layers of silky pistachio pudding, whipped cream, and crushed pistachios come together to create a visually stunning and delicious treat.
Prep Time: 15 minutes
Additional Time: 2 hours (chill time)
Total Time: 2 hours 15 minutes
Servings: 4
Ingredients:
- 1 package (3.4 oz) instant pistachio pudding mix
- 2 cups cold milk
- 1 cup whipped cream (store-bought or homemade)
- 1/2 cup crushed pistachios (plus extra for topping)
- 1/2 teaspoon vanilla extract
- Green food coloring (optional, for deeper color)
- Chocolate shavings or chocolate curls (for garnish)
Instructions:
Start by preparing the pistachio pudding. In a medium mixing bowl, whisk together the instant pistachio pudding mix and cold milk for about 2 minutes until it thickens. If you desire a deeper green color, add a few drops of green food coloring and mix until combined.
Next, gently fold in the whipped cream to create a light and airy texture. Stir in the crushed pistachios and vanilla extract, mixing until everything is well blended. Set this mixture aside while you prepare the parfaits.
To assemble your parfaits, take four serving glasses or jars and start layering. Begin with a generous spoonful of the pistachio pudding, followed by a layer of whipped cream. Repeat the layers until you fill the glasses, finishing with a layer of pudding on top.
For the final touch, sprinkle extra crushed pistachios on the top layer of pudding, and add some chocolate shavings or curls for an elegant garnish. Place the parfaits in the refrigerator for at least 2 hours to let the flavors meld together.
Extra Tips:
- For additional texture, consider adding crumbled shortbread cookies between the layers.
- If you’re a fan of nuttiness, you can substitute some of the crushed pistachios with chopped walnuts or almonds.
- These parfaits can be made a day in advance; just keep them covered in the refrigerator until ready to serve.
Nutrition Facts:
- Calories: 270 per serving
- Total Fat: 16g
- Saturated Fat: 8g
- Cholesterol: 30mg
- Sodium: 180mg
- Carbohydrates: 30g
- Fiber: 2g
- Sugars: 12g
- Protein: 6g
7 Bailey’s Irish Cream Trifle
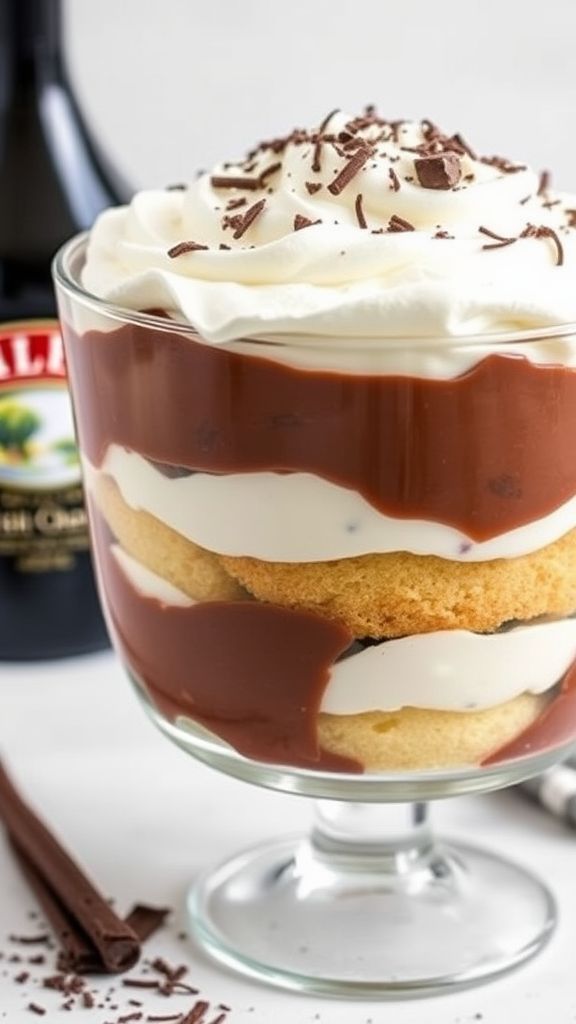
Indulge in the delightful layers of a Bailey’s Irish Cream Trifle that combines rich flavors and a comforting texture, perfect for celebrating St. Patrick’s Day or any special occasion. This elegant dessert showcases luscious cream, decadent chocolate pudding, and velvety sponge cake soaked in Bailey’s Irish Cream for a truly irresistible treat.
Prep Time: 30 minutes
Additional Time: 2 hours (Chill Time)
Total Time: 2 hours 30 minutes
Servings: 8
Ingredients:
- 1 cup of Bailey’s Irish Cream
- 1 package (12 oz) of sponge cake or ladyfingers
- 2 cups of heavy cream
- 1 cup of chocolate pudding (prepared)
- 1/4 cup of powdered sugar
- 2 tsp of vanilla extract
- 1/2 cup of shaved chocolate or chocolate chips (for garnish)
Instructions:
Begin by splitting the sponge cake into layers. If using ladyfingers, cut them in half lengthwise. Dip each piece quickly into Bailey’s Irish Cream to absorb the flavor without becoming soggy. Layer half of the soaked sponge cake pieces at the bottom of your trifle dish.
Next, spread a layer of chocolate pudding over the sponge cake. Follow this with a layer of freshly whipped heavy cream, which you can whip together with powdered sugar and vanilla extract until soft peaks form.
Repeat the layers by adding the remaining soaked sponge cake pieces, followed by another layer of chocolate pudding, and then another layer of whipped cream. Finish with the remaining whipped cream on top, smoothing it out evenly.
Finally, garnish the trifle with shaved chocolate or chocolate chips for an added touch of elegance. Cover the dish with plastic wrap and chill in the refrigerator for at least 2 hours to allow the flavors to meld together.
Extra Tips:
- For a non-alcoholic version, replace Bailey’s Irish Cream with a mixture of chocolate milk and a splash of vanilla extract.
- You can also add layers of fresh fruits, such as strawberries or raspberries, for extra flavor and color.
- Adjust the amount of powdered sugar based on your sweetness preference.
Nutrition Facts:
- Calories: 450
- Total Fat: 30g
- Saturated Fat: 18g
- Cholesterol: 90mg
- Sodium: 160mg
- Total Carbohydrates: 36g
- Dietary Fiber: 2g
- Sugars: 20g
- Protein: 5g
8 St. Patrick’s Day Rainbow Cake
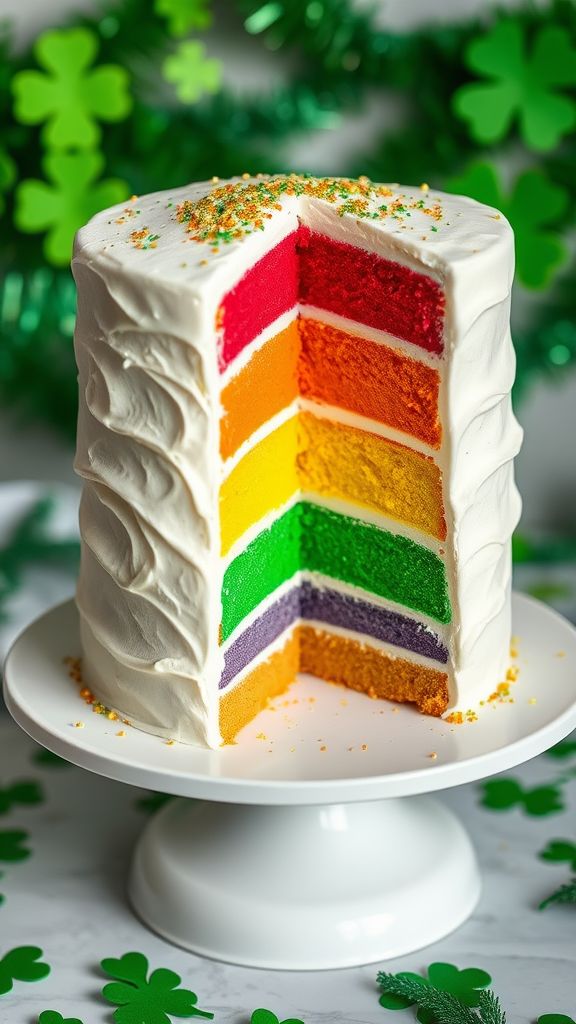
Celebrate St. Patrick’s Day with this eye-catching Rainbow Cake! A delightful treat that not only looks stunning but also tastes heavenly. Each slice reveals a vibrant array of colors, making it perfect for parties and gatherings.
Prep Time: 30 minutes
Cook Time: 30 minutes
Additional Time: 1 hour (for cooling and frosting)
Total Time: 2 hours
Servings: 12
Ingredients:
- 2 ½ cups all-purpose flour
- 2 ½ tsp baking powder
- ½ tsp salt
- 1 cup unsalted butter, softened
- 2 cups granulated sugar
- 5 large eggs
- 2 tsp vanilla extract
- 1 cup whole milk
- Gel food coloring (red, orange, yellow, green, blue, purple)
- 4 cups powdered sugar
- 1 cup unsweetened cocoa powder
- 1 cup heavy cream
Instructions:
Start by preheating your oven to 350°F (175°C). Grease and flour 6 round cake pans to prepare for the colorful layers.
In a large bowl, whisk together the flour, baking powder, and salt. In another bowl, cream the butter and sugar until light and fluffy. Next, add the eggs, one at a time, followed by the vanilla extract.
Gradually incorporate the flour mixture into the wet ingredients, alternating with the milk. Beat until just combined. Divide the batter evenly into six bowls. Use gel food coloring to tint each bowl a different color of the rainbow: red, orange, yellow, green, blue, and purple.
Pour each color of batter into its prepared cake pan. Bake for 25-30 minutes, or until a toothpick inserted into the center comes out clean. Allow the cakes to cool in the pans for 10 minutes before transferring them to wire racks to cool completely.
Once cooled, prepare the frosting by beating the heavy cream until soft peaks form. Gradually add the powdered sugar and continue to beat until stiff peaks form. Level each cake layer with a knife if necessary, then stack them from bottom to top in the order of the rainbow colors.
Frost the outside of the cake smoothly and add any extra decorations you desire. Slice and serve for a vibrant, festive treat!
Extra Tips:
- For an even more festive touch, sprinkle edible glitter or gold stars on top.
- Ensure the cakes are completely cool before frosting to prevent melting.
- You can use whipped cream or vanilla frosting as an alternative to heavy cream for a different taste.
Nutrition Facts:
- Calories: 350 per serving
- Total Fat: 18g
- Saturated Fat: 10g
- Cholesterol: 60mg
- Sodium: 150mg
- Total Carbohydrates: 45g
- Dietary Fiber: 1g
- Sugars: 30g
- Protein: 3g
9 Matcha Mint Mousse
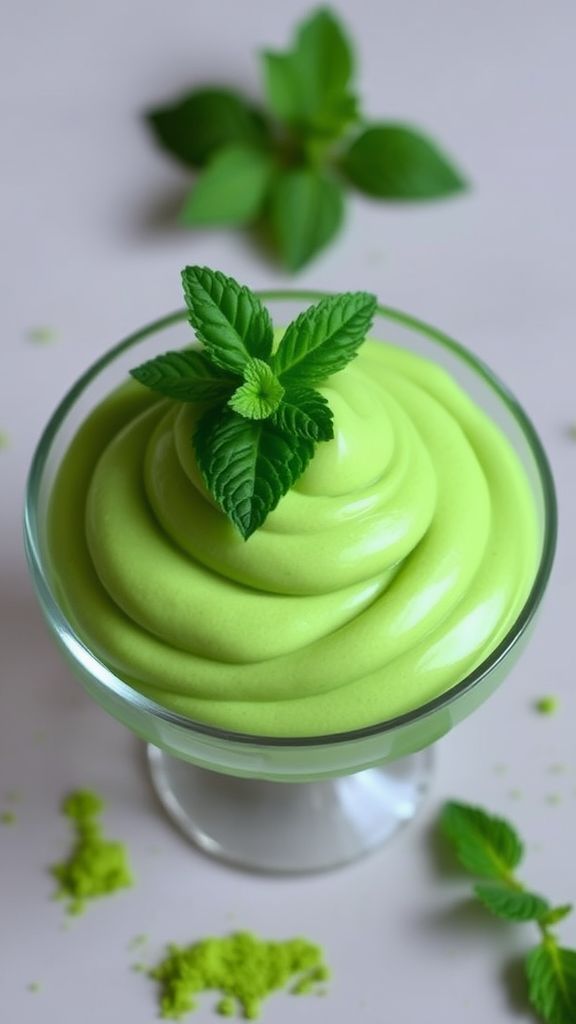
Indulge in the refreshing flavors of Matcha Mint Mousse, a delightful treat that merges the earthy notes of matcha with the coolness of mint. This light and velvety dessert is perfect for any occasion, particularly for celebrating St. Patrick’s Day with a vibrant green twist!
Prep Time: 15 minutes
Additional Time: 2 hours
Total Time: 2 hours 15 minutes
Servings: 4
Ingredients:
- 1 cup heavy cream
- 3 tablespoons powdered sugar
- 1 tablespoon matcha green tea powder
- 1 teaspoon fresh mint extract
- 1/2 teaspoon vanilla extract
- 1 tablespoon hot water
- Fresh mint leaves for garnish
Instructions:
Start by whisking the heavy cream in a large bowl using an electric mixer. Beat it until soft peaks form, then gradually add in the powdered sugar, continuing to whisk until stiff peaks are reached. This will give your mousse its light and airy texture.
In a separate bowl, combine the matcha green tea powder with hot water. Stir it well to create a smooth paste. Add the mint extract and vanilla extract to this mixture. Make sure the extracts are evenly blended into the matcha.
Gently fold the matcha mixture into the whipped cream, taking care to maintain the lightness of the cream. Use a spatula to combine, ensuring there are no streaks remaining. Each fold should be gentle to preserve the fluffy texture.
Once everything is well incorporated, spoon the mousse into serving dishes or glasses. Cover them with plastic wrap and refrigerate for at least 2 hours to allow the mousse to set properly.
Finally, once set, remove the mousse from the refrigerator and garnish with fresh mint leaves. Serve chilled and enjoy this refreshing dessert!
Extra Tips:
- For a stronger mint flavor, you can substitute the mint extract with a few crushed fresh mint leaves while whisking the cream.
- Ensure the heavy cream is very cold before whipping for the best volume.
- For added presentation, sprinkle some additional matcha powder on top of the mousse before serving.
Nutrition Facts:
- Calories: 260
- Fat: 23g
- Carbohydrates: 15g
- Protein: 3g
- Sugar: 10g
- Fiber: 1g
10 Clover Cookie Bars
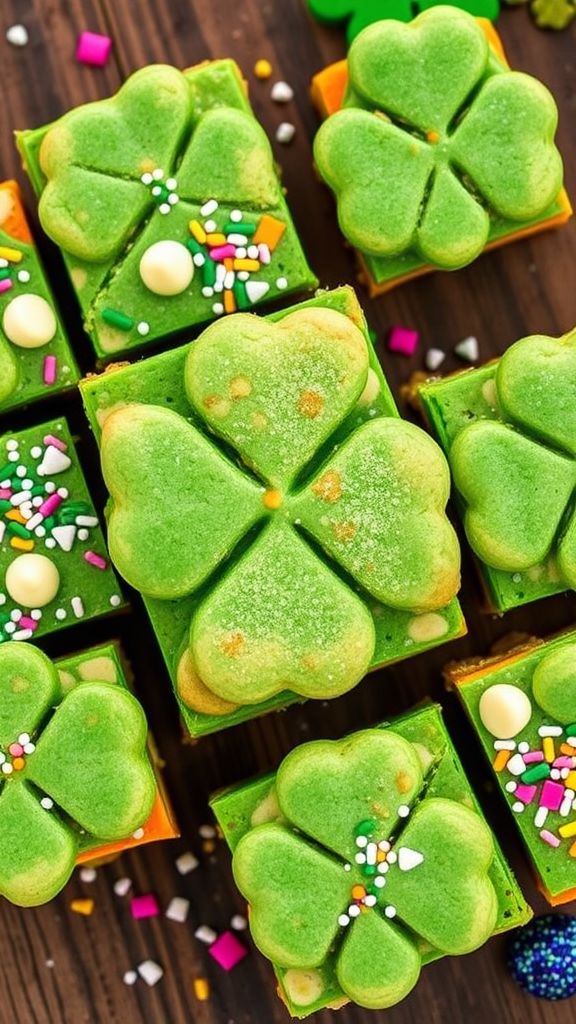
These delightful Clover Cookie Bars are perfect for celebrating St. Patrick’s Day. With their vibrant green color and sweet, buttery taste, they’re sure to impress everyone at your gathering. Easy to prepare and fun to decorate, these cookie bars make a fantastic treat for the festive occasion!
Prep Time: 20 minutes
Cook Time: 25 minutes
Additional Time: 10 minutes
Total Time: 55 minutes
Servings: 16 bars
Ingredients:
- 1 cup unsalted butter, softened
- 1 cup granulated sugar
- 1 cup brown sugar, packed
- 2 large eggs
- 2 teaspoons vanilla extract
- 3 cups all-purpose flour
- 1 teaspoon baking powder
- 1 teaspoon baking soda
- 1/2 teaspoon salt
- 1 cup white chocolate chips
- 1/4 cup green food coloring
- Sprinkles or edible glitter for decoration
Instructions:
Begin by preheating your oven to 350°F (175°C) and greasing a 9×13 inch baking pan.
In a large bowl, beat together the softened butter, granulated sugar, and brown sugar until light and fluffy. This should take about 2-3 minutes on medium speed.
Next, add in the eggs and vanilla extract. Continue mixing until well incorporated.
In a separate bowl, whisk together the flour, baking powder, baking soda, and salt. Gradually add this dry mixture into the wet ingredients, mixing gently until combined.
Next, pour in the green food coloring and fold until the batter is evenly colored. Be careful not to overmix.
Stir in the white chocolate chips until they are evenly distributed throughout the batter.
Spread the cookie dough evenly into the prepared baking pan, smoothing the top with a spatula.
Bake for 20-25 minutes, or until a toothpick inserted in the center comes out clean. Allow the bars to cool in the pan for about 10 minutes before transferring to a wire rack to cool completely.
Once cooled, cut into squares or rectangles. Decorate with sprinkles or edible glitter for a festive touch!
Extra Tips:
- For a stronger flavor, consider adding 1/2 teaspoon of almond extract in place of some of the vanilla extract.
- Ensure your butter is at room temperature for easier mixing and a better texture.
- Feel free to add chopped nuts or mini chocolate chips for extra texture and flavor.
Nutrition Facts:
- Calories: 250 per bar
- Protein: 2g
- Fat: 12g
- Carbohydrates: 35g
- Sugar: 20g
- Fiber: 0g
11 Irish Soda Bread Pudding
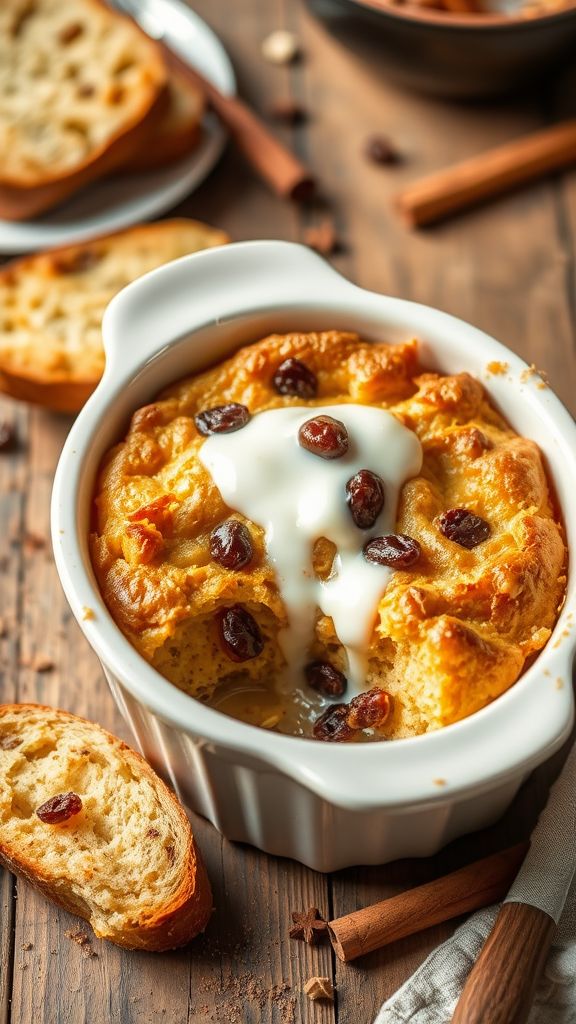
Irish Soda Bread Pudding is a delightful twist on traditional bread pudding, perfect for celebrating St. Patrick’s Day. This recipe incorporates the iconic flavors of Irish soda bread, creating a dish that’s both comforting and unique. Serve it warm with a drizzle of cream or a scoop of ice cream for a decadent treat.
Prep Time: 20 minutes
Cook Time: 45 minutes
Additional Time: 10 minutes
Total Time: 1 hour 15 minutes
Servings: 8
Ingredients:
- 6 cups of torn Irish soda bread (preferably stale)
- 2 cups of whole milk
- 1 cup of heavy cream
- 3 large eggs
- 3/4 cup of granulated sugar
- 1 tablespoon of vanilla extract
- 1 teaspoon of ground cinnamon
- 1/2 cup of raisins or currants
- 1/4 cup of Irish whiskey (optional)
- 1/4 teaspoon of salt
- Butter for greasing the baking dish
Instructions:
Begin by preheating your oven to 350°F (175°C). Grease a 9×13 inch baking dish with butter and set it aside. In a large mixing bowl, combine the milk and heavy cream. Whisk in the eggs, granulated sugar, vanilla extract, ground cinnamon, and salt until fully incorporated.
Next, add the torn pieces of Irish soda bread to the mixture and gently fold until they are well coated. If using, add the raisins or currants and the Irish whiskey at this point. Allow the mixture to sit for about 10 minutes so the bread can absorb the liquids.
Pour the mixture into the prepared baking dish and spread it out evenly. Bake in the preheated oven for 45 minutes, or until the pudding is set and the top is golden brown. You can poke the center with a knife to ensure it’s fully cooked.
Once it’s done, remove from the oven and let the bread pudding cool for around 10 minutes before serving. It can be enjoyed warm or at room temperature, topped with cream or ice cream.
Extra Tips:
- For extra flavor, consider adding orange zest to the custard mixture.
- If you don’t have Irish soda bread, you can substitute with any crusty bread.
- Make it festive by adding green food coloring to the cream for a St. Patrick’s Day presentation.
Nutrition Facts:
- Calories: 250 per serving
- Total Fat: 12g
- Saturated Fat: 7g
- Cholesterol: 80mg
- Sodium: 180mg
- Total Carbohydrates: 32g
- Dietary Fiber: 1g
- Sugars: 15g
- Protein: 5g
12 Green Tea Cheesecake Bites
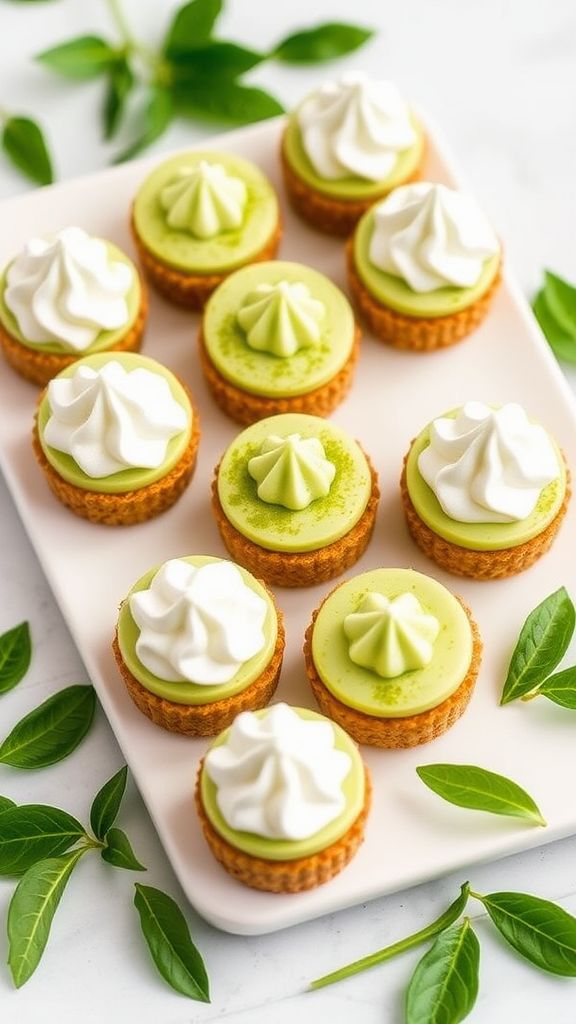
These delightful Green Tea Cheesecake Bites are the perfect treat to celebrate St. Patrick’s Day! With a creamy, rich texture and a hint of matcha, these bites will impress your guests and satisfy your sweet tooth. They’re easy to make and can be enjoyed as a fun snack or a festive dessert.
Prep Time: 20 minutes
Additional Time: 2 hours
Total Time: 2 hours 20 minutes
Servings: 24 bites
Ingredients:
- 1 cup crushed graham crackers
- 4 tablespoons unsalted butter, melted
- 16 oz cream cheese, softened
- 1 cup powdered sugar
- 2 teaspoons matcha green tea powder
- 1 teaspoon vanilla extract
- 1 tablespoon lemon juice
- 1 cup whipped cream
Instructions:
Start by preparing the crust. In a medium bowl, combine the crushed graham crackers and melted butter. Mix until the texture resembles wet sand. Press this mixture firmly into the bottom of a greased mini muffin tin. Set it aside to firm up as you make the filling.
In another large bowl, beat the cream cheese until smooth. Gradually add the powdered sugar, mixing well after each addition. Incorporate the matcha green tea powder, vanilla extract, and lemon juice until fully combined and smooth.
Next, gently fold in the whipped cream to lighten the mixture. Be careful not to deflate the whipped cream; you want to maintain that airy texture. Once combined, spoon the cheesecake mixture over the crust in each muffin cup, filling them to the top.
Place the muffin tin in the refrigerator and chill for at least 2 hours until the bites firm up. After chilling, carefully pop each cheesecake bite out of the tin. Arrange them on a serving platter and enjoy!
Extra Tips:
- For a more vibrant green color, consider adding more matcha powder to the cheesecake mixture, but taste as you go!
- Experiment by adding crushed green tea cookies into the crust for additional flavor and texture.
- Serve with a drizzle of white chocolate or a sprinkle of matcha on top for a stunning presentation.
Nutrition Facts:
- Calories: 80
- Fat: 5g
- Carbohydrates: 7g
- Fiber: 0g
- Protein: 1g
- Sugar: 4g
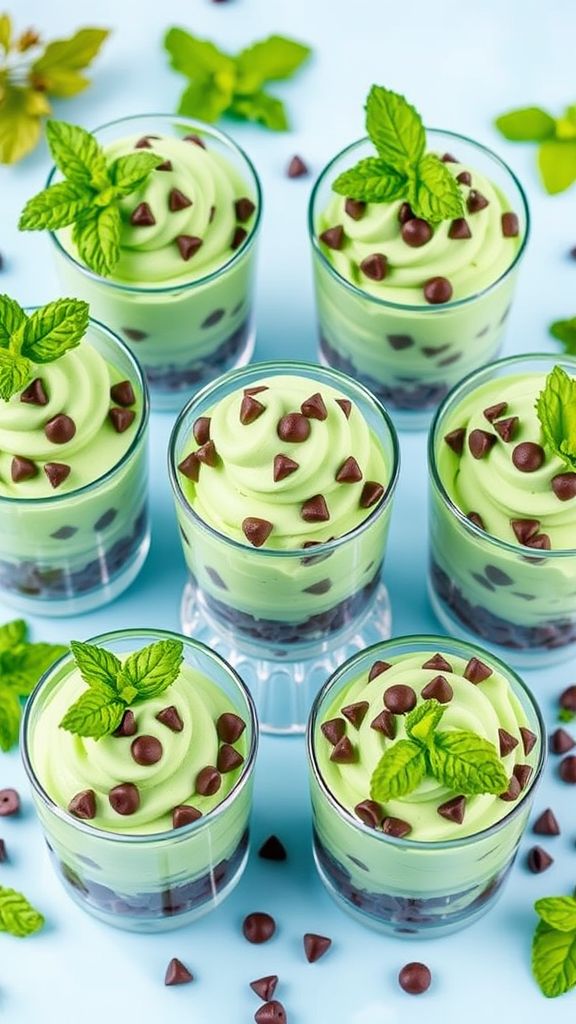
13 Minty Grasshopper Pie
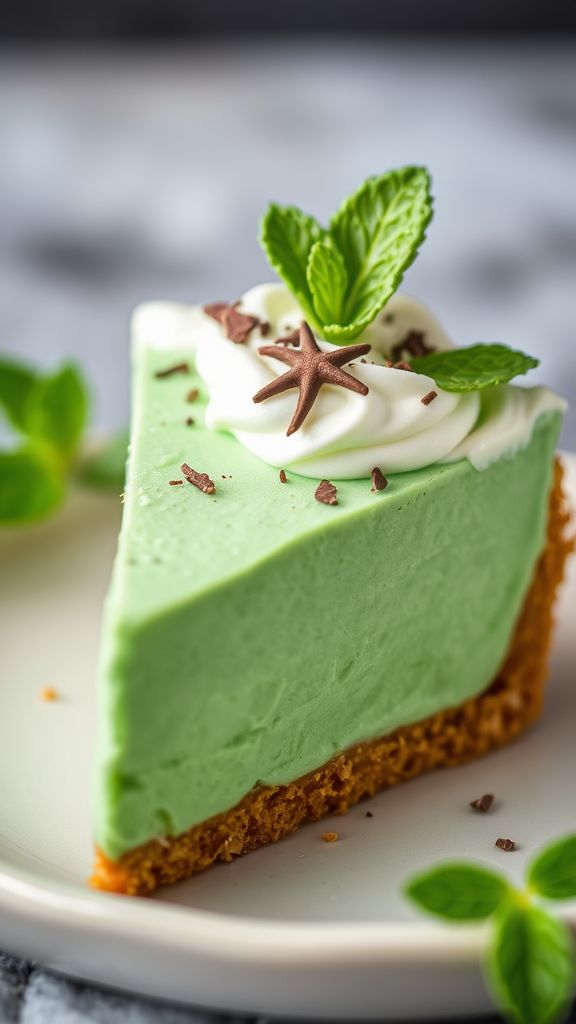
This Minty Grasshopper Pie is a delightful dessert that brings a refreshing minty flavor to any celebration. With its creamy texture and vibrant green color, it’s perfect for St. Patrick’s Day or any festive gathering. It’s sure to impress your guests with both its appearance and taste.
Prep Time: 20 minutes
Additional Time: 3 hours
Total Time: 3 hours 20 minutes
Servings: 8
Ingredients:
- 1 pre-made graham cracker crust
- 1 cup heavy whipping cream
- 1 cup sweetened condensed milk
- 1/2 cup mint chocolate chip ice cream
- 1/4 cup crème de menthe (or mint extract for a non-alcoholic version)
- 1/4 cup whipped topping
- Green food coloring (optional, for more vibrant color)
- Chocolate shavings or mint leaves for garnish (optional)
Instructions:
Begin by chilling a mixing bowl and beaters in the freezer for about 10 minutes. This helps the cream whip up nicely.
Once chilled, take the bowl out and pour in the heavy whipping cream. Beat on high speed until soft peaks form. This usually takes about 2-3 minutes.
Next, in another bowl, mix together the sweetened condensed milk, mint chocolate chip ice cream, and crème de menthe until smooth. If you prefer a more vibrant hue, add a few drops of green food coloring and stir until well combined.
Gently fold the whipped cream into the mint mixture, being careful not to deflate the whipped cream. Ensure everything is well combined for a smooth texture.
Spoon the filling into the graham cracker crust, smoothing the top with a spatula. Cover and place the pie in the freezer. Let it set for at least 3 hours to firm up.
Once ready to serve, take the pie out of the freezer and let it sit for a couple of minutes to soften slightly. If desired, garnish with chocolate shavings or fresh mint leaves before slicing and serving.
Extra Tips:
- For a more intense mint flavor, you can increase the amount of crème de menthe.
- Make the pie a day in advance to let it set overnight for the best texture.
- Consider using a chocolate cookie crust for a delicious twist on the traditional graham cracker crust.
Nutrition Facts:
- Calories: 320 per serving
- Total Fat: 20g
- Saturated Fat: 12g
- Cholesterol: 60mg
- Sodium: 150mg
- Total Carbohydrates: 35g
- Dietary Fiber: 1g
- Sugars: 24g
- Protein: 3g
14 Honeydew and Kiwi Sorbet

Treat yourself to a refreshing Honeydew and Kiwi Sorbet that perfectly blends the sweet taste of honeydew melons with the zesty flavor of kiwis. This delightful dessert is not only easy to make but also a vibrant addition to your St. Patrick’s Day celebration. Get ready to impress your guests with this vibrant green treat!
Prep Time: 15 minutes
Additional Time: 4 hours
Total Time: 4 hours 15 minutes
Servings: 4
Ingredients:
- 2 cups ripe honeydew melon, cubed
- 2 medium ripe kiwis, peeled and sliced
- 1/2 cup granulated sugar
- 1/2 cup water
- 2 tablespoons freshly squeezed lime juice
- 1 teaspoon mint leaves (optional, for garnish)
Instructions:
Begin by blending the honeydew melon and kiwi in a blender or food processor until smooth. This will create a beautiful green puree, perfect for your sorbet.
In a small saucepan, combine the granulated sugar and water. Heat the mixture over medium heat, stirring until the sugar fully dissolves. Once dissolved, remove it from the heat and allow it to cool.
Next, mix the cooled sugar syrup with the fruit puree in the blender. Pour in the freshly squeezed lime juice and blend again until everything is well incorporated. This adds a nice tang that complements the sweetness of the fruit.
Transfer the mixture into an airtight container and place it in the freezer. Let it freeze for about 4 hours, stirring it every 30 minutes to ensure it becomes smooth and creamy.
Once the sorbet is frozen and fluffy, scoop it into bowls. You can optionally garnish with mint leaves for an extra pop of color and flavor. Serve immediately and enjoy!
Extra Tips:
- For a smoother texture, try running the sorbet through a food processor once it’s fully frozen before serving.
- You can substitute granulated sugar with honey or agave syrup for a healthier option.
- Freeze some additional kiwi slices for a decorative touch on top when serving.
Nutrition Facts:
- Calories: 110 per serving
- Total Fat: 0g
- Sodium: 2mg
- Carbohydrates: 30g
- Fiber: 2g
- Sugars: 25g
- Protein: 1g
15 Chocolate Guinness Cake
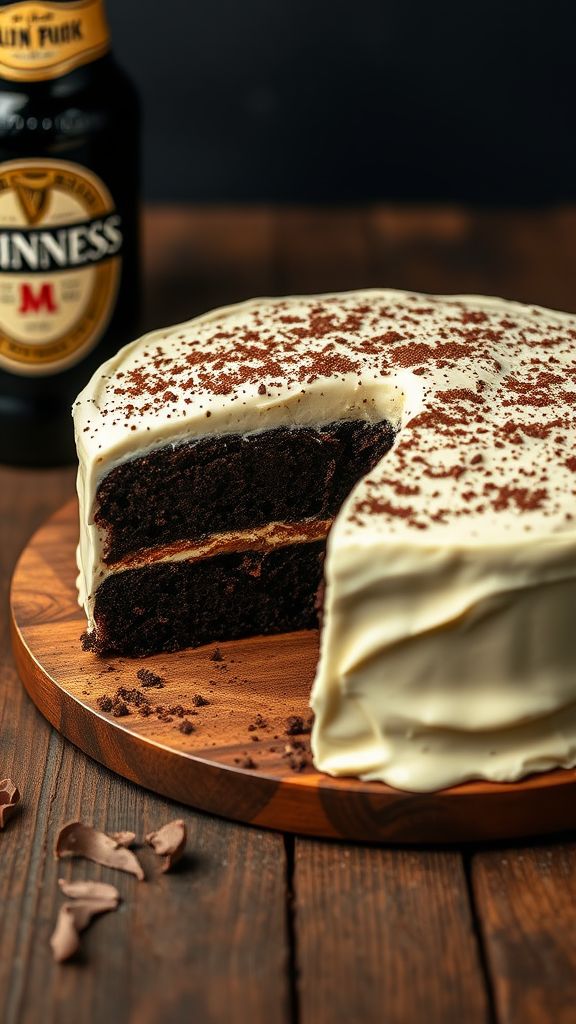
This Chocolate Guinness Cake is a decadent and moist delight that combines rich chocolate flavors with the unique taste of Guinness stout. Perfect for celebrating St. Patrick’s Day or any other occasion where chocolate is needed, this cake is sure to impress your guests.
Prep Time: 20 minutes
Cook Time: 45 minutes
Additional Time: 30 minutes (cooling)
Total Time: 1 hour 35 minutes
Servings: 12
Ingredients:
- 1 cup Guinness stout
- 1 cup unsalted butter
- 3/4 cup unsweetened cocoa powder
- 2 cups all-purpose flour
- 2 cups granulated sugar
- 1 1/2 teaspoons baking soda
- 3/4 teaspoon salt
- 2 large eggs
- 1 cup sour cream
- 1 teaspoon vanilla extract
- 1 cup heavy whipping cream
- 8 oz cream cheese, softened
- 3 cups powdered sugar
Instructions:
Preheat your oven to 350°F (175°C) and grease a 9×13 inch baking pan. In a medium saucepan, combine the Guinness stout and unsalted butter over medium heat until melted. Once melted, whisk in the cocoa powder until smooth.
In a large mixing bowl, whisk together the flour, sugar, baking soda, and salt. Pour the Guinness mixture into the dry ingredients and mix well until combined.
In another bowl, beat the eggs, sour cream, and vanilla extract together. Gradually fold this egg mixture into the chocolate batter until just combined. Be careful not to overmix.
Pour the batter into your prepared baking pan and smooth the top. Bake in the preheated oven for about 45 minutes, or until a toothpick inserted into the center comes out clean. Allow the cake to cool in the pan for 30 minutes before transferring to a wire rack to cool completely.
While the cake is cooling, prepare the frosting. In a large mixing bowl, beat the cream cheese until smooth. Slowly add the heavy whipping cream, and beat until fluffy. Gradually add in the powdered sugar, mixing until combined and smooth.
Once the cake is completely cooled, spread the cream cheese frosting evenly over the top. Slice and serve, enjoying the rich and delicious flavors of this wonderful cake.
Extra Tips:
- For an even richer flavor, you can add espresso powder to the batter.
- Ensure your cake is completely cool before frosting to prevent the cream cheese frosting from melting.
- Store leftover cake in an airtight container in the refrigerator for up to 5 days.
Nutrition Facts:
- Calories: 450 per serving
- Total Fat: 24g
- Saturated Fat: 14g
- Cholesterol: 80mg
- Sodium: 250mg
- Total Carbohydrates: 55g
- Dietary Fiber: 2g
- Sugars: 40g
- Protein: 5g
16 Coconut Lime Shamrock Bars
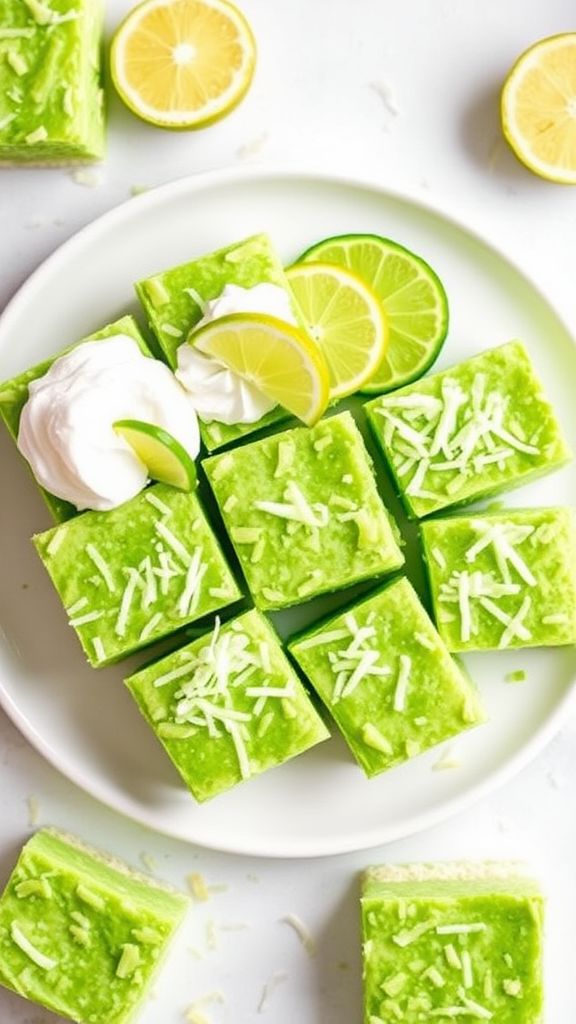
Bright, refreshing, and oh-so-delicious, these Coconut Lime Shamrock Bars are the perfect treat to celebrate St. Patrick’s Day! Combining the zesty flavor of lime with the creamy texture of coconut, these bars are not only gorgeous to look at, but they’re also indulgent and satisfying.
Prep Time: 20 minutes
Total Time: 1 hour 20 minutes
Servings: 12 bars
Ingredients:
- 1 cup graham cracker crumbs
- 1/2 cup unsweetened shredded coconut
- 1/4 cup unsalted butter, melted
- 1 can (14 oz) sweetened condensed milk
- 1/4 cup fresh lime juice
- 1 tablespoon lime zest
- 1/4 teaspoon salt
- Green food coloring (optional, for added color)
- Whipped cream (for topping, optional)
Instructions:
Begin by preheating your oven to 350°F (175°C). In a mixing bowl, combine the graham cracker crumbs, shredded coconut, and melted butter. Stir until well mixed. Press this mixture into the bottom of a greased 8-inch square baking dish to form an even crust.
In another bowl, whisk together the sweetened condensed milk, lime juice, lime zest, and salt. If you want a more vibrant green hue, add a few drops of green food coloring and mix until you achieve your desired color. Pour this mixture over the crust in the baking dish, spreading it evenly.
Bake the bars in the preheated oven for 20-25 minutes, or until set and lightly golden on the edges. Once they are done, allow the bars to cool in the dish for about 10 minutes. After they cool slightly, transfer them to the refrigerator for at least 1 hour to fully set.
Once chilled, cut the bars into squares and serve with a dollop of whipped cream on top, if desired. Enjoy the refreshing taste of lime and coconut that’s perfect for St. Patrick’s Day celebrations!
Extra Tips:
- For a more intense coconut flavor, consider adding a bit of coconut extract to the filling.
- Ensure the bars are fully chilled before cutting to achieve clean edges.
- Garnish with lime slices or extra shredded coconut for a beautiful presentation.
Nutrition Facts:
- Calories: 150 per bar
- Total Fat: 8g
- Saturated Fat: 5g
- Cholesterol: 15mg
- Sodium: 120mg
- Carbohydrates: 20g
- Dietary Fiber: 1g
- Sugars: 10g
- Protein: 2g
17 Pistachio and Lime Tart
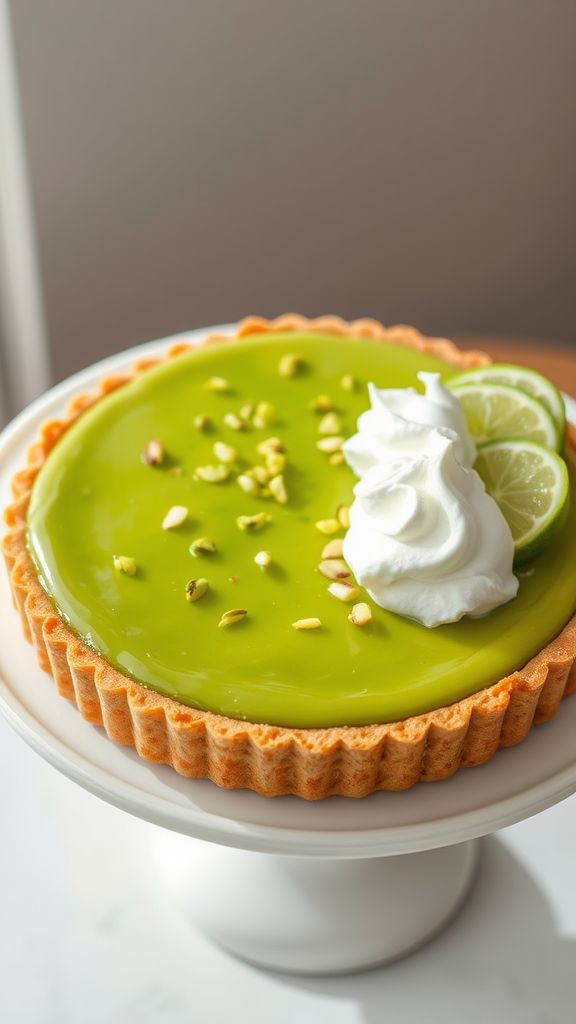
The Pistachio and Lime Tart is a vibrant dessert that perfectly balances the creamy richness of pistachios with the zesty brightness of lime. Ideal for spring celebrations or special occasions, this tart is sure to impress with its stunning appearance and delightful flavors.
Prep Time: 30 minutes
Total Time: 2 hours
Servings: 8
Ingredients:
- 1 pre-made tart shell (9-inch)
- 1 cup unsalted pistachios, shelled and toasted
- 1 cup sweetened condensed milk
- 3 large egg yolks
- 1/4 cup fresh lime juice (about 2-3 limes)
- 2 teaspoons lime zest
- 1/4 teaspoon salt
- 1 tablespoon unsalted butter, melted
- Whipped cream for serving (optional)
- Lime slices for garnish (optional)
Instructions:
Begin by preheating your oven to 350°F (175°C). Place your pre-made tart shell onto a baking sheet and set it aside.
In a food processor, combine the toasted pistachios until they form a coarse meal. In a large mixing bowl, whisk together the sweetened condensed milk, egg yolks, fresh lime juice, lime zest, and salt until fully combined.
Next, add the pistachio meal into the liquid mixture, and stir until everything is well mixed. Pour the filling into the prepared tart shell, smoothing the top with a spatula.
Bake the tart in the preheated oven for about 30-35 minutes, or until the filling is set and slightly puffed. Keep an eye on it to ensure it does not over-bake. Once done, remove it from the oven and allow it to cool on a wire rack.
After cooling, brush the tart lightly with melted butter for an extra shine. For the best flavor, chill the tart in the refrigerator for at least 1 hour before serving.
When ready to serve, slice the tart and top with some whipped cream and lime slices for garnish if desired. Enjoy the deliciously tangy dessert!
Extra Tips:
- For a more intense pistachio flavor, consider using pistachio extract in addition to the ground pistachios.
- If you want to make the tart ahead of time, you can prepare the filling and tart shell separately and assemble them just before serving.
- This tart can be stored in the refrigerator for up to 3 days; just make sure to cover it well to prevent it from absorbing odors.
Nutrition Facts:
- Calories: 300 per serving
- Total Fat: 15g
- Saturated Fat: 3g
- Cholesterol: 90mg
- Sodium: 150mg
- Carbohydrates: 35g
- Fiber: 1g
- Sugar: 22g
- Protein: 7g
18 Lucky Charms Marshmallow Treats
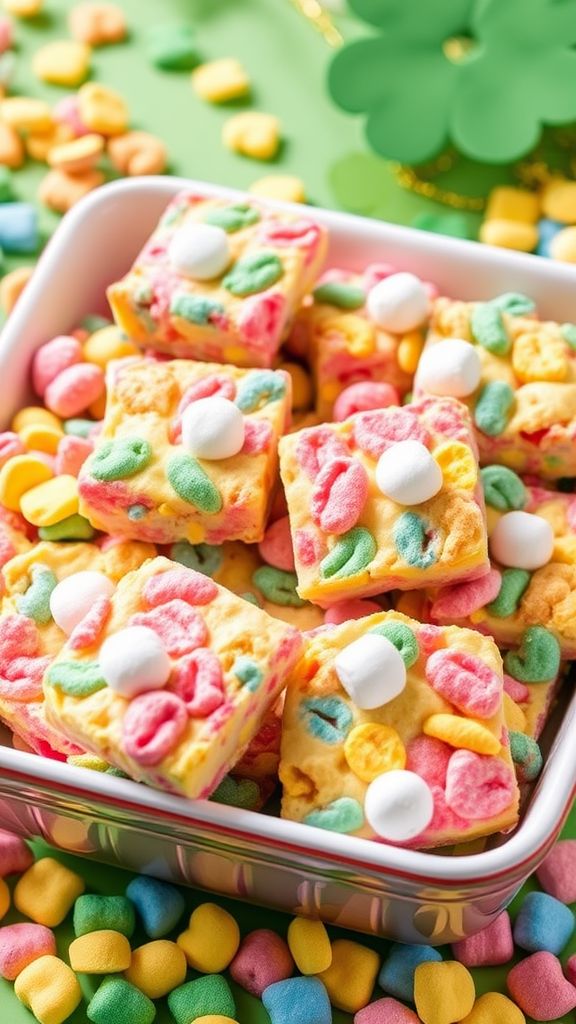
Indulge in the colorful and whimsical flavors of Lucky Charms Marshmallow Treats. This delightful twist on the classic rice krispie treats incorporates everyone’s favorite cereal, making it the perfect treat for St. Patrick’s Day celebrations. Quick and easy to make, these treats will surely bring luck and joy to your festivities.
Prep Time: 10 minutes
Total Time: 10 minutes
Servings: 12
Ingredients:
- 4 cups Lucky Charms cereal
- 3 tablespoons butter
- 4 cups mini marshmallows
- 1 teaspoon vanilla extract
- Cooking spray (for greasing)
Instructions:
Begin by greasing a 9×13 inch baking dish with cooking spray to prevent the treats from sticking. Set aside.
In a large saucepan, melt butter over low heat. Once the butter is completely melted, add in mini marshmallows and stir continuously until they are completely melted and combined with the butter. This should take around 2-3 minutes.
Remove the saucepan from heat and mix in vanilla extract, ensuring it’s well incorporated.
Next, add the Lucky Charms cereal to the melted marshmallow mixture. Stir gently until all the cereal pieces are coated evenly. Be careful not to crush the cereal too much as you want to maintain the fun shapes.
Transfer the mixture into the prepared baking dish. Using a spatula, press it down evenly into the dish. Make sure to press firmly but gently to avoid breaking the cereal.
Allow the treats to cool for a few minutes before cutting them into squares. Serve fresh and enjoy your Lucky Charms Marshmallow Treats!
Extra Tips:
- For a fun twist, try adding in some chocolate chips or peanut butter chips for extra flavor.
- If you want a little color contrast, sprinkle some extra Lucky Charms marshmallows on top before they cool completely.
- Store any leftovers in an airtight container to keep them fresh and chewy.
Nutrition Facts:
- Serving Size: 1 treat
- Calories: 140
- Total Fat: 5g
- Saturated Fat: 3g
- Cholesterol: 10mg
- Sodium: 50mg
- Total Carbohydrates: 22g
- Dietary Fiber: 1g
- Sugars: 9g
- Protein: 1g
19 Minty Fudge Swirl Brownies
Indulge in the delightful combination of rich, fudgy brownies swirled with a refreshing minty chocolate fudge. Perfect for St. Patrick’s Day celebrations or any day you crave a delicious chocolate treat, these brownies are sure to impress family and friends.
Prep Time: 15 minutes
Cook Time: 25 minutes
Additional Time: 10 minutes
Total Time: 50 minutes
Servings: 12
Ingredients:
- 1 cup unsalted butter (2 sticks)
- 2 cups granulated sugar
- 4 large eggs
- 1 teaspoon vanilla extract
- 1 cup all-purpose flour
- 1 cup cocoa powder
- 1/2 teaspoon salt
- 1/2 teaspoon baking powder
- 1/2 cup chocolate chips (optional)
- 1/2 cup mint chocolate fudge sauce (store-bought or homemade)
- 1/4 teaspoon peppermint extract (optional)
- Green food coloring (optional, for added color)
Instructions:
Preheat your oven to 350°F (175°C). Grease a 9×13 inch baking pan or line it with parchment paper for easy removal of the brownies.
In a medium saucepan, melt the butter over low heat. Once melted, remove from heat and stir in the sugar until well combined. Let it cool slightly before adding the eggs, one at a time, mixing well after each addition. Finally, stir in the vanilla extract.
In a separate bowl, whisk together the flour, cocoa powder, salt, and baking powder. Gradually fold the dry ingredients into the wet mixture until just combined. Avoid overmixing to keep the brownies fudgy.
If you desire, fold in the chocolate chips for an extra chocolaty flavor. Pour half of the brownie batter into the prepared baking pan and spread evenly. Drizzle the mint chocolate fudge sauce over this layer, allowing it to swirl with a knife for that signature minty fudge design.
Pour the remaining brownie batter on top and gently spread it to cover the fudge layer. If desired, you can add a few drops of green food coloring to the remaining brownie batter for a festive touch.
Bake for 25 minutes, or until a toothpick inserted in the center comes out with a few moist crumbs. Allow the brownies to cool in the pan for about 10 minutes before transferring them onto a wire rack to cool completely.
Once cool, cut into squares and enjoy the minty deliciousness!
Extra Tips:
- For a more intense mint flavor, consider adding a few drops of peppermint extract into the brownie batter.
- Store your brownies in an airtight container at room temperature for up to 3 days or in the fridge for up to 5 days for maximum freshness.
- These brownies can also be enjoyed warm, topped with a scoop of vanilla ice cream for an extra treat!
Nutrition Facts:
- Calories: 280 per serving
- Total Fat: 15g
- Saturated Fat: 9g
- Cholesterol: 70mg
- Sodium: 150mg
- Total Carbohydrates: 36g
- Dietary Fiber: 2g
- Sugars: 24g
- Protein: 3g
20 St. Paddy’s Day Cookie Decorating Kit

Bring the festive spirit of St. Paddy’s Day to your kitchen with this delightful Cookie Decorating Kit! Perfect for both kids and adults, this kit includes all the essentials for creating charming green-themed cookies that are not only delicious but also a fun way to celebrate the holiday.
Prep Time: 30 minutes
Additional Time: 1 hour (for cooling)
Total Time: 1 hour 30 minutes
Servings: 12 cookies
Ingredients:
- 2 ¾ cups all-purpose flour
- 1 tsp baking powder
- ½ tsp baking soda
- ½ tsp salt
- 1 cup unsalted butter, softened
- 1 cup granulated sugar
- 1 large egg
- 1 tsp vanilla extract
- ½ tsp almond extract
- Green food coloring
- Royal icing (store-bought or homemade)
- Decorative sprinkles (shamrocks, gold coins, and other themed items)
Instructions:
In a large bowl, whisk together the flour, baking powder, baking soda, and salt. Set aside to let the dry ingredients meld.
In a separate mixing bowl, cream the butter and granulated sugar together until the mixture is light and fluffy, which usually takes about 2-3 minutes.
Add the egg, vanilla extract, and almond extract to the butter mixture, mixing until well combined. Gradually incorporate the dry ingredients, blending well until a smooth dough forms.
Divide the dough in half and add a few drops of green food coloring to one half. Mix until the color is evenly distributed. Wrap both portions of dough in plastic wrap and refrigerate for at least 1 hour.
Preheat your oven to 350°F (175°C). Once the dough is chilled, roll it out on a lightly floured surface to about ¼ inch thickness. Use cookie cutters to cut out fun shapes like shamrocks and pots of gold. Place the cookies on a lined baking sheet.
Bake for about 8-10 minutes or until the edges turn golden. Allow the cookies to cool on the baking sheet for a few minutes before transferring them to a wire rack to cool completely.
Once the cookies are cool, use the royal icing to decorate and, if desired, top with decorative sprinkles. Allow the icing to set before serving.
Extra Tips:
- For a more vibrant color, start with a small amount of food coloring and gradually add more until you reach your desired shade.
- If you want to save time, you can purchase pre-made cookie dough and icing from the store.
- Consider hosting a cookie decorating party – it’s a fun way to celebrate St. Paddy’s Day with friends and family!
Nutrition Facts:
- Calories: 150 per cookie
- Total Fat: 8g
- Saturated Fat: 5g
- Cholesterol: 25mg
- Sodium: 65mg
- Total Carbohydrates: 18g
- Dietary Fiber: 0g
- Sugars: 6g
- Protein: 1g
21 White Chocolate Mint Bark
A delightful treat that’s perfect for any celebration, this White Chocolate Mint Bark is simple to make and bursting with flavor. The creamy sweetness of white chocolate paired with refreshing mint gives it a festive touch that’s irresistible.
Prep Time: 15 minutes
Additional Time: 1 hour
Total Time: 1 hour 15 minutes
Servings: 16 pieces
Ingredients:
- 2 cups white chocolate chips
- 1/2 teaspoon peppermint extract
- 1/4 cup crushed peppermint candies or candy canes
- 1/4 cup green sprinkles (optional)
Instructions:
Begin by preparing a baking sheet lined with parchment paper or a silicone mat. This will prevent the bark from sticking and make for easy removal once it has set.
Next, melt the white chocolate chips in a microwave-safe bowl. Heat in 30-second intervals, stirring after each interval until fully melted and smooth. This should take about 1-2 minutes total.
Once the chocolate is melted, stir in the peppermint extract until well combined. You want to ensure an even distribution of flavor throughout the chocolate.
Pour the melted white chocolate onto the prepared baking sheet and spread it out evenly to about 1/4-inch thick using a spatula. Be sure to create a nice, flat surface for the bark.
Sprinkle the crushed peppermint candies and green sprinkles (if using) evenly over the top of the melted chocolate before it sets. Press down gently with your hands to make sure the toppings stick.
Place the baking sheet in the refrigerator for about 1 hour or until the chocolate is completely set and firm.
Once set, remove the bark from the baking sheet and break it into pieces or cut it into squares. Serve immediately or store in an airtight container for up to a week.
Extra Tips:
- For an added touch, you can drizzle some melted dark chocolate over the top before refrigerating.
- Ensure the bowl used for melting chocolate is completely dry, as any moisture can cause the chocolate to seize.
- Customize your bark by adding different kinds of toppings such as nuts or dried fruit for variety.
Nutrition Facts:
- Calories per serving: 130
- Total Fat: 7g
- Saturated Fat: 4g
- Cholesterol: 5mg
- Sodium: 10mg
- Total Carbohydrates: 15g
- Dietary Fiber: 0g
- Sugars: 13g
- Protein: 1g
22 Emerald Isle Mini Pavlovas
These Emerald Isle Mini Pavlovas are delightful little treats that combine a crisp outer shell with a soft and marshmallowy inside. Topped with luscious whipped cream and a vibrant fruit medley, they make the perfect festive dessert for St. Patrick’s Day celebrations.
Prep Time: 20 minutes
Total Time: 2 hours
Servings: 8 mini pavlovas
Ingredients:
- 3 large egg whites
- 1/4 teaspoon cream of tartar
- 3/4 cup granulated sugar
- 1 teaspoon vanilla extract
- 1 teaspoon cornstarch
- 1 cup heavy cream
- 2 tablespoons powdered sugar
- 1 teaspoon vanilla extract
- 1 cup kiwi, peeled and sliced
- 1 cup green grapes, halved
- 1 cup pistachios, roughly chopped
Instructions:
Start by preheating your oven to 225°F (110°C). Line a baking sheet with parchment paper, and draw eight 3-inch circles on it as templates for your pavlovas.
In a clean, dry mixing bowl, beat the egg whites with an electric mixer on medium speed until they become frothy. Add the cream of tartar and continue to beat until soft peaks form.
Gradually add the granulated sugar, one tablespoon at a time. Increase the mixer speed to high and beat until the mixture turns glossy and stiff peaks form. This should take about 5 minutes. Gently fold in the vanilla extract and cornstarch until fully combined.
Spoon the meringue mixture onto the drawn circles on your parchment paper, creating a small well in the center of each pavlova for the toppings later.
Bake the pavlovas in the preheated oven for about 90 minutes or until they are dry to the touch. Once done, turn off the oven and leave the pavlovas inside to cool completely.
While the pavlovas cool, whip the heavy cream with the powdered sugar and vanilla extract until soft peaks form. Be careful not to overbeat.
Once the pavlovas are completely cool, remove them from the oven. Carefully top each pavlova with the whipped cream and then add the sliced kiwi, halved green grapes, and chopped pistachios for that vibrant Emerald Isle touch.
Extra Tips:
- Make Ahead: You can prepare the pavlovas a day in advance and store them in an airtight container to maintain their crispness.
- Fruit Variations: Feel free to swap the fruits with your favorites, like green apples or avocado slices for added variety.
- Serving Idea: For added flair, drizzle some mint syrup or a touch of lime zest over the top before serving.
Nutrition Facts:
- Calories: 190 per pavlova
- Total Fat: 11g
- Saturated Fat: 7g
- Cholesterol: 45mg
- Sodium: 5mg
- Total Carbohydrates: 20g
- Dietary Fiber: 1g
- Sugars: 13g
- Protein: 3g
23 Leprechaun Hat Cake Pops
Create some festive fun this St. Patrick’s Day with these adorable Leprechaun Hat Cake Pops! These easy-to-make treats are sure to bring a smile to both kids and adults alike. Let’s dive into the recipe and get ready to spread some holiday cheer!
Prep Time: 30 minutes
Total Time: 1 hour
Servings: 12 cake pops
Ingredients:
- 1 box chocolate cake mix (plus ingredients required on the box)
- 1 cup chocolate frosting
- 1 cup green candy melts
- 12 lollipop sticks
- 12 miniature Reese’s Peanut Butter Cups
- 12 chocolate candy buttons (or M&M’s)
- Black icing (for decoration)
Instructions:
Begin by preparing the chocolate cake mix according to package instructions. Once baked, let the cake cool completely. Crumble the cooled cake into a large mixing bowl.
Next, add the chocolate frosting to the crumbled cake. Mix until fully combined; the mixture should be moist but not overly wet. Roll the mixture into small balls, about 1 inch in diameter. Place the balls on a baking sheet lined with parchment paper.
Insert a lollipop stick into each cake ball, then refrigerate them for about 15 minutes to firm up. While the cake pops are chilling, melt the green candy melts according to package instructions.
Once the cake pops are firm, dip each one into the melted green candy, ensuring it’s fully coated. Tap off any excess candy coating. Place each coated cake pop upright into a styrofoam block or cake pop stand to set.
After the candy coating has hardened, carefully place a miniature Reese’s Peanut Butter Cup on top of each cake pop to create the leprechaun’s hat. Use the black icing to add a small circle or square decoration on the front of the Reese’s Peanut Butter Cup for the hat buckle.
Let the cake pops set for an additional 10-15 minutes before serving. Enjoy your delightful Leprechaun Hat Cake Pops!
Extra Tips:
- For a fun twist, try using different colored candy melts to create more variations of the cake pops.
- Store the cake pops in an airtight container in the refrigerator for up to one week.
- If you’re feeling creative, add edible glitter or sprinkles to the green candy coating for extra pizzazz!
Nutrition Facts:
- Calories: 150 per cake pop
- Total Fat: 7g
- Saturated Fat: 3.5g
- Cholesterol: 15mg
- Sodium: 120mg
- Carbohydrates: 20g
- Fiber: 0g
- Sugars: 15g
- Protein: 2g
24 Minty Chocolate Chip Ice Cream Cups
Indulge in the delightful coolness of Minty Chocolate Chip Ice Cream Cups, perfect for celebrating St. Patrick’s Day or simply satisfying your sweet tooth! The combination of minty freshness and rich chocolate creates a unique treat that will enchant your taste buds.
Prep Time: 15 minutes
Additional Time: 4 hours (for freezing)
Total Time: 4 hours 15 minutes
Servings: 6
Ingredients:
- 2 cups heavy whipping cream
- 1 cup sweetened condensed milk
- 1 teaspoon vanilla extract
- 1 teaspoon peppermint extract
- 1 cup mini chocolate chips
- 1 cup crushed chocolate sandwich cookies (optional for crust)
- Green food coloring (optional, for a festive touch)
- Mint leaves (for garnish)
Instructions:
In a large mixing bowl, combine the heavy whipping cream, sweetened condensed milk, vanilla extract, and peppermint extract. Whisk these ingredients together until well blended. If you want an extra pop of color, add a few drops of green food coloring and mix until you achieve your desired shade of green.
Gently fold in the mini chocolate chips to evenly distribute them throughout the mixture. If you’re opting for a crust, crush the chocolate sandwich cookies and layer them at the bottom of your serving cups.
Once your mixture is combined, spoon or pipe it into individual serving cups, layering it over the cookie crust if using. Smooth the tops with a spatula for a polished look.
Cover each cup with plastic wrap and freeze them for at least 4 hours or until the ice cream is firm. Once ready to serve, remove the cups from the freezer and let them sit for a few minutes to soften slightly.
Garnish the cups with fresh mint leaves on top for a refreshing touch. Enjoy your Minty Chocolate Chip Ice Cream Cups!
Extra Tips:
- For a more intense mint flavor, adjust the peppermint extract to your taste.
- Use a combination of dark and semi-sweet chocolate chips for a unique flavor experience.
- These cups can be made a day ahead, making them a perfect make-ahead dessert option.
Nutrition Facts:
- Calories: 240 per serving
- Fat: 18g
- Carbohydrates: 20g
- Sugars: 15g
- Protein: 3g
25 Rainbow Fruit Tart
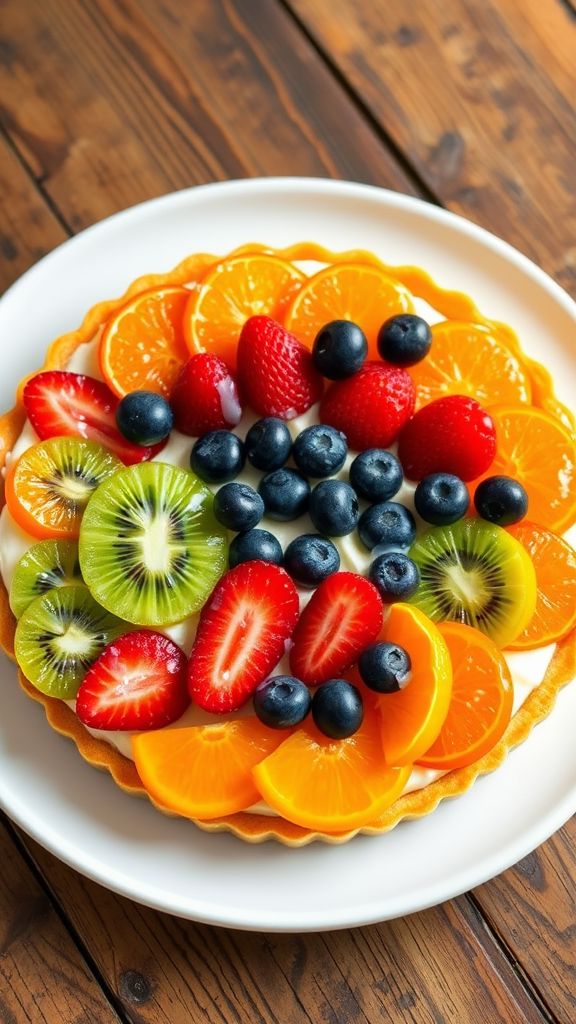
A vibrant and colorful Rainbow Fruit Tart is the perfect way to celebrate any occasion, especially St. Patrick’s Day! This tart features a buttery crust, rich cream filling, and an array of fresh fruits arranged like a beautiful rainbow. Make it the centerpiece of your dessert table!
Prep Time: 30 minutes
Additional Time: 2 hours
Total Time: 2 hours 30 minutes
Servings: 8
Ingredients:
- 1 pre-made tart crust (9-inch)
- 1 cup heavy whipping cream
- 8 oz cream cheese, softened
- 1/2 cup powdered sugar
- 1 teaspoon vanilla extract
- 1/4 cup fruit preserve (apricot or your choice)
- 1/2 cup strawberries, sliced
- 1/2 cup kiwis, sliced
- 1/2 cup blueberries
- 1/2 cup blackberries
- 1/2 cup mandarin slices, drained
Instructions:
Start by preheating your oven according to the tart crust package instructions, if applicable. Bake the tart crust until golden brown, and set aside to cool completely.
In a mixing bowl, combine the cream cheese, powdered sugar, and vanilla extract. Beat with an electric mixer until smooth and creamy. In a separate bowl, whip the heavy whipping cream until stiff peaks form. Gently fold the whipped cream into the cream cheese mixture to keep it light and airy.
Spread the cream mixture evenly into the cooled tart crust, smoothing it out to the edges.
Now it’s time to assemble the fruits! Starting from one end, arrange the sliced strawberries to form the red layer of the rainbow. Next, add the kiwis for the green layer, followed by blueberries, blackberries, and finally, mandarin slices to create the orange and yellow layers.
Once all the fruit is arranged, warm the fruit preserve in a small saucepan over low heat until it becomes more liquid. Brush the warm preserve over the fruits to give them a beautiful glaze.
Refrigerate the tart for at least 2 hours before serving for everything to set perfectly. Slice and enjoy your stunning rainbow creation!
Extra Tips:
- Feel free to use any fruits you love or have on hand; just keep the order of the rainbow colors in mind.
- To add an extra layer of flavor, consider adding a hint of lemon zest to the cream cheese filling.
- Keep any leftovers stored in the refrigerator for up to 2 days for best freshness.
Nutrition Facts:
- Calories: 280 per serving
- Total Fat: 18g
- Saturated Fat: 10g
- Cholesterol: 60mg
- Carbohydrates: 30g
- Fiber: 2g
- Sugar: 16g
- Protein: 3g