15 Fun St. Patrick’s Day Treats for Kids
Did you know that St. Patrick’s Day is celebrated in more countries than any other national festival? It’s the perfect opportunity to get creative in the kitchen and make some delightful treats for your little ones!
In this vibrant collection, you’ll discover 15 fun St. Patrick’s Day treats that are sure to spark joy and excitement. From Leprechaun Rainbow Fruit Kabobs to Mint Chocolate Chip Rice Krispie Treats, these easy and festive recipes will make your celebrations even more special.
Get ready to fill your home with the delightful scents of baking and the laughter of children as they indulge in these festive creations!
Shop Our Must-Haves


1 Leprechaun Rainbow Fruit Kabobs

Celebrate St. Patrick’s Day with these vibrant Leprechaun Rainbow Fruit Kabobs that are as fun to make as they are to eat! Perfect for kids and adults alike, these colorful skewers are packed with fresh fruit, delivering a healthy dose of vitamin C along with a festive touch.
Prep Time: 15 minutes
Total Time: 15 minutes
Servings: 8
Ingredients:
- 1 cup strawberries, hulled and halved
- 1 cup orange segments
- 1 cup pineapple chunks
- 1 cup green grapes
- 1 cup blueberries
- 1 cup purple grapes
- Wooden skewers (about 8-10)
Instructions:
Begin by preparing your fruit. Wash all the fruit thoroughly under cold water to ensure they are clean and ready to eat. Hull and halve the strawberries, and prepare the orange segments and pineapple chunks as needed.
Next, gather your wooden skewers and start assembling the kabobs. Begin with a strawberry on the skewer, followed by an orange segment. Alternate between adding different fruits, following the order of pineapple chunks, green grapes, blueberries, and finally, purple grapes. Aim to create a visually appealing rainbow effect on each skewer.
Once all the skewers are assembled, you can present them with a playful twist. Arrange the kabobs in a tall glass or a jar to mimic a colorful bouquet, making it a delightful centerpiece for your St. Patrick’s Day celebration.
Extra Tips:
- Use seasonal fruits for the best flavor and color variety – you can substitute or add fruits based on availability.
- Soak the wooden skewers in water for about 30 minutes before using them to prevent splintering and burning if you decide to grill the kabobs.
- Provide a dip such as yogurt or chocolate sauce for a fun, interactive element when serving these kabobs.
Nutrition Facts:
- Calories: 120 per skewer
- Total Fat: 0.5g
- Sodium: 5mg
- Total Carbohydrates: 30g
- Dietary Fiber: 3g
- Sugars: 20g
- Protein: 1g
2 Shamrock Shake Cupcakes

These delightful Shamrock Shake Cupcakes are the perfect festive treat for St. Patrick’s Day! With a light mint flavor and a luscious green frosting, these cupcakes will have everyone feeling lucky.
Prep Time: 20 minutes
Cook Time: 20 minutes
Additional Time: 30 minutes
Total Time: 1 hour 10 minutes
Servings: 12 cupcakes
Ingredients:
- 1 cup all-purpose flour
- 1 cup granulated sugar
- 1/2 cup unsweetened cocoa powder
- 1/2 teaspoon baking powder
- 1/2 teaspoon baking soda
- 1/4 teaspoon salt
- 1/2 cup unsalted butter, softened
- 2 large eggs
- 1/2 cup whole milk
- 1 teaspoon vanilla extract
- 1/2 teaspoon peppermint extract
- Green food coloring (to desired color)
For the Frosting:
- 1/2 cup unsalted butter, softened
- 2 cups powdered sugar
- 2 tablespoons heavy cream
- 1/2 teaspoon peppermint extract
- Green food coloring (to desired color)
- Whipped cream (for topping, optional)
- Chocolate shavings or sprinkles (for garnish, optional)
Instructions:
Preheat your oven to 350°F (175°C) and line a muffin tin with cupcake liners. In a large mixing bowl, whisk together the flour, sugar, cocoa powder, baking powder, baking soda, and salt until well combined.
In a separate bowl, cream the butter until smooth. Add in the eggs, milk, vanilla extract, and peppermint extract. Mix until all wet ingredients are well incorporated. Slowly add the dry ingredients to the wet mixture, combining until there are no lumps.
Fold in the green food coloring until you reach your desired shade of green. Fill the cupcake liners about two-thirds full with the batter. Bake for 18-20 minutes or until a toothpick inserted in the center comes out clean.
Once baked, allow the cupcakes to cool in the tin for about 5 minutes, then transfer to a wire rack to cool completely. While the cupcakes cool, prepare the frosting by beating together the butter and powdered sugar until fluffy. Add the heavy cream, peppermint extract, and more green food coloring to achieve your desired color and flavor.
Once the cupcakes are cool, pipe the mint frosting onto each one generously. For a finishing touch, top with a dollop of whipped cream and sprinkle with chocolate shavings or sprinkles.
Extra Tips:
- For an extra burst of flavor, mix in chocolate chips into the batter.
- Feel free to adjust the amount of peppermint extract based on your personal taste preferences.
- Store any leftovers in an airtight container at room temperature for up to 3 days.
Nutrition Facts:
- Calories: 300
- Total Fat: 14g
- Saturated Fat: 8g
- Cholesterol: 40mg
- Sodium: 220mg
- Total Carbohydrates: 40g
- Dietary Fiber: 1g
- Sugars: 25g
- Protein: 3g
3 Green Velvet Cake Pops
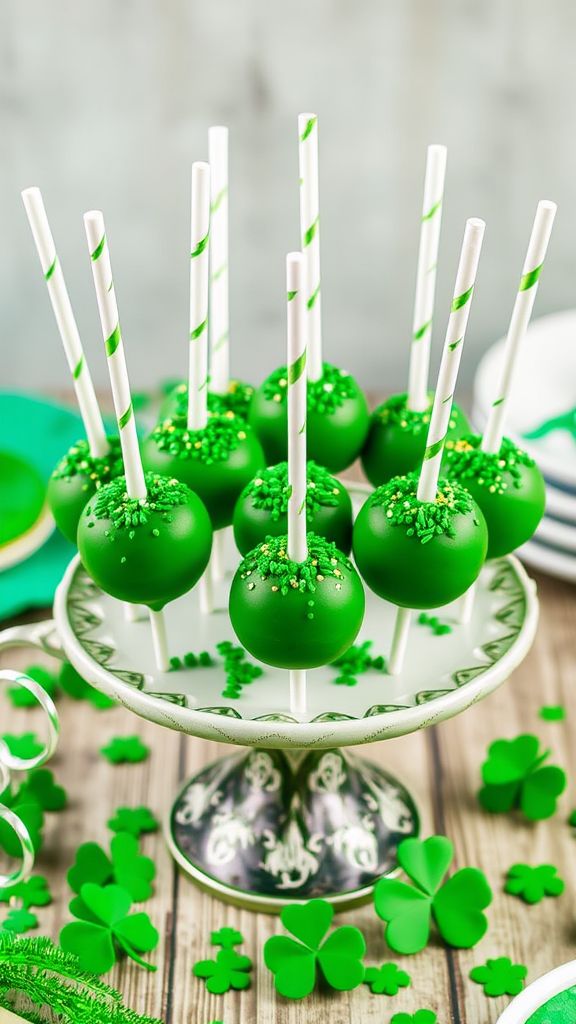
Delight your guests with these fun and festive Green Velvet Cake Pops! Perfect for any St. Patrick’s Day celebration, these cake pops are moist, flavorful, and coated in a creamy green chocolate shell. They’re sure to bring a smile to everyone’s face.
Prep Time: 30 minutes
Additional Time: 1 hour
Total Time: 1 hour 30 minutes
Servings: 24 cake pops
Ingredients:
- 1 box green velvet cake mix
- 3 large eggs
- 1 cup buttermilk
- 1/2 cup vegetable oil
- 1/2 cup cream cheese frosting
- 12 oz white chocolate melting wafers
- 2 tbsp vegetable oil (for thinning chocolate)
- Green sprinkles (optional for decoration)
- Lollipop sticks
Instructions:
Preheat your oven to 350°F (175°C). Prepare a 9×13 inch cake pan by greasing it lightly. In a mixing bowl, combine the green velvet cake mix, eggs, buttermilk, and vegetable oil. Beat on medium speed until the mixture is smooth and well combined.
Once the batter is ready, pour it into the prepared cake pan and bake in the oven for about 25-30 minutes. To check if it’s finished, insert a toothpick in the center; it should come out clean. After baking, allow the cake to cool completely.
Once the cake is cool, crumble it into a large mixing bowl. Add the cream cheese frosting and mix thoroughly until well combined. The mixture should be moist and hold together when you squeeze it in your hand.
Next, scoop out small portions of the cake mixture and roll them into balls, about the size of a table tennis ball. Place the cake balls onto a baking sheet lined with parchment paper.
Melt the white chocolate melting wafers in a microwave-safe bowl, adding the vegetable oil to thin it out. Dip each lollipop stick in the melted chocolate, then insert it into the center of a cake ball. This will help the cake pop stay secured to the stick. Once all the sticks are inserted, refrigerate the cake pops for approximately 30 minutes to firm up.
After the cake pops are chilled, dip each one into the melted chocolate, ensuring it’s fully coated. Let any excess chocolate drip off, and sprinkle with green sprinkles for decoration if desired. Place the finished cake pops in a foam block or a cake pop stand to set completely.
Extra Tips:
- Make Ahead: You can make the cake balls ahead of time and store them in the refrigerator for up to three days before decorating.
- Different Colors: Feel free to color the white chocolate with different shades of green or even use different colors for various occasions.
- Storage: Store your decorated cake pops in an airtight container in the fridge for up to one week.
Nutrition Facts:
- Calories: 150 per cake pop
- Total Fat: 7g
- Saturated Fat: 4g
- Cholesterol: 25mg
- Sodium: 100mg
- Total Carbohydrate: 20g
- Dietary Fiber: 0g
- Sugars: 12g
- Protein: 2g
4 Lucky Charms Marshmallow Treats
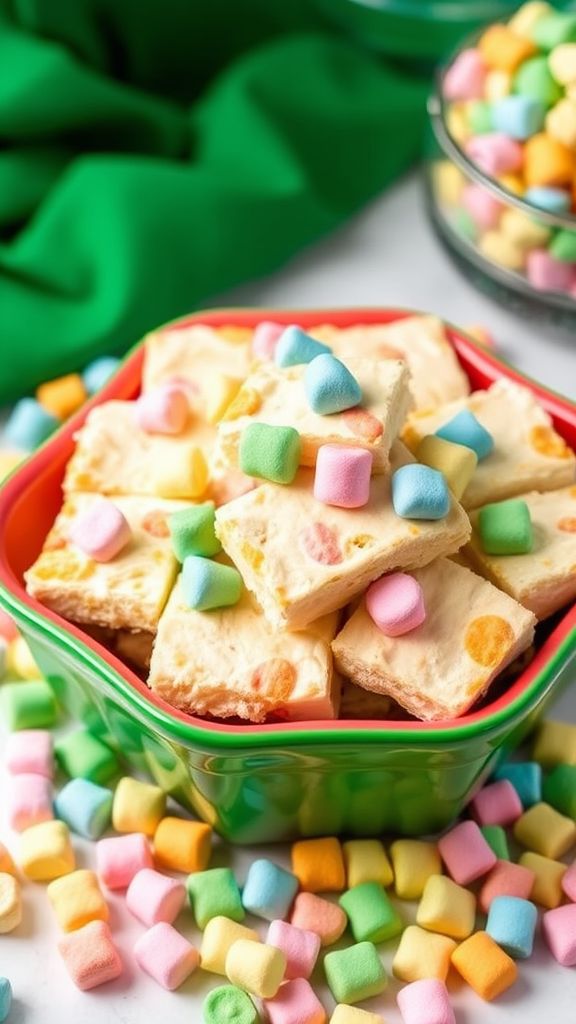
Lucky Charms Marshmallow Treats are a fun and colorful twist on the classic rice cereal treat, perfect for celebrating St. Patrick’s Day! With a delightful combination of marshmallows and the iconic Lucky Charms cereal, these treats are sure to bring a smile to everyone’s face.
Prep Time: 10 minutes
Total Time: 10 minutes
Servings: 12
Ingredients:
- 5 cups Lucky Charms cereal
- 3 tablespoons unsalted butter
- 4 cups mini marshmallows
- 1 teaspoon vanilla extract
- 1/2 cup additional Lucky Charms marshmallows (optional, for topping)
Instructions:
Start by greasing a 9×13-inch baking pan with non-stick cooking spray or butter to prevent the treats from sticking. In a large saucepan over low heat, melt the butter gently. Once melted, add the mini marshmallows to the saucepan and stir continuously until completely melted and smooth.
Remove the saucepan from the heat, and stir in the vanilla extract. Next, add the Lucky Charms cereal to the melted marshmallow mixture, and carefully fold the cereal in until it is evenly coated. Be gentle to avoid crushing the cereal too much.
Once well combined, transfer the mixture to the prepared baking pan. Use a spatula or your hands (moistened with a little butter) to press the mixture firmly and evenly into the pan. If desired, sprinkle the additional Lucky Charms marshmallows on top, pressing them down slightly to adhere.
Allow the treats to cool at room temperature for about 30 minutes before cutting them into squares and serving.
Extra Tips:
- For an extra touch, you can drizzle melted chocolate over the top before adding the extra marshmallows.
- To help keep your hands from sticking while pressing the treats, lightly grease them with butter.
- Store any leftovers in an airtight container to maintain freshness.
Nutrition Facts:
- Calories: 140 per serving
- Total Fat: 4g
- Saturated Fat: 2.5g
- Cholesterol: 10mg
- Sodium: 90mg
- Total Carbohydrates: 25g
- Dietary Fiber: 0g
- Sugars: 10g
- Protein: 1g
5 St. Paddy’s Day Cookie Decorating Kits

Get ready to celebrate St. Patrick’s Day with these fun and vibrant cookie decorating kits! Perfect for parties or family gatherings, these kits include everything you need to create festive cookies. Kids and adults alike will have a blast decorating and enjoying these tasty treats.
Prep Time: 30 minutes
Additional Time: 1 hour
Total Time: 1 hour 30 minutes
Servings: 12 cookie kits
Ingredients:
- 2 cups all-purpose flour
- 1 tsp baking powder
- 1 tsp baking soda
- ½ tsp salt
- ½ cup unsalted butter, softened
- 1 cup granulated sugar
- 1 egg
- 1 tsp vanilla extract
- ½ tsp almond extract
- Green, gold, and white icing (store-bought or homemade)
- Sprinkles: shamrocks, gold coins, and other festive designs
- Cookie cutters (shamrock, pot of gold, etc.)
- Piping bags (optional)
Instructions:
First, in a mixing bowl, combine the flour, baking powder, baking soda, and salt. Whisk these dry ingredients together until thoroughly mixed.
Next, in a separate bowl, cream together the butter and granulated sugar until light and fluffy. This should take about 2-3 minutes. Then add the egg, vanilla extract, and almond extract, mixing until well combined.
Gradually add the dry ingredients to the wet mix. Stir until a cohesive dough forms. If the dough feels too sticky, you can add a little more flour.
Once your dough is ready, divide it into two balls and flatten each into a disk. Wrap in plastic wrap and refrigerate for about 30 minutes to let it firm up.
While the dough chills, preheat your oven to 350°F (175°C). Once chilled, roll out the dough on a floured surface to about ¼ inch thick. Using your cookie cutters, cut out shapes and place them on parchment-lined baking sheets.
Bake in the preheated oven for 8-10 minutes, or until the edges are lightly golden. Remove from the oven and let the cookies cool completely on wire racks.
Now it’s time to pack your decorating kits! Place a few cookies, piping bags filled with different colored icing, and sprinkles in each kit. You can also include instructions for decorating on a cute card.
Extra Tips:
- Use gel food coloring for icing to achieve vibrant colors without thinning the icing too much.
- Allow the cookies to cool completely before decorating to prevent the icing from melting.
- Package additional decorations like edible glitter or chocolate coins for an extra fun touch!
Nutrition Facts:
- Calories: 150 per cookie
- Total Fat: 7g
- Saturated Fat: 4g
- Cholesterol: 20mg
- Sodium: 95mg
- Total Carbohydrates: 20g
- Dietary Fiber: 0g
- Sugars: 8g
- Protein: 1g
6 Mint Chocolate Chip Rice Krispie Treats
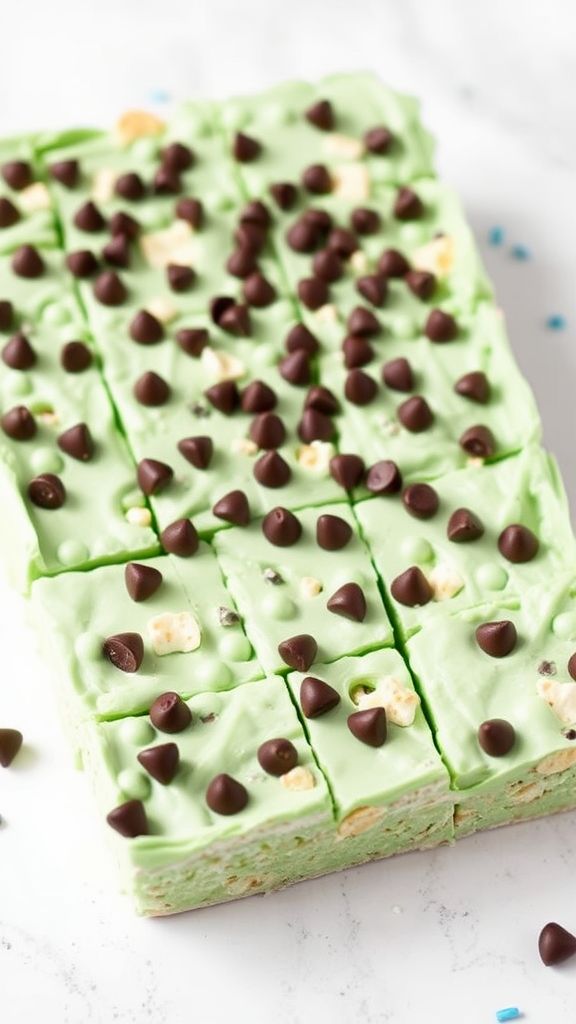
These Mint Chocolate Chip Rice Krispie Treats are a delightful twist on the classic recipe, perfect for celebrating St. Patrick’s Day or satisfying your sweet tooth. With a refreshing hint of mint and a splash of chocolatey goodness, these treats are sure to impress family and friends. Let’s get started!
Prep Time: 10 minutes
Additional Time: 30 minutes
Total Time: 40 minutes
Servings: 12
Ingredients:
- 3 tablespoons butter
- 1 package (10 oz) mini marshmallows
- 1/2 teaspoon peppermint extract
- 5 cups Rice Krispies cereal
- 1 cup semi-sweet chocolate chips
- 1/4 cup green food coloring (optional)
- Extra chocolate chips for topping (optional)
Instructions:
Start by melting the butter in a large saucepan over low heat. Once it’s melted, add in the mini marshmallows, stirring constantly until fully melted and smooth.
Next, remove the saucepan from the heat and mix in the peppermint extract and green food coloring if using. Stir until well combined.
Gradually add the Rice Krispies cereal into the mixture, using a spatula to fold the cereal in until everything is evenly coated. Then, fold in the chocolate chips gently.
Once everything is mixed thoroughly, pour the mixture into a greased 9×13 inch baking dish. Press down firmly with your hands or a spatula to make an even layer. For extra chocolatey goodness, sprinkle a few more chocolate chips on top and press them in.
Allow the treats to cool at room temperature for about 30 minutes. Once set, cut into squares and serve.
Extra Tips:
- For a more festive look, use colorful sprinkles on top of the treats before they set.
- Store leftovers in an airtight container to keep them fresh for up to a week.
- Feel free to substitute with white chocolate chips for a different flavor twist.
Nutrition Facts:
- Calories: 180 per serving
- Total Fat: 7g
- Saturated Fat: 4g
- Cholesterol: 15mg
- Sodium: 50mg
- Total Carbohydrates: 27g
- Dietary Fiber: 0g
- Sugars: 12g
- Protein: 1g
7 Rainbow Jello Cups
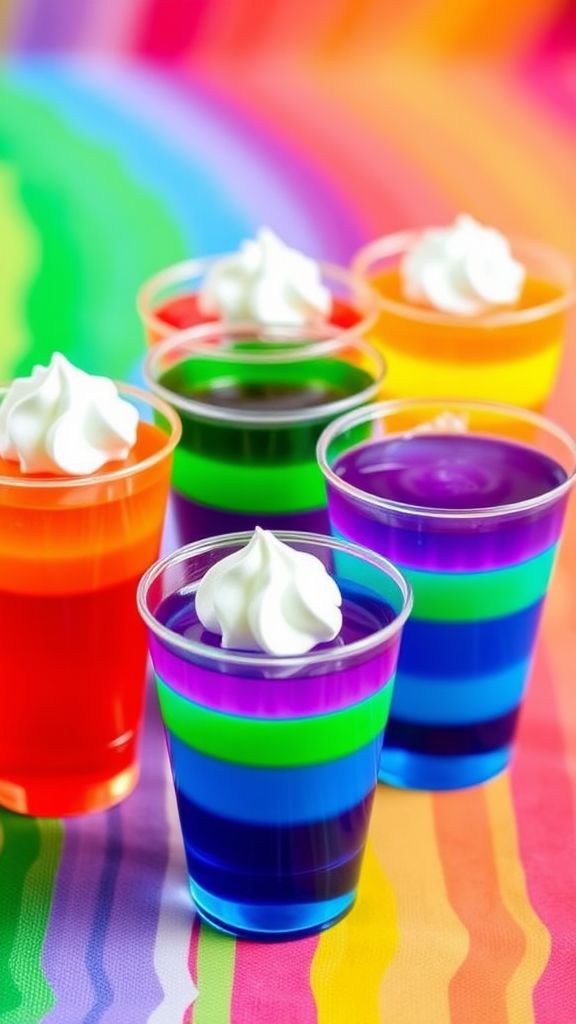
Create a burst of color and fun with these delightful Rainbow Jello Cups! Perfect for parties, St. Patrick’s Day celebrations, or simply as a colorful treat, these layered jello cups are sure to bring a smile to everyone’s face. With vibrant layers of fruity flavors, they are as tasty as they are visually appealing.
Prep Time: 20 minutes
Additional Time: 4 hours (for setting)
Total Time: 4 hours 20 minutes
Servings: 8 cups
Ingredients:
- 1 cup boiling water
- 1 cup cold water
- 1 box (3 oz) of strawberry jello
- 1 box (3 oz) of orange jello
- 1 box (3 oz) of lemon jello
- 1 box (3 oz) of lime jello
- 1 box (3 oz) of blue raspberry jello
- 1 box (3 oz) of grape jello
- 1 cup whipped cream (optional, for topping)
- Clear plastic cups for serving
Instructions:
Start by dissolving the strawberry jello. In a mixing bowl, combine 1 cup of boiling water with 1 box (3 oz) of strawberry jello. Stir until fully dissolved. Then, add 1 cup of cold water and mix well.
Pour the strawberry mixture evenly into the bottom of the clear plastic cups, filling each cup about 1/4 full. Place the cups in the refrigerator for about 30 minutes to set.
After the strawberry layer is set, repeat the process for the orange jello. Dissolve the orange jello in the same way, stirring it into 1 cup of boiling water, followed by 1 cup of cold water. Gently pour the orange layer over the set strawberry layer in each cup. Return the cups to the refrigerator and allow them to set for another 30 minutes.
Continue this method for each color in the order of lemon, lime, blue raspberry, and finally, grape, allowing each layer to set for 30 minutes before adding the next layer.
Once all the layers are prepared and fully set, top each jello cup with a dollop of whipped cream if desired. Serve immediately or refrigerate until serving.
Extra Tips:
- For best results, always pour new layers slowly to avoid disturbing the set layers.
- Use different flavored jello to create your own color combinations!
- To make the jello cups extra festive, add a small piece of gold foil or a chocolate coin on top as a nod to the pot of gold at the end of the rainbow.
Nutrition Facts:
- Serving Size: 1 cup
- Calories: 80 kcal
- Total Fat: 0g
- Sodium: 50mg
- Total Carbohydrates: 20g
- Sugars: 15g
- Protein: 0g
8 Chocolate-Covered Pretzel Coins
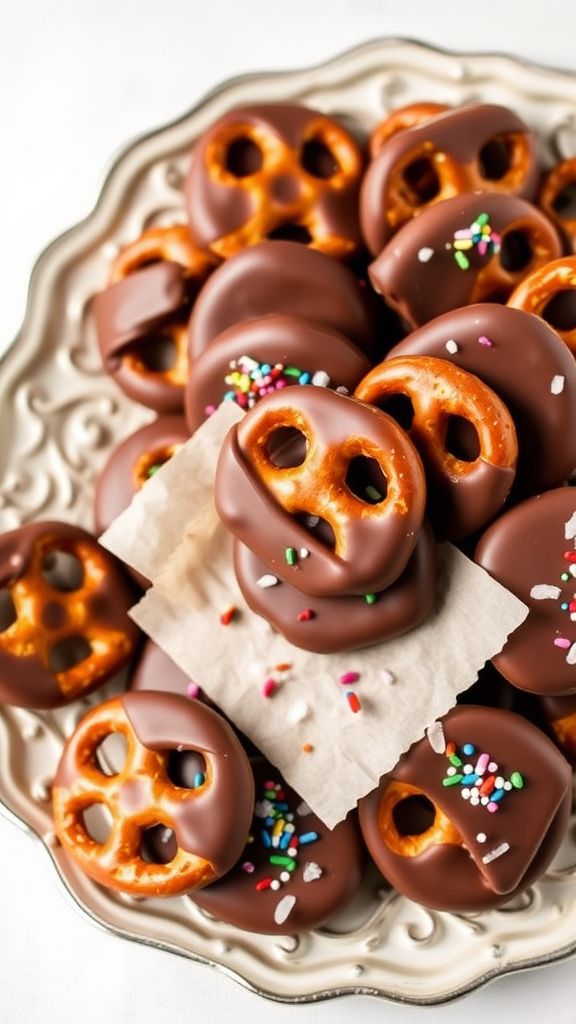
Chocolate-Covered Pretzel Coins are the perfect sweet and salty treat, ideal for any festive occasion. The crunchy pretzels combined with smooth chocolate create a delightful snack that is both easy to prepare and utterly irresistible. Get ready to impress your friends and family with these delicious treats!
Prep Time: 15 minutes
Total Time: 15 minutes
Servings: 20
Ingredients:
- 1 cup pretzel coins
- 1 cup semi-sweet chocolate chips
- 1 tablespoon coconut oil (optional, for smoother chocolate)
- Sprinkles or sea salt for topping (optional)
Instructions:
Start by gathering all your ingredients and setting up your workspace. Line a baking sheet with parchment paper to keep the pretzel coins from sticking.
In a microwave-safe bowl, combine the chocolate chips and coconut oil if using. Microwave in 30-second intervals, stirring between each interval, until the chocolate is smooth and fully melted.
Once your chocolate is melted, dip each pretzel coin into the warm chocolate, ensuring it’s completely coated. Use a fork to lift the pretzel out and let any excess chocolate drip off.
Place the chocolate-covered pretzel coins on the prepared baking sheet. If desired, sprinkle some sprinkles or sea salt on top before the chocolate sets.
After decorating, let the pretzel coins sit at room temperature for about 10-15 minutes until the chocolate has completely hardened. Alternatively, you can place them in the refrigerator for quicker setting.
Once set, your delicious Chocolate-Covered Pretzel Coins are ready to serve! Enjoy them as a festive treat or pack them for a fun snack.
Extra Tips:
- For added flavor, consider using white chocolate or milk chocolate instead of semi-sweet.
- Try adding different toppings like crushed nuts or toffee bits for a unique twist.
- Store leftovers in an airtight container at room temperature for up to a week.
Nutrition Facts:
- Calories: 80 per coin
- Total Fat: 4g
- Saturated Fat: 2g
- Cholesterol: 0mg
- Sodium: 40mg
- Total Carbohydrates: 10g
- Dietary Fiber: 0g
- Sugars: 6g
- Protein: 1g
9 Green Pancake Stacks with Whipped Cream
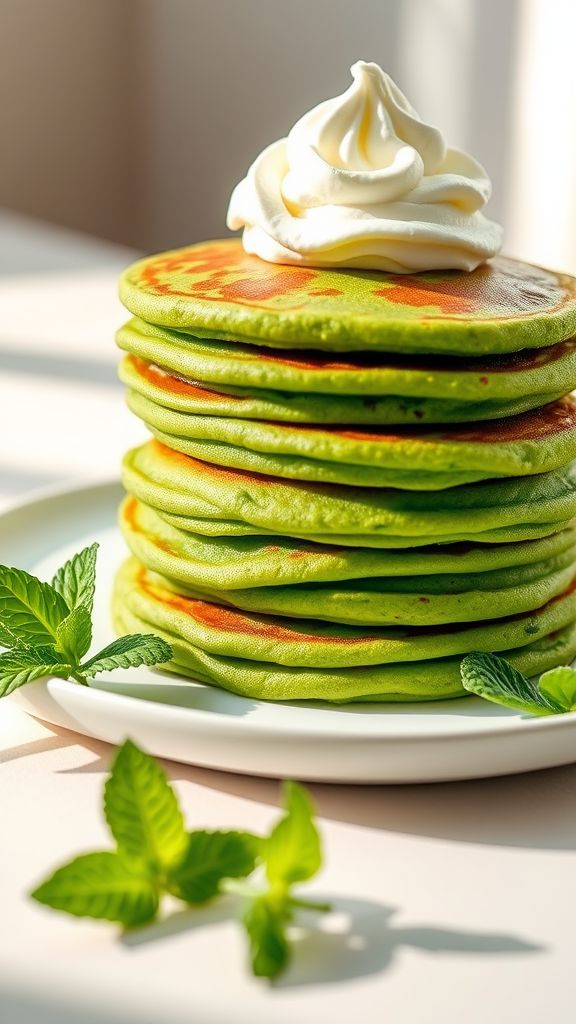
Brighten up your breakfast with these delightful Green Pancake Stacks with Whipped Cream! Perfect for St. Patrick’s Day, these vibrant pancakes are not only festive but also deliciously fluffy and fun. Serve them stacked high and drizzled with whipped cream for a treat that everyone will love.
Prep Time: 15 minutes
Cook Time: 20 minutes
Total Time: 35 minutes
Servings: 4
Ingredients:
- 1 cup all-purpose flour
- 1 tbsp baking powder
- 1/2 tsp salt
- 1 tbsp sugar
- 1 cup milk
- 1 large egg
- 2 tbsp melted butter
- 1/2 cup spinach (fresh or frozen, blended until smooth)
- 1 tsp vanilla extract
- Whipped cream for topping
- Green food coloring (optional)
Instructions:
In a large mixing bowl, combine all-purpose flour, baking powder, salt, and sugar. Whisk these dry ingredients together until evenly combined.
In a separate bowl, mix the milk, egg, and melted butter. Add the blended spinach and vanilla extract. If you want a more intense green color, add a few drops of green food coloring to the wet mixture.
Pour the wet ingredients into the dry ingredients, stirring until just combined. Be careful not to overmix; it’s okay if there are a few lumps.
Preheat a non-stick skillet or griddle over medium heat. Once hot, ladle about 1/4 cup of batter onto the skillet for each pancake. Cook until bubbles form on the surface, about 2-3 minutes, then flip and cook for another 1-2 minutes until golden brown.
Remove the pancakes and keep them warm while you repeat with the remaining batter. Stack the pancakes high on a plate and top with generous dollops of whipped cream.
Extra Tips:
- For added flavor, try mixing in a teaspoon of cinnamon or a splash of almond extract to the batter.
- Decorate your pancakes with fresh fruit or a dusting of powdered sugar for an extra festive touch.
- If you want to keep the pancakes green longer, serve immediately after cooking to prevent them from cooling and losing color.
Nutrition Facts:
- Calories: 210 per serving
- Protein: 6g
- Carbohydrates: 30g
- Fat: 8g
- Sugar: 2g
10 Leprechaun Hat Brownies
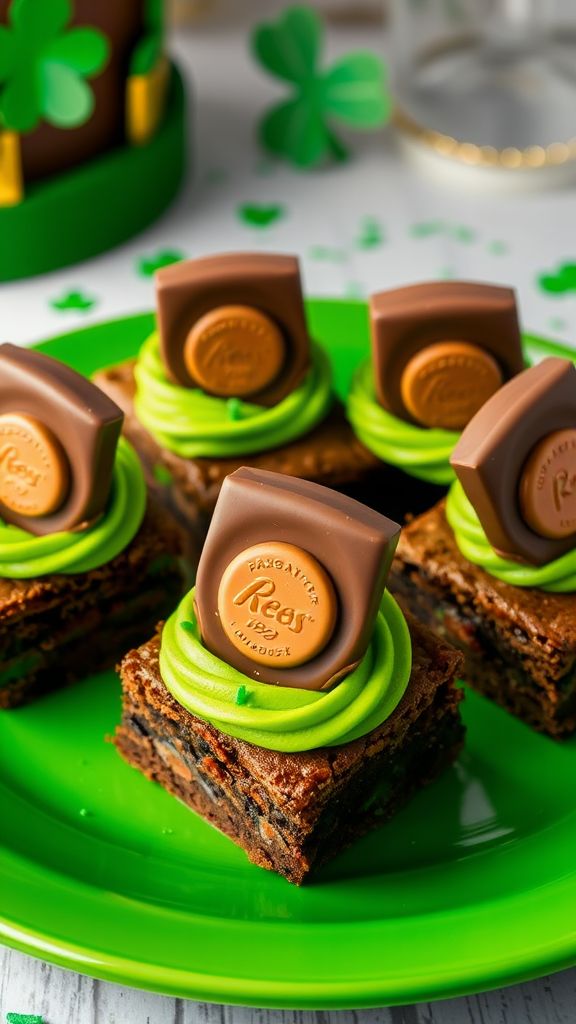
Leprechaun Hat Brownies are the perfect festive treat to celebrate St. Patrick’s Day! These delightful brownies are not only delicious but also visually stunning, resembling the iconic hats of leprechauns. With a few simple ingredients and steps, you can create a unique dessert that will impress friends and family.
Prep Time: 20 minutes
Cook Time: 30 minutes
Additional Time: 30 minutes
Total Time: 1 hour 20 minutes
Servings: 12
Ingredients:
- 1 box brownie mix (plus ingredients needed to prepare according to package)
- 12 Reese’s Peanut Butter Cups (mini size)
- 1 cup green frosting
- 12 chocolate coins (for decoration)
- 1 cup green sprinkles
Instructions:
Begin by preheating your oven according to the instructions on the brownie mix box. Prepare the brownie mix as directed, then pour it into a greased 9×9 inch baking pan. Bake the brownies until they are set and a toothpick inserted in the center comes out clean.
Once baked, remove the brownies from the oven and allow them to cool in the pan for about 15 minutes. After they have cooled slightly, transfer them to a wire rack to cool completely. This will make it easier to cut and assemble your leprechaun hats.
Next, once the brownies are cool, use a sharp knife to cut them into squares or rectangles, depending on your preference. Now, take the Reese’s Peanut Butter Cups and place them upside down on top of each brownie square.
After placing the peanut butter cups, generously pipe or spread green frosting around the base of each cup to resemble the leprechaun’s hat band. The frosting will not only enhance the appearance but will also help secure the Reese’s in place.
For the final touch, place a chocolate coin on top of each Reese’s cup and finish off by sprinkling green sprinkles around the base of the frosting. This will add extra color and festive flair to your Leprechaun Hat Brownies.
Extra Tips:
- For added texture, consider mixing in nuts or chocolate chips into the brownie batter before baking.
- Use different shades of green frosting for a layered effect on the hat bands.
- Store leftover brownies in an airtight container at room temperature for up to three days.
Nutrition Facts:
- Calories: 240 per serving
- Total Fat: 12g
- Saturated Fat: 5g
- Cholesterol: 30mg
- Sodium: 150mg
- Total Carbohydrates: 32g
- Dietary Fiber: 1g
- Sugars: 20g
- Protein: 4g
11 St. Patrick’s Day Popcorn Mix
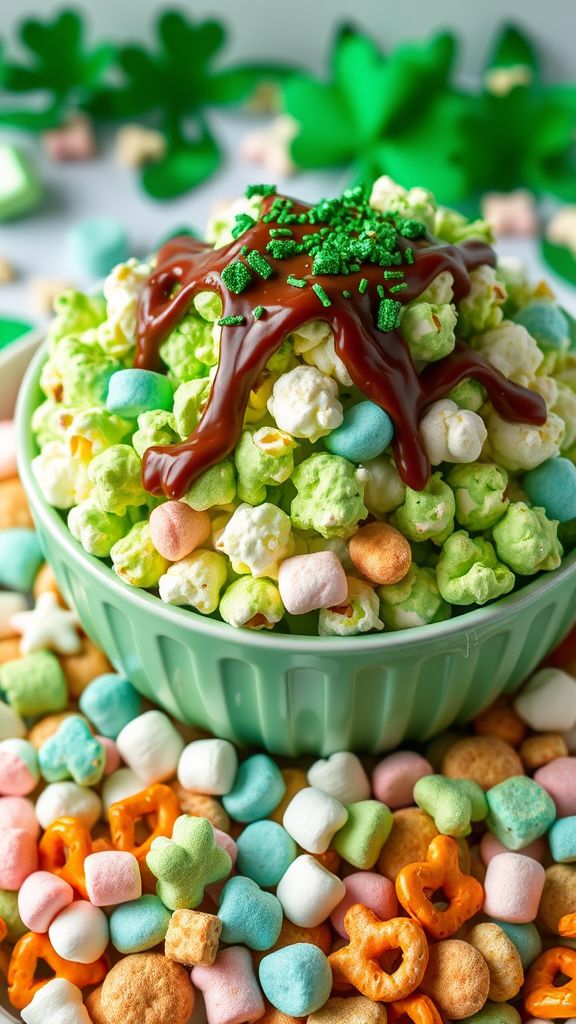
Celebrate St. Patrick’s Day with a delightful and festive popcorn mix that will have everyone feeling lucky! This easy-to-make treat combines popcorn, chocolate, and colorful sprinkles for a sweet snack that’s perfect for parties or cozy movie nights.
Prep Time: 10 minutes
Total Time: 10 minutes
Servings: 6 servings
Ingredients:
- 8 cups popped popcorn (about 1/2 cup unpopped kernels)
- 1 cup green candy melts or white chocolate
- 1/2 cup mini marshmallows
- 1/2 cup shamrock-shaped pretzels
- 1/2 cup lucky charm cereal
- 1/4 cup green sprinkles
Instructions:
Start by popping the popcorn and transferring it to a large mixing bowl. Make sure to remove any unpopped kernels to ensure a delightful munching experience.
In a microwave-safe bowl, melt the green candy melts or white chocolate in 30-second intervals, stirring in between until smooth. This should take about 1-2 minutes.
Drizzle the melted chocolate over the popcorn, stirring gently to coat evenly. The chocolate will provide a delicious sweet base that holds everything together.
Next, add the mini marshmallows, shamrock-shaped pretzels, and lucky charm cereal into the bowl. Toss everything together until it’s well combined. The colorful mix will create an eye-catching snack that’s perfect for the holiday.
Finally, sprinkle the green sprinkles on top for that festive touch. Allow the mixture to cool for a few minutes before serving, and enjoy your St. Patrick’s Day Popcorn Mix!
Extra Tips:
- For a more intense flavor, consider adding a pinch of sea salt to balance the sweetness.
- Swap in your favorite chocolate or candy melts, depending on your preference for flavors.
- Store any leftovers in an airtight container to keep the popcorn crisp for a few days.
Nutrition Facts:
- Calories: 200 per serving
- Total Fat: 8g
- Saturated Fat: 3.5g
- Cholesterol: 0mg
- Sodium: 120mg
- Total Carbohydrates: 31g
- Dietary Fiber: 1g
- Sugars: 15g
- Protein: 2g
12 Irish Soda Bread Mini Loaves
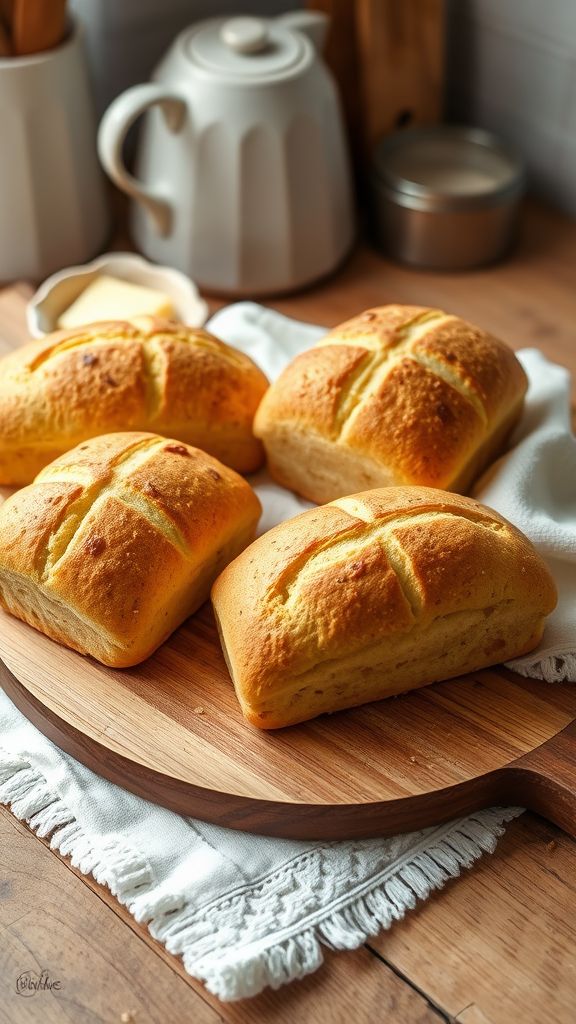
Irish Soda Bread Mini Loaves are a delightful twist on the traditional Irish bread, perfect for your St. Patrick’s Day celebrations or any occasion! These little loaves are easy to make, requiring no yeast and only a handful of simple ingredients. Enjoy them warm with butter, or use them for sandwiches; either way, they are a real treat!
Prep Time: 15 minutes
Cook Time: 30 minutes
Additional Time: 10 minutes
Total Time: 55 minutes
Servings: 4 mini loaves
Ingredients:
- 4 cups all-purpose flour
- 1 teaspoon baking soda
- 1 teaspoon salt
- 1 and 3/4 cups buttermilk
- 1 tablespoon honey (optional)
- 1/2 cup raisins or caraway seeds (optional)
Instructions:
Begin by preheating your oven to 375°F (190°C) and greasing a mini loaf pan or lining it with parchment paper. In a large mixing bowl, combine the flour, baking soda, and salt. Whisk these dry ingredients together until they are well-mixed.
Next, create a well in the center of your dry ingredients and pour in the buttermilk and honey (if using). Stir the mixture with a wooden spoon until it forms a shaggy dough. If you are adding raisins or caraway seeds, fold them in gently at this stage.
Turn the dough onto a floured surface and knead it gently for about 30 seconds. Shape the dough into a rectangle and divide it into four equal pieces to form your mini loaves. Place each piece into the prepared loaf pan.
Using a sharp knife, score a shallow X on the top of each loaf. This helps the bread to cook evenly and gives it that classic soda bread appearance. Bake in the preheated oven for around 30 minutes, or until the tops are golden brown and the loaves sound hollow when tapped.
Once baked, remove the mini loaves from the oven and let them cool in the pan for about 10 minutes before transferring them to a wire rack to cool completely. Slice and serve warm for a delicious treat!
Extra Tips:
- For a richer flavor, try adding 1 tablespoon of butter into the dry ingredients as you mix.
- If you don’t have buttermilk, you can easily make your own by adding 1 tablespoon of lemon juice or vinegar to 1 and 3/4 cups of regular milk and letting it sit for 5-10 minutes.
- To enhance the flavor, consider adding herbs like rosemary or thyme to the dough.
Nutrition Facts:
- Calories: 180 per serving
- Total Fat: 1g
- Sodium: 400mg
- Carbohydrates: 37g
- Fiber: 2g
- Sugar: 0g
- Protein: 5g
13 Funfetti Shamrock Cookies
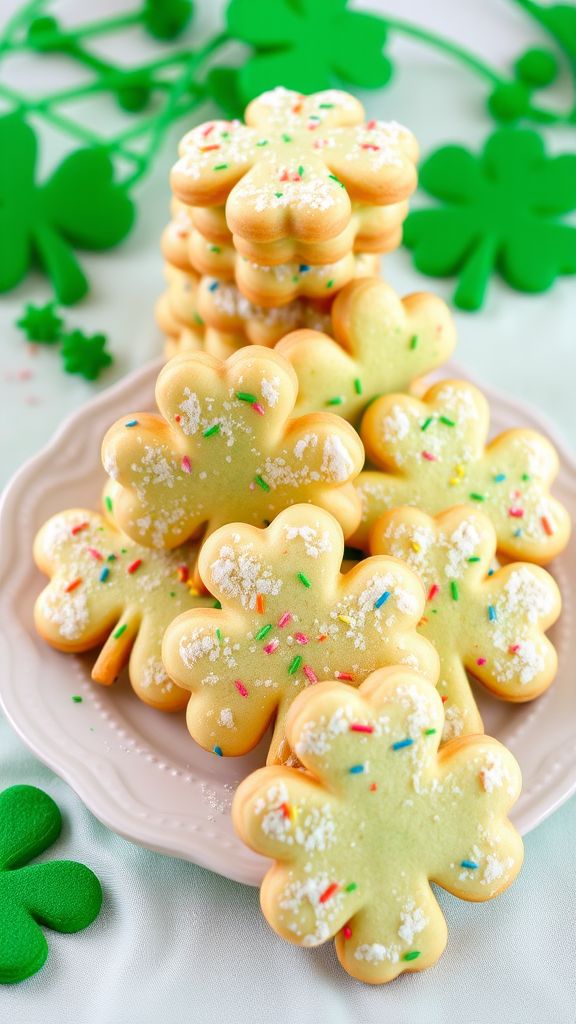
These Funfetti Shamrock Cookies are a delightful and festive treat perfect for St. Patrick’s Day celebrations. With their vibrant colors and fun sprinkles, these cookies are sure to bring a smile to everyone who takes a bite. Plus, they are easy to make and even more enjoyable to eat!
Prep Time: 20 minutes
Cook Time: 10-12 minutes
Additional Time: 30 minutes (for cooling)
Total Time: 1 hour
Servings: 24 cookies
Ingredients:
- 1 cup unsalted butter, softened
- 1 cup granulated sugar
- 1 cup brown sugar, packed
- 2 large eggs
- 2 teaspoons vanilla extract
- 3 cups all-purpose flour
- 1 teaspoon baking soda
- 1/2 teaspoon salt
- 1/2 cup rainbow sprinkles
- green food coloring (optional, for more color)
- Powdered sugar for dusting (optional)
Instructions:
Begin by preheating your oven to 350°F (175°C) and lining a baking sheet with parchment paper. In a large mixing bowl, cream together the unsalted butter, granulated sugar, and brown sugar until the mixture is light and fluffy. This should take about 3-5 minutes with a hand or stand mixer.
Next, add the eggs one at a time, followed by the vanilla extract. Continue mixing until well combined. In a separate bowl, whisk together the all-purpose flour, baking soda, and salt. Gradually mix the dry ingredients into the wet ingredients until the dough comes together nicely. If you want to add a festive touch, mix in a few drops of green food coloring.
Now it’s time to fold in the rainbow sprinkles, ensuring they are evenly distributed throughout the dough. Chill the dough in the refrigerator for about 30 minutes to make it easier to handle. After the dough is chilled, scoop tablespoons of dough and shape them into shamrock forms or simply round balls.
Place the shaped cookies on the prepared baking sheet, making sure to leave enough space between each cookie as they will spread while baking. Bake in the preheated oven for 10-12 minutes, or until the edges turn lightly golden. Once baked, remove the cookies from the oven and allow them to cool on the baking sheet for a few minutes before transferring them to a wire rack.
If desired, dust the cooled cookies with powdered sugar for an elegant finish!
Extra Tips:
- For an extra fun touch, use shamrock-shaped cookie cutters to create fun designs.
- Store your cookies in an airtight container to keep them fresh for several days.
- Mixing different types of sprinkles can give your cookies a unique twist!
Nutrition Facts:
- Serving Size: 1 cookie
- Calories: 150
- Total Fat: 7g
- Saturated Fat: 4g
- Cholesterol: 30mg
- Sodium: 80mg
- Total Carbohydrates: 21g
- Dietary Fiber: 0g
- Sugars: 10g
- Protein: 1g
14 Edible Gold Coin Collectors

Indulge in the festive spirit of St. Patrick’s Day with these delightful Edible Gold Coin Collectors! These delicious treats are perfect for celebrating the occasion and make for a fun craft activity, allowing even the little leprechauns in your life to join in on the magic.
Prep Time: 20 minutes
Additional Time: 30 minutes
Total Time: 50 minutes
Servings: 12 coins
Ingredients:
- 1 cup all-purpose flour
- 1/4 cup unsweetened cocoa powder
- 1/2 cup granulated sugar
- 1/4 cup unsalted butter, softened
- 1/4 cup milk
- 1 tsp vanilla extract
- 1/2 tsp baking powder
- Gold luster dust (for decoration)
- Edible gold foil (for wrapping)
Instructions:
Begin by preheating your oven to 350°F (175°C). In a mixing bowl, combine the flour, cocoa powder, sugar, and baking powder. Mix until they are evenly distributed.
In another bowl, cream together the softened butter, milk, and vanilla extract until smooth. Gradually add the dry ingredients to the wet mixture, stirring until a dough forms.
Once your dough is ready, divide it into small rounds and flatten each one into a coin shape. Lay the coins on a baking sheet lined with parchment paper.
Bake in the preheated oven for 10-12 minutes or until the edges start to become slightly firm. After baking, remove the coins from the oven and let them cool completely on a wire rack.
Once cooled, brush each coin with the gold luster dust to give them that dazzling gold appearance. Finally, wrap each coin in the edible gold foil to complete your Edible Gold Coin Collectors.
Extra Tips:
- Use different shapes or cookie cutters to create various coin designs for a fun presentation.
- Experiment with flavors by adding a sprinkle of mint extract to the dough for a refreshing twist.
- Make a treasure hunt game by hiding these coins around your home or yard; it’s a great way to engage kids in the celebration!
Nutrition Facts:
- Calories: 90 per coin
- Total Fat: 3.5g
- Saturated Fat: 2g
- Cholesterol: 10mg
- Sodium: 20mg
- Total Carbohydrates: 14g
- Dietary Fiber: 0.5g
- Sugars: 5g
- Protein: 1g
15 Clover-Shaped Peanut Butter Sandwiches

These adorable clover-shaped peanut butter sandwiches are the perfect treat for St. Patrick’s Day! Not only are they delicious and easy to make, but they also add a festive touch to any celebration. Gather your ingredients and let’s get started!
Prep Time: 15 minutes
Total Time: 15 minutes
Servings: 6 sandwiches
Ingredients:
- 4 slices of whole wheat bread
- 1/2 cup of creamy peanut butter
- 1/4 cup of honey or jelly (optional)
- Green food coloring (optional for decoration)
- Mini chocolate chips (for decoration, optional)
Instructions:
Begin by using a clover-shaped cookie cutter to cut out shapes from the slices of bread. For each sandwich, you will need three clover shapes.
Next, spread a generous layer of peanut butter on the bottom of one clover shape. If you are using honey or jelly, you can spread a thin layer on top of the peanut butter.
Place another clover shape on top of the peanut butter and gently press down. Repeat this process with the third clover shape to make a sandwich.
If you want to add a pop of color, mix a few drops of green food coloring into some extra peanut butter and spread it on the top clover before adding a few mini chocolate chips for decoration.
Cut the edges of the sandwiches if desired to make the edges smooth. Arrange on a plate and drizzle with extra honey or jelly if you like.
Extra Tips:
- To make the sandwiches more festive, use shimmery gold sprinkles to symbolize good luck.
- Substitute peanut butter with almond or sunflower butter for a nut-free option.
- Consider using cookie cutters in different shapes for variety, or make a layered sandwich with additional fillings.
Nutrition Facts:
- Calories: 260 per sandwich
- Total Fat: 13g
- Saturated Fat: 2g
- Carbohydrates: 30g
- Sugar: 6g
- Protein: 8g