15 Cute Easter Desserts Kids Love
Do you want to make this Easter extra special for your kids? Treating them to adorable desserts is a great way to spread joy and create lasting memories! From Bunny Brownie Bites to Coconut Macaroon Nests, you’ll find delicious ideas that spark their creativity and have them smiling all day long. Let’s dive into these delightful treats that ensure your Easter celebration is one to remember!
Shop Our Must-Haves


1 Bunny Brownie Bites
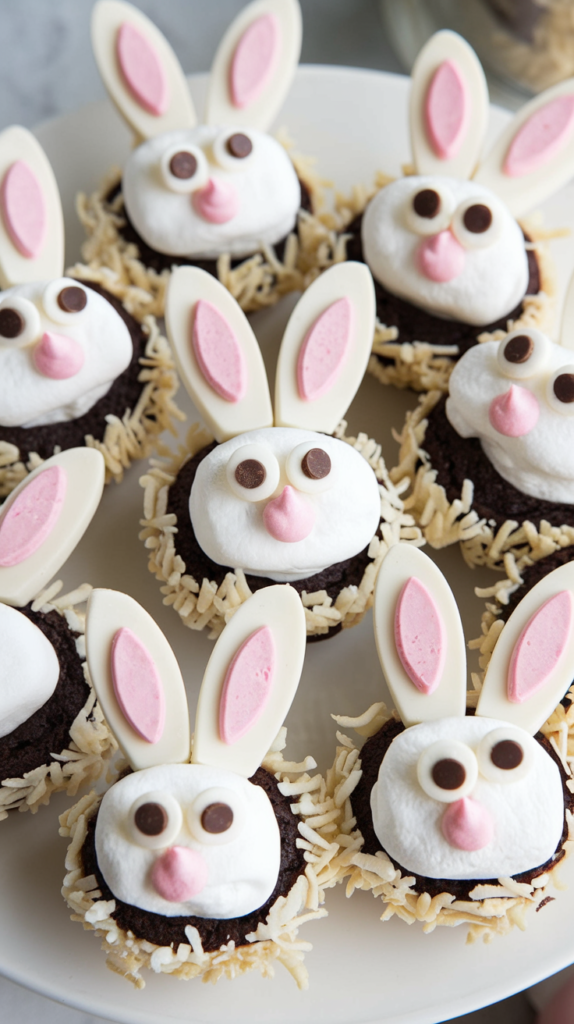
These Bunny Brownie Bites are the perfect treat for Easter! They are fun to make and even more fun to eat. With cute bunny faces, they are sure to be a hit at any gathering!
Prep Time: 20 minutes
Cook Time: 25 minutes
Additional Time: 15 minutes
Total Time: 1 hour
Servings: 24 bites
Ingredients:
- 1 box of brownie mix (plus ingredients on box: eggs, oil, water)
- 24 mini marshmallows
- 24 chocolate chips
- 1 cup of coconut flakes (sweetened or unsweetened)
- 1/2 cup of white chocolate chips
- Pink or red frosting (for decorating)
- Candy eyes (optional, for decoration)
Instructions:
First, preheat your oven to 350°F (175°C). Grease a mini muffin tin to prevent sticking. Then, prepare the brownie mix according to the package instructions by combining the brownie mix with the eggs, oil, and water.
Next, fill each mini muffin cup with the brownie batter until it is about two-thirds full. Bake the brownies for 20-25 minutes or until a toothpick comes out clean. Let them cool in the pan for about 10 minutes, then transfer to a wire rack to cool completely.
Once cooled, use a small knife to make a tiny indentation on the top of each brownie bite. Next, take the white chocolate chips and melt them in a microwave-safe bowl. Dip each brownie into the melted chocolate, covering the top. While the chocolate is still warm, press a mini marshmallow in the center of each brownie bite.
Now it’s time to create the bunny faces! Use the pink or red frosting to pipe on a nose and whiskers on each bunny. Add two chocolate chips on top as eyes, and if you have candy eyes, stick them on for extra cuteness!
Finally, to finish the bunny look, roll the edges of each brownie bite in coconut flakes to resemble fur. Let them set for about 15 minutes before serving.
Tips:
- For added flavor, consider mixing in nuts or chocolate chips to the brownie batter.
- You can customize the bunny faces with different colored frosting for a fun twist!
- Store any leftovers in an airtight container at room temperature for up to three days.
Nutrition Facts:
- Calories: 120 per brownie bite
- Total Fat: 5g
- Saturated Fat: 2.5g
- Cholesterol: 25mg
- Sodium: 90mg
- Total Carbohydrates: 17g
- Dietary Fiber: 0.5g
- Sugars: 8g
- Protein: 1g
2 Chick Cupcake Pops
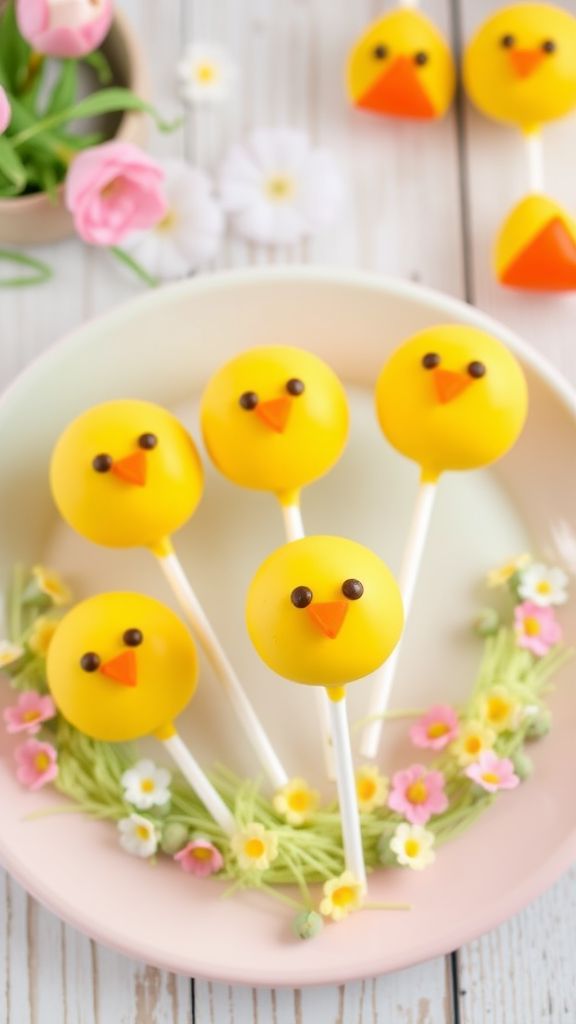
These adorable Chick Cupcake Pops are perfect for spring celebrations and will surely bring a smile to everyone who sees them! With a delightful blend of flavors and a fun design, these treats are a fun activity for kids and adults alike.
Prep Time: 30 minutes
Additional Time: 1 hour
Total Time: 1 hour 30 minutes
Servings: 12 cupcake pops
Ingredients:
- 1 box vanilla cake mix
- 1 cup water
- 1/3 cup vegetable oil
- 3 large eggs
- 1/2 cup butter, softened
- 2 cups powdered sugar
- 2-3 tablespoons milk
- 1 teaspoon vanilla extract
- Yellow candy coating melts (or yellow chocolate)
- Mini chocolate chips for eyes
- Candy corn for beak
- Lollipop sticks
Instructions:
Begin by preheating your oven to 350°F (175°C). In a large mixing bowl, combine the cake mix, water, vegetable oil, and eggs. Mix until everything is well combined and smooth.
Pour the batter into a cupcake tray lined with cupcake liners and bake for 18-20 minutes, or until a toothpick inserted comes out clean. Once baked, let the cupcakes cool completely.
After the cupcakes are cool, crumble them into a bowl. In a separate bowl, whip together the butter, powdered sugar, milk, and vanilla extract until you have a smooth frosting. Add the frosting to the crumbled cupcakes and mix until it binds together.
Now, take small portions of the mixture and roll them into balls. Place the balls on a parchment-lined baking sheet. Insert a lollipop stick into each ball and freeze for about 30 minutes to firm them up.
While they freeze, melt the yellow candy coating melts in a microwave-safe bowl as per the package instructions. Once melted, dip each cupcake pop into the yellow coating, making sure they are fully covered. Tap off any excess coating.
While the coating is still wet, place mini chocolate chips for eyes and a candy corn for the beak. Allow the coating to set for about 30 minutes. Once set, your Chick Cupcake Pops are ready to serve!
Tips:
- For more vibrant chicks, you can add edible glitter or colored sprinkles on top before the coating sets.
- Use a cake pop stand or a piece of Styrofoam to hold the pops upright while setting.
- Customize your chicks with different colored candy melts for a fun twist!
Nutrition Facts:
- Calories: 180 per pop
- Total Fat: 7g
- Saturated Fat: 4g
- Cholesterol: 30mg
- Sodium: 150mg
- Total Carbohydrates: 29g
- Dietary Fiber: 0g
- Sugars: 15g
- Protein: 2g
3 Carrot Patch Dirt Cups
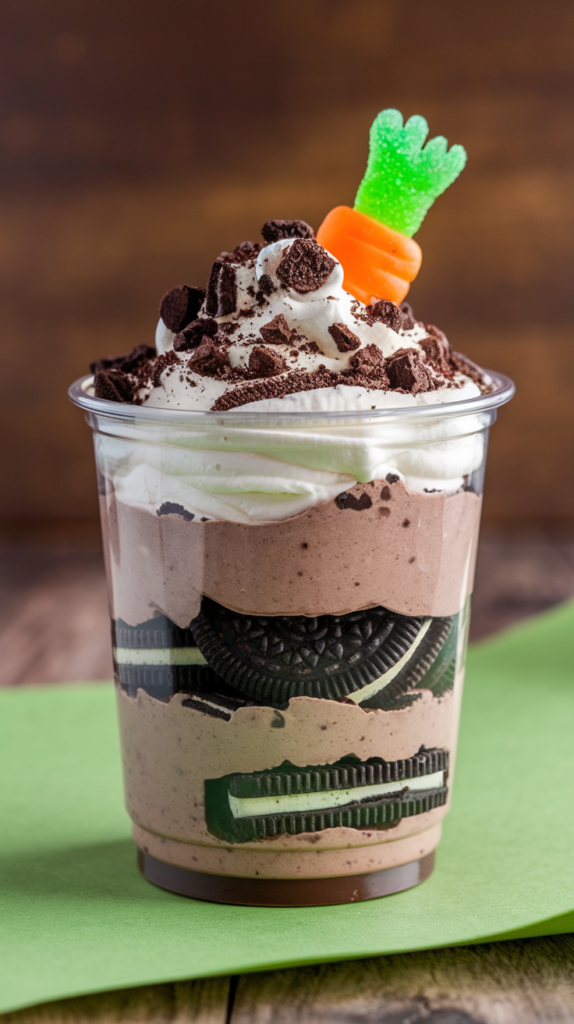
These Carrot Patch Dirt Cups are a fun and tasty dessert perfect for Easter! They look like little gardens filled with chocolate “dirt” and bright orange carrots. Kids will love helping to make and decorate these cute cups.
Prep Time: 20 minutes
Total Time: 20 minutes
Servings: 6
Ingredients:
- 1 package of instant chocolate pudding mix
- 2 ¾ cups of milk
- 1 package of Oreos (about 15 cookies)
- 1 cup of whipped topping
- 2 cups of gummy carrots or candy carrots
- 6 clear plastic cups
Instructions:
Start by making the chocolate pudding. In a bowl, mix the instant chocolate pudding with milk and whisk for about 2 minutes until it’s thick. Let it sit for a few minutes.
Next, take the Oreos and crush them into small pieces. You can put them in a plastic bag and use a rolling pin, or crush them in a food processor. Keep some large pieces for decoration!
Now, layer your dessert in the clear plastic cups. Start with a layer of crushed Oreos at the bottom to create the “dirt”. Add a layer of the chocolate pudding on top of the Oreos.
Follow this with a layer of whipped topping and then another layer of crushed Oreos. Repeat those layers until you reach the top of the cups, ending with crushed Oreos.
Finally, take the gummy carrots and stick them into the top layer of each cup. Make it look like a mini garden!
Tips:
- You can add some gel food coloring to the whipped topping to make it festive!
- For an extra crunch, throw in a handful of chocolate sprinkles on top as decoration.
- If you want to make it healthier, consider adding some real shredded carrots in between layers!
Nutrition Facts:
- Calories: 320 per serving
- Total Fat: 15g
- Saturated Fat: 8g
- Cholesterol: 10mg
- Sodium: 330mg
- Total Carbohydrates: 45g
- Dietary Fiber: 2g
- Sugars: 24g
- Protein: 4g
4 Easter Egg Rice Krispie Treats
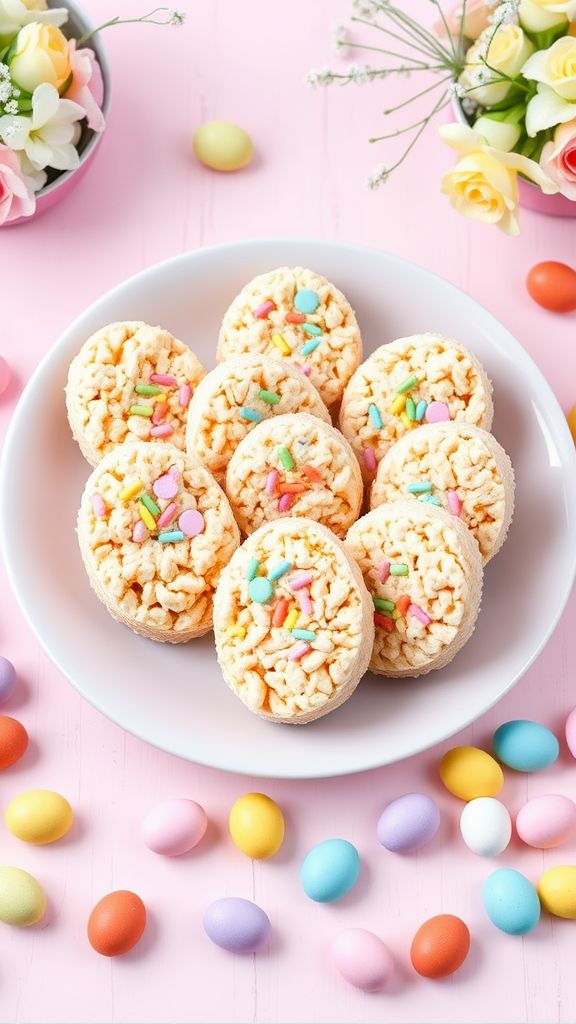
These Easter Egg Rice Krispie Treats are the perfect fun and festive dessert for your Easter celebration! With a delightful combination of crispy rice cereal and colorful candy, these treats will surely bring joy to kids and adults alike.
Prep Time: 15 minutes
Total Time: 15 minutes
Servings: 12
Ingredients:
- 3 tablespoons unsalted butter
- 1 package (10 oz) marshmallows (or 4 cups mini marshmallows)
- 6 cups Rice Krispies cereal
- 1 cup candy-coated chocolate eggs (like M&M’s or chocolate eggs)
- 1/2 cup pastel sprinkles (optional for topping)
- Cooking spray or extra butter for greasing the pan
Instructions:
Start by preparing your workspace. Lightly grease a 9×13-inch baking pan with cooking spray or butter. This will help prevent the treats from sticking to the pan.
In a large saucepan, melt the butter over low heat. Once melted, add the marshmallows and stir them continuously until they are completely melted and smooth. This will take about 2-3 minutes.
Once the marshmallows are melted, remove the saucepan from the heat. Immediately add the Rice Krispies cereal to the melted mixture, stirring until all the cereal is well coated.
Next, fold in the candy-coated chocolate eggs gently so they are evenly distributed. Try not to break them! Make sure to mix everything well.
Pour the mixture into your prepared baking pan. Using a spatula or your hands (lightly greased), press the mixture down firmly and evenly.
If you’d like, sprinkle the pastel sprinkles on top while the mixture is still warm. This gives a fun and colorful look! Allow the treats to cool for at least 30 minutes before cutting into squares or shapes.
Tips:
- For extra fluffiness, use mini marshmallows instead of regular ones.
- You can add a little vanilla extract for extra flavor when melting the marshmallows.
- Try using other candies or chocolate for a fun twist on the recipe!
Nutrition Facts:
- Serving size: 1 treat
- Calories: 120
- Total Fat: 4g
- Saturated Fat: 2.5g
- Cholesterol: 10mg
- Sodium: 90mg
- Total Carbohydrates: 22g
- Dietary Fiber: 0g
- Sugars: 8g
- Protein: 1g
5 Springtime Fruit Tarts
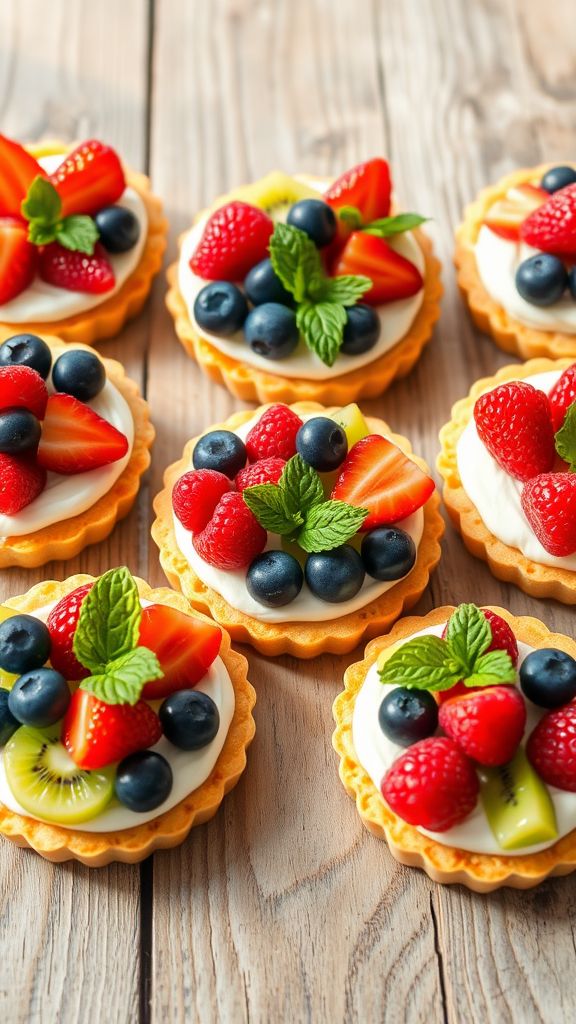
Springtime Fruit Tarts are a delightful treat that brings the flavors of the season to your table. With a crisp crust, creamy filling, and fresh fruits, these tarts are perfect for any spring celebration or just a sunny afternoon. They are easy to make and sure to impress your family and friends!
Prep Time: 30 minutes
Total Time: 30 minutes
Servings: 8 tarts
Ingredients:
- 1 pre-made tart crust (store-bought or homemade)
- 1 cup heavy cream
- 1/2 cup powdered sugar
- 1 teaspoon vanilla extract
- 1 cup assorted fresh fruits (strawberries, blueberries, kiwis, raspberries, etc.)
- 1/4 cup fruit glaze (optional for shine)
- Mint leaves for garnish (optional)
Instructions:
Start by preparing your tart crust. If using a store-bought crust, follow the package instructions for blind-baking. If you made one from scratch, make sure it is completely cool. The crust should be crisp and ready to hold the filling.
In a mixing bowl, pour in the heavy cream. Add the powdered sugar and vanilla extract. Using a hand mixer or whisk, beat the mixture until you achieve soft peaks. This should take about 3 to 5 minutes.
Next, carefully spoon the whipped cream mixture into the cooled tart crust. Spread it evenly with a spatula, making sure to cover the entire surface.
Now it’s time to arrange the assorted fresh fruits on top of the whipped cream filling. Get creative with your designs! You can create patterns or simply pile them on for a colorful look.
If you want to add a bit of shine to your tarts, brush some fruit glaze over the fresh fruits. This step is optional but definitely makes the tarts look extra special.
Finally, if you like, garnish the tarts with mint leaves for an added splash of color and freshness. Cut the tarts into slices and serve immediately, or chill briefly in the refrigerator before serving.
Tips:
- Use seasonal fruits for the best flavor and freshness.
- You can substitute whipped cream with Greek yogurt for a healthier option.
- Feel free to add a splash of lemon or orange zest to the whipped cream for an extra zing.
Nutrition Facts:
- Calories: 250 per serving
- Total Fat: 15g
- Saturated Fat: 10g
- Cholesterol: 50mg
- Sodium: 50mg
- Carbohydrates: 30g
- Fiber: 2g
- Sugar: 18g
- Protein: 2g
6 Jelly Bean Cookie Sandwiches
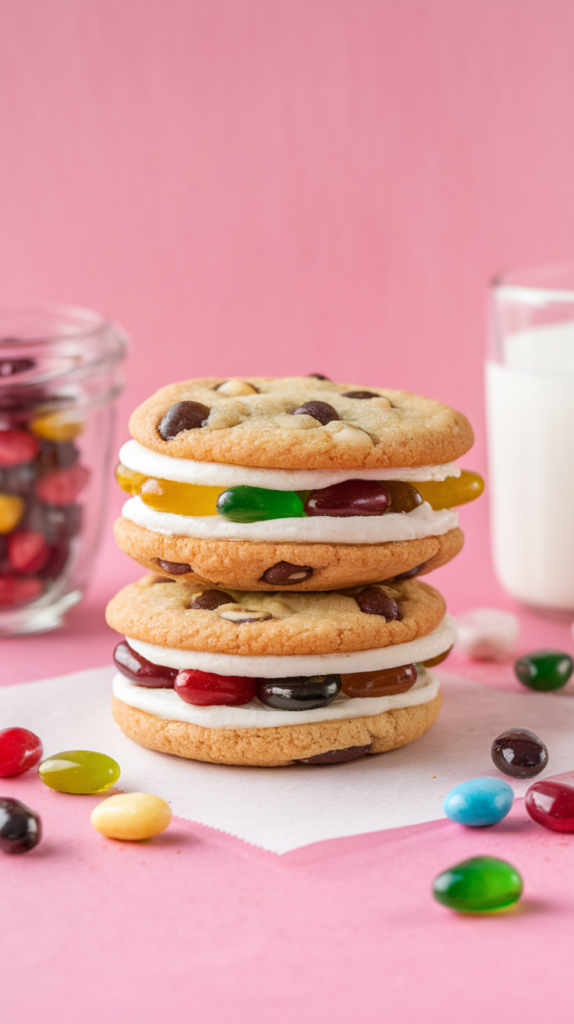
These Jelly Bean Cookie Sandwiches are a fun and colorful treat perfect for any Easter celebration! They combine soft cookies with a gooey filling and vibrant jelly beans to bring a festive touch to your dessert table. Kids and adults alike will love these sweet delights!
Prep Time: 15 minutes
Cook Time: 10 minutes
Additional Time: 20 minutes
Total Time: 45 minutes
Servings: 12 sandwiches
Ingredients:
- 1 cup unsalted butter, softened
- 1 cup granulated sugar
- 1 cup brown sugar, packed
- 2 large eggs
- 1 teaspoon vanilla extract
- 3 cups all-purpose flour
- 1 teaspoon baking soda
- 1/2 teaspoon salt
- 2 cups jelly beans (your favorite colors and flavors)
- 1 cup powdered sugar (for frosting)
- 3 tablespoons milk (for frosting)
Instructions:
Start by preheating your oven to 350°F (175°C). Line two baking sheets with parchment paper.
In a large mixing bowl, cream together the softened butter, granulated sugar, and brown sugar until light and fluffy. This usually takes about 3-4 minutes.
Add the eggs one at a time, mixing well after each addition. Then stir in the vanilla extract.
In another bowl, whisk together the flour, baking soda, and salt. Gradually mix the dry ingredients into the wet ingredients until well blended.
Fold in 1 1/2 cups of jelly beans gently, being careful not to break them.
Spoon tablespoon-sized amounts of dough onto the prepared baking sheets, leaving space between each cookie. Bake for 8-10 minutes, or until the edges are lightly golden.
Once baked, remove the cookies from the oven and let them cool on the baking sheets for about 5 minutes, then transfer them to wire racks to cool completely.
While the cookies cool, make the frosting. In a small bowl, mix together the powdered sugar and milk until smooth. You can add more milk if it’s too thick.
Once the cookies are cool, spread a bit of frosting on the flat side of one cookie, then place another cookie on top to make a sandwich. Press down gently.
For the final touch, decorate the outside of the cookie sandwich with the remaining jelly beans. Enjoy your tasty treats!
Tips:
- You can substitute jelly beans with other candies like M&Ms or Skittles for a different flavor.
- If you want to make them extra special, add sprinkles to the frosting!
- Store any leftover cookie sandwiches in an airtight container to keep them soft and fresh.
Nutrition Facts:
- Calories: 220
- Total Fat: 9g
- Saturated Fat: 5g
- Cholesterol: 30mg
- Sodium: 130mg
- Carbohydrates: 35g
- Dietary Fiber: 0g
- Sugars: 18g
- Protein: 2g
7 Peep S’mores Bars
Make your Easter celebrations even sweeter with these fun and colorful Peep S’mores Bars! They combine the classic flavors of s’mores with the festive charm of marshmallow Peeps, making them a delightful treat for kids and adults alike.
Prep Time: 10 minutes
Cook Time: 15 minutes
Additional Time: 30 minutes
Total Time: 55 minutes
Servings: 12
Ingredients:
- 1 cup of graham cracker crumbs
- 1/2 cup of unsalted butter, melted
- 1/4 cup of granulated sugar
- 1 cup of mini marshmallows
- 1 cup of chocolate chips
- 12 Peeps (any color)
- 1/2 teaspoon of vanilla extract
Instructions:
Start by preheating your oven to 350°F (175°C). Grease a 9×9 inch baking dish with cooking spray or butter. In a medium bowl, mix the graham cracker crumbs, melted butter, and granulated sugar. Stir until everything is combined.
Pour this delicious mixture into the baking dish and press it down firmly to create an even layer. Now, sprinkle mini marshmallows and chocolate chips over the top of the graham cracker crust. This will add a gooey and chocolaty goodness.
Next, place your baking dish in the preheated oven. Bake for about 10-15 minutes, or until the marshmallows are golden and the chocolate has melted. Keep an eye on them so they don’t burn!
Once they’re done baking, remove the dish from the oven and let it cool for about 30 minutes. This cooling time helps everything set. After it’s cooled, gently place the Peeps on top for that festive touch. You can even pop it back in the oven for a minute or two if you want the Peeps to get slightly soft.
Once the bars are fully set and the Peeps are on top, cut them into squares and enjoy your Peep S’mores Bars!
Tips:
- If you prefer a thicker bar, you can use an 8×8 inch baking dish instead.
- Feel free to experiment with different flavors of Peeps for a fun twist.
- Drizzle some chocolate syrup on top before serving for extra sweetness!
Nutrition Facts:
- Calories: 180 per serving
- Total Fat: 7g
- Saturated Fat: 4g
- Cholesterol: 15mg
- Sodium: 50mg
- Total Carbohydrates: 28g
- Dietary Fiber: 1g
- Sugars: 12g
- Protein: 2g
8 Chocolate-Dipped Strawberries with Bunny Ears
Make your Easter celebration extra special with these delightful Chocolate-Dipped Strawberries with Bunny Ears! They are not only delicious but also super cute, making them perfect for kids and adults alike. Follow this simple recipe to create a fun treat that will thrill everyone at the table.
Prep Time: 15 minutes
Additional Time: 30 minutes
Total Time: 45 minutes
Servings: 12
Ingredients:
- 12 fresh strawberries
- 1 cup semi-sweet chocolate chips
- 1 teaspoon coconut oil (optional)
- 12 mini marshmallows
- 12 green candy melts or green frosting (for the ears)
- Black edible marker or melted dark chocolate (for the eyes)
Instructions:
Start by washing the strawberries gently. Pat them dry with a paper towel to ensure they are completely dry. Any moisture can make the chocolate slide off.
Next, melt the chocolate chips in a microwave-safe bowl. Heat them in the microwave in 30-second intervals, stirring in between until the chocolate is smooth. If you want a shiny finish, add 1 teaspoon of coconut oil while melting the chocolate.
Once the chocolate is melted, dip each strawberry into the chocolate, covering it about halfway. Let the excess chocolate drip off, then place the dipped strawberries on a parchment-lined baking sheet.
Now, grab the mini marshmallows. Cut them in half diagonally to create bunny ears and place two halves on the top of each chocolate-dipped strawberry. This adds a fun touch!
For the ear detail, melt the green candy melts according to the package instructions. Dip the pointed ends of the marshmallows into the melted candy, allowing any excess to drip off. Position the candy-covered marshmallows back onto the strawberries.
Next, take your black edible marker or melted dark chocolate and dot it onto the berry to make the eyes. If you have young helpers, they’ll love adding this detail!
Once everything looks cute and ready, place the baking sheet in the fridge for about 30 minutes. This helps the chocolate set firmly.
Your Chocolate-Dipped Strawberries with Bunny Ears are now ready to be served. Enjoy your festive treats!
Tips:
- Use high-quality chocolate for the best flavor and melting experience.
- If you don’t find green candy melts, you can use green frosting instead for easy application.
- Experiment with different toppings like sprinkles or nuts to add more fun to the strawberries!
Nutrition Facts:
- Calories: 80 per serving
- Total Fat: 4g
- Saturated Fat: 2g
- Cholesterol: 0mg
- Sodium: 3mg
- Total Carbohydrates: 10g
- Dietary Fiber: 1g
- Sugars: 7g
- Protein: 1g
9 Marshmallow Fluff Bunny Dip
This Marshmallow Fluff Bunny Dip is a sweet and fluffy treat perfect for Easter celebrations. It’s fun, easy to make, and kids will love dipping their favorite snacks into it. Get ready to hop into the kitchen and whip up this delightful dip!
Prep Time: 10 minutes
Total Time: 10 minutes
Servings: 8
Ingredients:
- 1 cup of Marshmallow Fluff
- 8 oz of cream cheese, softened
- 1/2 cup of powdered sugar
- 1 teaspoon of vanilla extract
- 1/4 cup of mini chocolate chips
- Fresh fruits, graham crackers, or pretzels for dipping
Instructions:
First, take a large mixing bowl and combine the softened cream cheese and Marshmallow Fluff. Use a hand mixer or a spatula to blend them together until the mixture is smooth and creamy.
Next, add in the powdered sugar and vanilla extract. Mix again until everything is well combined, and you achieve a fluffy texture. This will add sweetness and flavor to your dip.
Now, carefully fold in the mini chocolate chips. This will give your Bunny Dip a nice chocolate touch and fun texture.
Once everything is mixed and ready, transfer the dip into a serving bowl. You can create bunny ears using extra chocolate chips or garnish it however you like!
Serve this dip with fresh fruits, graham crackers, or pretzels. Everyone will enjoy scooping and dipping into this sweet delight!
Tips:
- For extra color, consider adding a sprinkle of colorful sprinkles on top.
- Keep leftovers in an airtight container in the fridge for up to three days.
- Feel free to mix in other candies or nuts to personalize your dip.
Nutrition Facts:
- Calories: 150 per serving
- Total Fat: 7g
- Saturated Fat: 4g
- Cholesterol: 30mg
- Sodium: 70mg
- Carbohydrates: 22g
- Dietary Fiber: 0g
- Sugars: 17g
- Protein: 2g
10 Colorful Egg Cake Pops
Egg cake pops are a fun and festive treat that’s perfect for Easter celebrations! These colorful pops are not only delightful to look at but also yummy to eat. With a few simple ingredients, you’ll have an eye-catching dessert that everyone will love.
Prep Time: 30 minutes
Additional Time: 1 hour
Total Time: 1 hour 30 minutes
Servings: 12 pops
Ingredients:
- 1 box of cake mix (any flavor)
- 2 large eggs
- 1 cup of water
- 1/3 cup of vegetable oil
- 1 cup of frosting (any flavor)
- 1 cup of candy melts (various colors)
- 12 lollipop sticks
- Sprinkles (optional for decoration)
Instructions:
Start by preheating your oven according to the instructions on the cake mix box. Prepare a baking pan by greasing it lightly or lining it with parchment paper.
In a large bowl, mix together the cake mix, water, vegetable oil, and eggs. Stir everything until the batter is smooth and well combined. Pour the batter into the prepared baking pan and bake it according to the package instructions. Once done, let the cake cool completely.
After the cake has cooled, crumble it into small pieces using your hands in a big bowl. Add the frosting to the crumbled cake and mix well until it forms a dough-like consistency. You can add small amounts of frosting gradually to get the right texture.
Now, shape the mixture into small egg-shaped balls, about one inch in size. Place the formed pops on a baking sheet lined with parchment paper. Once you’ve made all the pops, insert a lollipop stick into each one.
Next, melt the candy melts according to the package instructions in a microwave or a double boiler. Dip each cake pop into the melted candy, ensuring it’s fully coated. Allow any excess candy to drip off before placing the pops back on the baking sheet.
Finally, while the candy coating is still wet, you can sprinkle some decorative sprinkles on top for extra flair. Let the cake pops sit at room temperature or refrigerate them for about an hour to let the candy coating harden.
Tips:
- Mix and match flavors of cake and frosting for more variety.
- Use white candy melts if you want to tint them with food coloring.
- Store cake pops in the refrigerator for up to a week for freshness.
Nutrition Facts:
- Calories: 150 per pop
- Total Fat: 7g
- Saturated Fat: 3.5g
- Cholesterol: 30mg
- Sodium: 130mg
- Total Carbohydrates: 21g
- Dietary Fiber: 0g
- Sugars: 12g
- Protein: 1g
11 Sweet Carrot Cake Pudding Cups
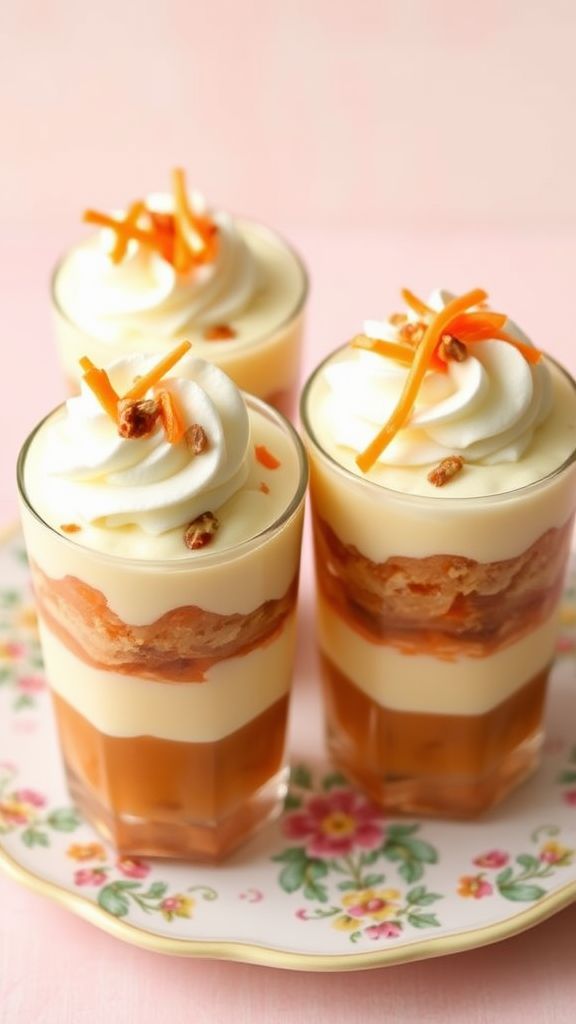
Get ready to enjoy a delightful twist on traditional carrot cake with these Sweet Carrot Cake Pudding Cups! They’re easy to make and perfect for any celebration, especially Easter. These pudding cups are creamy, flavorful, and will definitely impress your friends and family.
Prep Time: 15 minutes
Total Time: 15 minutes
Servings: 4
Ingredients:
- 1 cup vanilla pudding mix
- 2 cups milk
- 1 cup grated carrots
- 1/2 cup crushed pineapple, drained
- 1/2 cup chopped pecans or walnuts
- 1 tsp ground cinnamon
- 1/2 tsp vanilla extract
- 1 cup whipped cream
- Carrot shavings and nuts for garnish
Instructions:
Start by mixing the pudding mix with the milk in a large bowl. Whisk them together until there are no lumps. This step is crucial to get your pudding nice and smooth.
Next, add in the grated carrots, crushed pineapple, chopped pecans or walnuts, ground cinnamon, and vanilla extract. Stir everything well until the ingredients are well combined.
Once your mixture is ready, gently fold in the whipped cream. This will add a light and fluffy texture to the pudding. Be careful not to deflate the cream too much as you mix.
Now, it’s time to assemble your pudding cups! Spoon the carrot cake pudding into small serving cups or bowls. You can layer them or just add a generous scoop into each cup.
Finally, garnish the top of each cup with some carrot shavings and a sprinkle of nuts. This will give your pudding cups a lovely presentation and extra crunch.
Tips:
- For a fun touch, you can add a few chocolate chips or raisins for extra flavor.
- These pudding cups can be made a few hours ahead of time. Just keep them covered in the fridge until you’re ready to serve!
- Feel free to swap out pecans for almonds or any other nut based on your preference.
Nutrition Facts:
- Calories: 250
- Total Fat: 12g
- Saturated Fat: 3g
- Cholesterol: 20mg
- Sodium: 150mg
- Total Carbohydrates: 32g
- Dietary Fiber: 1g
- Sugars: 10g
- Protein: 4g
Enjoy your Sweet Carrot Cake Pudding Cups as a deliciously sweet treat!
12 Coconut Macaroon Nests

These Coconut Macaroon Nests are a delightful treat that brings a festive touch to your Easter celebrations. With their sweet, chewy coconut filling and sweet chocolate drizzle, these nests are perfect for holding colorful candies or chocolate eggs. Kids and adults alike will love these fun and tasty bites.
Prep Time: 15 minutes
Cook Time: 20 minutes
Additional Time: 30 minutes
Total Time: 1 hour 5 minutes
Servings: 12
Ingredients:
- 2 ½ cups unsweetened shredded coconut
- 2 large egg whites
- ½ cup granulated sugar
- 1 teaspoon vanilla extract
- ¼ teaspoon salt
- ½ cup chocolate chips (for drizzling)
- ½ cup mini chocolate eggs or jelly beans (for decoration)
Instructions:
Preheat your oven to 325°F (163°C) and line a baking sheet with parchment paper. This helps prevent the macaroon nests from sticking.
In a mixing bowl, combine 2 ½ cups of unsweetened shredded coconut, 2 large egg whites, ½ cup of granulated sugar, 1 teaspoon of vanilla extract, and ¼ teaspoon of salt. Stir everything together until the coconut is well coated.
Using your hands, shape the coconut mixture into small nests on the prepared baking sheet. Make a small indentation in the center of each nest to hold the treats later.
Bake the nests in the preheated oven for 20 minutes, or until they are golden brown. Once baked, take them out and allow them to cool on the baking sheet for about 10 minutes before transferring them to a wire rack to cool completely.
While the nests are cooling, melt the ½ cup of chocolate chips in the microwave or over a double boiler. If using a microwave, heat them in 30-second intervals, stirring in between until smooth.
Once the nests are cool, drizzle the melted chocolate over each nest. Don’t be shy – the more, the merrier! While the chocolate is still melted, place mini chocolate eggs or jelly beans in the center of each nest for decoration.
Let the chocolate set for about 30 minutes before serving. Now, your delicious Coconut Macaroon Nests are ready to impress!
Tips:
- For a more colorful nest, use pastel-colored chocolate eggs or a mix of candies.
- You can add almond extract instead of vanilla for a different flavor twist.
- Store any leftovers in an airtight container to keep them fresh for up to 3 days.
Nutrition Facts:
- Calories: 150
- Total Fat: 7g
- Saturated Fat: 5g
- Cholesterol: 0mg
- Sodium: 50mg
- Total Carbohydrates: 22g
- Dietary Fiber: 2g
- Sugars: 10g
- Protein: 2g
13 Pink Lemonade Cupcakes with Marshmallow Frosting
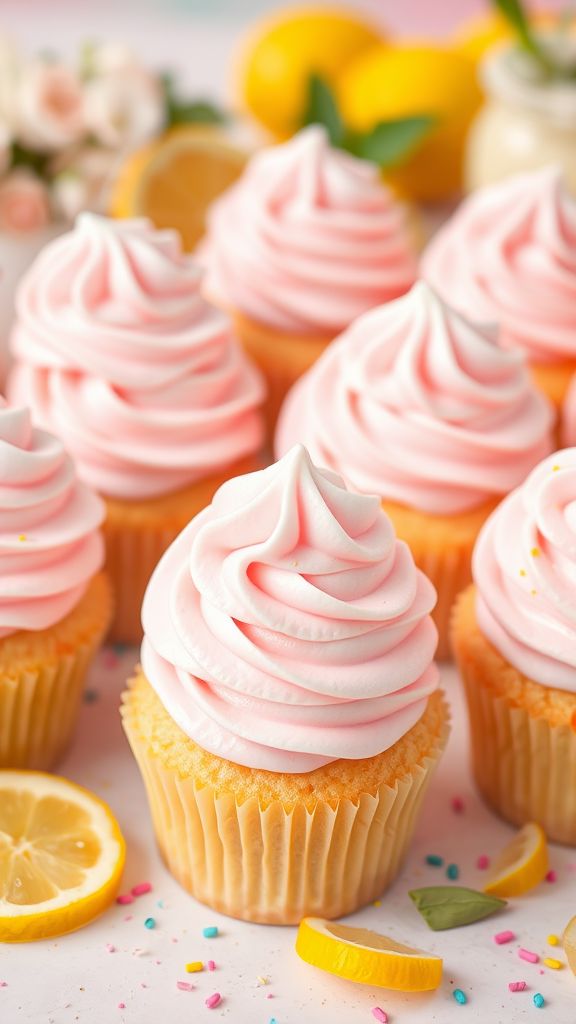
These Pink Lemonade Cupcakes are a delightful treat that will brighten up any occasion. Topped with an airy Marshmallow Frosting, they combine a sweet and tangy flavor that everyone will love. Perfect for spring gatherings or just because!
Prep Time: 20 minutes
Cook Time: 15 minutes
Additional Time: 30 minutes
Total Time: 1 hour 5 minutes
Servings: 12 cupcakes
Ingredients:
- 1 box of lemon cake mix
- 1 cup of lemonade (preferably pink)
- 1/3 cup of vegetable oil
- 3 large eggs
- 1 teaspoon of lemon zest
- 1/4 teaspoon of salt
- 1 cup of mini marshmallows (for frosting)
- 1/4 cup of unsweetened powdered sugar (for frosting)
- 1/4 cup of heavy cream (for frosting)
- 1 teaspoon of vanilla extract (for frosting)
Instructions:
Start by preheating your oven to 350°F (175°C). Line a cupcake pan with cupcake liners to make sure your cupcakes don’t stick.
In a large bowl, mix together the lemon cake mix, lemonade, vegetable oil, eggs, lemon zest, and salt. Stir until the batter is smooth and well combined. It’s okay if there are a few lumps; just don’t overmix!
Pour the batter evenly into the prepared cupcake liners, filling each about two-thirds full. Bake in the preheated oven for about 15 minutes, or until a toothpick inserted into the center of a cupcake comes out clean. Let the cupcakes cool in the pan for a few minutes before transferring them to a wire rack to cool completely.
While the cupcakes are cooling, make the marshmallow frosting. In a mixing bowl, beat the heavy cream with an electric mixer until soft peaks begin to form. Gradually add the powdered sugar and continue beating until stiff peaks form. Gently fold in the mini marshmallows and vanilla extract until combined.
Once the cupcakes are completely cool, spread or pipe the marshmallow frosting on top of each cupcake. You can use a knife or a piping bag to make it pretty!
Tips:
- For extra flavor, add a few drops of pink food coloring to the frosting.
- Try topping the cupcakes with a small slice of lemon or candied lemon peel for decoration.
- Store any leftover cupcakes in an airtight container at room temperature for up to 3 days.
Nutrition Facts:
- Calories: 220
- Total Fat: 8g
- Saturated Fat: 2g
- Cholesterol: 35mg
- Sodium: 250mg
- Total Carbohydrates: 34g
- Dietary Fiber: 0g
- Sugars: 18g
- Protein: 2g
14 Mini Cheesecake Bunny Faces
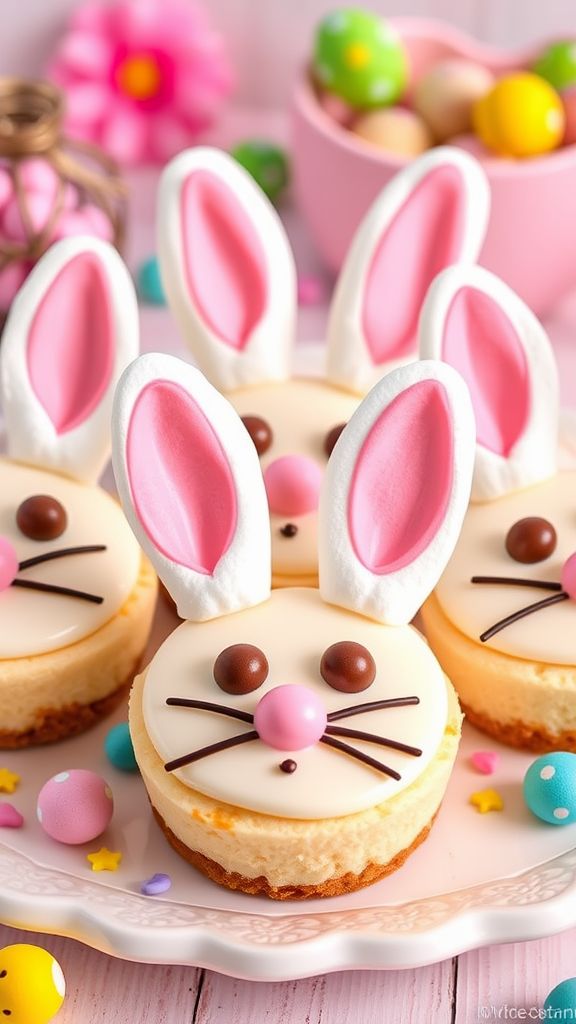
These adorable Mini Cheesecake Bunny Faces are perfect for your Easter celebrations! They are cute, delicious, and fun to make with kids. You’ll love how easy it is to create these little bunny delights!
Prep Time: 20 minutes
Total Time: 2 hours 20 minutes
Servings: 12
Ingredients:
- 1 cup graham cracker crumbs
- 1/4 cup granulated sugar
- 1/2 cup unsalted butter, melted
- 16 oz cream cheese, softened
- 1 cup powdered sugar
- 1 tsp vanilla extract
- 2 cups whipped topping
- Mini chocolate chips for eyes
- Pink candy melts for the nose
- Black decorating gel for whiskers
- Marshmallows for ears
Instructions:
Start by preheating your oven to 325°F (162°C). In a mixing bowl, combine the graham cracker crumbs, granulated sugar, and melted butter. Stir until the mixture is well blended.
Next, press this mixture into the bottom of 12 muffin tins or mini cheesecake pans to form the crust. Make sure to pack it down firmly. Bake for about 10 minutes, then let it cool completely.
While the crust is cooling, prepare the cheesecake filling. In another large bowl, beat the cream cheese with a mixer until it’s smooth. Slowly add in the powdered sugar and vanilla extract, mixing until everything is well combined. Gently fold in the whipped topping until no streaks remain.
Once the crusts have cooled, carefully spoon the cheesecake filling into each cup until they are filled to the top. Use a spatula to smooth the surface. Cover with plastic wrap and place them in the fridge to chill for about 2 hours.
After the chilling time, it’s time to decorate! Take the mini chocolate chips and press them into the cheesecake to make eyes. For the nose, melt the pink candy melts and place a small dot in the center. Use the black decorating gel to draw whiskers. Lastly, cut the marshmallows into bunny ear shapes and place one on each side of the cheesecake for the perfect bunny look!
Tips:
- For an even creamier cheesecake, let the cream cheese sit at room temperature for a bit before mixing.
- Feel free to use colored sprinkles for added fun on your bunny faces!
- You can make these cheesecakes a day ahead; they taste even better after a night in the fridge!
Nutrition Facts:
- Calories: 250 per serving
- Total Fat: 15g
- Saturated Fat: 9g
- Cholesterol: 50mg
- Sodium: 180mg
- Total Carbohydrates: 27g
- Dietary Fiber: 0g
- Sugars: 12g
- Protein: 3g
15 Pastel M&M Cookie Bars
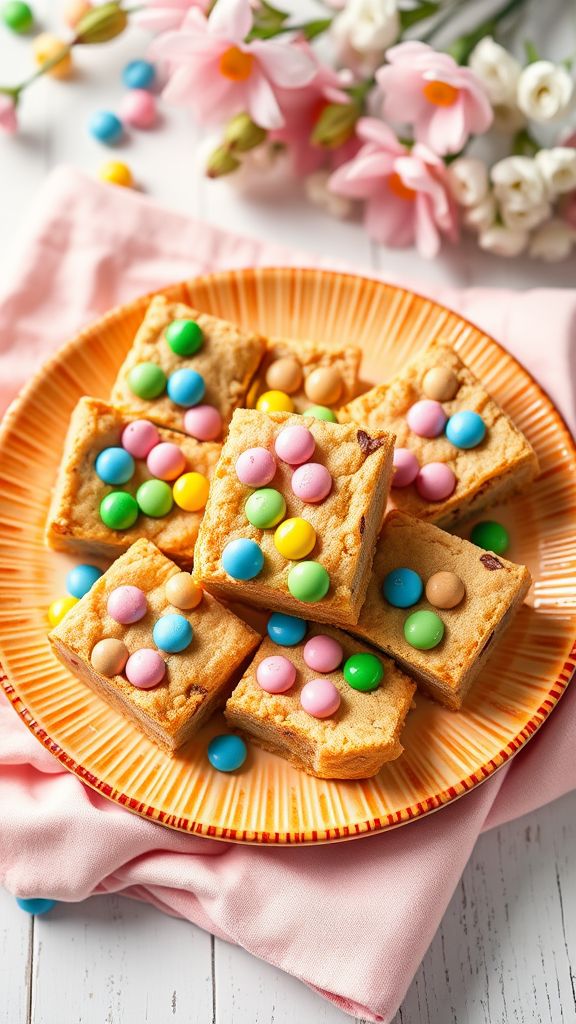
These Pastel M&M Cookie Bars are a delightful treat that’s perfect for adding a pop of color to your Easter celebrations! With their chewy texture and sweet pastel candies, these bars are sure to be a hit with friends and family.
Prep Time: 15 minutes
Cook Time: 25 minutes
Additional Time: 10 minutes
Total Time: 50 minutes
Servings: 16 bars
Ingredients:
- 1 cup unsalted butter, softened
- 1 cup granulated sugar
- 1 cup packed brown sugar
- 2 large eggs
- 2 teaspoons vanilla extract
- 3 cups all-purpose flour
- 1 teaspoon baking soda
- 1/2 teaspoon salt
- 1 cup pastel M&M’s
- 1/2 cup chocolate chips (optional)
Instructions:
Preheat your oven to 350°F (175°C) and grease a 9×13 inch baking pan. You can also line the bottom with parchment paper for easier removal.
In a large mixing bowl, cream together the softened butter, granulated sugar, and brown sugar until smooth. This usually takes about 2-3 minutes.
Next, add the eggs and vanilla extract to the mixture. Beat everything together until it’s well combined.
In a separate bowl, whisk together the flour, baking soda, and salt. Gradually mix this dry mix into the wet ingredients, stirring until just combined.
Fold in the pastel M&M’s and chocolate chips (if using) gently, ensuring they are evenly distributed throughout the dough.
Spread the cookie dough into the prepared baking pan, smoothing it out evenly with a spatula. Bake in the preheated oven for 20-25 minutes or until the edges turn golden and a toothpick inserted in the center comes out clean.
Once done, remove the bars from the oven and let them cool in the pan for about 10 minutes. Then, transfer them to a wire rack to cool completely before cutting them into squares.
Tips:
- For extra flavor, you can sprinkle a pinch of sea salt on top before baking.
- Store leftover cookie bars in an airtight container at room temperature for up to a week.
- Feel free to mix in other colorful candies or nuts for a fun twist!
Nutrition Facts:
- Calories: 200 per bar
- Total Fat: 10g
- Saturated Fat: 6g
- Cholesterol: 35mg
- Sodium: 100mg
- Total Carbohydrates: 29g
- Dietary Fiber: 1g
- Sugars: 15g
- Protein: 2g