30 Easy Easter Dinner Ideas
30 Easy Easter Dinner Ideas can transform your holiday feast into a delightful event! Imagine gathering around the table with family, savoring delicious dishes without the stress of complicated recipes. You deserve simple yet tasty meals that make your Easter celebration one to remember, and this collection will help you do just that!
Shop Our Must-Haves


1 Honey Glazed Ham with Pineapple Salsa
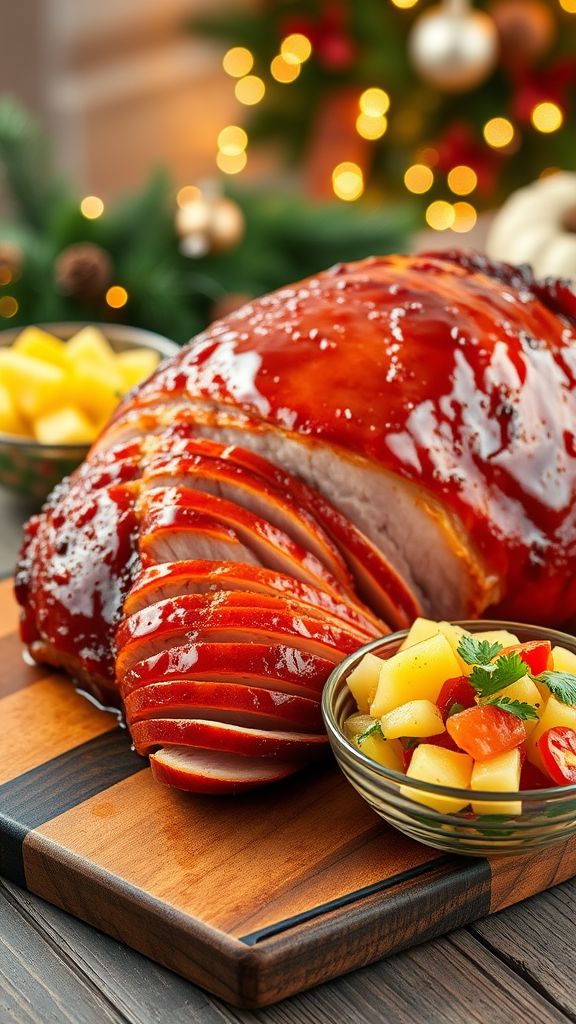
This Honey Glazed Ham with Pineapple Salsa is a delicious and festive dish perfect for any holiday meal. The sweet and tangy glaze pairs perfectly with the fresh and vibrant pineapple salsa, making it a crowd-pleaser. Let’s dive into making this tasty dish!
Prep Time: 20 minutes
Cook Time: 2 hours
Additional Time: 15 minutes
Total Time: 2 hours 35 minutes
Servings: 10
Ingredients:
- 1 fully cooked ham (about 8-10 lbs)
- 1 cup honey
- 1/2 cup brown sugar
- 1/4 cup Dijon mustard
- 1 teaspoon ground cinnamon
- 1/2 teaspoon ground cloves
- 1 cup pineapple, diced
- 1/2 cup red bell pepper, diced
- 1/4 cup red onion, finely chopped
- 1/4 cup fresh cilantro, chopped
- Juice of 1 lime
- Salt and pepper, to taste
Instructions:
First, preheat your oven to 325°F (163°C). While the oven is heating, prepare the glaze. In a medium bowl, mix together the honey, brown sugar, Dijon mustard, cinnamon, and cloves. Stir it well until the sugar is dissolved.
Next, take the fully cooked ham and place it in a roasting pan. Score the surface with shallow cuts in a diamond pattern. This helps the glaze stick better. Brush a generous amount of the glaze over the ham. Reserve some of the glaze for later.
Now, place the ham in the oven and bake for about 1.5 hours. Halfway through, take the ham out and baste it with more of the glaze. This will help create that beautiful sticky layer on the outside.
While the ham is baking, let’s prepare the pineapple salsa. In a large bowl, combine the pineapple, red bell pepper, red onion, cilantro, and the lime juice. Mix it gently, and season it with salt and pepper to taste. Set aside to let the flavors blend.
Once the ham has finished baking, remove it from the oven and let it rest for about 15 minutes. This is important because it allows the juices to settle, making the ham more succulent.
Finally, slice the ham and serve it with the fresh pineapple salsa on the side. Enjoy your delicious honey glazed ham with the tropical touch of pineapple salsa!
Tips:
- For extra flavor, you can add crushed red pepper to the salsa if you like a bit of heat.
- If you don’t have fresh pineapple, canned pineapple works just fine. Drain it well before using.
- Leftovers can be stored in the fridge for up to 4 days, making great sandwiches!
Nutrition Facts:
- Calories: 350 per serving
- Protein: 25g
- Carbohydrates: 45g
- Fat: 10g
- Sodium: 800mg
- Fiber: 1g
2 Lemon Herb Roasted Chicken
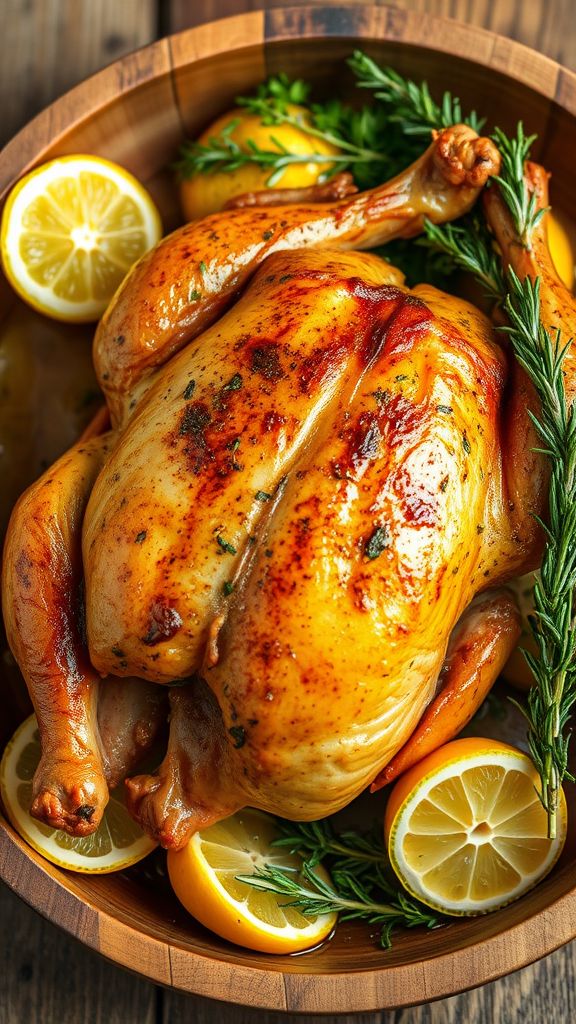
Get ready to impress your family with this mouth-watering Lemon Herb Roasted Chicken! This dish is not only flavorful but also super easy to make. The lemony and herby goodness will fill your kitchen with a wonderful aroma, making it perfect for any dinner.
Prep Time: 15 minutes
Cook Time: 1 hour 15 minutes
Additional Time: 10 minutes
Total Time: 1 hour 40 minutes
Servings: 6
Ingredients:
- 1 whole chicken (about 4-5 pounds)
- 2 lemons, halved
- 4 cloves garlic, minced
- 2 tablespoons olive oil
- 2 teaspoons salt
- 1 teaspoon black pepper
- 1 tablespoon dried thyme (or fresh thyme if available)
- 1 tablespoon dried rosemary (or fresh rosemary if available)
- 1 teaspoon paprika
- Fresh herbs for garnish (optional)
Instructions:
First, preheat your oven to 425°F (220°C). This will help your chicken cook evenly and get that crispy skin we all love.
Next, take the chicken and pat it dry with paper towels. This helps the skin get crispy while cooking. Place the chicken in a roasting pan or a large baking dish.
In a small bowl, mix together the olive oil, garlic, salt, black pepper, thyme, rosemary, and paprika. Rub this mixture all over the chicken, making sure to get it under the skin and inside the cavity for extra flavor.
Now, squeeze the juice from the halved lemons over the chicken and then place the lemon halves inside the cavity. This adds a lovely lemon flavor while the chicken cooks.
Put the chicken in your preheated oven and roast it for about 1 hour and 15 minutes. You can check the internal temperature with a meat thermometer. It should reach 165°F (75°C) in the thickest part of the thigh.
Once done, take the chicken out of the oven and let it rest for about 10 minutes before carving. This helps the juices stay in, making your chicken juicy and tender.
Garnish with fresh herbs if you like, and serve it up with your favorite sides!
Tips:
- Try using fresh herbs for an even better flavor if you can find them.
- For crispy skin, make sure to pat the chicken dry before applying the seasoning.
- You can add vegetables like carrots and potatoes around the chicken while it roasts for a complete meal.
Nutrition Facts:
- Serving Size: 1/6 of chicken
- Calories: 400
- Total Fat: 22g
- Saturated Fat: 5g
- Cholesterol: 120mg
- Sodium: 600mg
- Total Carbohydrates: 2g
- Protein: 44g
3 Spring Vegetable Quiche

Spring Vegetable Quiche is a delightful dish that bursts with fresh flavors. It’s perfect for brunch, lunch, or a light dinner. With a mixture of vibrant vegetables and creamy eggs, this quiche will surely impress your family and friends.
Prep Time: 15 minutes
Cook Time: 35 minutes
Total Time: 50 minutes
Servings: 6
Ingredients:
- 1 pre-made pie crust
- 1 cup fresh spinach, chopped
- 1 cup asparagus, chopped
- 1/2 cup cherry tomatoes, halved
- 1/2 cup bell peppers, diced
- 1 cup shredded cheese (such as cheddar or feta)
- 4 large eggs
- 1 cup milk
- 1/2 teaspoon salt
- 1/2 teaspoon black pepper
- 1/4 teaspoon garlic powder
- 1/4 teaspoon onion powder
Instructions:
First, preheat your oven to 375°F (190°C). This ensures your quiche will bake evenly.
Next, place the pre-made pie crust in a 9-inch pie dish and poke a few holes in the bottom with a fork. This helps prevent the crust from bubbling up while baking.
In a large mixing bowl, beat the eggs and then add the milk, salt, black pepper, garlic powder, and onion powder. Whisk everything together until smooth.
Now, add the chopped spinach, asparagus, cherry tomatoes, and bell peppers to the egg mixture. Stir to combine all the ingredients well.
Pour the vegetable and egg mixture into the prepared pie crust. Make sure it is evenly distributed.
Finally, sprinkle the shredded cheese on top of the quiche. This will melt and create a delicious crust on top while baking.
Place the quiche in the oven and bake for about 35 minutes or until the edges are golden brown and the center is set. You can check if it’s done by inserting a knife in the center; it should come out clean.
Once it’s finished baking, let the quiche cool for about 5 minutes. Then slice it into wedges and serve warm.
Tips:
- You can substitute your favorite vegetables based on what’s in season or what you have on hand.
- For extra flavor, consider adding herbs like thyme or basil to the egg mixture.
- This quiche can be made ahead of time and stored in the refrigerator for up to 3 days.
Nutrition Facts:
- Calories: 250 per serving
- Protein: 12g
- Total Fat: 16g
- Carbohydrates: 18g
- Fiber: 2g
- Sugar: 2g
4 Baked Garlic Parmesan Asparagus
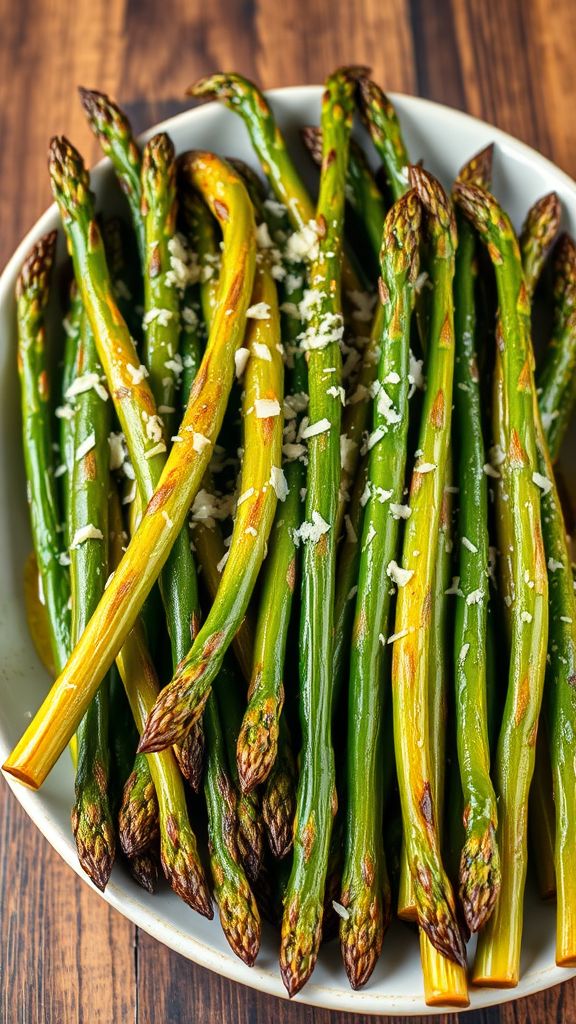
Baked Garlic Parmesan Asparagus is a delicious and easy side dish that will elevate any meal. With its crispy texture and savory flavors, this recipe is perfect for dinner gatherings or holiday meals. Let’s get started!
Prep Time: 10 minutes
Cook Time: 15 minutes
Total Time: 25 minutes
Servings: 4
Ingredients:
- 1 pound fresh asparagus, trimmed
- 2 tablespoons olive oil
- 4 cloves garlic, minced
- 1/2 cup grated Parmesan cheese
- 1/2 teaspoon salt
- 1/4 teaspoon black pepper
- 1/2 teaspoon garlic powder (optional)
- 1 tablespoon lemon juice (for added flavor)
Instructions:
Preheat your oven to 400°F (200°C). This helps ensure that the asparagus cooks evenly and becomes nice and crispy.
In a large bowl, toss the trimmed asparagus with olive oil, minced garlic, salt, black pepper, and garlic powder if you’re using it. Make sure every piece of asparagus gets coated well.
Next, lay the asparagus in a single layer on a baking sheet. It’s important not to crowd them to ensure they roast properly.
Sprinkle the grated Parmesan cheese over the asparagus evenly. This will create a delicious, cheesy crust as it bakes.
Bake in the preheated oven for 15 minutes or until the asparagus is tender and the cheese is golden. You can check by piercing a stalk with a fork; it should be easy to pierce.
Once baked, remove from the oven and drizzle with a little lemon juice for a fresh flavor boost. Serve immediately and enjoy!
Tips:
- For extra crunch, broil the asparagus for the last 2 minutes of cooking time.
- Feel free to add some red pepper flakes for a bit of heat.
- You can substitute Parmesan cheese with other types of cheese like asiago or feta for a different flavor.
Nutrition Facts:
- Calories: 120
- Protein: 6g
- Carbohydrates: 5g
- Fat: 10g
- Sodium: 350mg
- Fiber: 3g
5 Creamy Mushroom Risotto
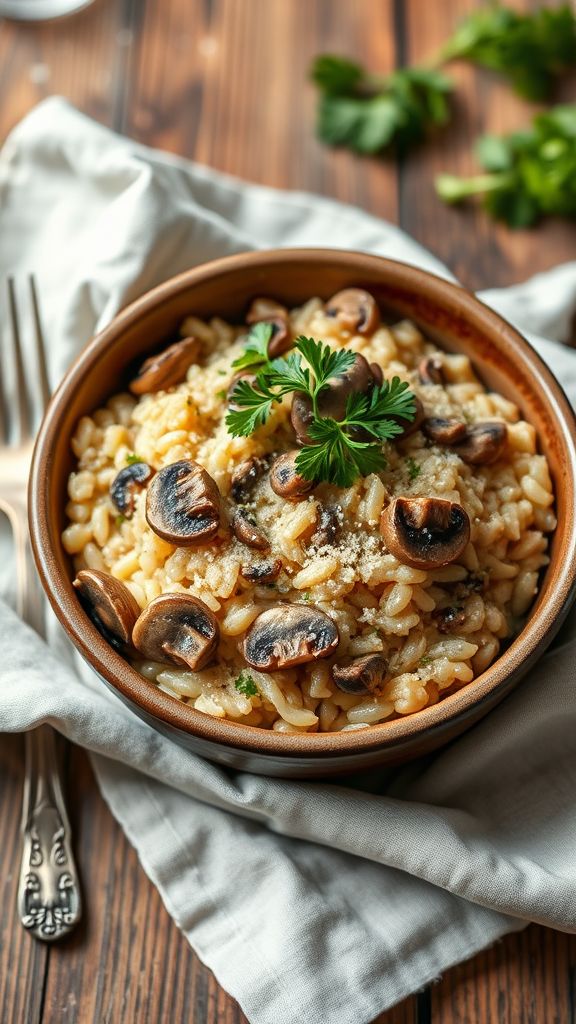
Creamy Mushroom Risotto is a delicious dish that’s perfect for any special occasion, especially Easter dinner. This risotto is rich, creamy, and packed with flavor from fresh mushrooms. It’s not just tasty, but also a fun cooking project that’s sure to impress your family and friends.
Prep Time: 10 minutes
Cook Time: 30 minutes
Total Time: 40 minutes
Servings: 4
Ingredients:
- 1 cup Arborio rice
- 4 cups vegetable or chicken broth
- 1 tablespoon olive oil
- 1 small onion, finely chopped
- 2 cloves garlic, minced
- 8 ounces fresh mushrooms, sliced (such as cremini or button)
- 1/2 cup white wine (optional)
- 1/2 cup grated Parmesan cheese
- 1/2 cup heavy cream
- Salt and pepper to taste
- Fresh parsley for garnish (optional)
Instructions:
Start by bringing the vegetable or chicken broth to a gentle simmer in a medium saucepan. Keep it warm on low heat as you cook the risotto. This helps the rice cook evenly.
In a large skillet, heat the olive oil over medium heat. Add the chopped onion and sauté it for about 2-3 minutes until it becomes translucent. Then, add the garlic and sliced mushrooms to the skillet. Cook for an additional 5-7 minutes until the mushrooms are tender and brown.
Once the mushrooms are cooked, stir in the Arborio rice. Toast the rice in the pan for about 1 minute, stirring constantly. This releases the starches, which will help make the risotto creamy.
Next, pour in the white wine (if using) and let it simmer. Stir the mixture until the wine has mostly evaporated. This adds an extra layer of flavor to your risotto.
Now, it’s time to add the warm broth. Start with one ladleful of broth, stirring constantly until it is absorbed by the rice. Repeat this process, adding broth one ladle at a time and stirring frequently, until the rice is creamy and al dente, about 18-20 minutes.
When the rice is almost done, stir in the heavy cream and Parmesan cheese. Mix well until everything is combined and creamy. Season with salt and pepper to taste. Cook for another 2-3 minutes until everything is heated through.
Finally, remove the skillet from heat. Serve your Creamy Mushroom Risotto hot, garnished with fresh parsley if desired.
Tips:
- Use fresh mushrooms for the best flavor and texture in your risotto.
- Stirring frequently helps to release starches from the rice, creating a creamy consistency.
- For extra flavor, try toasting some pine nuts and sprinkle them on top just before serving.
Nutrition Facts:
- Calories: 450 per serving
- Protein: 12g
- Fat: 18g
- Carbohydrates: 60g
- Fiber: 2g
- Sugar: 2g
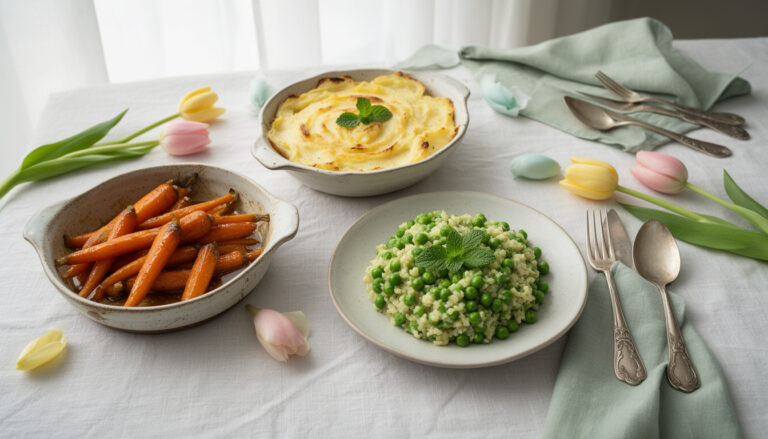
6 Honey Mustard Glazed Carrots

These Honey Mustard Glazed Carrots are a sweet and tangy side dish that adds color and flavor to any meal. With just a few simple ingredients, you can create a delicious treat that everyone will love. Perfect for an Easter dinner, they are sure to impress your guests!
Prep Time: 10 minutes
Cook Time: 20 minutes
Total Time: 30 minutes
Servings: 4
Ingredients:
- 1 pound baby carrots
- 2 tablespoons honey
- 2 tablespoons Dijon mustard
- 1 tablespoon olive oil
- Salt and pepper to taste
- 1 tablespoon chopped fresh parsley (for garnish)
Instructions:
Start by washing the baby carrots under cold water to remove any dirt. If you’re using larger carrots, peel and slice them into sticks about the same size as the baby carrots.
Next, in a mixing bowl, whisk together the honey, Dijon mustard, and olive oil until well combined. This mixture will become your flavorful glaze.
In a large skillet over medium heat, add the washed carrots. Pour the honey mustard mixture over the carrots, and stir to coat them evenly.
Cook the carrots for about 20 minutes, stirring occasionally. You want them to become tender and slightly caramelized but not mushy. Add salt and pepper to taste during the last few minutes of cooking.
Once done, remove the carrots from heat. Transfer them to a serving dish and sprinkle the top with chopped fresh parsley for a pop of color. Serve warm, and enjoy the delicious flavors!
Tips:
- For added flavor, you can sprinkle some garlic powder or onion powder in the glaze mixture.
- If you like a bit of heat, try adding a pinch of cayenne pepper or red pepper flakes.
- This dish can easily be doubled for larger gatherings.
Nutrition Facts:
- Calories: 120 per serving
- Carbohydrates: 26g
- Protein: 1g
- Fat: 3g
- Fiber: 3g
- Sugar: 8g
7 Herb-Crusted Rack of Lamb
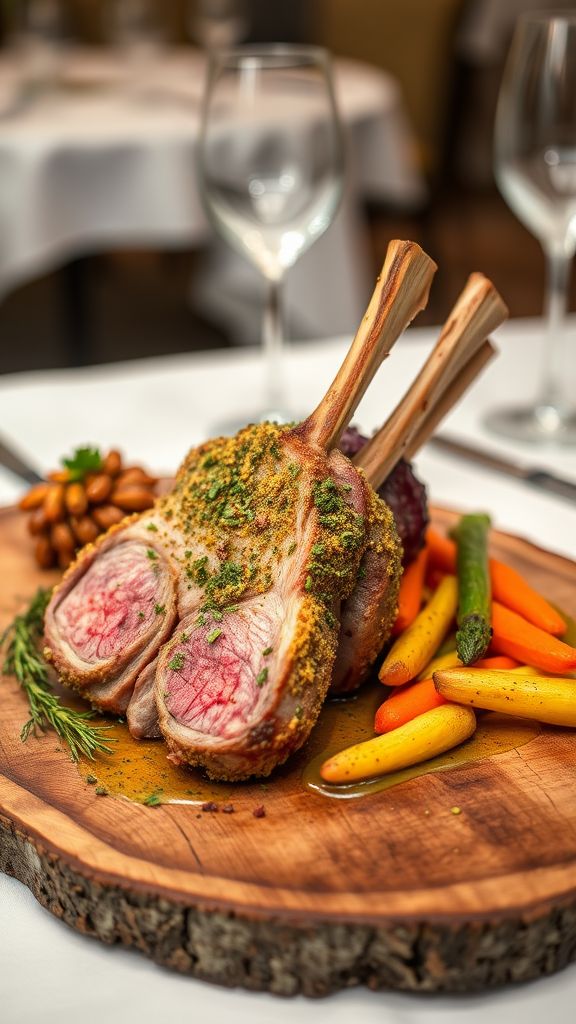
This Herb-Crusted Rack of Lamb is a delicious and fancy dish that will impress your family and friends. It’s perfect for special occasions like Easter dinner. The savory herbs create a tasty crust on the tender lamb, making it a dish you won’t forget!
Prep Time: 15 minutes
Cook Time: 25 minutes
Additional Time: 10 minutes
Total Time: 50 minutes
Servings: 4
Ingredients:
- 1 rack of lamb (about 1.5 to 2 pounds)
- 2 tablespoons olive oil
- 1 cup fresh breadcrumbs
- 2 tablespoons Dijon mustard
- 2 cloves garlic, minced
- 1 tablespoon fresh rosemary, chopped
- 1 tablespoon fresh thyme, chopped
- Salt and pepper to taste
Instructions:
First, preheat your oven to 400°F (200°C). Begin by removing any excess fat from the lamb. This helps ensure that the meat cooks evenly and is not too greasy.
Next, heat the olive oil in a skillet over medium heat. Once hot, add the minced garlic, rosemary, and thyme. Sauté for about 2 minutes until fragrant, and then add the breadcrumbs. Stir everything together and cook until the breadcrumbs are lightly golden, about 3 to 4 minutes.
Now, brush the rack of lamb with Dijon mustard on all sides. This will not only add flavor but help the herb crust stick to the meat. After that, press the breadcrumb mixture onto the lamb, making sure to cover it evenly.
Place the lamb on a baking sheet, and season it with salt and pepper. Bake in the preheated oven for 25 minutes or until the lamb reaches your desired doneness. For medium-rare, aim for an internal temperature of 130°F (54°C).
After baking, remove the lamb from the oven and let it rest for about 10 minutes. This helps retain the juices. Finally, slice it between the bones into chops, serve, and enjoy!
Tips:
- For an extra flavor boost, marinate the lamb with garlic, herbs, and olive oil for 1-2 hours before cooking.
- Pair the herb-crusted lamb with roasted vegetables or a fresh salad for a complete meal.
- Use leftover lamb to make delicious sandwiches or salads the next day.
Nutrition Facts:
- Calories: 430 per serving
- Protein: 32g
- Total Fat: 30g
- Carbohydrates: 10g
- Fiber: 1g
8 Spinach and Feta Stuffed Pastry

Spinach and Feta Stuffed Pastry is a delightful and tasty dish that perfectly combines fresh spinach with creamy feta cheese, all wrapped in golden, flaky pastry. These stuffed pastries are great for appetizers, a light lunch, or even as part of your Easter dinner table. Let’s get cooking!
Prep Time: 20 minutes
Cook Time: 25 minutes
Additional Time: 10 minutes
Total Time: 55 minutes
Servings: 4
Ingredients:
- 1 cup fresh spinach, chopped
- 1 cup feta cheese, crumbled
- 1 medium onion, finely chopped
- 2 cloves garlic, minced
- 1 tbsp olive oil
- 1 tsp lemon juice
- 1 package puff pastry (2 sheets), thawed
- 1 egg, beaten (for egg wash)
- Salt and pepper to taste
Instructions:
Start by preheating your oven to 400°F (200°C). Line a baking sheet with parchment paper to prevent sticking.
In a medium skillet, heat 1 tablespoon of olive oil over medium heat. Add the chopped onion and cook until it becomes translucent, about 3-4 minutes. Stir in the minced garlic and cook for another minute until fragrant.
Next, add the chopped spinach to the skillet. Cook until it wilts down, which should take about 2-3 minutes. Remove the skillet from the heat and let the mixture cool slightly. Then, stir in the crumbled feta cheese and drizzle with 1 teaspoon of lemon juice. Season with salt and pepper to taste.
Now, take the thawed puff pastry and roll it out on a lightly floured surface. Cut each sheet into 4 squares. Place a generous spoonful of the spinach and feta mixture in the center of each square.
Fold the corners of the pastry over the filling to create a triangle shape. Pinch the edges to seal them tightly so the filling doesn’t escape during baking. Brush the tops of the pastries with the beaten egg to give them a lovely golden color.
Arrange the stuffed pastries on the prepared baking sheet and bake them in the preheated oven for 20-25 minutes, or until they are puffed and golden brown. Once done, allow them to cool for a few minutes before serving.
Tips:
- You can add some herbs like dill or parsley to enhance the flavor.
- For extra crunch, sprinkle sesame seeds on top before baking.
- These pastries can be made ahead of time; freeze them before baking and cook straight from the freezer for about 30 minutes.
Nutrition Facts:
- Calories: 250 per serving
- Protein: 8g
- Carbohydrates: 28g
- Fat: 14g
- Fiber: 2g
9 Roasted Beet and Goat Cheese Salad
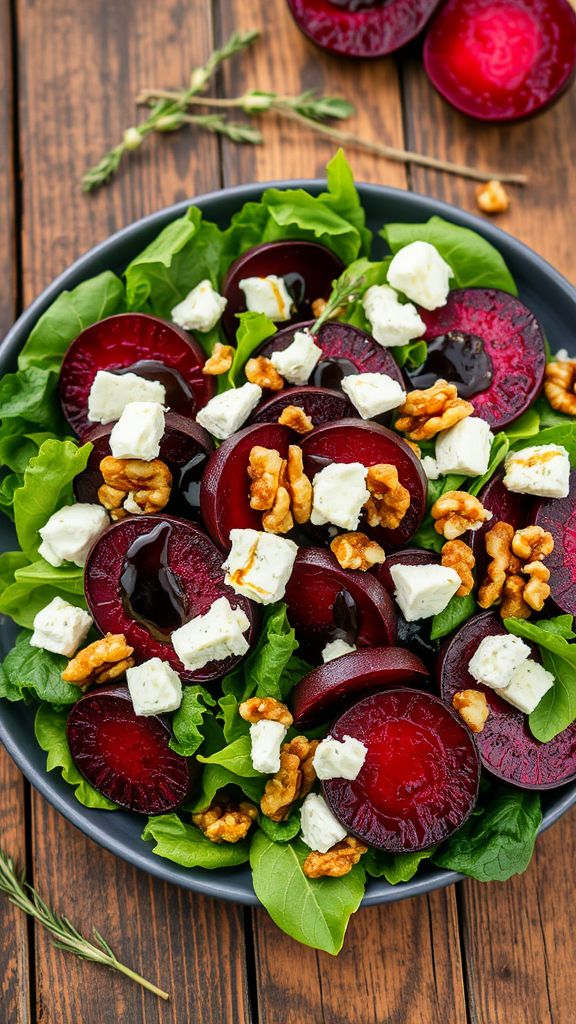
Roasted Beet and Goat Cheese Salad is a delicious and colorful dish that’s perfect for any occasion. The sweetness of the beets pairs wonderfully with the tangy goat cheese, making each bite a treat. It’s easy to make and will make your table look gorgeous!
Prep Time: 15 minutes
Cook Time: 45 minutes
Additional Time: 10 minutes (for cooling)
Total Time: 1 hour 10 minutes
Servings: 4
Ingredients:
- 4 medium-sized beets
- 2 tablespoons olive oil
- Salt and pepper to taste
- 4 cups mixed salad greens
- 1/4 cup goat cheese, crumbled
- 1/4 cup walnuts, toasted
- 2 tablespoons balsamic vinegar
- 1 tablespoon honey
Instructions:
Start by preheating your oven to 400°F (200°C). While the oven is heating, wash the beets thoroughly and trim off the greens, leaving about an inch of the stems. Wrap each beet in aluminum foil, placing them directly on the oven rack.
Roast the beets for about 45 minutes. You can check if they are done by inserting a fork; it should go in easily. Once done, take them out and let them cool for about 10 minutes. Unwrap the foil carefully since it will be hot, and then peel the skins off. You can use gloves to prevent staining your hands.
Next, slice the beets into thin rounds or ** wedges, whichever you prefer. In a large bowl, combine the **mixed salad greens and toss in the olive oil, balsamic vinegar, honey, and a pinch of salt and pepper. Mix well until everything is coated.
To serve, place the dressed greens on plates. Top them with the sliced beets, sprinkle the crumbled goat cheese and toasted walnuts on top. Enjoy this vibrant salad!
Tips:
- To save time, you can buy pre-cooked beets from the store.
- Add some sliced avocado for extra creaminess.
- For a burst of flavor, sprinkle fresh herbs like basil or parsley on top before serving.
Nutrition Facts:
- Calories: 220
- Protein: 5g
- Fat: 16g
- Carbohydrates: 20g
- Fiber: 4g
- Sugar: 10g
10 Apricot Glazed Pork Tenderloin
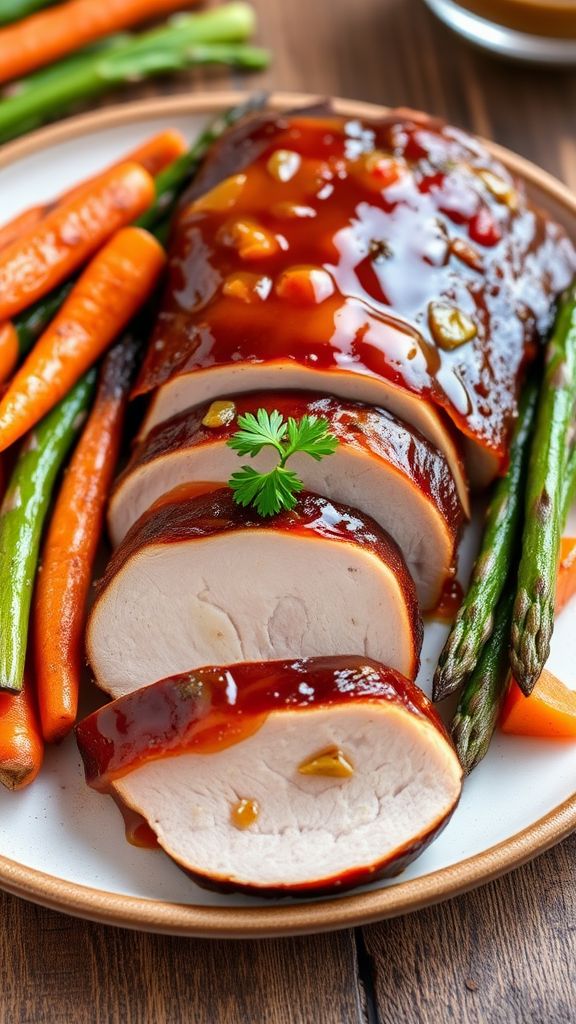
This Apricot Glazed Pork Tenderloin is a delicious way to impress your family during dinner. It’s sweet, savory, and tender, making it a perfect centerpiece for your meal. Let’s get started!
Prep Time: 20 minutes
Cook Time: 25 minutes
Additional Time: 10 minutes
Total Time: 55 minutes
Servings: 4
Ingredients:
- 1 pound pork tenderloin
- 1/2 cup apricot preserves
- 2 tablespoons soy sauce
- 1 tablespoon Dijon mustard
- 2 cloves garlic, minced
- 1 teaspoon ginger, grated
- Salt and pepper to taste
- Olive oil for cooking
- Fresh parsley for garnish (optional)
Instructions:
Start by preheating your oven to 400°F (200°C). While the oven is heating, take the pork tenderloin out and season it generously with salt and pepper on all sides.
In a bowl, mix together the apricot preserves, soy sauce, Dijon mustard, minced garlic, and grated ginger. This mixture will be your glaze. Make sure everything is well-combined.
Next, heat a skillet over medium-high heat and add a splash of olive oil. Once the oil is hot, sear the pork tenderloin for about 3-4 minutes on each side until it gets a nice golden-brown crust. Don’t rush this step; browning adds flavor!
Once browned, transfer the pork to a baking dish. Brush the apricot glaze generously over the top of the tenderloin. Save a little glaze for basting later.
Place the dish in the preheated oven and bake for 20-25 minutes. Baste the pork with remaining glaze halfway through to keep it moist and flavorful.
Use a meat thermometer to check for doneness. The internal temperature should reach 145°F (63°C). After it’s done, take the pork out and let it rest for about 10 minutes before slicing. This allows the juices to redistribute, making the meat tender.
Slice and serve the pork tenderloin on a plate, drizzled with any extra glaze. You can also garnish with some fresh parsley for a pop of color.
Tips:
- Make sure the pork tenderloin is at room temperature before cooking for even cooking.
- If you have leftover glaze, it can be refrigerated and used as a dipping sauce for veggies or bread.
- Pair the pork with roasted vegetables or rice for a complete meal.
Nutrition Facts:
- Calories: 320 per serving
- Protein: 30g
- Carbohydrates: 35g
- Fat: 10g
- Sodium: 600mg
- Sugar: 20g
11 Scalloped Potatoes with Cheddar

Scalloped Potatoes with Cheddar is a creamy and cheesy side dish that is perfect for any holiday meal. This comforting dish layers thinly sliced potatoes with rich cheddar cheese and a delightful cream sauce. It’s sure to be a hit at your dining table!
Prep Time: 20 minutes
Cook Time: 1 hour
Total Time: 1 hour 20 minutes
Servings: 6
Ingredients:
- 4 large potatoes, thinly sliced
- 1 tablespoon butter
- 2 cups shredded cheddar cheese
- 1 cup heavy cream
- 1 cup milk
- 2 cloves garlic, minced
- 1 teaspoon salt
- 1/2 teaspoon pepper
- 1/2 teaspoon paprika
- 1/4 teaspoon onion powder
- 1 tablespoon fresh parsley, chopped (for garnish)
Instructions:
Preheat your oven to 350°F (175°C). Grease a large baking dish with butter to prevent sticking.
In a mixing bowl, combine the heavy cream, milk, minced garlic, salt, pepper, paprika, and onion powder. Mix well to ensure all the ingredients blend together seamlessly.
Layer half of the sliced potatoes into the prepared baking dish. Pour half of the cream mixture over the potatoes, spreading it evenly. Then, sprinkle half of the shredded cheddar cheese on top.
Repeat this process with the remaining potatoes, cream mixture, and cheese. Make sure the last layer is cheese for that deliciously melty topping.
Cover the baking dish with aluminum foil and bake in the preheated oven for 45 minutes. After that time, remove the foil and continue to bake for an additional 15 minutes, or until the top is golden brown and bubbly.
Once done, let the dish cool for a few minutes before serving. Garnish with fresh parsley for a pop of color and extra flavor!
Tips:
- For extra creaminess, you can add some cream cheese to the milk and cream mixture.
- Use different types of cheese like Monterey Jack or Gruyère for a unique flavor twist.
- Make ahead of time! You can assemble the dish a day in advance and bake it when you’re ready.
Nutrition Facts:
- Calories: 350 per serving
- Total Fat: 20g
- Saturated Fat: 12g
- Cholesterol: 70mg
- Sodium: 600mg
- Total Carbohydrates: 30g
- Dietary Fiber: 3g
- Protein: 10g
12 Lemon Garlic Grilled Shrimp
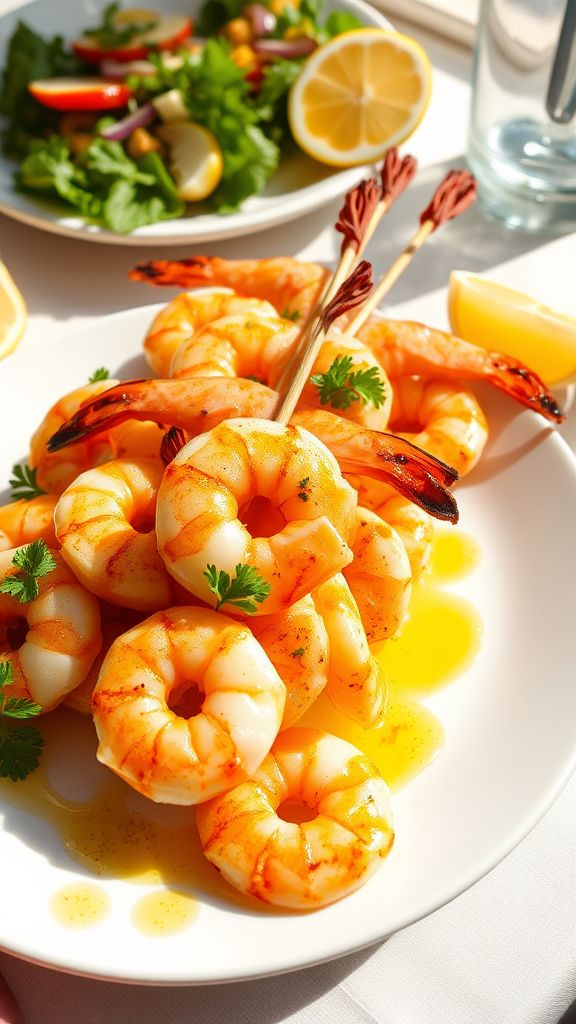
Lemon Garlic Grilled Shrimp is a light and flavorful dish that’s perfect for any occasion, especially Easter dinner! The bright flavors of lemon and garlic soak into the shrimp, making it the star of your meal. Plus, it’s quick and easy to prepare, which means more time to enjoy with family and friends.
Prep Time: 15 minutes
Cook Time: 5 minutes
Additional Time: 30 minutes (marinating)
Total Time: 50 minutes
Servings: 4
Ingredients:
- 1 pound large shrimp, peeled and deveined
- 1/4 cup olive oil
- 2 tablespoons fresh lemon juice
- 4 cloves garlic, minced
- 1 teaspoon lemon zest
- 1 teaspoon paprika
- Salt and pepper to taste
- Fresh parsley for garnish
Instructions:
Start by marinating the shrimp. In a large bowl, mix together olive oil, lemon juice, minced garlic, lemon zest, and paprika. Add salt and pepper according to your taste.
Once the marinade is ready, add the shrimp to the bowl. Make sure all the shrimp are well-coated in the marinade. Cover the bowl and refrigerate for about 30 minutes to let the flavors soak in.
After the shrimp has marinated, preheat your grill to medium-high heat. Thread the shrimp onto skewers for easy grilling. Make sure not to overcrowd the skewers; this helps them cook evenly.
Place the skewers on the hot grill and cook for 2-3 minutes on each side, or until the shrimp turn pink and opaque. Be careful not to overcook them, as they can become tough.
Once cooked, remove the shrimp from the grill. Garnish with fresh parsley for added flavor and color. Serve hot and enjoy!
Tips:
- For an extra kick, add a pinch of red pepper flakes to the marinade.
- If you don’t have skewers, you can grill the shrimp directly on the grill grates using a grill basket.
- Pair with a fresh salad or rice for a complete meal that’s sure to impress!
Nutrition Facts:
- Calories: 180
- Protein: 24g
- Fat: 8g
- Carbohydrates: 1g
- Fiber: 0g
- Sodium: 300mg
13 Balsamic Glazed Brussels Sprouts
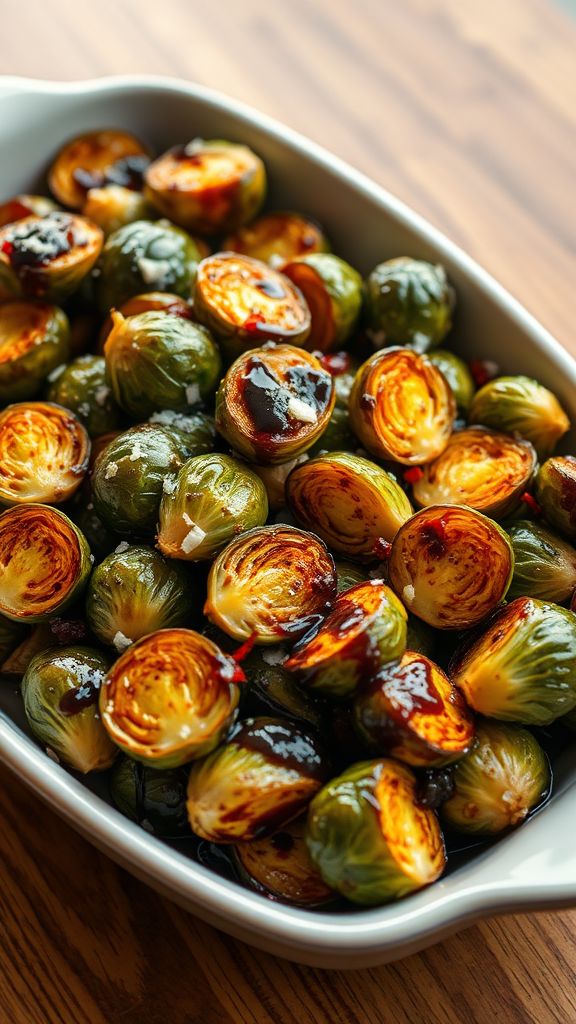
Balsamic Glazed Brussels Sprouts are a delicious and healthy side dish that will brighten up any meal. The savory flavor of Brussels sprouts combined with a sweet balsamic glaze makes for a perfect pairing. This dish is not only packed with nutrients but also simple to prepare.
Prep Time: 10 minutes
Cook Time: 20 minutes
Total Time: 30 minutes
Servings: 4
Ingredients:
- 1 pound Brussels sprouts, trimmed and halved
- 2 tablespoons olive oil
- 1/4 cup balsamic vinegar
- 2 tablespoons honey or maple syrup
- Salt and pepper, to taste
- 1 teaspoon garlic powder
- 1/4 teaspoon red pepper flakes (optional)
- Parmesan cheese, for garnish (optional)
Instructions:
Start by preheating your oven to 400°F (200°C). While the oven is heating, wash and trim the Brussels sprouts. Cut them in half to help them cook evenly.
In a large bowl, toss the Brussels sprouts with olive oil, salt, pepper, and garlic powder. Make sure they are well-coated. Spread them out on a baking sheet in a single layer for the best roasting.
Roast the Brussels sprouts in the preheated oven for about 20 minutes. Halfway through, shake the pan or stir them to ensure they cook evenly. They should be golden brown and crispy when done.
While the sprouts are roasting, prepare the balsamic glaze. In a small saucepan over medium heat, combine the balsamic vinegar and honey (or maple syrup). Allow it to simmer until it begins to thicken, about 5-7 minutes. Remove it from the heat once it’s syrupy.
Once the Brussels sprouts are cooked, take them out of the oven and drizzle the balsamic glaze over them. If you like a little heat, sprinkle some red pepper flakes on top. Mix well to coat all the sprouts.
Transfer the glazed Brussels sprouts to a serving dish and sprinkle with Parmesan cheese if desired. Serve warm and enjoy!
Tips:
- Make sure to trim the ends of the Brussels sprouts to remove any bitterness.
- For extra flavor, add chopped nuts like walnuts or pecans before serving.
- You can prepare the balsamic glaze ahead of time and warm it up before serving.
Nutrition Facts:
- Calories: 150
- Fat: 7g
- Carbohydrates: 21g
- Fiber: 6g
- Sugar: 5g
- Protein: 4g
14 Savory Sweet Potato Casserole
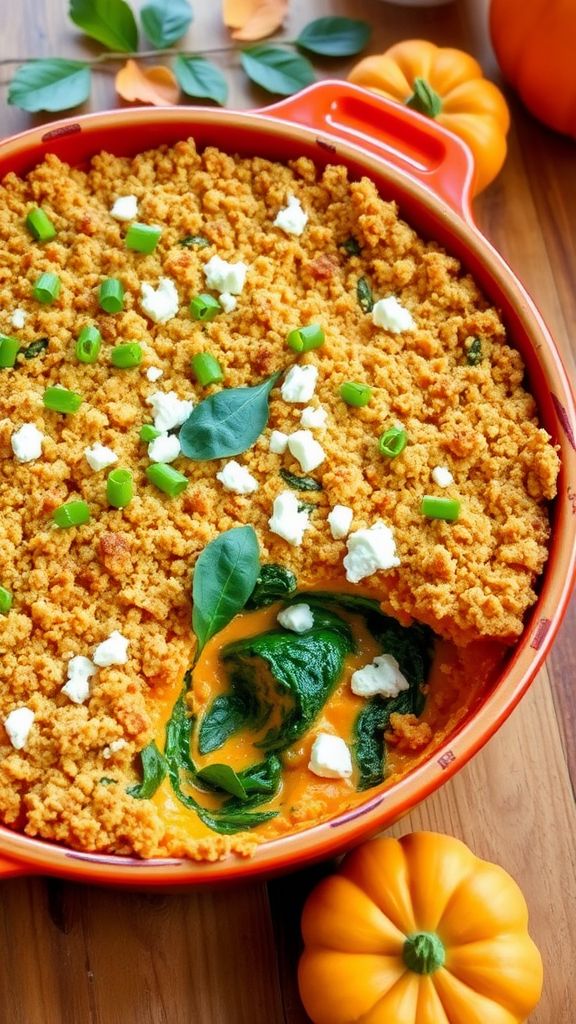
Sweet potato casserole doesn’t just have to be a sweet dish! This Savory Sweet Potato Casserole is a delicious twist that brings together creamy sweet potatoes with savory ingredients. It’s perfect for a holiday gathering or a cozy family dinner.
Prep Time: 15 minutes
Cook Time: 30 minutes
Additional Time: 10 minutes
Total Time: 55 minutes
Servings: 6
Ingredients:
- 2 large sweet potatoes, peeled and cubed
- 1/2 cup milk (or dairy-free alternative)
- 2 tablespoons olive oil
- 1 teaspoon garlic powder
- 1 teaspoon onion powder
- 1/2 teaspoon smoked paprika
- 1/4 teaspoon salt
- 1/4 teaspoon black pepper
- 1 cup fresh spinach, chopped
- 1/2 cup crumbled feta cheese
- 1/4 cup chopped green onions
- 1/2 cup breadcrumbs (optional for topping)
Instructions:
Start by preheating your oven to 350°F (175°C). While it heats up, bring a large pot of water to a boil. Add the cubed sweet potatoes to the boiling water and cook for about 15 minutes, or until they are tender when poked with a fork.
Once cooked, drain the sweet potatoes and return them to the pot. Add in the milk, olive oil, garlic powder, onion powder, smoked paprika, salt, and black pepper. Mash the mixture until it’s smooth and creamy.
Next, fold in the chopped spinach, crumbled feta cheese, and chopped green onions. Mix everything well until combined.
Transfer the sweet potato mixture into a greased baking dish. If desired, sprinkle breadcrumbs on top for a nice crunchy texture. Bake the casserole in the preheated oven for 25-30 minutes.
Once it’s bubbly and golden on top, take it out and let it cool for about 10 minutes before serving. This helps it set a little better!
Tips:
- For extra flavor, try adding some fresh herbs like thyme or rosemary into the sweet potato mixture.
- You can also substitute feta cheese with goat cheese for a different taste.
- This casserole can be made ahead of time. Just prepare it, refrigerate it, and bake it before serving.
Nutrition Facts:
- Calories: 210
- Protein: 5g
- Carbohydrates: 36g
- Fat: 8g
- Fiber: 5g
- Sodium: 300mg
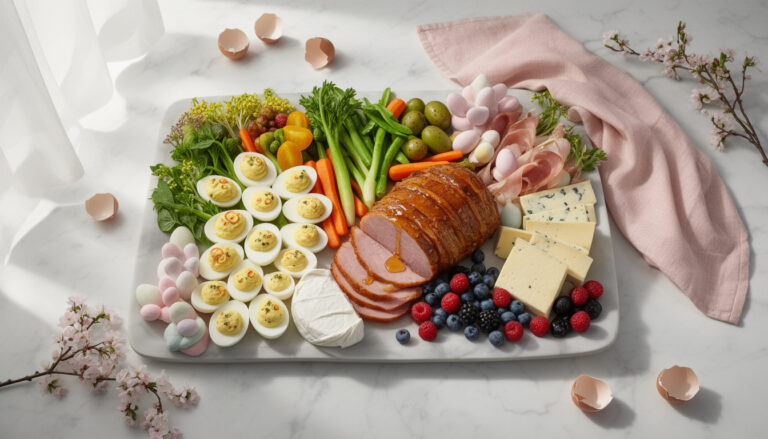
15 Classic Deviled Eggs

Classic Deviled Eggs are a tasty and easy appetizer that everyone loves. They are perfect for gatherings, parties, or just a special snack. With a creamy filling and a hint of spice, these eggs will impress your family and friends!
Prep Time: 15 minutes
Cook Time: 10 minutes
Additional Time: 30 minutes (for chilling)
Total Time: 55 minutes
Servings: 12
Ingredients:
- 6 large eggs
- 3 tablespoons mayonnaise
- 1 teaspoon Dijon mustard
- 1 teaspoon white vinegar
- Salt and pepper to taste
- Paprika for garnish
- Chives or parsley for garnish (optional)
Instructions:
Start by boiling the eggs. Place them in a saucepan and cover them with cold water. Make sure the water is about an inch above the eggs. Bring the water to a boil over high heat. Once it reaches a boil, remove the pan from heat, cover it, and let the eggs sit for 10 minutes.
After the eggs have sat, carefully drain the hot water. Run cold water over the eggs to cool them down quickly. When they’re cool enough to handle, gently crack the shells and peel them. Rinse each egg under cold water to remove any bits of shell.
Next, cut each egg in half lengthwise. Carefully scoop out the yolks and place them in a mixing bowl. Arrange the egg whites on a serving plate. Mash the yolks with a fork until they are crumbly.
Now add the mayonnaise, Dijon mustard, white vinegar, and a pinch of salt and pepper to the mashed yolks. Mix everything together until it’s smooth and creamy. Taste the filling and adjust the seasoning if necessary.
Spoon or pipe the yolk mixture back into the egg white halves. You can use a piping bag for a nicer look, or just a spoon if you prefer it simple. Once all the filling is in, sprinkle a little paprika on top for color. If you like, you can also add chopped chives or parsley for extra flair.
Finally, cover your deviled eggs and place them in the fridge for 30 minutes to chill. This will make them taste even better!
Tips:
- For extra flavor, try adding a pinch of cayenne pepper or hot sauce to the filling.
- If you’re short on time, you can use store-bought egg salad as a filling.
- Always use the freshest eggs you can find for the best flavor and texture.
Nutrition Facts:
- Calories: 60 kcal per egg half
- Protein: 3 grams
- Fat: 5 grams
- Carbohydrates: 1 gram
- Cholesterol: 186 mg
- Sodium: 65 mg
16 Cranberry Pecan Wild Rice
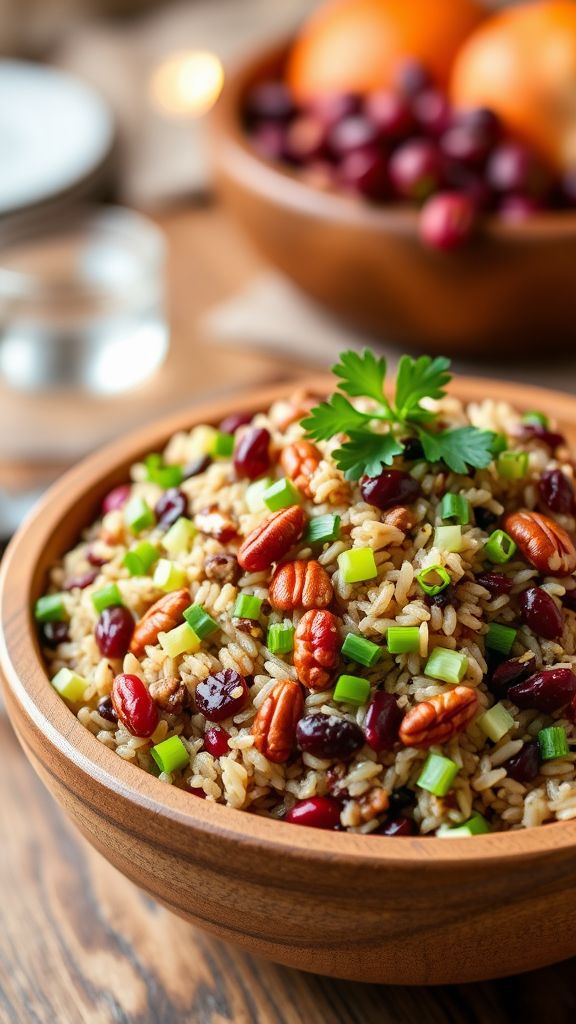
Cranberry Pecan Wild Rice is a delightful combination of nutty flavors and sweet cranberries. It adds a colorful and tasty touch to your dinner table, making it perfect for special occasions. Plus, it’s easy to make and packed with nutrients!
Prep Time: 10 minutes
Cook Time: 40 minutes
Total Time: 50 minutes
Servings: 4
Ingredients:
- 1 cup wild rice
- 2 cups vegetable broth
- 1/2 cup dried cranberries
- 1/2 cup chopped pecans
- 1/2 cup chopped green onions
- 1/4 cup chopped fresh parsley
- 2 tablespoons olive oil
- 1 tablespoon balsamic vinegar
- Salt and pepper to taste
Instructions:
Start by rinsing the wild rice under cold water. This helps to remove any dirt or debris. In a medium saucepan, combine the wild rice and the 2 cups of vegetable broth. Bring it to a boil over medium-high heat.
Once it starts boiling, lower the heat and cover the pot. Allow the wild rice to simmer for about 40 minutes or until the grains are tender and most of the liquid is absorbed. You might need to check occasionally and add a little more broth or water if necessary.
While the rice is cooking, prepare the other ingredients. Chop the pecans, green onions, and parsley. Set them aside in a bowl. In a small bowl, mix the olive oil and balsamic vinegar together. This will be used to dress the rice later.
Once the wild rice is cooked, remove it from the heat and let it sit for 5 minutes with the lid on. After this, fluff the rice with a fork and transfer it to a large serving bowl.
Add the dried cranberries, chopped pecans, green onions, and parsley to the bowl. Drizzle the olive oil and balsamic vinegar mixture over everything. Season with salt and pepper to taste. Gently toss all the ingredients together until well combined.
Tips:
- Feel free to add other nuts, like walnuts or almonds, for extra crunch.
- For a bit more sweetness, try adding a tablespoon of honey or maple syrup.
- This dish can be served warm or at room temperature, making it versatile for your gatherings.
Nutrition Facts:
- Calories: 280
- Protein: 6g
- Fat: 12g
- Carbohydrates: 38g
- Fiber: 5g
- Sugars: 8g
17 Roasted Lemon Rosemary Potatoes
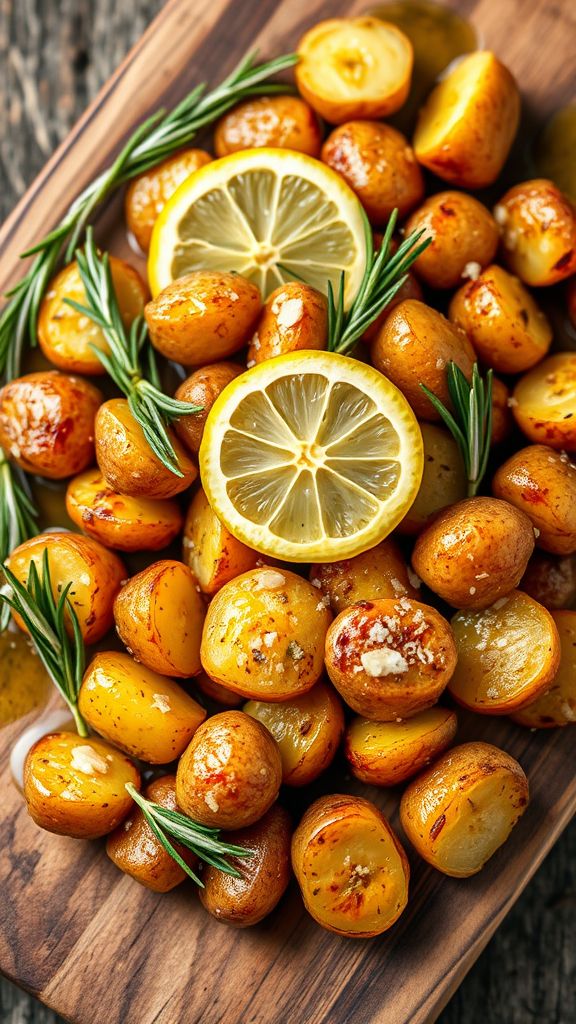
Roasted Lemon Rosemary Potatoes are a delicious and easy side dish perfect for any meal. The zesty lemon and fragrant rosemary add bright flavors to crispy potatoes. These flavorful bites will surely be a hit at your dinner table!
Prep Time: 10 minutes
Cook Time: 30 minutes
Total Time: 40 minutes
Servings: 4
Ingredients:
- 2 pounds baby potatoes, halved
- 3 tablespoons olive oil
- 1 lemon, juiced and zested
- 2 teaspoons fresh rosemary, chopped (or 1 teaspoon dried)
- 4 cloves garlic, minced
- 1 teaspoon salt
- 1/2 teaspoon black pepper
Instructions:
Preheat your oven to 425°F (220°C). This high temperature will help the potatoes get nice and crispy.
In a large bowl, combine the halved baby potatoes with olive oil, lemon juice, and lemon zest. Stir well so the potatoes are evenly coated.
Add in the chopped rosemary, minced garlic, salt, and black pepper. Mix everything together until the potatoes are well combined with the seasonings.
Spread the potatoes in a single layer on a baking sheet. This will help them roast evenly. Make sure the cut sides are facing down to get that nice crispy texture.
Roast in the preheated oven for 30 minutes, or until the potatoes are golden brown and fork-tender. Make sure to flip them halfway through for even cooking.
Once done, take the baking sheet out of the oven and let the roasted potatoes cool for a couple of minutes before serving. Enjoy these flavorful bites warm as a side dish!
Tips:
- For an extra kick, add a sprinkle of red pepper flakes before roasting.
- Use fresh rosemary if possible for the best flavor, but dried works well too.
- Pair with grilled meats or a fresh salad for a complete meal.
Nutrition Facts:
- Calories: 200 kcal
- Carbohydrates: 35 g
- Protein: 3 g
- Fat: 7 g
- Sodium: 400 mg
- Fiber: 4 g
18 Maple Walnut Glazed Brussels Sprouts
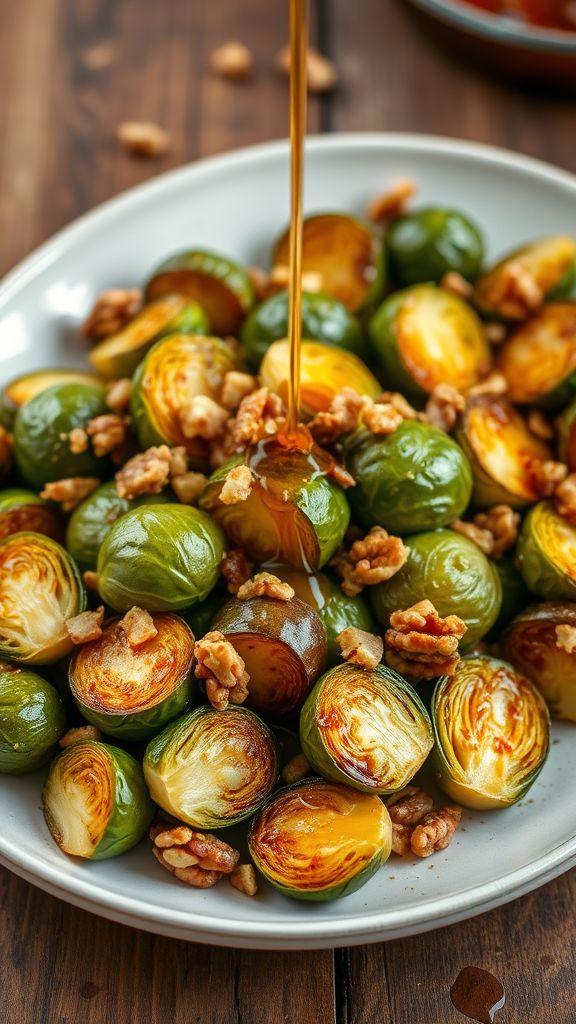
These Maple Walnut Glazed Brussels Sprouts are a delicious and unique side dish that will impress your family and friends. The sweet maple glaze combined with crunchy walnuts makes these sprouts irresistible. Perfect for any gathering or holiday dinner!
Prep Time: 10 minutes
Cook Time: 20 minutes
Total Time: 30 minutes
Servings: 4
Ingredients:
- 1 pound Brussels sprouts, trimmed and halved
- 1/4 cup walnuts, chopped
- 3 tablespoons maple syrup
- 2 tablespoons olive oil
- 1 teaspoon salt
- 1/2 teaspoon black pepper
- 1/4 teaspoon garlic powder (optional)
Instructions:
Start by preheating your oven to 400°F (200°C). This will ensure the Brussels sprouts cook evenly and develop a nice crisp.
Next, take the Brussels sprouts and place them in a large mixing bowl. Drizzle with olive oil, then sprinkle with salt, black pepper, and garlic powder, if you’re using it. Toss everything together until the sprouts are evenly coated.
Spread the Brussels sprouts on a baking sheet in a single layer. Make sure they aren’t overcrowded, or they won’t get crispy. Roast them in the oven for about 15-20 minutes, flipping halfway through, until they are golden brown and tender.
While the sprouts are roasting, prepare the maple walnut glaze. In a small saucepan over low heat, combine maple syrup and chopped walnuts. Stir until the walnuts are toasted and fragrant, about 3-5 minutes. Be careful not to burn the syrup!
Once the Brussels sprouts are done cooking, remove them from the oven and drizzle the maple walnut mixture over them. Toss gently to coat the sprouts in the glaze.
Finally, serve the Brussels sprouts warm as a delightful side dish. Enjoy the sweet and savory explosion of flavors!
Tips:
- For extra crunch, try adding panko breadcrumbs before roasting.
- You can substitute pecans for walnuts for a different taste.
- Add a squeeze of lemon juice right before serving for a bit of brightness.
Nutrition Facts:
- Calories: 200
- Protein: 4g
- Fat: 10g
- Carbohydrates: 30g
- Fiber: 5g
- Sugar: 10g
19 Garlic Butter Seared Salmon

Garlic Butter Seared Salmon is an easy and delicious dish that will impress your family and friends. The rich flavor of garlic butter combined with tender, flaky salmon makes this a perfect choice for any dinner occasion. Let’s get started on this mouth-watering recipe!
Prep Time: 10 minutes
Cook Time: 10 minutes
Total Time: 20 minutes
Servings: 4
Ingredients:
- 4 salmon fillets (about 6 oz each)
- 3 tablespoons unsalted butter
- 4 cloves garlic, minced
- 1 tablespoon fresh lemon juice
- 1 teaspoon fresh parsley, chopped
- Salt and pepper to taste
- Lemon wedges for serving (optional)
Instructions:
Begin by patting the salmon fillets dry with paper towels. This step helps to achieve a nice sear. Once dried, season both sides of the salmon fillets with salt and pepper to taste.
Next, heat a large skillet over medium-high heat. Add 2 tablespoons of butter to the hot skillet and let it melt. Once the butter starts to foam, carefully place the salmon fillets skin-side down in the pan. Let them cook for about 4-5 minutes without moving them.
After the skin is crispy, gently flip the fillets over using a spatula. Now, add the remaining 1 tablespoon of butter, the minced garlic, and the lemon juice to the pan. Continuously spoon the melted garlic butter over the salmon for an added flavor boost. Cook for another 3-4 minutes, or until the salmon is cooked through and flakes easily with a fork.
Finally, sprinkle the chopped parsley on top for a fresh touch. Serve your Garlic Butter Seared Salmon hot with lemon wedges on the side for extra zing. Enjoy!
Tips:
- Use fresh salmon for the best flavor and texture.
- Make sure your skillet is hot before adding the salmon to achieve a good sear.
- You can substitute lemon juice with lime juice for a different flavor!
Nutrition Facts:
- Calories: 350
- Protein: 36g
- Fat: 22g
- Carbohydrates: 1g
- Fiber: 0g
- Sodium: 80mg
20 Traditional Easter Bread

Traditional Easter Bread is a delightful treat that many families bake to celebrate the holiday. This sweet, braided bread is often decorated with colorful eggs and has a lovely flavor that fills your home with the smell of freshness. It’s perfect for sharing with loved ones during your Easter gathering!
Prep Time: 30 minutes
Additional Time: 2 hours
Total Time: 2 hours 30 minutes
Servings: 12
Ingredients:
- 4 cups all-purpose flour
- 1/4 cup sugar
- 1 packet (2 1/4 teaspoons) active dry yeast
- 1/2 cup milk, warmed
- 1/4 cup unsalted butter, melted
- 3 large eggs
- 1 teaspoon vanilla extract
- 1/2 teaspoon salt
- 1 egg, for egg wash (optional)
- Colored sprinkles or dyed eggs for decoration (optional)
Instructions:
Start by warming the milk in a small saucepan until it’s warm but not boiling. Take the warm milk off the heat and mix in the yeast. Allow it to sit for about 5 minutes until it’s frothy. This means the yeast is working!
In a large mixing bowl, combine flour, sugar, and salt. Make a well in the center and add the frothy yeast mixture, melted butter, eggs, and vanilla extract. Mix everything together until a dough starts to form.
Turn the dough out onto a floured surface and knead it for about 8 to 10 minutes, until it’s smooth and elastic. Place the dough into a lightly greased bowl and cover it with a clean cloth. Let it rise in a warm place for about 1 to 2 hours, or until it doubles in size.
Once the dough has risen, punch it down gently and divide it into three equal pieces. Roll each piece into long strands, about 12 inches long. Braid the strands together to form a loaf and pinch the ends together to seal.
Place the braided dough onto a baking sheet lined with parchment paper. If you want, you can brush the top with a beaten egg to give it a nice glaze. Cover the loaf with a cloth again and let it rise for another 30 minutes.
Preheat your oven to 350°F (175°C). Once the bread has risen, bake it for about 25-30 minutes, or until the top is golden brown. Let it cool slightly before decorating with sprinkles or placing dyed eggs on the loaf.
Tips:
- For extra flavor, you can add lemon or orange zest to the dough.
- Use toothpicks to secure dye-decorated eggs onto the loaf for a fun look!
- Store any leftover bread in an airtight container at room temperature.
Nutrition Facts:
- Serving Size: 1 slice (approx. 1/12 of the loaf)
- Calories: 200
- Total Fat: 6g
- Saturated Fat: 3g
- Cholesterol: 45mg
- Sodium: 150mg
- Total Carbohydrates: 32g
- Dietary Fiber: 1g
- Sugars: 5g
- Protein: 5g
21 Ratatouille Pasta Primavera
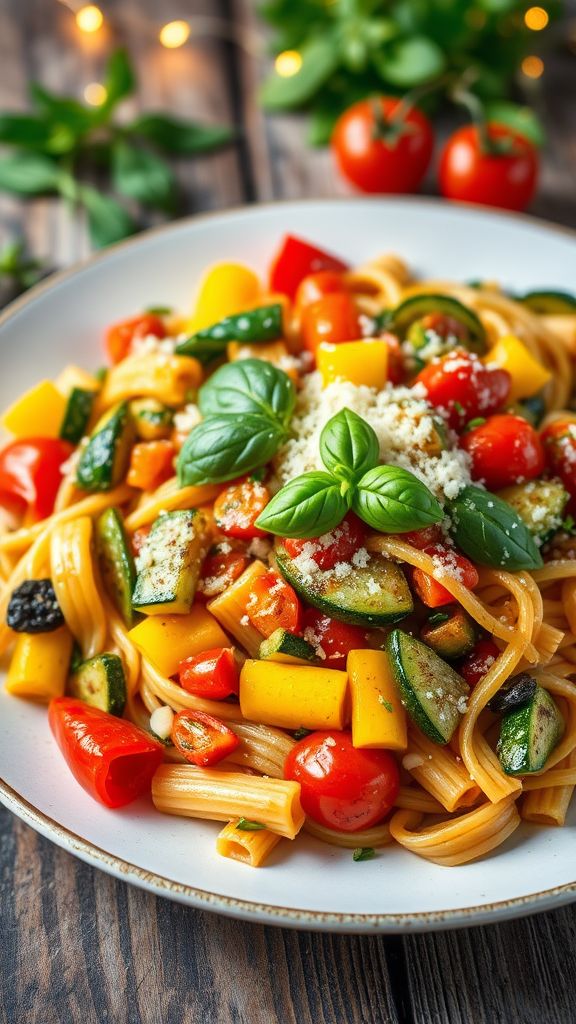
Ratatouille Pasta Primavera is a colorful and delicious dish that brings together a variety of fresh vegetables and pasta. It’s perfect for a delightful dinner that feels both light and hearty. You’ll love how the flavors of the vegetables shine in this bright, flavorful meal!
Prep Time: 15 minutes
Cook Time: 20 minutes
Total Time: 35 minutes
Servings: 4
Ingredients:
- 8 oz of pasta (any shape you like)
- 1 zucchini, diced
- 1 yellow squash, diced
- 1 bell pepper (red or yellow), diced
- 1 onion, chopped
- 2 cloves garlic, minced
- 1 cup cherry tomatoes, halved
- 1 cup eggplant, diced
- 1 tsp dried Italian seasoning
- Salt and pepper to taste
- 2 tbsp olive oil
- Fresh basil for garnish (optional)
- Grated Parmesan cheese for serving (optional)
Instructions:
Start by cooking the pasta according to the package instructions. Make sure to add a little salt to the water for flavor. Once it’s al dente, drain the pasta and set it aside.
In a large skillet, heat 2 tablespoons of olive oil over medium heat. Add the chopped onion and sauté for about 2-3 minutes until it becomes translucent. Then, add the minced garlic and cook for an additional 30 seconds until fragrant.
Next, add the diced zucchini, yellow squash, and eggplant to the skillet. Cook for about 5-7 minutes, stirring occasionally until the vegetables start to soften.
Then, toss in the diced bell pepper, followed by the halved cherry tomatoes. Season the mixture with 1 teaspoon of dried Italian seasoning, and add salt and pepper to taste. Cook everything for another 5 minutes, until all the vegetables are tender and the tomatoes are slightly blistered.
Finally, add the cooked pasta to the skillet. Gently toss everything together until the pasta is well coated with the vegetable mixture. Cook for an additional 2-3 minutes to heat through.
Serve your Ratatouille Pasta Primavera warm, garnished with fresh basil and a sprinkle of grated Parmesan cheese if desired.
Tips:
- Feel free to substitute any of the vegetables based on your preferences or what you have available.
- To add a little kick, sprinkle some red pepper flakes into the vegetable mixture while it cooks.
- This dish can be stored in the fridge for up to 3 days and makes great leftovers!
Nutrition Facts:
- Calories: 320
- Protein: 10g
- Carbohydrates: 55g
- Fat: 10g
- Fiber: 5g
- Sugar: 6g
22 Buttermilk Biscuits with Honey Butter

Buttermilk biscuits are a Southern classic that are perfectly flaky and light. Topped with sweet honey butter, they make an irresistible addition to any meal. Whether you’re serving them for breakfast or alongside a festive Easter dinner, these biscuits are sure to impress.
Prep Time: 15 minutes
Cook Time: 15 minutes
Total Time: 30 minutes
Servings: 12 biscuits
Ingredients:
- 2 cups all-purpose flour
- 1 tablespoon baking powder
- 1/2 teaspoon baking soda
- 1/2 teaspoon salt
- 1/4 cup unsalted butter, cold and cubed
- 3/4 cup buttermilk
- 1/4 cup honey
- 1/2 cup unsalted butter, softened
Instructions:
Preheat your oven to 425°F (220°C). Make sure to line a baking sheet with parchment paper to prevent sticking.
In a large bowl, mix together the flour, baking powder, baking soda, and salt. Stir these together until they are well combined.
Now, add the cold butter to the flour mixture. Use a pastry cutter or your fingers to cut the butter into the flour until it resembles coarse crumbs. It’s important to leave some small pieces of butter for flakiness.
Pour in the buttermilk and stir until just combined. Do not overmix because you want the biscuits to be tender.
Turn the dough out onto a lightly floured surface. Gently knead it 3-4 times, then pat it into a rectangle about 1-inch thick.
Use a biscuit cutter to cut out the biscuits. Place them on the prepared baking sheet, allowing a little space between each one.
Bake the biscuits in your preheated oven for 12-15 minutes or until they are golden brown.
While the biscuits are baking, prepare the honey butter. In a small bowl, mix together the softened butter and honey until smooth.
Once the biscuits are done, remove them from the oven and let them cool slightly. Serve warm with the honey butter spread on top!
Tips:
- For extra flaky biscuits, keep all your ingredients cold, especially the butter and buttermilk.
- You can add herbs like rosemary or thyme to the dough for a savory twist.
- Feel free to double the honey butter for a sweeter taste!
Nutrition Facts:
- Calories: 158 per biscuit
- Total Fat: 8g
- Saturated Fat: 5g
- Cholesterol: 19mg
- Sodium: 208mg
- Total Carbohydrates: 19g
- Dietary Fiber: 0.5g
- Sugars: 1g
- Protein: 3g
23 Fresh Berry Salad with Citrus Dressing
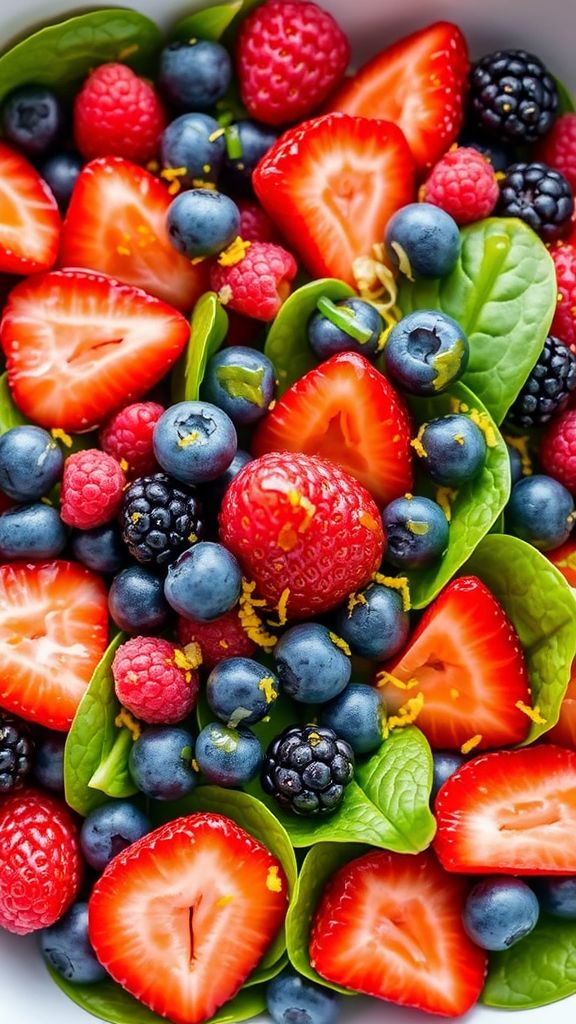
This Fresh Berry Salad with Citrus Dressing is a perfect way to celebrate spring and add a burst of color to your table. It’s light, refreshing, and packed with vitamins. With just a few simple ingredients, you can create a delicious salad that everyone will love.
Prep Time: 10 minutes
Total Time: 10 minutes
Servings: 4
Ingredients:
- 1 cup fresh strawberries, hulled and sliced
- 1 cup fresh blueberries
- 1 cup fresh raspberries
- 1 cup fresh blackberries
- ½ cup spinach leaves (optional)
- 1 tablespoon honey
- 2 tablespoons orange juice
- 1 tablespoon lemon juice
- Zest of 1 orange
- Zest of 1 lemon
Instructions:
Start by washing all the berries under cool water. Pat them dry with a paper towel. Make sure to remove any stems from the strawberries and slice them into thin pieces.
In a large mixing bowl, add the strawberries, blueberries, raspberries, and blackberries. If you’re using spinach, add it in as well for a touch of green.
Next, prepare the dressing. In a small bowl, whisk together honey, orange juice, and lemon juice. Add the orange zest and lemon zest for extra flavor. Mix until everything is well combined.
Drizzle the citrus dressing over the berry mixture. Gently toss everything together using a spatula. Be careful not to mash the berries.
Once well-coated, serve immediately or chill for a few minutes before serving to let the flavors blend.
Tips:
- For added crunch, sprinkle some chopped nuts like almonds or walnuts on top before serving.
- If you want a creamier dressing, consider adding a dollop of Greek yogurt to the citrus mixture.
- This salad can be easily customized. Swap in your favorite berries or add in some sliced kiwi for extra color.
Nutrition Facts:
- Calories: 150 per serving
- Protein: 2g
- Carbohydrates: 36g
- Fat: 0.5g
- Fiber: 5g
- Sugar: 10g
24 Creamy Spinach and Artichoke Dip

This Creamy Spinach and Artichoke Dip is the perfect appetizer for any gathering. It’s warm, cheesy, and packed with flavor. Get ready to impress your guests with this delightful dip!
Prep Time: 15 minutes
Cook Time: 30 minutes
Additional Time: 0 minutes
Total Time: 45 minutes
Servings: 8
Ingredients:
- 1 cup fresh spinach, chopped
- 1 cup artichoke hearts, chopped
- 1 cup cream cheese, softened
- 1/2 cup sour cream
- 1/2 cup mayonnaise
- 1 cup shredded mozzarella cheese
- 1/2 cup grated Parmesan cheese
- 2 cloves garlic, minced
- 1/2 teaspoon red pepper flakes (optional)
- Salt and pepper to taste
Instructions:
Preheat your oven to 350°F (175°C). This ensures that the dip will bake evenly and get bubbly.
In a mixing bowl, combine the cream cheese, sour cream, and mayonnaise. Mix well until you have a smooth and creamy consistency.
Next, stir in the chopped spinach, artichoke hearts, mozzarella cheese, Parmesan cheese, and minced garlic. If you like a bit of heat, add the red pepper flakes. Season with salt and pepper to taste.
Transfer the mixture into an oven-safe baking dish and spread it out evenly. Bake in the preheated oven for about 25-30 minutes or until the top is golden and the dip is bubbly.
Once done, remove it from the oven and let it cool slightly before serving. Enjoy it warm with tortilla chips, bread, or fresh veggies for dipping!
Tips:
- For a healthier version, you can use Greek yogurt instead of sour cream and mayonnaise.
- Feel free to add extra cheese on top for a cheesier layer.
- You can prepare this dip ahead of time and then bake it right before serving.
Nutrition Facts:
- Calories: 250 per serving
- Protein: 8g
- Carbohydrates: 8g
- Fat: 22g
- Saturated Fat: 10g
- Cholesterol: 45mg
- Sodium: 400mg
- Fiber: 2g
25 Grilled Vegetable Skewers
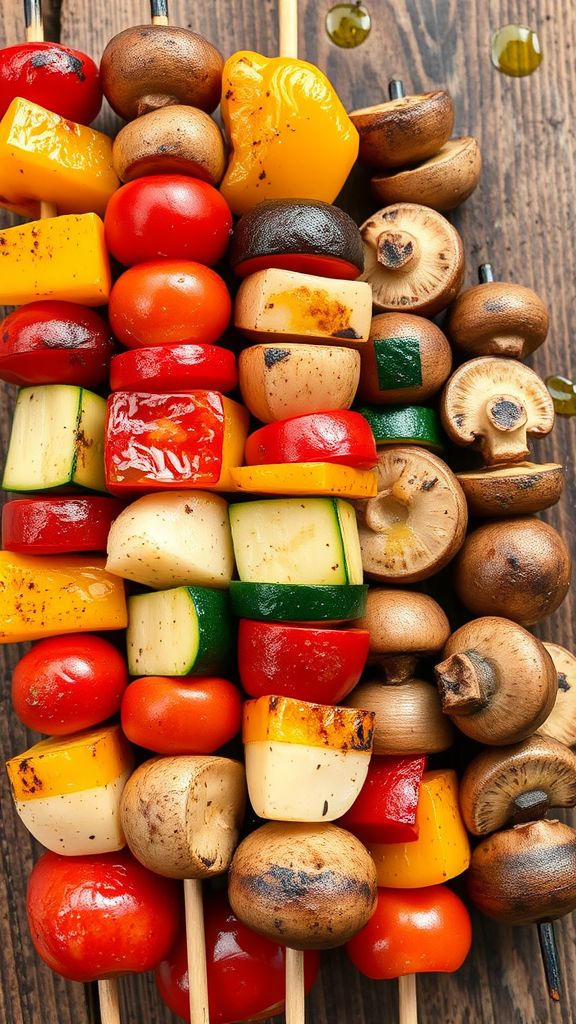
Grilled Vegetable Skewers are a colorful and tasty way to enjoy veggies. They are perfect for a summer barbecue or as a side dish for any meal. You can mix and match your favorite vegetables for a fun and healthy treat!
Prep Time: 15 minutes
Cook Time: 10-15 minutes
Additional Time: 30 minutes (for marinating)
Total Time: 55 minutes
Servings: 4
Ingredients:
- 2 cups bell peppers (red, yellow, green), cut into large chunks
- 1 cup cherry tomatoes
- 1 medium zucchini, sliced into rounds
- 1 medium red onion, cut into chunks
- 1 cup mushrooms, whole or halved
- 1/4 cup olive oil
- 2 tablespoons balsamic vinegar
- 2 cloves garlic, minced
- 1 teaspoon dried oregano
- Salt and pepper to taste
- Skewers (wooden or metal)
Instructions:
Start by soaking the wooden skewers in water for about 30 minutes if using them. This helps prevent them from burning on the grill.
In a large bowl, combine the olive oil, balsamic vinegar, minced garlic, dried oregano, salt, and pepper. Stir well to mix everything together.
Add all the chopped vegetables into the bowl with the marinade. Toss the veggies gently to ensure they are evenly coated. Let the mixture marinate for at least 30 minutes to soak in those delicious flavors.
Once marinated, take the skewers and carefully thread the vegetables onto them. You can alternate the vegetables for a colorful presentation. Leave a little space between each piece so they grill evenly.
Preheat your grill to medium-high heat. When it’s hot, place the skewers on the grill. Cook them for about 10 to 15 minutes, turning occasionally until the vegetables are tender and have nice grill marks.
Finally, remove the skewers from the grill and let them cool slightly before serving. Enjoy your tasty Grilled Vegetable Skewers as a delicious side or a main dish!
Tips:
- Feel free to add other veggies like asparagus or eggplant for variety.
- For an extra flavor kick, sprinkle some feta cheese on top before serving.
- To make it a complete meal, serve the skewers with grilled chicken or tofu.
Nutrition Facts:
- Calories: 150 per serving
- Protein: 3g
- Carbohydrates: 9g
- Fat: 12g
- Fiber: 3g
- Sugar: 2g
26 Rustic Herb Focaccia Bread

Rustic Herb Focaccia Bread is a delightful and easy-to-make bread that is perfect for any occasion. Its crunchy exterior and soft, fluffy interior, flavored with fresh herbs, will surely wow your family and friends. You can enjoy it on its own or as a side to your favorite dishes.
Prep Time: 15 minutes
Additional Time: 1 hour 30 minutes
Total Time: 1 hour 45 minutes
Servings: 8
Ingredients:
- 2 cups all-purpose flour
- 1 tablespoon instant yeast
- 1 teaspoon salt
- 1 teaspoon sugar
- ¾ cup warm water (about 110°F)
- 2 tablespoons olive oil (plus extra for drizzling)
- 1 tablespoon fresh rosemary, chopped
- 1 tablespoon fresh thyme, chopped
- 1 tablespoon fresh parsley, chopped
- Coarse sea salt for sprinkling on top
Instructions:
In a large bowl, combine the all-purpose flour, instant yeast, salt, and sugar. Mix these dry ingredients together until they are well combined.
Next, add the warm water and 2 tablespoons of olive oil to the dry mixture. Stir until the ingredients start to come together to form a dough. You may need to add a little more water or flour to reach the right consistency.
Knead the dough on a floured surface for about 5 minutes until it is smooth and elastic. Place the dough in a lightly greased bowl, cover it with a clean kitchen towel, and let it rise in a warm place for 1 hour or until it has doubled in size.
Once the dough has risen, punch it down gently to release the air. Then, transfer it to a greased baking sheet and use your fingers to stretch and flatten the dough into a rectangle about 1 inch thick.
Drizzle a bit more olive oil on top of the dough. Use your fingers to make dimples all over the surface. Sprinkle the chopped rosemary, thyme, and parsley over the top. Finish with a sprinkle of coarse sea salt.
Cover the dough once again with a towel and let it rise for an additional 30 minutes. Preheat your oven to 425°F while you wait.
After the second rise, bake the focaccia in the preheated oven for about 20-25 minutes or until the bread turns golden brown. Once it’s done, take it out of the oven and let it cool for a few minutes before slicing.
Tips:
- For a delicious flavor twist, try adding sun-dried tomatoes or olives to the dough.
- You can substitute the fresh herbs with dried herbs if fresh ones are not available.
- Serve the focaccia warm with a side of olive oil for dipping.
Nutrition Facts:
- Calories: 180
- Total Fat: 5g
- Saturated Fat: 0.5g
- Cholesterol: 0mg
- Sodium: 300mg
- Total Carbohydrates: 29g
- Dietary Fiber: 1g
- Sugars: 1g
- Protein: 4g
27 Zucchini Noodles with Pesto
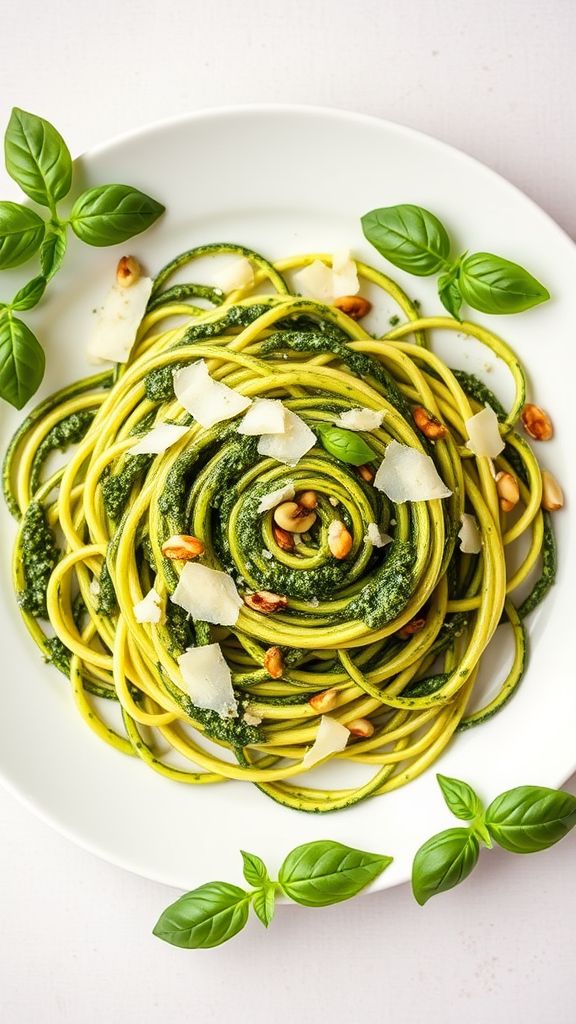
Zucchini Noodles with Pesto is a fun and healthy dish that will impress your family and friends. These fresh noodles are light and packed with flavor, making them perfect for any meal. Plus, they’re super easy to make!
Prep Time: 15 minutes
Total Time: 15 minutes
Servings: 2
Ingredients:
- 2 medium zucchinis
- 1 cup fresh basil leaves
- 1/4 cup grated Parmesan cheese
- 1/4 cup pine nuts
- 2 cloves garlic, minced
- 1/4 cup olive oil
- Salt and pepper to taste
Instructions:
First, start by making the zucchini noodles. You can use a spiralizer or a vegetable peeler to create thin noodle-like strips from the zucchinis. Set them aside after you finish.
Next, prepare the pesto by adding the basil leaves, Parmesan cheese, pine nuts, and minced garlic to a blender or food processor. Blend these ingredients together until they are finely chopped.
While blending, slowly pour in the olive oil to create a smooth pesto sauce. You can stop and scrape down the sides of the blender if needed. Season with salt and pepper to taste.
Once the pesto is ready, combine the zucchini noodles with the pesto sauce in a large bowl. Toss them gently until the noodles are well coated.
Serve the Zucchini Noodles with Pesto right away, and enjoy your delicious and healthy meal!
Tips:
- For added protein, consider adding grilled chicken or shrimp to the dish.
- You can use nuts like walnuts or almonds instead of pine nuts for a different flavor.
- Store leftovers in an airtight container in the fridge for up to 2 days.
Nutrition Facts:
- Calories: 250
- Fat: 20g
- Carbohydrates: 8g
- Fiber: 3g
- Protein: 6g
28 Chocolate Coconut Easter Cake

This Chocolate Coconut Easter Cake is a delightful treat for your Easter celebrations. With a rich chocolate flavor and a touch of coconut, it’s sure to impress your family and friends. Plus, it’s easy to make and even more fun to decorate!
Prep Time: 20 minutes
Cook Time: 30 minutes
Additional Time: 1 hour (for cooling and frosting)
Total Time: 1 hour 50 minutes
Servings: 12
Ingredients:
- 1 ¾ cups all-purpose flour
- 1 ½ cups granulated sugar
- ¾ cup unsweetened cocoa powder
- 1 ½ teaspoons baking powder
- 1 ½ teaspoons baking soda
- 1 teaspoon salt
- 2 large eggs
- 1 cup whole milk
- ½ cup vegetable oil
- 2 teaspoons vanilla extract
- 1 cup boiling water
- 1 cup sweetened shredded coconut (plus extra for topping)
- 1 cup chocolate frosting (store-bought or homemade)
- Chocolate eggs or bunnies for decoration (optional)
Instructions:
Start by preheating your oven to 350°F (175°C). Grease and flour two 9-inch round cake pans. This will help the cake come out easily when it’s done.
In a large bowl, mix together the flour, sugar, cocoa powder, baking powder, baking soda, and salt. Whisk all the dry ingredients together until they are well combined.
Next, add the eggs, milk, vegetable oil, and vanilla extract to the bowl. Mix everything together on medium speed with an electric mixer for about 2 minutes. The batter will be thick and creamy.
Now, carefully stir in the boiling water. The batter will be thin, and that’s okay! Stir in the shredded coconut until well distributed.
Pour the batter evenly into the prepared cake pans. Bake in the oven for 30 minutes or until a toothpick inserted into the center comes out clean.
Once baked, let the cakes cool in the pans for about 10 minutes, then transfer them to a wire rack to cool completely for about 1 hour.
When the cakes are cool, spread a layer of chocolate frosting on top of one of the cakes. Place the second cake on top and frost the top and sides. Add extra shredded coconut on top to create a pretty and festive look. If you want, decorate with chocolate eggs or bunnies.
Tips:
- You can use dark chocolate cocoa powder for a richer flavor if you prefer.
- For extra moisture, consider adding a tablespoon of yogurt to the batter.
- Make sure the cakes are completely cool before frosting to avoid melting.
Nutrition Facts:
- Calories: 350
- Protein: 4g
- Carbohydrates: 52g
- Fat: 15g
- Sugar: 30g
- Fiber: 2g
29 Strawberry Shortcake Trifle

Nothing says spring like a delicious Strawberry Shortcake Trifle! This delightful dessert layers fresh strawberries, fluffy whipped cream, and cake for a treat everyone will love. Perfect for celebrating any occasion, this is a show-stopping dessert that’s surprisingly easy to make.
Prep Time: 25 minutes
Additional Time: 2 hours
Total Time: 2 hours 25 minutes
Servings: 6-8
Ingredients:
- 2 cups fresh strawberries, hulled and sliced
- 1/4 cup granulated sugar
- 1 teaspoon vanilla extract
- 1 pound pound cake, cut into cubes (store-bought or homemade)
- 2 cups heavy whipping cream
- 1/4 cup powdered sugar
- 1 teaspoon vanilla extract (for the cream)
Instructions:
First, combine the sliced strawberries with granulated sugar in a bowl. Gently mix them and let them sit for about 30 minutes. This will help the strawberries release their juices, making them sweeter.
Next, in another bowl, whip the heavy cream with a hand mixer or stand mixer until soft peaks form. Add in powdered sugar and vanilla extract, and continue to whip until stiff peaks form. Be careful not to over-whip the cream!
Now, it’s time to assemble the trifle. In a large clear glass bowl or individual cups, start layering your ingredients. Begin with a layer of cubed pound cake at the bottom, followed by a layer of the sweetened strawberries and a layer of whipped cream.
Repeat the layers until you reach the top of your dish. Finish with a generous dollop of whipped cream and a few extra sliced strawberries on top for garnish.
Finally, cover your trifle and place it in the refrigerator for at least 2 hours before serving. This allows all the flavors to meld beautifully.
Tips:
- Use ripe strawberries for the best flavor.
- You can substitute the pound cake with angel food cake for a lighter option.
- Feel free to add other fruits like blueberries or raspberries for variety.
Nutrition Facts:
- Calories: 320 per serving
- Total Fat: 18g
- Saturated Fat: 10g
- Cholesterol: 60mg
- Sodium: 150mg
- Carbohydrates: 36g
- Fiber: 1g
- Sugar: 20g
- Protein: 4g
30 Almond Flour Carrot Cake
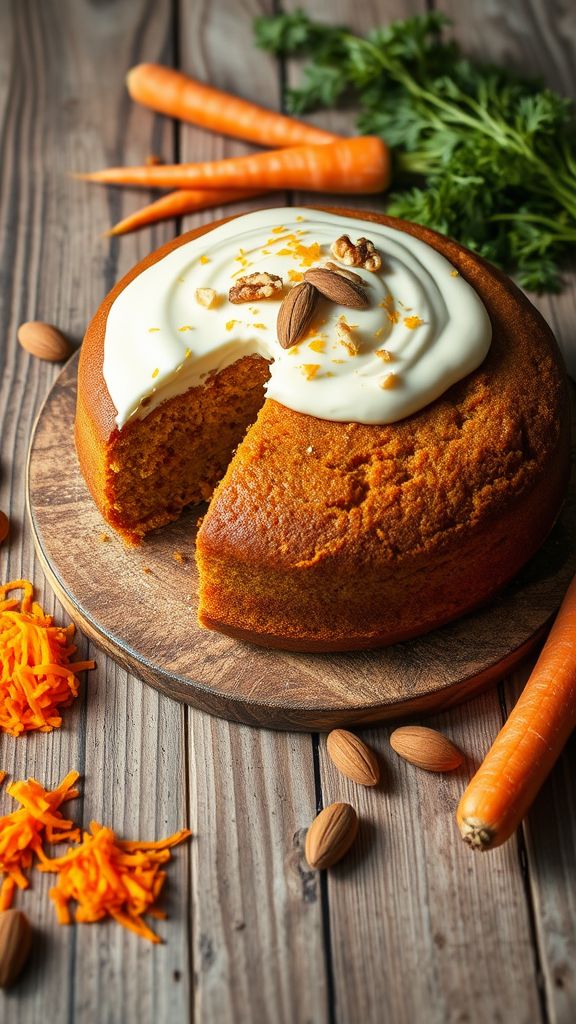
Almond Flour Carrot Cake is a deliciously moist and healthy treat, perfect for any celebration! Packed with the natural sweetness of carrots and the nutty flavor of almond flour, this cake is not only gluten-free but also incredibly satisfying. It’s great for Easter dinner or any spring gathering.
Prep Time: 15 minutes
Cook Time: 30 minutes
Additional Time: 10 minutes
Total Time: 55 minutes
Servings: 10
Ingredients:
- 2 cups almond flour
- 1 cup grated carrots
- 1/2 cup honey or maple syrup
- 1/4 cup coconut oil, melted
- 4 large eggs
- 1 teaspoon vanilla extract
- 1 teaspoon baking soda
- 1 teaspoon baking powder
- 1 teaspoon cinnamon
- 1/2 teaspoon nutmeg
- 1/4 teaspoon salt
- 1/2 cup chopped walnuts (optional)
- 1/2 cup raisins (optional)
Instructions:
Preheat your oven to 350°F (175°C) and grease a 9-inch round cake pan. This will ensure your cake comes out easily once it’s baked.
In a large mixing bowl, combine the almond flour, baking soda, baking powder, cinnamon, nutmeg, and salt. Mix these dry ingredients well, so they evenly incorporate when you add the wet ingredients.
In a separate bowl, whisk together the honey (or maple syrup), melted coconut oil, eggs, and vanilla extract. Make sure the mixture is thoroughly combined for a smooth batter.
Pour the wet ingredients into the dry ingredients and mix until just combined. Don’t over-mix! Gently fold in the grated carrots, chopped walnuts, and raisins if you’re using them.
Transfer the batter into the prepared cake pan. Spread it evenly and smooth the top with a spatula. Bake the cake in the preheated oven for about 30 minutes, or until a toothpick inserted into the center comes out clean.
Once baked, allow the cake to cool in the pan for about 10 minutes. Then, transfer it to a wire rack to cool completely before slicing and serving.
Tips:
- For an extra flavor boost, add some orange zest to the batter.
- Try topping the cooled cake with a cream cheese frosting for a special treat.
- Store any leftovers in an airtight container at room temperature for up to 3 days.
Nutrition Facts:
- Calories: 250 per slice
- Protein: 6g
- Carbohydrates: 20g
- Fat: 18g
- Fiber: 3g
- Sugar: 8g