15 Spring Cake Designs That Are Fresh, Floral, and Gorgeous
Spring deserves a cake that actually looks like spring — soft petals, pastel layers, and flavors that taste like the season finally showed up.
From a Lavender Honey Drip Cake to an Elderflower Champagne Layer Cake, every recipe here leans into florals, fresh fruit, and light, bright flavors. There’s a design for every skill level, from rustic naked cakes to showstopping stacked layers.
Bookmark this one now — you’re going to want it on hand for Easter, Mother’s Day, bridal showers, or honestly any excuse to bake something beautiful this season.
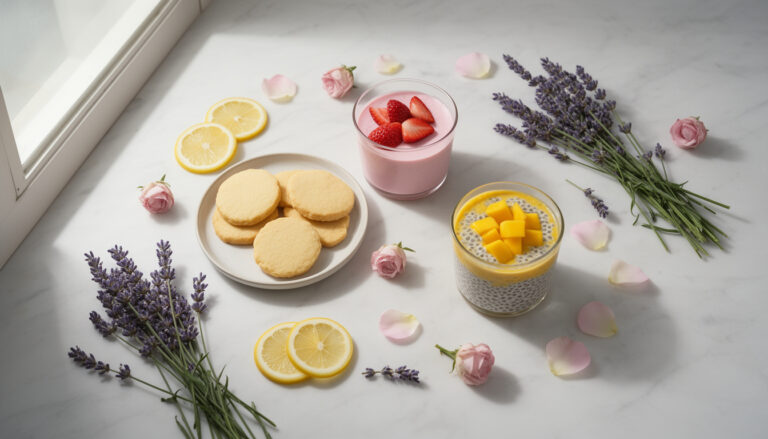
1. Lavender Honey Drip Cake
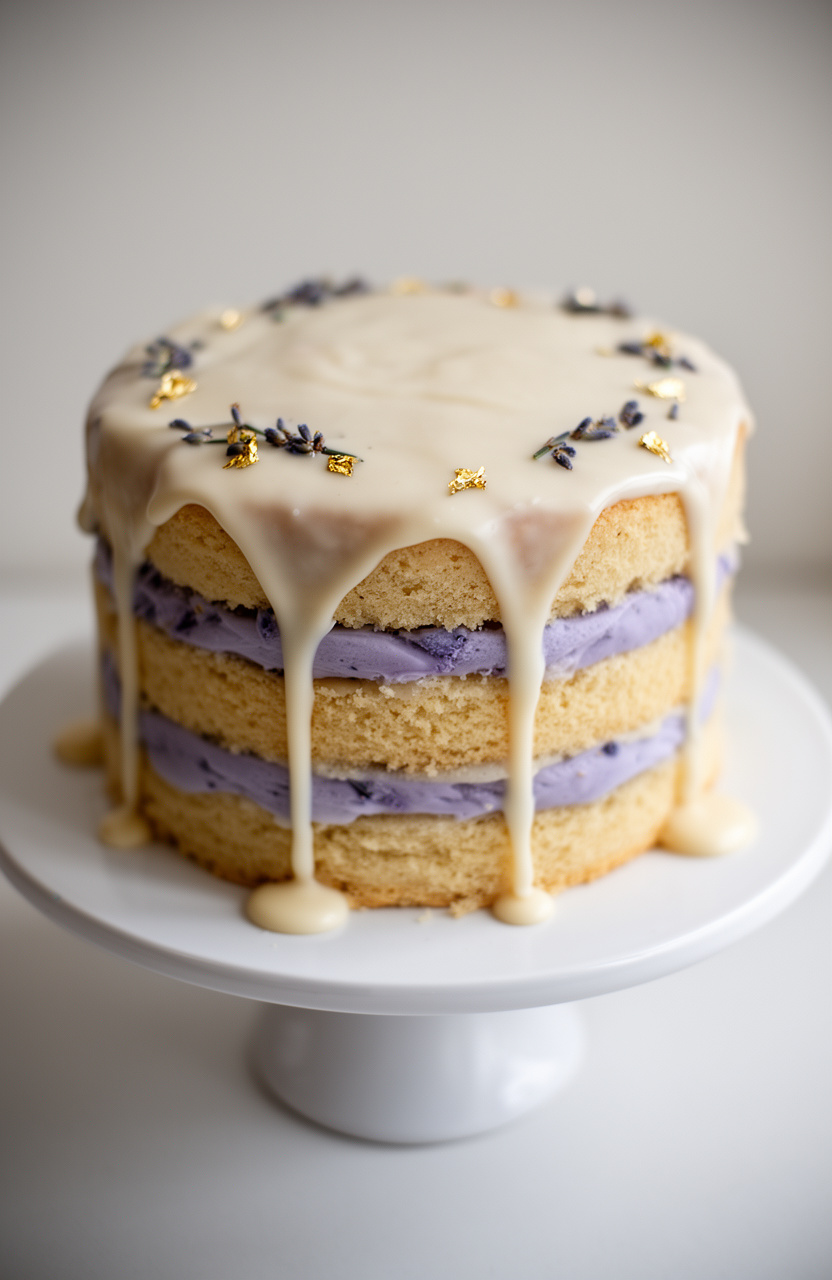
Floral and golden, this lavender honey drip cake layers wildflower honey infused with dried culinary lavender buds into a tender, flour-based crumb that’s finished with a silky heavy cream drip cascading down the sides.
Lavender Honey Drip Cake
Lavender Honey Infusion
Lavender Cake Layers
Lavender Honey Buttercream
Honey Drip
Garnish
- 🍰Three 8-inch round cake pans
- 🔌Stand mixer with paddle and whisk attachments
- 🫕Small heavy-bottomed saucepan
- 🪣Fine-mesh strainer or cheesecloth
- ⚖️Digital kitchen scale
- 🥄Offset spatula (small and large)
- 🍴Cake turntable
- 🍴Bench scraper
- 🍴Drip bottle or squeeze bottle
- 🌡️Instant-read thermometer
- 📄Parchment paper circles
- 🪜Cooling wire racks
- 🔪Serrated cake leveler or long serrated knife
- 🖌️Pastry brush
- 🥄Rubber spatula
- 🥄Measuring cups and spoons
- 🥣Mixing bowls (large and medium)
Infuse Lavender Honey
Make the lavender honey infusion: Combine 1 cup raw wildflower honey and 3 tablespoons dried culinary lavender buds (2 tablespoons for the infusion, 1 tablespoon reserved for grinding into the cake) in a small heavy-bottomed saucepan over low heat. Warm gently, stirring occasionally, until the honey reaches 150°F on an instant-read thermometer, about 8–10 minutes.
Do not boil. Remove from heat, cover, and allow to steep for 30 minutes.
Pour through a fine-mesh strainer, pressing the buds to extract maximum flavor. Discard the spent lavender.
Reserve 1/4 cup of the infused honey for the buttercream and 1/2 cup for the drip. The remaining honey can be used as a simple syrup to brush the cake layers.
Prepare Cake Pans
Preheat your oven to 350°F (175°C). Grease three 8-inch round cake pans thoroughly with butter or non-stick spray, line the bottoms with parchment paper circles, and grease the parchment.
Lightly flour the pans, tapping out any excess. Set aside on a level surface.
Mix Dry Ingredients
Grind 1 tablespoon of dried culinary lavender buds in a spice grinder or mortar and pestle until very fine, almost powdery. In a large mixing bowl, whisk together 3 cups sifted all-purpose flour, 1 tablespoon baking powder, 1/2 teaspoon baking soda, 1/2 teaspoon fine sea salt, and the ground lavender until evenly combined.
Set aside. In a separate small pitcher, whisk together 1 cup buttermilk and 1/2 cup whole milk.
Set aside.
Cream Butter and Sugar
In the bowl of a stand mixer fitted with the paddle attachment, beat 1 cup room-temperature unsalted butter on medium speed for 3 minutes until pale and creamy. Add 1 3/4 cups granulated sugar and beat on medium-high speed for 5 full minutes, scraping down the sides and bottom of the bowl twice, until the mixture is very light, fluffy, and nearly white.
This extended creaming is essential for a tender crumb.
Add Eggs and Extracts
Reduce mixer speed to medium-low. Add 4 eggs one at a time, beating for 30 seconds after each addition and scraping down the bowl between additions.
Add 2 teaspoons vanilla extract and 1 teaspoon lavender extract, mixing until just combined. If the batter looks slightly curdled at this stage, don’t worry — it will come together once the flour is added.
If using, add 6 drops of purple gel food coloring and mix briefly.
Combine Batter
With the mixer on low speed, add the flour mixture in three additions, alternating with the buttermilk-milk mixture in two additions (flour, milk, flour, milk, flour). Begin and end with the flour.
Mix each addition only until just combined — do not overmix. After the last addition of flour, stop the mixer and finish folding the batter by hand with a rubber spatula, scraping the very bottom of the bowl to incorporate any unmixed streaks.
The batter should be smooth, thick, and fragrant.
Bake Cake Layers
Divide the batter evenly among the three prepared 8-inch pans, using a kitchen scale for accuracy (approximately 560–580g per pan). Smooth the tops with an offset spatula.
Tap each pan firmly on the counter 3–4 times to release any large air bubbles. Bake on the center rack of the preheated 350°F oven for 32–35 minutes, rotating the pans 180° at the 20-minute mark, until a toothpick inserted in the center comes out with just a few moist crumbs and the edges have pulled slightly away from the pan sides.
Cool Cake Layers
Remove the cakes from the oven and allow them to cool in their pans on wire racks for 20 minutes. Run a thin offset spatula around the edges of each pan, then invert the layers onto the wire racks.
Peel off and discard the parchment circles. Allow the layers to cool completely to room temperature, at least 1 hour, before assembling.
For flatter layers, you can wrap the cooled cakes tightly in plastic wrap and refrigerate for up to 24 hours — cold cakes are much easier to frost.
Make Buttercream
Make the lavender honey buttercream: In the bowl of a stand mixer fitted with the paddle attachment, beat 1 1/2 cups room-temperature unsalted butter on medium-high speed for 5 minutes until very pale, fluffy, and almost white. Reduce speed to low and gradually add 5 cups sifted powdered sugar, 1 cup at a time, mixing until incorporated before each addition.
Add 1/4 cup of the strained lavender honey infusion, 3 tablespoons heavy cream, 1 teaspoon vanilla extract, and 1/4 teaspoon sea salt. Increase speed to medium-high and beat for 3 minutes until light and silky.
If using, add 4 drops of purple gel food coloring and mix to achieve a soft lavender hue. Adjust consistency with additional cream (1 teaspoon at a time) if needed.
Stack Cake Layers
Level the tops of each cooled cake layer using a serrated cake leveler or long serrated knife, creating flat, even surfaces. Place one cake layer on a cardboard cake round set on your cake turntable.
Using a pastry brush, lightly brush the top of the layer with the remaining lavender honey infusion (used as a simple syrup) to add moisture and flavor. Spread approximately 3/4 cup of buttercream evenly over the top using a large offset spatula, reaching the edges.
Place the second layer on top, press gently to adhere, brush with honey syrup, and repeat with 3/4 cup buttercream. Add the third and final layer, cut side down for the flattest top, and brush with honey syrup.
Apply Crumb Coat
Apply a thin crumb coat: Using an offset spatula, spread a very thin layer of buttercream over the entire outside of the cake — top and sides — to seal in any crumbs. This layer should be thin enough that you can see the cake through it.
Smooth with a bench scraper. Transfer the cake (still on the turntable) to the refrigerator and chill for 30 minutes until the crumb coat is firm to the touch.
Final Frost Cake
Apply the final coat of buttercream: Remove the chilled cake from the refrigerator. Using a large offset spatula, apply a generous, even layer of buttercream to the top and sides of the cake.
Hold the bench scraper vertically against the side of the cake while rotating the turntable smoothly to create a clean, straight edge. Smooth the top with the offset spatula, pulling any excess buttercream from the edges inward.
For a textured finish, use the back of a spoon or a small offset spatula to create soft swirls. Refrigerate the frosted cake for at least 30 minutes until very firm.
Prepare Honey Drip
Make the honey drip: Combine 1/2 cup of the strained lavender honey infusion, 2 tablespoons heavy cream, and 1 tablespoon unsalted butter in a small saucepan over medium-low heat. Stir constantly and cook for 8–10 minutes until the mixture is slightly thickened and glossy, reaching about 200°F on an instant-read thermometer.
Remove from heat and allow to cool for 10–15 minutes until it reaches a pourable but not runny consistency — it should fall off a spoon in a slow, thick drizzle. Transfer to a drip bottle or squeeze bottle.
Apply Honey Drip
Remove the chilled cake from the refrigerator. Test the drip consistency on the back of a cold spoon or the inside of the cake pan — it should flow slowly and stop before running all the way down.
Working around the top edge of the cake, apply the honey drip by squeezing the bottle and allowing it to drip down the sides at irregular intervals, varying the length of each drip for a natural look. Some drips can reach nearly the base of the cake; others should stop halfway.
Once all drips are applied, pour a small pool of the honey mixture onto the center of the top and spread gently with a small offset spatula to cover the top surface.
Garnish and Chill
Decorate the cake while the drip is still slightly tacky: Arrange fresh edible lavender sprigs in a cluster on one side of the top of the cake. Scatter dried culinary lavender buds lightly over the top.
Place 2–3 pieces of natural honeycomb on the top surface for a dramatic focal point. Using tweezers, carefully apply small flakes of edible gold leaf to the drip areas on the sides for a luxurious finish.
Refrigerate the completed cake for at least 2 hours (or up to overnight) to allow all elements to set fully before slicing and serving.
Slice and Serve
To serve, remove the cake from the refrigerator 20–30 minutes before slicing to allow the buttercream to soften slightly for the best texture and flavor. Use a long sharp knife dipped in hot water and wiped clean between each cut for clean, beautiful slices.
Serve each slice with an optional drizzle of extra lavender honey on the plate. Store leftover cake covered at room temperature for up to 2 days or refrigerated for up to 5 days.
Per serving (1 slice (1/12 of cake)) — values are estimates
Editor’s Choice


2. Pressed Wildflower Buttercream Cake
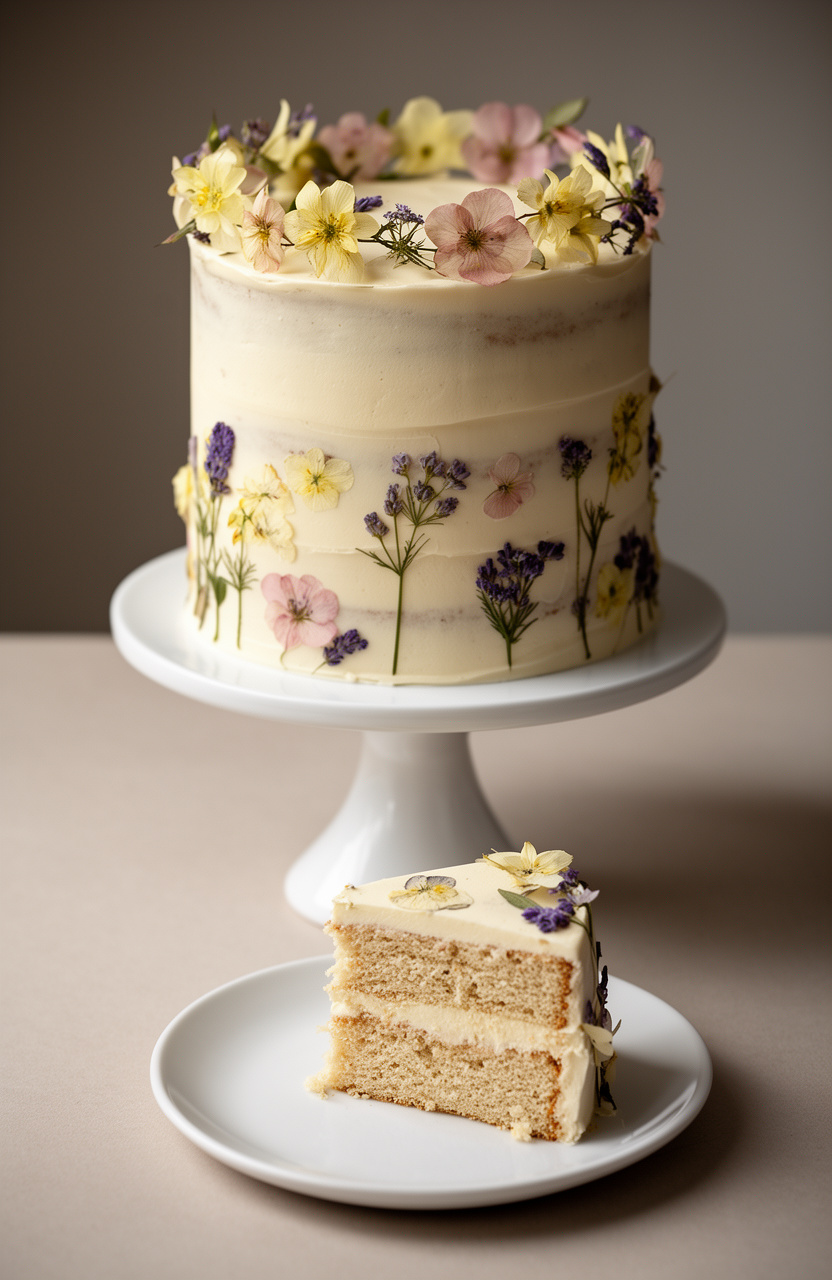
Pressed wildflowers set into smooth buttercream give this tall layered cake a botanical finish that looks hand-crafted and delicate. The tender, flour-based crumb bakes up light and even, providing a soft contrast to the rich, creamy frosting anchoring each bloom in place.
Pressed Wildflower Buttercream Cake
Vanilla Cake
Swiss Meringue Buttercream
Buttercream Coloring
Decoration
Pan Preparation
- 🍰Three 8-inch round cake pans
- 🔌Stand mixer with whisk and paddle attachments
- 🥣Large heatproof mixing bowl
- 🫕Medium saucepan
- 🌡️Candy or instant-read thermometer
- 🍴Bench scraper
- 🥄Large offset spatula
- 🥄Small offset spatula
- 🍴Cake turntable
- 📄Parchment paper
- 🪜Wire cooling racks
- 🔪Serrated cake leveling knife
- 🍽️Cake board or serving platter
- 🎂Piping bags
- 🍴Assorted piping tips (Wilton 1M, 104 petal tip, round tip #12)
- 🖌️Pastry brush
- 🖌️Small paint brush (food-safe, for luster dust)
- 🍴Tweezers (food-safe, for flower placement)
- 🍴Flower press or heavy books (if pressing flowers yourself)
- 🍴Sifter
- 🥄Rubber spatula
- ⚖️Digital kitchen scale
Press Wildflowers
If pressing your own wildflowers, do this at least 2 weeks in advance. Place freshly picked, unblemished edible flowers between sheets of parchment paper inside a flower press or between the pages of heavy books.
Stack additional weight on top and leave undisturbed for 2 weeks until completely flat and dry. Store pressed flowers in a dry, airtight container away from light until ready to use.
If using pre-pressed edible flowers, skip this step.
Prep Oven and Pans
Preheat your oven to 350°F (175°C) with a rack positioned in the center. Spray three 8-inch round cake pans generously with non-stick baking spray, then line the bottoms with parchment rounds and spray again.
Set aside. Allow all refrigerated cake ingredients — butter, eggs, buttermilk, and sour cream — to sit at room temperature for at least 30 minutes before beginning.
Combine Dry Ingredients
In a large bowl, sift together 3 cups all-purpose flour, 1 tablespoon baking powder, 1/2 teaspoon baking soda, and 1 teaspoon sea salt. Whisk briefly to combine evenly.
Set aside. In a separate medium bowl or measuring cup, whisk together 1 cup buttermilk and 1/2 cup sour cream until smooth.
Set aside.
Cream Butter and Sugar
In the bowl of a stand mixer fitted with the paddle attachment, beat 1 cup room-temperature butter on medium-high speed for 3 minutes until pale and fluffy. Add 2 cups granulated sugar and continue beating on medium-high for another 4 minutes, scraping down the sides of the bowl halfway through, until the mixture is very light and creamy.
Add 4 eggs one at a time, beating for 30 seconds after each addition and scraping the bowl between additions. Add 2 teaspoons vanilla extract and 1 teaspoon almond extract, and mix for 30 seconds more.
Combine Wet and Dry
Reduce the mixer to low speed. Add one-third of the flour mixture to the butter mixture and mix just until nearly combined.
Add half of the buttermilk-sour cream mixture and mix until just incorporated. Repeat with another third of the flour, the remaining buttermilk mixture, and finish with the final third of the flour.
Stop the mixer as soon as the last streaks of flour disappear — do not overmix. Use a rubber spatula to fold the batter from the bottom of the bowl once or twice to ensure everything is evenly incorporated.
Bake Cake Layers
Divide the batter evenly among the three prepared 8-inch pans, using a kitchen scale for accuracy (approximately 560g per pan). Smooth the tops with a small offset spatula.
Firmly tap each pan on the counter 3-4 times to release any air bubbles. Bake all three layers simultaneously on the center rack at 350°F for 30-35 minutes, rotating the pans front-to-back at the 20-minute mark.
The cakes are done when a toothpick inserted into the center comes out with just a few moist crumbs and the tops spring back lightly when pressed.
Cool Cake Layers
Remove the pans from the oven and let the cakes cool in the pans on wire racks for exactly 15 minutes. Run a thin knife or small offset spatula around the edges of each pan, then invert the layers onto the wire racks.
Peel off and discard the parchment rounds. Allow the cake layers to cool completely at room temperature for at least 1 hour before frosting.
For the cleanest cuts and easiest assembly, wrap the cooled layers tightly in plastic wrap and refrigerate for at least 1 hour or overnight.
Heat Meringue Base
Make the Swiss meringue buttercream: Combine 6 large egg whites, 1 3/4 cups granulated sugar, and 1/4 teaspoon salt in the large heatproof bowl of your stand mixer. Set the bowl over a saucepan of barely simmering water (the bottom of the bowl should not touch the water).
Whisk constantly by hand for 5-7 minutes until the mixture is hot to the touch and reaches 160°F on a candy thermometer, and all sugar granules have completely dissolved — rub a small amount between your fingers to test; it should feel completely smooth with no grittiness.
Build the Buttercream
Transfer the bowl to the stand mixer fitted with the whisk attachment. Beat the egg white mixture on high speed for 10-12 minutes until the meringue is stiff, glossy, and the bowl is completely cool to the touch (this is critical — adding butter to a warm meringue will cause it to melt).
The meringue should hold stiff peaks and look bright white. Switch to the paddle attachment.
With the mixer on medium-low, add 2 cups room-temperature butter one tablespoon at a time, waiting about 10 seconds between each addition. The mixture may look curdled or soupy after about half the butter — this is completely normal.
Continue adding all the butter.
Finish and Color Buttercream
Once all the butter has been added, increase the mixer to medium-high and beat for 5-6 minutes until the buttercream is silky smooth, thick, and creamy. If it still looks curdled, keep beating — it will come together.
Add 2 teaspoons vanilla extract and 1 tablespoon heavy cream, and beat for 1 minute more. The finished buttercream should be smooth, spreadable, and hold its shape.
Reserve about 1 1/2 cups of white buttercream in a separate bowl. Divide the remaining buttercream into small bowls and tint portions with soft green, blush pink, lavender, and ivory gel food coloring for piped flower accents, if desired.
Stack and Fill Cake
Remove the chilled cake layers from the refrigerator. Using a long serrated knife, level the tops of any domed layers by slicing horizontally to create flat, even surfaces.
Place a small dab of white buttercream in the center of a cake board or serving plate and set the first cake layer on top, cut side up, to anchor it. Place the board on a cake turntable.
Using a large offset spatula, spread a generous, even layer of white buttercream (about 3/4 cup) over the top of the first layer. Place the second cake layer on top, cut side down, and press gently to adhere.
Add another 3/4 cup layer of buttercream on top. Place the third and final layer on top, cut side down.
Crumb Coat and Frost
Apply a thin, even crumb coat of white buttercream over the entire cake — top and sides — using the large offset spatula and bench scraper. This initial thin coat seals in any crumbs.
Refrigerate the crumb-coated cake uncovered for 30 minutes until the coating is firm to the touch. Remove from the refrigerator and apply a final, generous coat of white buttercream.
Use the bench scraper held vertically against the side of the cake while spinning the turntable to smooth the sides to a clean finish. Smooth the top with the large offset spatula.
The finish does not need to be perfectly smooth — a slightly textured, organic finish complements the wildflower aesthetic beautifully.
Pipe Buttercream Flowers
Refrigerate the fully frosted cake for at least 1 hour until the buttercream exterior is completely firm. Meanwhile, fit piping bags with your chosen tips and fill with the tinted buttercream colors.
Once the cake is firm, remove it from the refrigerator. Using the 1M tip, pipe small rosettes and swirls in clusters around the top edge and lower sides of the cake.
Use the petal tip to pipe delicate ruffled flowers in blush and lavender. Use the round tip to pipe small dots and buds.
Work quickly and keep the design organic and asymmetrical — clusters of piped flowers should leave open spaces for the pressed wildflowers.
Place Pressed Flowers
Using food-safe tweezers or clean fingertips, carefully lift each pressed wildflower and gently press it flat against the chilled buttercream surface. Begin placing the larger pressed flowers first — pansies and violas — then fill in with smaller chamomile, lavender sprigs, and bachelor’s buttons.
Arrange them in a cascading diagonal pattern from the top-left of the cake down toward the lower-right side, or cluster them artistically around the piped buttercream flowers. Press each flower very gently but firmly into the buttercream so it adheres without breaking.
If desired, use a small food-safe paint brush to lightly dust gold luster dust mixed with vodka over select flowers and piped accents for a luminous finish.
Set, Rest, and Serve
Once all flowers are placed and any luster dust has been applied, refrigerate the finished cake uncovered for 30 minutes to set the decorations. Before serving, remove the cake from the refrigerator and allow it to sit at room temperature for 30-45 minutes — cold buttercream is firm and dense, while room-temperature buttercream is silky and delicious.
Slice with a sharp, thin-bladed knife wiped clean between each cut. The pressed flowers are fully edible and can be eaten along with the cake.
Store any leftover cake covered in the refrigerator for up to 4 days; bring individual slices to room temperature before serving.
Per serving (1 slice (1/12 of cake)) — values are estimates
Recommended for You
3. Lemon Poppy Seed Naked Cake
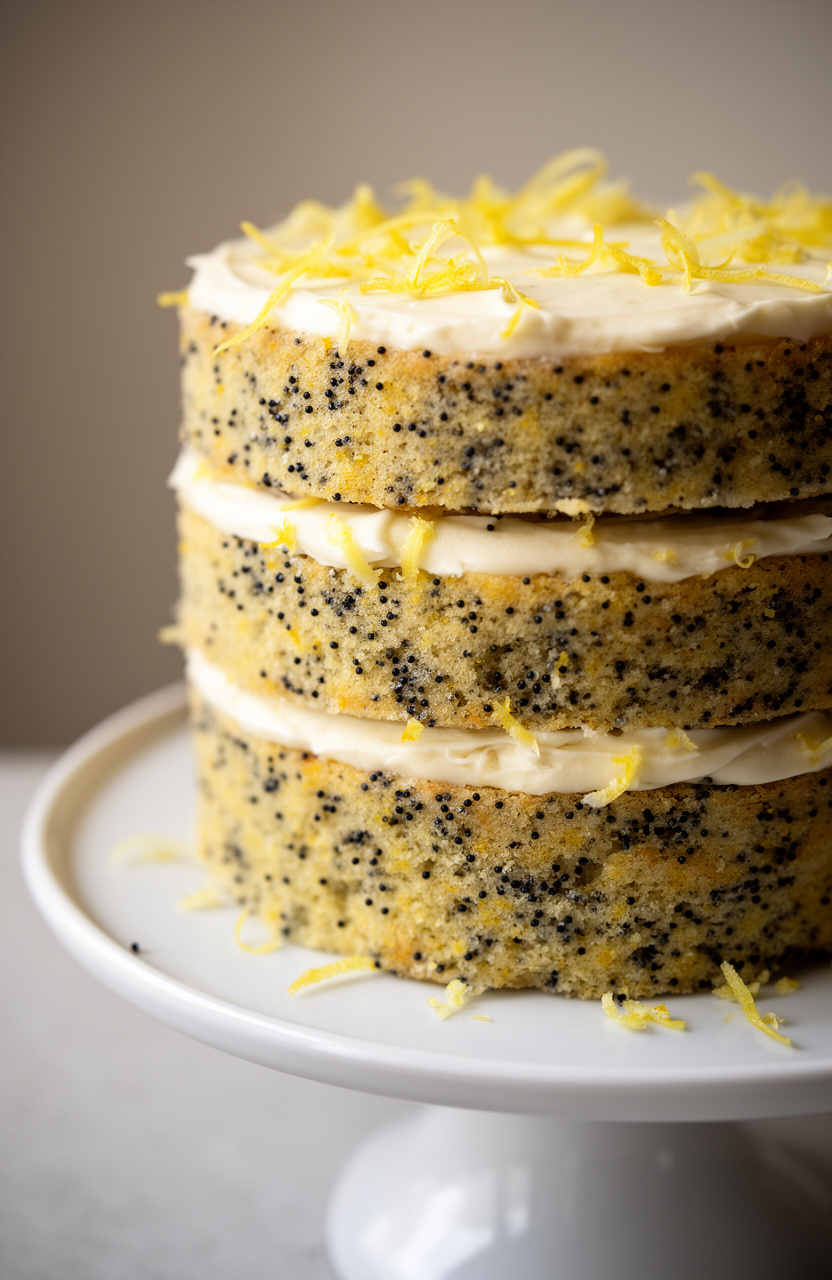
Bright lemon zest and scattered poppy seeds run through every layer of this flour-based naked cake, giving it a subtly nutty crunch against a tender, moist crumb. The unfrosted sides let the soft, airy layers speak for themselves, with just enough cream between each one to balance the citrus bite.
Lemon Poppy Seed Naked Cake
Cake
Lemon Syrup
Frosting
Whipped Cream Topping
Garnish
- 🍰Three 8-inch round cake pans
- 🔌Stand mixer with paddle and whisk attachments
- 🥣Large mixing bowls
- 🔪Microplane or fine zester
- 🍴Citrus juicer
- ⚖️Kitchen scale
- 🥄Rubber spatula
- 🥄Offset spatula
- 🍴Bench scraper
- 🍴Cake turntable
- 🪜Wire cooling racks
- 🖌️Pastry brush
- 🫕Small saucepan
- 🎂Piping bag with large round or star tip
- 🔪Serrated knife or cake leveler
- 📄Parchment paper
- 🪣Sifter or fine mesh sieve
Prepare the Pans
Preheat your oven to 350°F (175°C). Grease three 8-inch round cake pans generously with butter or nonstick spray, line the bottoms with parchment paper circles, then grease the parchment as well.
Dust the sides lightly with flour and tap out any excess. Set aside.
Mix Dry Ingredients
In a large bowl, whisk together 3 cups (360g) all-purpose flour, 2 tablespoons poppy seeds, 1 tablespoon baking powder, 1/2 teaspoon baking soda, and 1/2 teaspoon fine sea salt until evenly combined. Set aside.
Combine Wet Mixture
In a separate medium bowl or large measuring cup, whisk together 1 cup (240ml) sour cream, 1/4 cup (60ml) whole milk, 1/4 cup (60ml) fresh lemon juice, and 2 teaspoons vanilla extract until smooth. Set aside.
Cream Butter and Sugar
In the bowl of a stand mixer fitted with the paddle attachment, beat 1 cup (225g) softened unsalted butter and 1 3/4 cups (350g) granulated sugar on medium-high speed for 4 to 5 minutes, scraping down the sides of the bowl halfway through, until the mixture is very pale, light, and fluffy. Add 1 tablespoon lemon zest and beat for 1 more minute to release the aromatic oils.
Add the Eggs
With the mixer on medium speed, add the 4 large eggs one at a time, beating for 30 seconds after each addition and scraping down the bowl as needed. The batter should look smooth and cohesive.
If it appears slightly curdled, continue mixing — it will come together once the flour is added.
Fold in Flour
Reduce the mixer speed to low. Add the flour mixture in three additions, alternating with the sour cream mixture in two additions (flour, wet, flour, wet, flour), beginning and ending with the flour.
Mix each addition only until just combined — do not overmix. Use a rubber spatula to fold the batter a few times by hand to ensure no dry streaks remain at the bottom of the bowl.
Fill the Pans
Divide the batter evenly among the three prepared cake pans, using a kitchen scale for accuracy (approximately 520g of batter per pan). Smooth the tops with an offset spatula.
Tap each pan firmly on the counter 3 to 4 times to release any air bubbles.
Bake the Cakes
Bake in the preheated 350°F (175°C) oven for 28 to 30 minutes, or until the tops are golden and a toothpick inserted into the center of each cake comes out clean or with just a few moist crumbs. Rotate the pans front to back halfway through baking for even browning.
Do not open the oven door before the 25-minute mark.
Make Lemon Syrup
While the cakes bake, make the lemon soaking syrup. Combine 1/3 cup (80ml) fresh lemon juice and 1/3 cup (67g) granulated sugar in a small saucepan over medium heat.
Stir until the sugar is fully dissolved, about 2 to 3 minutes. Remove from heat and set aside to cool slightly.
Cool and Soak Layers
Remove the cakes from the oven and let them cool in their pans on wire racks for 10 minutes. Run a thin knife around the edges, then invert the cakes onto the wire racks and peel off the parchment.
While still warm, use a pastry brush to generously brush the lemon soaking syrup over the tops and sides of all three layers. Allow the cakes to cool completely at room temperature, about 30 minutes, before frosting.
Make Lemon Buttercream
Make the lemon buttercream: In the bowl of a stand mixer fitted with the paddle attachment, beat 1 1/2 cups (340g) softened unsalted butter on medium-high speed for 3 to 4 minutes until very pale and creamy. Reduce speed to low and gradually add 5 cups (600g) sifted powdered sugar, 1 cup at a time, mixing until incorporated after each addition.
Add 3 tablespoons fresh lemon juice, 1 tablespoon lemon zest, 2 tablespoons heavy cream, 1/4 teaspoon salt, and 1 teaspoon vanilla extract. Increase speed to medium-high and beat for 3 minutes until the buttercream is light, fluffy, and spreadable.
Adjust consistency with additional cream (1 teaspoon at a time) if needed.
Stack the Layers
If any cake layers have domed tops, use a serrated knife or cake leveler to trim them flat. Place the first cake layer on a cake board or serving plate set on a cake turntable.
Spread about 3/4 cup of buttercream evenly over the top using an offset spatula, taking it all the way to the edges. Place the second cake layer on top, pressing gently to adhere, and repeat with another 3/4 cup of buttercream.
Place the third cake layer on top, cut side down for the flattest surface.
Apply Crumb Coat
Apply a very thin crumb coat of buttercream over the entire cake — top and sides — using an offset spatula. This layer should be thin enough that you can see the cake through it; its purpose is to seal in crumbs.
Smooth as best you can with a bench scraper. Refrigerate the crumb-coated cake for 20 minutes to firm up.
Finish Naked Style
For the naked cake finish, apply a second, slightly thicker layer of buttercream to the top and sides of the chilled cake. Use the bench scraper held at a 90-degree angle to the cake and spin the turntable to smooth the sides, deliberately leaving some areas with visible cake showing through for the characteristic naked look.
The top can be left with soft swoops. Refrigerate the assembled cake for at least 2 hours to fully set.
Whip the Cream
Just before serving, make the stabilized whipped cream topping. In the chilled bowl of the stand mixer fitted with the whisk attachment, beat 1 cup (240ml) cold heavy whipping cream, 2 tablespoons powdered sugar, and 1 teaspoon vanilla extract on medium-high speed until stiff peaks form, about 3 to 4 minutes.
Do not overbeat. Transfer to a piping bag fitted with a large star or round tip.
Garnish and Serve
Remove the chilled cake from the refrigerator. Pipe decorative rosettes or dollops of whipped cream around the top edge of the cake.
Garnish with thin lemon rounds, a sprinkle of poppy seeds, and optional edible flowers or fresh thyme sprigs for a beautiful, rustic presentation. Serve immediately or refrigerate uncovered for up to 30 minutes before serving.
Per serving (1 slice (1/12 of cake)) — values are estimates
Most Loved Products
4. Strawberry Rose Petal Cake
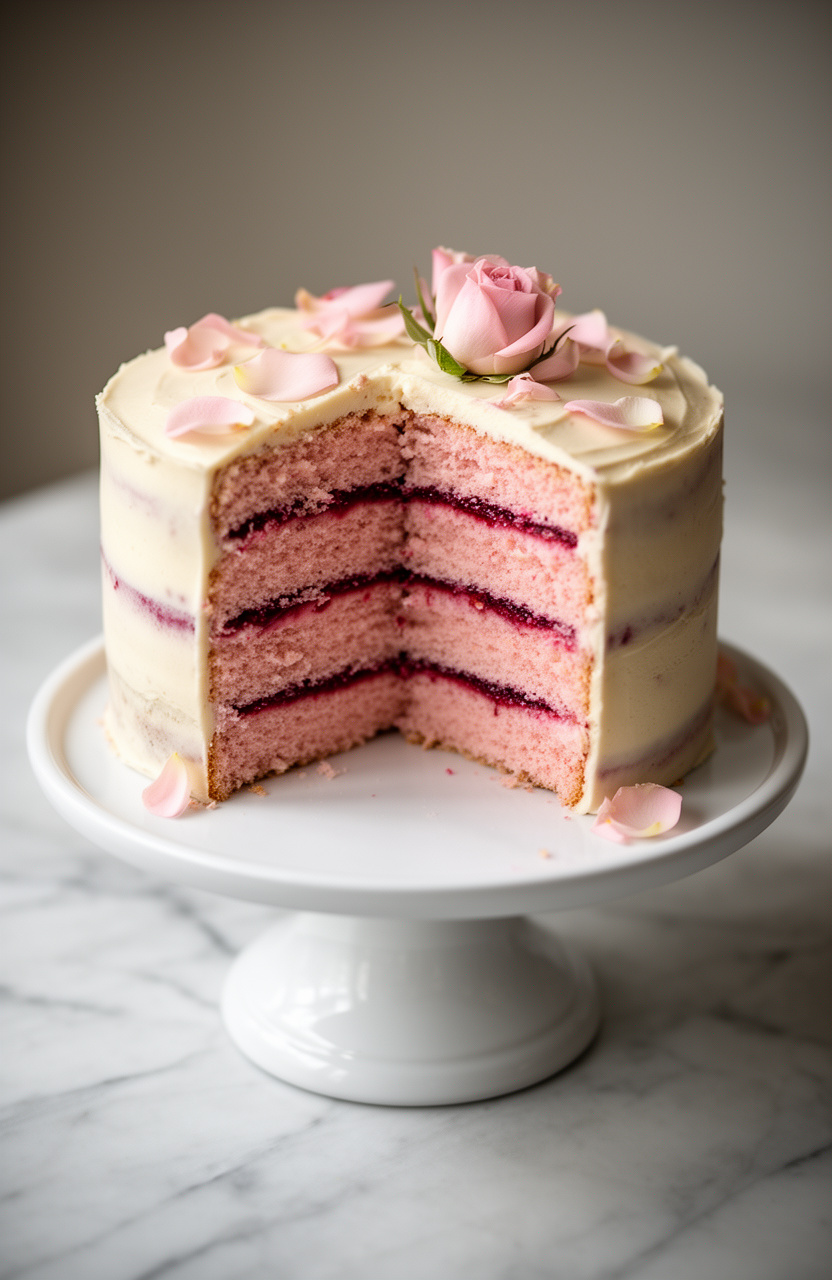
Infusing heavy cream with fresh rose petals pulls a delicate floral depth into every layer of this French-style cake before a single scoop of batter is mixed. Butter-rich and tender, the crumb holds its softness against the bright, jammy sweetness of fresh strawberries woven throughout.
Strawberry Rose Petal Cake
Cake Batter
Strawberry Compote
Rose Infused Cream
Rose Buttercream
Decoration
- 🍰Three 8-inch round cake pans
- 🔌Stand mixer with paddle and whisk attachments
- 🫕Medium saucepan
- 🪣Fine-mesh sieve
- 🥄Offset spatula
- 🍴Bench scraper
- 🍴Rotating cake turntable
- 🖌️Pastry brush
- 🎂Piping bags with large round and star tips
- 📄Parchment paper
- ⚖️Digital kitchen scale
- 🌡️Instant-read thermometer
- 🥣Mixing bowls (various sizes)
- 🥄Rubber spatula
- 🪜Wire cooling racks
- 🍽️Cake board or serving platter
Infuse Rose Cream
Infuse the cream: In a small saucepan over medium-low heat, warm 1/2 cup (120ml) heavy cream until it just begins to steam — do not boil. Remove from heat, add 2 tablespoons dried culinary rose petals, stir gently, and cover.
Allow to infuse for 30 minutes at room temperature. Strain through a fine-mesh sieve, pressing the petals firmly to extract all the cream.
Discard petals and refrigerate the rose-infused cream until needed.
Prepare Cake Pans
Preheat your oven to 350°F (175°C). Grease three 8-inch round cake pans with butter, line the bottoms with parchment paper circles, then grease the parchment and dust lightly with flour.
Tap out any excess flour and set the pans aside.
Combine Dry Ingredients
In a medium bowl, whisk together 2 cups (240g) sifted all-purpose flour, 2 teaspoons baking powder, 1/2 teaspoon fine sea salt, and 2 tablespoons finely ground dried culinary rose petals. Set aside.
In a separate small bowl or measuring cup, combine 3/4 cup (180ml) whole milk and 1/4 cup (60ml) sour cream, stirring until smooth.
Cream Butter and Sugar
In the bowl of a stand mixer fitted with the paddle attachment, beat 1 cup (225g) room-temperature unsalted butter on medium speed for 3 minutes until pale and fluffy. Add 1 3/4 cups (350g) granulated sugar and beat on medium-high for a further 4–5 minutes, scraping down the sides of the bowl as needed, until the mixture is very light and airy.
Add 4 large eggs one at a time, beating for 30 seconds after each addition. Add 1 teaspoon vanilla extract and 1 tablespoon rose water, mixing until just combined.
If using, add 2 drops of pink food coloring and mix briefly.
Fold Cake Batter
With the mixer on low speed, add the flour mixture in three additions, alternating with the milk-sour cream mixture in two additions (flour–milk–flour–milk–flour). Begin and end with the flour mixture.
Mix only until each addition is just incorporated — do not overmix. Finish folding by hand with a rubber spatula to ensure no streaks remain at the bottom of the bowl.
Bake Cake Layers
Divide the batter evenly among the three prepared 8-inch cake pans, using a kitchen scale for accuracy (approximately 400g per pan). Smooth the tops with an offset spatula.
Bake in the preheated 350°F (175°C) oven for 35 minutes, or until a toothpick inserted into the center comes out clean and the edges begin to pull away from the sides of the pans. Rotate the pans halfway through baking for even browning.
Cool Cake Layers
Remove the pans from the oven and allow the cakes to rest in their pans on wire cooling racks for 30 minutes. Then run a thin knife or offset spatula around the edges of each pan and carefully invert the layers onto the wire racks.
Peel off the parchment paper and allow the layers to cool completely to room temperature before frosting.
Cook Strawberry Compote
Make the strawberry compote: In a medium saucepan, combine 1 lb (450g) hulled and sliced fresh strawberries, 1/3 cup (65g) granulated sugar, 2 tablespoons fresh lemon juice, and 1 teaspoon rose water. Cook over medium heat, stirring occasionally, for 20 minutes until the strawberries have broken down and the mixture is bubbling and reduced.
Stir in the cornstarch slurry (1 tablespoon cornstarch dissolved in 2 tablespoons cold water) and cook for an additional 2 minutes, stirring constantly, until thickened. Transfer to a bowl and refrigerate until completely cold, at least 1 hour.
Make Rose Buttercream
Make the rose buttercream: In the clean bowl of a stand mixer fitted with the paddle attachment, beat 3 cups (680g) room-temperature unsalted butter on medium-high speed for 5 minutes until very pale, fluffy, and nearly white. Reduce speed to low and gradually add 5 cups (600g) sifted powdered sugar, one cup at a time, beating for 30 seconds between each addition.
Add 3 tablespoons of the chilled rose-infused cream, 2 tablespoons rose water, and 1/4 teaspoon fine sea salt. Increase speed to medium-high and beat for 3–4 minutes until silky smooth.
Add 3–4 drops of pink food coloring and beat until the color is uniform. If the buttercream is too stiff, add additional rose-infused cream one teaspoon at a time.
Fill First Layer
Level each cooled cake layer using a long serrated knife, removing any domed tops to create flat, even surfaces. Place the first cake layer on a cake board or serving platter set on a rotating turntable.
Spread a thin, even layer of rose buttercream over the top using an offset spatula. Pipe a buttercream border around the outer edge of the layer to act as a dam, then spoon half of the chilled strawberry compote into the center and spread evenly within the border.
Assemble and Crumb Coat
Place the second cake layer on top, pressing gently to adhere. Repeat the process: spread a thin layer of buttercream, pipe a border dam, and fill with the remaining strawberry compote.
Place the third and final cake layer on top, flat side up, and press gently. Apply a thin crumb coat of rose buttercream over the entire cake — top and sides — using an offset spatula and bench scraper.
Refrigerate the crumb-coated cake for 30 minutes until the buttercream is firm.
Final Buttercream Coat
Apply the final coat of rose buttercream: using a large offset spatula and bench scraper, apply a generous layer of buttercream to the top and sides of the chilled cake. Spin the turntable while holding the bench scraper at a 45-degree angle against the side of the cake to create a smooth, even finish.
For a textured look, use the back of a spoon or offset spatula to create soft swoops. Refrigerate the finished cake for at least 2 hours (or up to overnight) until the buttercream is fully set.
Decorate and Serve
To decorate, remove the cake from the refrigerator 20 minutes before serving. Pipe rosette swirls of rose buttercream on top using a piping bag fitted with a large star tip.
Arrange 8–10 halved fresh strawberries artfully on and around the rosettes. Scatter fresh or dried culinary rose petals over the top and sides of the cake.
Dust lightly with freeze-dried strawberry powder using a fine sieve for a vibrant pink finish. If desired, apply a few flakes of edible gold leaf using a dry brush for an elegant French patisserie touch.
Slice with a warm, clean knife and serve.
Per serving (1 slice (1/12 of cake)) — values are estimates
Top Picks Today
5. Elderflower Champagne Layer Cake
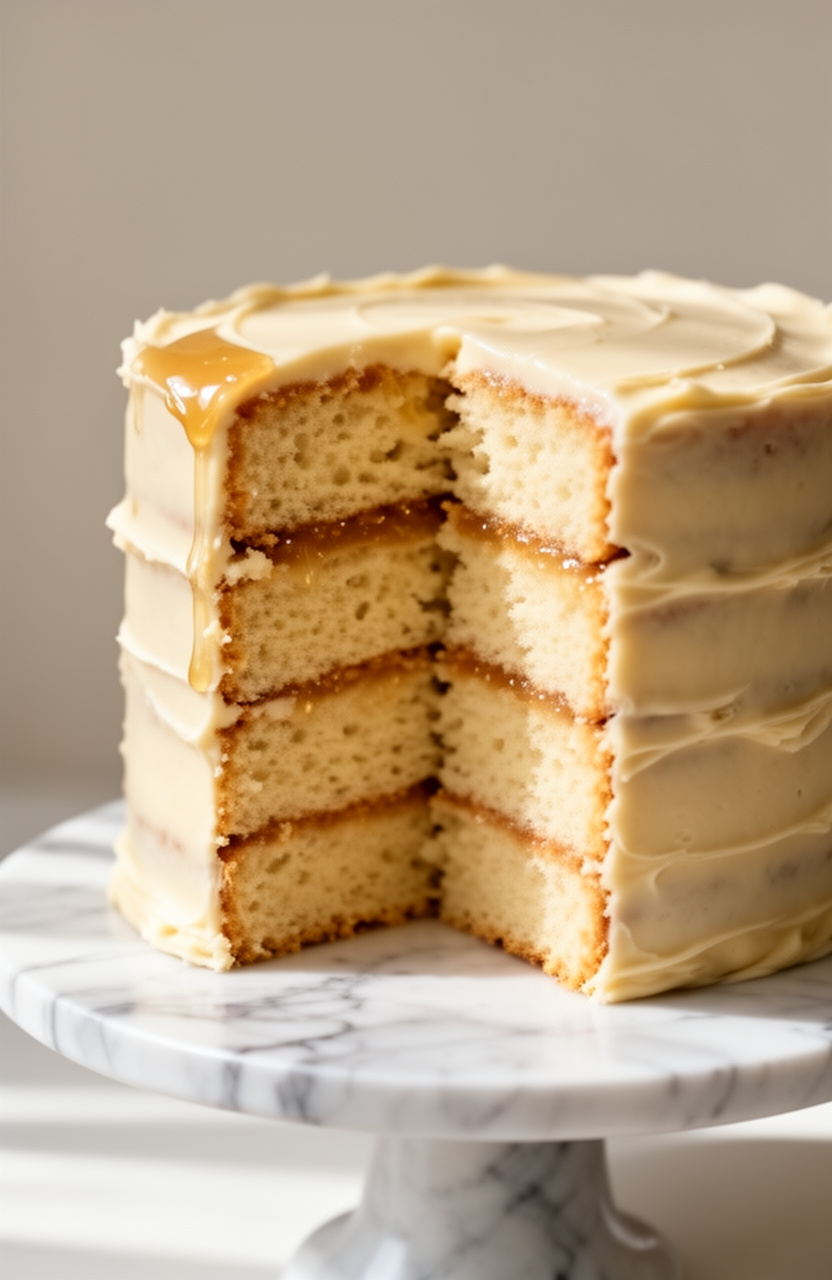
Elderflower and champagne syrup soak into each buttery layer of this tall British celebration cake, drawing a delicate floral sweetness through the soft, flour-based crumb. The lightness of the sponge sits in quiet contrast to the richness of the butter-heavy batter it’s built from.
Elderflower Champagne Layer Cake
Sponge
Champagne Syrup
Elderflower Cream
Champagne Buttercream
Decoration
- 🍴Three 20cm round sandwich cake tins
- 🔌Stand mixer with paddle and whisk attachments
- 🥄Hand-held electric whisk
- 🥣Large mixing bowls
- 🫕Small saucepan
- ⚖️Digital kitchen scale
- 🪣Fine mesh sieve
- 🔪Offset palette knife
- 🍴Large cake turntable
- 🖌️Pastry brush
- 🎂Piping bag with large star nozzle
- 🍴Cake scraper or bench scraper
- 🪜Cooling wire racks
- 📄Parchment paper
- 🔪Zester or microplane
- 🍴Cake board or serving stand
- 🌡️Thermometer (optional)
Prepare Tins
Preheat your oven to 180°C (160°C fan) / 350°F / Gas Mark 4. Grease three 20cm round sandwich cake tins generously with softened butter, then line the bases with circles of parchment paper.
Grease the parchment as well. Set aside.
Cream Butter and Sugar
In the bowl of a stand mixer fitted with the paddle attachment, beat 300g softened butter and 300g caster sugar together on medium-high speed for 6–8 minutes until the mixture is very pale, light, and fluffy. Scrape down the sides of the bowl with a spatula halfway through to ensure even mixing.
Add Eggs and Zest
With the mixer running on medium speed, add the 6 eggs one at a time, beating well for about 30 seconds after each addition. If the mixture begins to look curdled, add a tablespoon of the sifted flour to bring it back together.
Add the lemon zest from 2 lemons and beat briefly to combine.
Fold in Flour
Remove the bowl from the stand mixer. Sift in the 300g self-raising flour and 1 tsp baking powder in two batches, folding gently with a large metal spoon or spatula using a figure-of-eight motion to preserve the air.
Once almost combined, add 4 tbsp elderflower cordial and 2 tbsp whole milk, then fold until just smooth — do not overmix.
Bake the Sponges
Divide the batter evenly between the three prepared tins — use your kitchen scale to ensure each tin receives approximately the same weight of batter (roughly 380–400g each). Level the tops with an offset palette knife.
Bake in the preheated oven for 28–30 minutes, or until the sponges are golden, well-risen, and a skewer inserted into the centre comes out clean.
Cool the Sponges
Remove the sponges from the oven and allow them to cool in their tins for 10 minutes. Run a palette knife around the edges, then turn out onto wire cooling racks.
Peel off the parchment and leave to cool completely at room temperature for at least 30 minutes before soaking or assembling.
Make Champagne Syrup
While the sponges cool, make the Champagne syrup. Combine 150ml Champagne, 100g caster sugar, and 3 tbsp elderflower cordial in a small saucepan over medium heat.
Stir gently until the sugar has dissolved, then bring to a simmer and cook for 3–4 minutes until slightly syrupy. Remove from heat and allow to infuse and cool for 30 minutes.
The syrup should be fragrant and lightly thickened.
Make Champagne Buttercream
For the Champagne buttercream, gently simmer 4 tbsp Champagne in a very small saucepan over medium heat for 3–4 minutes until reduced by half to approximately 2 tbsp. Allow to cool completely.
In the stand mixer with the paddle attachment, beat 250g softened butter on high speed for 5 minutes until very pale and fluffy. Reduce speed to low and gradually add 500g sifted icing sugar in three batches.
Once incorporated, add the cooled reduced Champagne, 2 tbsp elderflower cordial, and a pinch of sea salt. Beat on medium-high for 3–4 minutes until silky smooth and spreadable.
Set aside at room temperature.
Make Elderflower Cream
For the elderflower cream filling, place the cold 250g mascarpone in a large bowl and beat briefly with a hand-held electric whisk until smooth. In a separate chilled bowl, whisk the 500ml very cold double cream with 4 tbsp elderflower cordial, 2 tbsp sifted icing sugar, and 1 tsp vanilla bean paste until soft peaks form.
Gently fold the whipped cream into the mascarpone in two additions until you have a thick, stable cream that holds its shape. Refrigerate until needed.
Soak First Layer
Once the sponges are fully cooled, use a long serrated knife to level the tops of each sponge if they have domed. Place the first sponge layer on your cake board or turntable.
Using a pastry brush, generously soak the top surface with one-third of the cooled Champagne syrup, allowing it to absorb for 1–2 minutes.
Layer and Fill Cake
Spread a generous layer of the elderflower mascarpone cream over the first soaked sponge using an offset palette knife, leaving a 1cm border around the edge. The cream layer should be approximately 1.5cm thick.
Place the second sponge layer on top, pressing gently to level. Soak with another third of the Champagne syrup, then spread with another layer of elderflower cream.
Place the final sponge layer on top, soaked-side down, and brush the top with the remaining Champagne syrup.
Apply Crumb Coat
Apply a thin crumb coat of the Champagne buttercream all over the outside of the cake — top and sides — using an offset palette knife. This seals in any loose crumbs.
Refrigerate the cake for 30 minutes until the crumb coat is firm to the touch.
Final Buttercream Coat
Remove the cake from the refrigerator. Apply a final, generous layer of Champagne buttercream to the top and sides of the cake.
Use a large cake scraper held at a 45-degree angle against the side of the cake while rotating the turntable to achieve a smooth finish. Use the offset palette knife to smooth the top.
For a more textured look, use the scraper to create soft, sweeping strokes. Refrigerate for another 2 hours until the buttercream is fully set.
Decorate and Serve
Transfer any remaining elderflower cream to a piping bag fitted with a large star nozzle. Pipe elegant rosettes or tall swirls around the top edge of the cake.
Decorate with fresh or crystallised elderflower sprigs, small clusters of fresh raspberries or white currants, delicate curls of lemon zest, and carefully applied pieces of edible gold leaf for a luxurious finish. Serve at room temperature — remove from the refrigerator 20–30 minutes before serving for the best flavour and texture.
Per serving (1 slice (1/12 of cake)) — values are estimates
Our Best Picks


6. Pastel Ombre Ruffled Cake
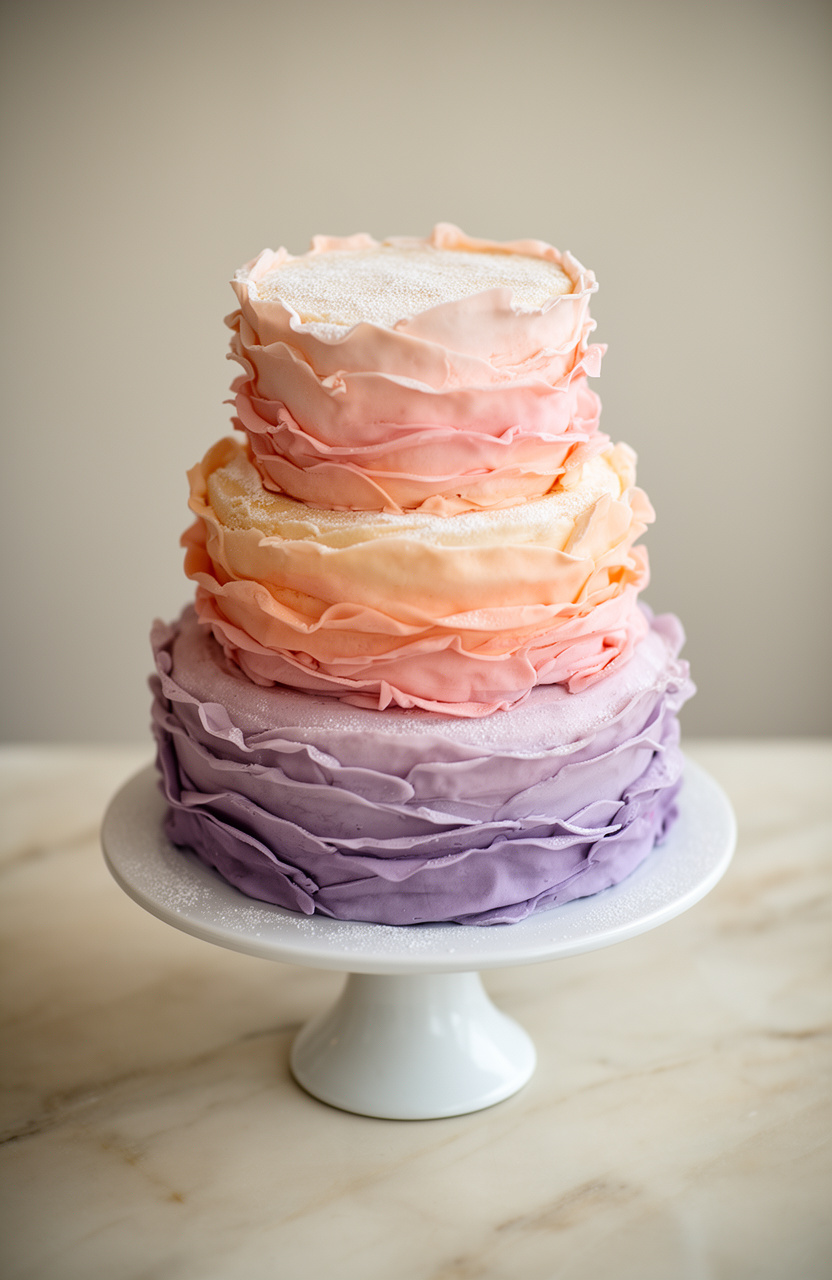
Layering softened butter into a flour-based batter builds a tender, close crumb that holds its structure through each ruffled tier of graduating pastel color. The finished cake delivers a rich, buttery flavor with a pillowy texture that fans outward in delicate, petal-like folds across every layer.
Pastel Ombre Ruffled Cake
Cake
Buttercream
Decoration
- 🍰Three 8-inch round cake pans
- 🔌Stand mixer with paddle and whisk attachments
- 🎂Large piping bags (at least 6)
- 🍴Petal piping tip (Wilton #104 or #125)
- 🥄Offset spatula
- 🍴Bench scraper
- 🍴Cake turntable
- 🍽️Cake board or serving plate
- 🪜Wire cooling racks
- 🥣Mixing bowls (multiple sizes)
- 🥄Rubber spatulas
- 📍Toothpicks
- ⚖️Kitchen scale
- 🪣Sifter or fine mesh sieve
Prepare Pans
Preheat your oven to 350°F (175°C). Grease three 8-inch round cake pans with butter or nonstick spray, line the bottoms with parchment paper circles, then grease the parchment as well.
Lightly dust the sides with flour and tap out any excess.
Mix Dry Ingredients
In a medium bowl, whisk together 3 cups (360g) all-purpose flour, 1 tablespoon baking powder, and 1/2 teaspoon fine sea salt until evenly combined. Set aside.
Cream Butter
In the bowl of a stand mixer fitted with the paddle attachment, beat 1 cup (226g) softened unsalted butter on medium-high speed for 3 minutes until pale and very fluffy. Scrape down the sides of the bowl.
Add Sugar
With the mixer on medium speed, gradually add 2 cups (400g) granulated sugar to the butter, about 1/4 cup at a time. Once all the sugar is added, increase speed to medium-high and beat for an additional 4 minutes until the mixture is very light and fluffy.
Add Eggs
Add 4 large room-temperature eggs one at a time, beating well for 30 seconds after each addition and scraping down the bowl as needed. Mix in 1 tablespoon pure vanilla extract until combined.
Combine Batter
In a small bowl or measuring cup, stir together 1 cup (240ml) whole milk and 1/2 cup (120ml) sour cream until smooth. With the mixer on low speed, alternate adding the flour mixture and the milk mixture to the butter mixture in three additions of flour and two of milk, beginning and ending with the flour.
Mix just until each addition is incorporated — do not overmix.
Bake Cake Layers
Divide the batter evenly among the three prepared 8-inch cake pans (approximately 560g per pan). Smooth the tops with an offset spatula.
Bake at 350°F (175°C) for 30–35 minutes, or until a toothpick inserted in the center comes out clean and the edges are just beginning to pull away from the sides of the pan.
Cool Cake Layers
Remove the pans from the oven and let the cakes cool in the pans on wire racks for 15 minutes. Then turn the cakes out onto the wire racks, peel off the parchment paper, and allow them to cool completely to room temperature, about 1 hour.
Do not frost warm cakes.
Make Buttercream
To make the vanilla buttercream, beat 2 cups (452g) softened unsalted butter in the stand mixer with the paddle attachment on medium-high speed for 5 minutes until very pale and fluffy. Reduce speed to low and gradually add 8 cups (960g) sifted powdered sugar, one cup at a time, mixing until incorporated before adding the next.
Add 4 tablespoons (60ml) heavy cream, 2 teaspoons vanilla extract, and 1/4 teaspoon salt. Increase speed to medium-high and beat for 3 minutes until smooth and silky.
Color Buttercream
Divide the buttercream into five portions: one large portion (about 2 cups) kept white for crumb coating and filling, and four smaller portions (about 3/4 cup each) for the ombre ruffles. Using gel food coloring and a toothpick, tint the four smaller portions: one lavender, one soft pink, one baby blue, and one mint green.
Mix each color thoroughly until uniform. Keep all portions covered with plastic wrap to prevent crusting.
Stack and Crumb Coat
Place one cooled cake layer on a cake board or serving plate set on a turntable. Spread about 1/2 cup of the white buttercream evenly over the top using an offset spatula.
Place the second cake layer on top and repeat with another 1/2 cup of white buttercream. Add the third cake layer, pressing gently to level.
Apply a thin crumb coat of white buttercream over the entire outside of the cake — top and sides — using the offset spatula and bench scraper. Refrigerate the crumb-coated cake for 30 minutes to set.
Apply Final Coat
After the crumb coat has chilled for 30 minutes, apply a smooth, even final coat of white buttercream over the entire cake using the offset spatula and bench scraper. The sides should be as smooth as possible since the ruffles will be piped directly onto them.
Refrigerate for another 20 minutes to firm up.
Pipe Ombre Ruffles
Fit four piping bags each with a Wilton #104 or #125 petal piping tip. Fill each bag with one of the four tinted buttercream colors (lavender, pink, blue, and mint).
To pipe ruffles, hold the bag with the wide end of the petal tip touching the cake surface and the narrow end pointing outward. Using the turntable, pipe horizontal rows of ruffles around the cake starting from the bottom: pipe the first 3–4 rows with lavender, the next 3–4 rows with pink, the next 3–4 rows with baby blue, and finish the top rows and top surface with mint green.
Each ruffle row should slightly overlap the previous one to create a full, layered look.
Decorate Cake Top
For the top of the cake, use the mint green buttercream to pipe a rosette or swirl pattern covering the entire top surface, starting from the outer edge and working inward in a spiral motion. Alternatively, pipe a continuation of the ruffle rows across the top for a uniform look.
Chill and Garnish
If desired, scatter edible pearl sprinkles or sugar pearls over the ruffles for extra elegance. Refrigerate the finished cake for at least 1 hour (and up to 2 hours total chill time for the decorated cake) to allow the buttercream to fully set before slicing.
Remove from the refrigerator 20–30 minutes before serving to allow the buttercream to soften slightly.
Per serving (1 slice (1/12 of cake)) — values are estimates
Recommended for You


7. Cherry Blossom Matcha Cake
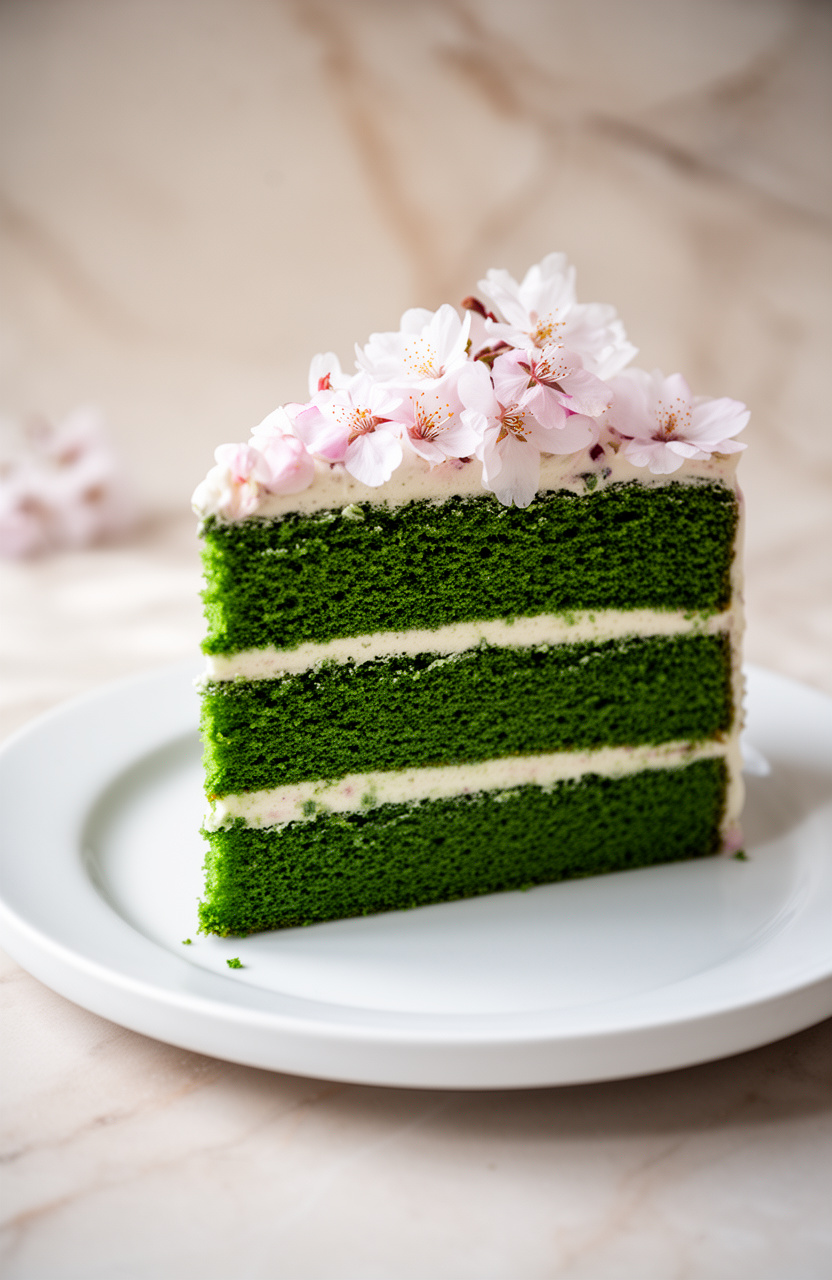
Sifted cake flour and ceremonial matcha powder come together in carefully prepared pans, baking into a tender, velvety crumb that carries a deep, grassy bitterness softened by the delicate floral lift of cherry blossom throughout every slice.
Cherry Blossom Matcha Cake
Matcha Sponge
Sakura Whipped Cream
Cherry Blossom Syrup
Filling And Decoration
- 🍰Two 8-inch round cake pans
- 🔌Stand mixer with whisk and paddle attachments
- 🥣Large mixing bowls
- 🪣Fine mesh sieve or sifter
- 🥄Rubber spatula
- 🥄Offset spatula
- 🍴Cake turntable
- 🍴Bench scraper
- 🖌️Pastry brush
- 🎂Piping bag with large star tip
- 🪜Wire cooling racks
- 🔪Serrated knife or cake leveler
- 📄Parchment paper
- 🌡️Instant-read thermometer
- 🫕Small saucepan
Prepare Pans
Preheat your oven to 325°F (165°C). Grease two 8-inch round cake pans generously with butter or non-stick spray, line the bottoms with parchment paper circles, then grease the parchment as well.
Lightly dust the sides with cake flour and tap out any excess. Set aside.
Sift Dry Ingredients
In a large bowl, sift together 2 cups cake flour, 3 tablespoons matcha powder, 1 1/2 teaspoons baking powder, and 1/2 teaspoon fine sea salt. Whisk to combine thoroughly.
Sifting is critical here — matcha clumps easily and even distribution is essential for a uniform green color and flavor throughout the sponge.
Prepare Yolk Mixture
Separate 6 large eggs, placing the yolks in one large bowl and the whites in the bowl of your stand mixer. Ensure the whites bowl is completely clean and grease-free — any fat will prevent proper whipping.
To the egg yolks, add 3/4 cup (150g) of the granulated sugar and whisk vigorously by hand for about 2 minutes until the mixture is pale yellow and slightly thickened. Whisk in 1/2 cup whole milk, 1/3 cup neutral oil, and 1 teaspoon vanilla extract until smooth and fully combined.
Combine Wet and Dry
Gradually fold the sifted dry ingredients into the egg yolk mixture in three additions, using a rubber spatula and folding gently until just combined after each addition. Do not overmix — a few small streaks of flour are acceptable at this stage as the egg whites will be folded in next.
Set the batter aside.
Whip Egg Whites
Using the stand mixer fitted with the whisk attachment, beat the 6 egg whites on medium speed for 1 minute until foamy. Add 1/4 teaspoon cream of tartar, then increase the speed to medium-high.
Gradually stream in the remaining 1/2 cup (100g) granulated sugar, one tablespoon at a time, over about 3 minutes. Continue beating on high until stiff, glossy peaks form, about 4 to 5 minutes total.
The whites should hold a firm peak and look shiny, not dry or grainy.
Fold In Whites
Using a large rubber spatula, gently fold one-third of the whipped egg whites into the matcha batter to lighten it — use broad, sweeping strokes from the bottom of the bowl up and over. Once mostly incorporated, fold in the remaining whites in two additions, being very careful not to deflate the batter.
Stop folding as soon as no white streaks remain. The batter should be airy and light green.
Bake the Sponges
Divide the batter evenly between the two prepared 8-inch cake pans, using a kitchen scale for accuracy if possible. Gently smooth the tops with an offset spatula.
Tap each pan firmly on the counter two or three times to release any large air bubbles. Bake in the preheated 325°F (165°C) oven for 28 to 30 minutes, or until the tops spring back when lightly touched, the edges pull away slightly from the pan, and a wooden skewer inserted in the center comes out clean.
Cool the Cakes
Remove the cakes from the oven and allow them to cool in their pans on a wire rack for 15 minutes. Run a thin knife or offset spatula around the edges of each pan to loosen, then invert onto the wire rack, peel off the parchment, and flip right-side up.
Allow the cakes to cool completely at room temperature for at least 30 minutes before frosting or cutting. Do not rush this step — frosting a warm cake will melt the cream.
Make Soaking Syrup
While the cakes cool, make the cherry blossom soaking syrup. Combine 1/2 cup water and 1/2 cup granulated sugar in a small saucepan over medium heat.
Stir until the sugar dissolves completely, about 3 to 4 minutes. Remove from heat and stir in 2 tablespoons sakura liqueur or cooled cherry blossom tea and 1 teaspoon rose water.
Allow the syrup to cool completely to room temperature before using.
Make Sakura Cream
Make the sakura mascarpone whipped cream. In the bowl of the stand mixer fitted with the whisk attachment, combine 8 oz cold mascarpone cheese, 3 tablespoons powdered sugar, 2 tablespoons sakura paste or extract, and 1 teaspoon rose water.
Beat on medium speed for 1 minute until smooth and creamy. With the mixer running on medium-low, slowly pour in 2 cups of very cold heavy whipping cream in a thin, steady stream.
Add 2 drops of pink gel food coloring if desired. Increase speed to medium-high and whip until the cream holds firm, stable peaks, about 3 to 4 minutes.
Watch carefully — mascarpone cream can overwhip quickly. Refrigerate until ready to use.
Level and Soak Cakes
Once the cakes are fully cooled, use a serrated knife or cake leveler to trim any domed tops so both layers are level and flat. Place one cake layer on a cake board or serving plate set on a turntable.
Using a pastry brush, generously soak the top of the first layer with the cooled cherry blossom syrup, applying it slowly so it absorbs rather than pools on the surface.
Fill the Cake
Spread a generous, even layer of about 1 cup of the sakura mascarpone cream over the soaked first cake layer using an offset spatula, building it about 1/2 inch thick. Arrange 1 1/2 cups of pitted, halved fresh cherries evenly over the cream, pressing them in gently.
Scatter 6 to 8 of the rinsed and dried salt-preserved sakura blossoms over the cherries for a floral, subtly salty contrast.
Crumb Coat and Chill
Carefully place the second soaked cake layer on top, cut-side down, aligning it evenly. Press down very gently to secure.
Apply a thin crumb coat of the sakura cream all over the top and sides of the cake using an offset spatula — this seals in any loose crumbs. Smooth as best you can, then refrigerate the cake uncovered for 30 minutes to firm up the crumb coat.
Final Frost the Cake
After the crumb coat has chilled for 30 minutes, apply the final coat of sakura mascarpone cream. Dollop the remaining cream generously over the top and spread it down the sides using an offset spatula, rotating the turntable as you work.
Use a bench scraper held vertically against the side of the cake while rotating the turntable to achieve smooth, clean sides. Smooth the top with the offset spatula.
For a textured look, use the back of a spoon to create soft swirls.
Decorate the Cake
Transfer any remaining sakura cream to a piping bag fitted with a large star tip. Pipe decorative rosettes or swirls around the top edge of the cake.
Arrange the remaining 6 to 8 rinsed sakura blossoms artfully on top of the cake. Dust the top lightly with 1 tablespoon of matcha powder through a fine mesh sieve for a dramatic green contrast against the pink cream.
Add edible gold leaf flakes and fresh cherry blossoms or food-safe flowers if desired.
Chill and Serve
Refrigerate the finished cake for at least 3 hours, or up to overnight, before slicing. This chilling time allows the cream to fully set and the flavors to meld beautifully.
When ready to serve, use a sharp knife dipped in hot water and wiped clean between each cut for the cleanest slices. Serve chilled for the best texture and flavor.
Per serving (1 slice (1/12 of cake)) — values are estimates
Recommended for You

8. Violet Blueberry Watercolor Cake
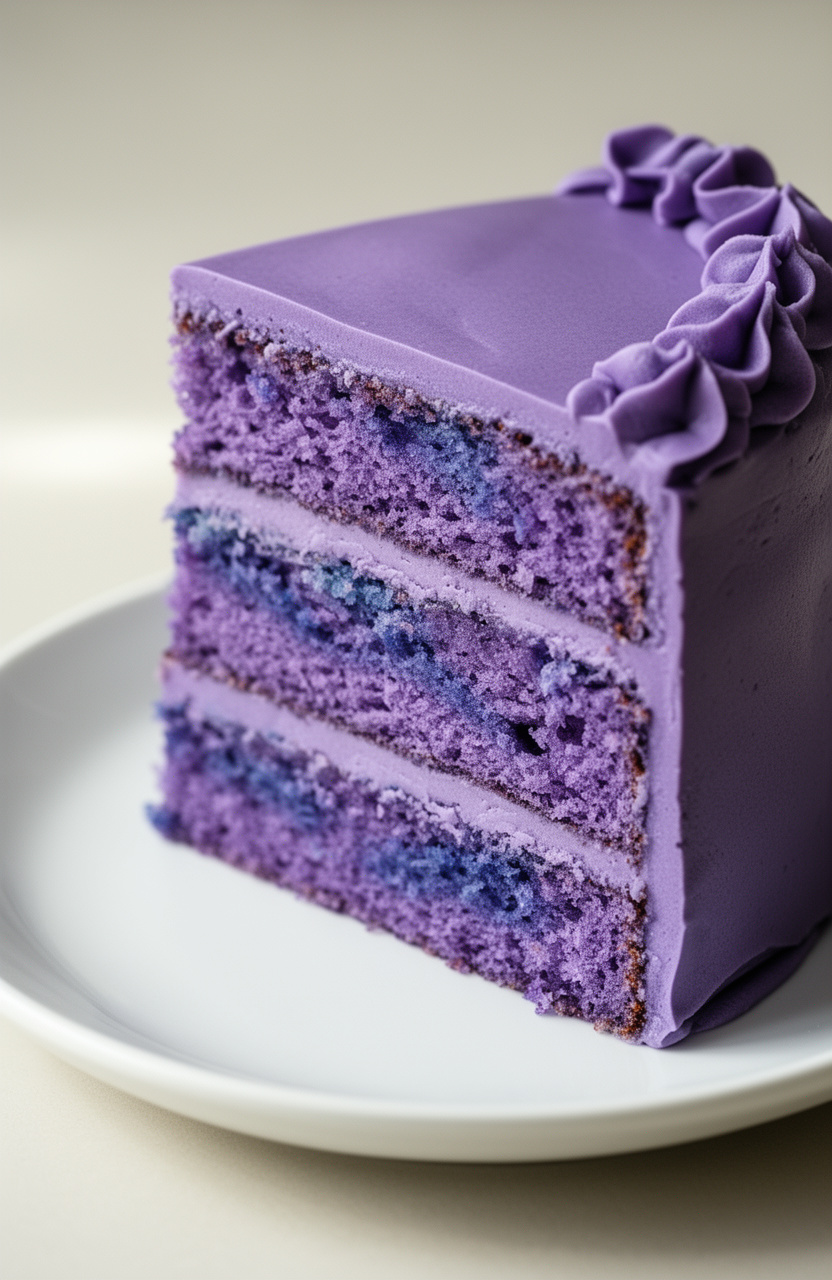
Blueberry puree swirled into the batter before baking creates those signature violet and indigo watercolor streaks across each layer. The crumb bakes up tender and moist, offering a soft, fruity contrast to the smooth, richly pigmented frosting swept across the outside.
Violet Blueberry Watercolor Cake
Cake
Blueberry Compote
Swiss Meringue Buttercream
Watercolor Decoration
- 🍰Three 8-inch round cake pans
- 🔌Stand mixer with whisk and paddle attachments
- 🥣Heatproof mixing bowl
- 🫕Medium saucepan
- 🪣Fine mesh sieve
- 🌀Blender or food processor
- 🍴Cake turntable
- 🥄Offset spatula (large and small)
- 🍴Bench scraper
- 🖌️Pastry brush
- 🌡️Instant-read thermometer
- 📄Parchment paper
- 🪜Wire cooling racks
- 🔪Serrated knife or cake leveler
- 🎂Piping bags
- 🥄Rubber spatulas
Make Blueberry Puree
Prepare your blueberry puree first. Blend 1 cup of fresh blueberries in a blender until completely smooth.
Pass through a fine mesh sieve, pressing with a rubber spatula to extract all juice. Discard solids.
You should have about 1/2 cup of vibrant deep-purple puree. Set aside at room temperature.
Cook Blueberry Compote
Make the blueberry compote filling. In a medium saucepan over medium heat, combine 2 cups fresh blueberries, 1/3 cup granulated sugar, 2 tablespoons fresh lemon juice, and 1 teaspoon lemon zest.
Cook, stirring occasionally, for about 8 minutes until the blueberries burst and the mixture begins to thicken. Stir in the cornstarch slurry (1 tablespoon cornstarch mixed with 2 tablespoons cold water) and cook for an additional 2 minutes until glossy and thickened.
Remove from heat. Reserve 2 tablespoons for the buttercream.
Transfer the rest to a bowl, press plastic wrap directly on the surface, and refrigerate until completely cold, at least 1 hour.
Prepare Cake Pans
Preheat your oven to 350°F (175°C). Grease three 8-inch round cake pans, line the bottoms with parchment paper circles, then grease the parchment.
Lightly flour the pans, tapping out any excess. Set aside.
Combine Dry Ingredients
In a medium bowl, whisk together 3 cups all-purpose flour, 2 teaspoons baking powder, 1/2 teaspoon baking soda, and 1/2 teaspoon fine sea salt until evenly combined. Set aside.
Cream Butter and Sugar
In the bowl of a stand mixer fitted with the paddle attachment, beat 1 cup room-temperature butter on medium-high speed for 3 minutes until very pale and fluffy. Add 2 cups granulated sugar and continue beating for another 4 minutes, scraping down the sides of the bowl as needed, until the mixture is extremely light and creamy.
Add Eggs and Puree
With the mixer on medium speed, add 4 eggs one at a time, beating for 30 seconds after each addition and scraping the bowl between additions. Add 2 teaspoons vanilla extract and the 1/2 cup blueberry puree.
Mix on low speed until just combined — the batter may look slightly curdled at this stage, which is normal.
Combine Batter
With the mixer on low speed, add the flour mixture in three additions, alternating with the 1 cup buttermilk in two additions (beginning and ending with flour). Mix each addition only until just combined — do not overmix.
Use a rubber spatula to give the batter a final few folds to ensure everything is incorporated. The batter will be thick and a beautiful lavender-purple color.
Bake Cake Layers
Divide the batter evenly among the three prepared pans (approximately 600g per pan if you have a kitchen scale). Smooth the tops with an offset spatula.
Bake at 350°F (175°C) for 30-35 minutes, rotating the pans halfway through, until a wooden skewer inserted in the center comes out clean and the tops spring back lightly when touched. The internal temperature should read 205-210°F (96-99°C).
Cool Cake Layers
Allow the cakes to cool in their pans on wire racks for 30 minutes. Then run an offset spatula around the edges, invert onto the racks, peel off the parchment, and allow to cool completely for at least 30 more minutes before assembling.
The layers must be completely cool before frosting.
Heat Egg Whites
Make the Swiss meringue buttercream. Combine 6 large egg whites, 1 3/4 cups granulated sugar, and 1/4 teaspoon salt in the heatproof bowl of your stand mixer.
Set the bowl over a saucepan of simmering water (do not let the bottom of the bowl touch the water). Whisk constantly by hand until the mixture is hot to the touch and reaches 160°F (71°C) on an instant-read thermometer and the sugar is completely dissolved, about 4-5 minutes.
Whip Meringue
Transfer the bowl to the stand mixer fitted with the whisk attachment. Whip on medium-high speed for 10-12 minutes until the meringue is thick, glossy, and holds stiff peaks, and the bowl feels completely cool to the touch.
It is critical that the meringue is fully cooled before adding butter.
Build Buttercream
Switch to the paddle attachment. With the mixer on medium speed, add 1 1/2 cups room-temperature butter, one tablespoon at a time, waiting about 10 seconds between each addition.
After all butter is added, increase speed to medium-high and beat for 5 minutes until the buttercream is silky smooth. Add 2 teaspoons vanilla extract and the 2 reserved tablespoons of blueberry compote.
Mix until fully incorporated. The buttercream will be a soft, natural lavender hue.
Fill and Stack Layers
Level the tops of all three cooled cake layers using a serrated knife or cake leveler so they are perfectly flat. Place one cake layer on a cake board or serving plate on a turntable.
Spread about 1/2 cup of buttercream in an even layer over the top using an offset spatula. Pipe a border ring of buttercream around the edge to act as a dam, then spoon half of the chilled blueberry compote inside the dam and spread gently.
Place the second cake layer on top and repeat. Place the third layer on top, cut-side down.
Apply Crumb Coat
Apply a thin crumb coat of buttercream over the entire outside of the cake — top and sides — using an offset spatula and bench scraper. This thin layer traps any loose crumbs.
Refrigerate the crumb-coated cake for 30 minutes until the buttercream is firm to the touch.
Apply Final Coat
Divide the remaining buttercream into four portions. Leave one portion white.
Tint one portion with a small amount of violet gel food coloring, one with purple gel food coloring, and one with a tiny touch of navy blue gel food coloring, adjusting the amounts to achieve distinct but harmonious shades. Apply a generous final coat of the white buttercream over the chilled cake using an offset spatula, smoothing the sides with a bench scraper until perfectly even.
This is the base coat for the watercolor effect.
Create Watercolor Effect
Create the watercolor effect. Using a small offset spatula or the back of a spoon, randomly dab small to medium patches of the violet, purple, and navy buttercream around the sides and top of the cake in an organic, asymmetric pattern — concentrate more color at the bottom third and top edge, leaving areas of white showing through.
Immediately use a clean bench scraper held at a 45-degree angle and rotate the turntable slowly to blend the colors into each other in long, smooth strokes, creating a soft watercolor wash effect. Work quickly and don’t over-blend — you want to see distinct color variation.
Use a small offset spatula to feather and blend the colors on the top of the cake in sweeping motions.
Chill and Decorate
Refrigerate the finished cake for at least 2 hours to set the buttercream completely. Remove from the refrigerator 30 minutes before serving to allow it to come to room temperature.
Decorate the top with a cluster of fresh blueberries, optional fresh lavender sprigs, and carefully applied edible gold leaf or a dusting of gold luster dust for an elegant finishing touch. Slice with a warm, clean knife for the cleanest cuts.
Per serving (1 slice (1/12 of cake)) — values are estimates
Editor’s Choice
9. Peach Hibiscus Mirror Glaze Cake
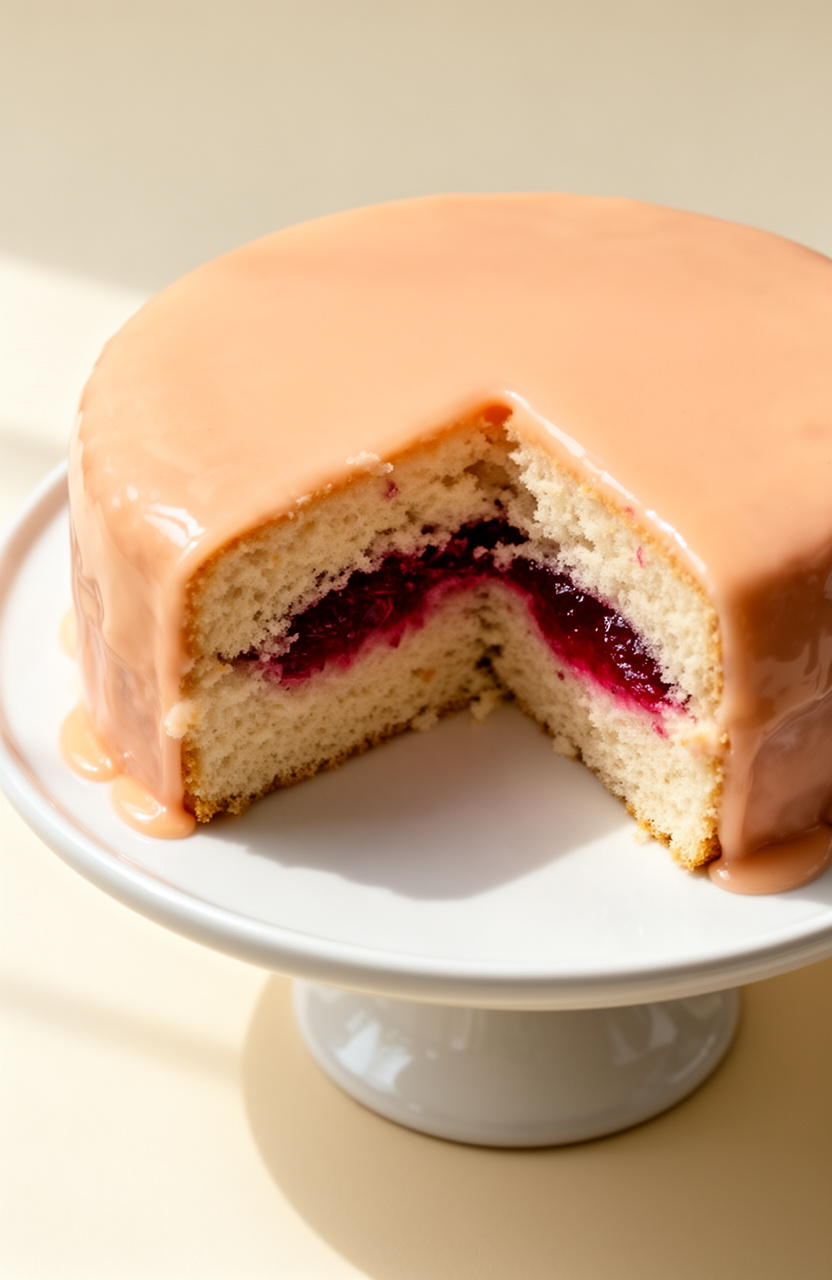
Preparing hibiscus jelly first layers a tart, floral intensity beneath the glossy mirror glaze that gives this cake its signature glass-like finish. All-purpose flour, almond flour, and eggs build a tender, slightly nutty crumb that holds its structure beneath the silky peach-tinted glaze pooling across the surface.
Peach Hibiscus Mirror Glaze Cake
Almond Sponge
Peach Mousse
Hibiscus Jelly Insert
Peach Soaking Syrup
Mirror Glaze
Garnish
- 🍰8-inch round springform pan
- 🍴8-inch round silicone entremet mold
- 🍴6-inch round silicone insert mold
- 🔌Stand mixer with whisk attachment
- 🌀Hand immersion blender
- 🪣Fine-mesh strainer
- 🌡️Digital kitchen thermometer
- ⚖️Kitchen scale
- 🫕Medium saucepan
- 🥣Heatproof mixing bowls
- 🥄Offset spatula
- 🪜Wire cooling rack
- 🥧Baking sheet
- 🍴Acetate cake collar
- 🥄Rubber spatula
- 🖌️Pastry brush
- 🔪Serrated knife
- 📄Parchment paper
Prepare Hibiscus Jelly
Make the hibiscus jelly insert first so it has time to set. Bloom 1 1/2 teaspoons (5g) powdered gelatin in 2 tablespoons cold water for 5 minutes.
Pour 1 1/2 cups boiling water over 1/4 cup dried hibiscus flowers and 3 tablespoons sugar in a heatproof bowl. Stir to dissolve the sugar and steep for 30 minutes.
Strain the deep crimson hibiscus tea through a fine-mesh strainer, discarding the flowers. You should have about 1 cup of intensely colored liquid.
Stir in 1 teaspoon lemon juice. Warm 2 tablespoons of the hibiscus tea in the microwave for 15 seconds, then whisk in the bloomed gelatin until fully dissolved.
Stir the gelatin mixture back into the remaining hibiscus tea. Pour into a 6-inch round silicone insert mold and refrigerate until fully set, at least 4 hours or overnight.
Bake Almond Sponge
Preheat your oven to 350°F (175°C). Grease an 8-inch round springform pan and line the bottom with parchment paper.
In a stand mixer fitted with the whisk attachment, beat 4 large eggs and 3/4 cup granulated sugar on high speed for 5 to 6 minutes until the mixture is very pale, thick, and has tripled in volume — it should fall from the whisk in a thick ribbon. Add 1 teaspoon vanilla extract and mix briefly.
In a separate bowl, whisk together 1 cup all-purpose flour, 1/2 cup almond flour, 1 teaspoon baking powder, and 1/4 teaspoon sea salt. Sift the flour mixture in three additions over the egg mixture, folding gently with a rubber spatula after each addition.
In a small bowl, whisk together the warm milk and melted butter. Drizzle this down the side of the bowl and fold in until just combined, being careful not to deflate the batter.
Pour into the prepared pan and bake at 350°F for 28 to 30 minutes, until the top is golden and a toothpick inserted in the center comes out clean. Cool in the pan for 10 minutes, then turn out onto a wire rack to cool completely, at least 30 minutes.
Trim and Soak Sponge
Once the sponge is completely cool, use a serrated knife to trim it into an even 3/4-inch thick layer. Using the base of your 8-inch entremet mold as a guide, cut a clean round disk from the sponge.
Set aside. In a small saucepan, combine 1/2 cup peach nectar, 2 tablespoons sugar, and 1 tablespoon lemon juice.
Bring to a simmer over medium heat, stirring until the sugar dissolves, about 2 minutes. Remove from heat and let cool to room temperature.
Use a pastry brush to generously soak the sponge disk on both sides with the cooled syrup. Set aside.
Make Peach Mousse
Make the peach mousse. Bloom 2 1/4 teaspoons powdered gelatin in 3 tablespoons cold water for 5 minutes.
Peel, pit, and dice 3 large ripe peaches. Combine the diced peaches, 1/2 cup granulated sugar, and 2 tablespoons lemon juice in a medium saucepan.
Cook over medium heat, stirring occasionally, for about 10 minutes until the peaches are very soft and jammy. Transfer to a blender or use an immersion blender to puree until completely smooth.
Strain through a fine-mesh strainer for a silky texture; you should have about 1 1/4 cups puree. While the puree is still warm (above 140°F/60°C), whisk in the bloomed gelatin until fully dissolved.
Transfer to a bowl and let cool to room temperature, about 20 minutes, stirring occasionally. Do not allow it to set.
In the stand mixer with the whisk attachment, whip 1 1/2 cups cold heavy cream to soft peaks. Gently fold one-third of the whipped cream into the cooled peach puree to lighten it, then fold in the remaining cream in two additions until no white streaks remain.
Assemble and Freeze
Assemble the entremet. Place your 8-inch silicone entremet mold on a flat baking sheet.
Pour approximately two-thirds of the peach mousse into the bottom of the mold, spreading it evenly with an offset spatula. Tap the baking sheet gently on the counter to remove air bubbles.
Unmold the set hibiscus jelly insert and carefully center it on top of the mousse, pressing it down gently so it sinks slightly into the mousse but remains centered. Pour the remaining peach mousse over and around the hibiscus jelly, smoothing the top.
Place the soaked almond sponge disk on top of the mousse, pressing it down gently so the top of the sponge is flush with the top of the mold. The sponge will become the base once the cake is inverted.
Cover with plastic wrap and freeze until completely solid, at least 6 hours or overnight.
Prepare Mirror Glaze
Prepare the mirror glaze when you are ready to finish the cake. Bloom 2 1/4 teaspoons powdered gelatin in 3 tablespoons cold water for 5 minutes.
Combine 3/4 cup granulated sugar and 3/4 cup water in a medium saucepan. Bring to a boil over medium heat, stirring to dissolve the sugar.
Remove from heat and stir in 1/2 cup sweetened condensed milk. Add the bloomed gelatin and whisk until fully dissolved.
Place 1 cup white chocolate chips in a heatproof bowl. Pour the hot condensed milk mixture directly over the white chocolate.
Let sit for 1 minute, then use an immersion blender to blend until completely smooth, keeping the blender submerged to avoid bubbles. For the hibiscus color, steep 2 tablespoons dried hibiscus flowers in 3 tablespoons of the hot glaze for 5 minutes, then strain; this creates a natural deep pink concentrate.
Divide the glaze into two portions: tint one portion with peach/orange gel food coloring for a warm golden-peach hue, and tint the second portion with the hibiscus concentrate plus magenta gel food coloring for a vivid deep pink. Let both glazes cool, stirring occasionally, until they reach 90 to 95°F (32 to 35°C) — this is the ideal pouring temperature for mirror glaze.
Glaze the Cake
When the glaze reaches 90 to 95°F, unmold the frozen cake by flexing the silicone mold and inverting it onto a wire rack set over a rimmed baking sheet to catch drips. Work quickly.
Pour the peach-orange glaze in a slow, steady stream over the center of the frozen cake, letting it flow naturally over the sides. Immediately follow with the hibiscus-pink glaze, pouring in a circular motion or letting it drip from a spoon to create a marbled, two-tone effect.
You can use a toothpick or skewer to gently swirl the two colors where they meet for a marble effect. Allow the glaze to drip completely and set for about 3 to 4 minutes.
Use a small offset spatula to carefully transfer the glazed cake to a serving platter or cake board. Refrigerate for at least 4 hours to fully thaw before serving.
Garnish and Serve
Just before serving, garnish the top of the cake with thinly sliced fresh peach arranged in a fan or overlapping pattern in the center. Tuck a few dried hibiscus flowers around the peach slices for color and texture.
If desired, apply small pieces of edible gold leaf using a dry brush for an elegant, luxurious finish. Slice with a warm, dry knife — run the blade under hot water and wipe dry between each cut for the cleanest slices that reveal the beautiful layers inside: golden sponge, peachy mousse, and the jewel-toned hibiscus jelly center.
Serve immediately.
Per serving (1 slice (approximately 150g)) — values are estimates
Highly Recommended


10. Jasmine Earl Grey Chiffon Cake
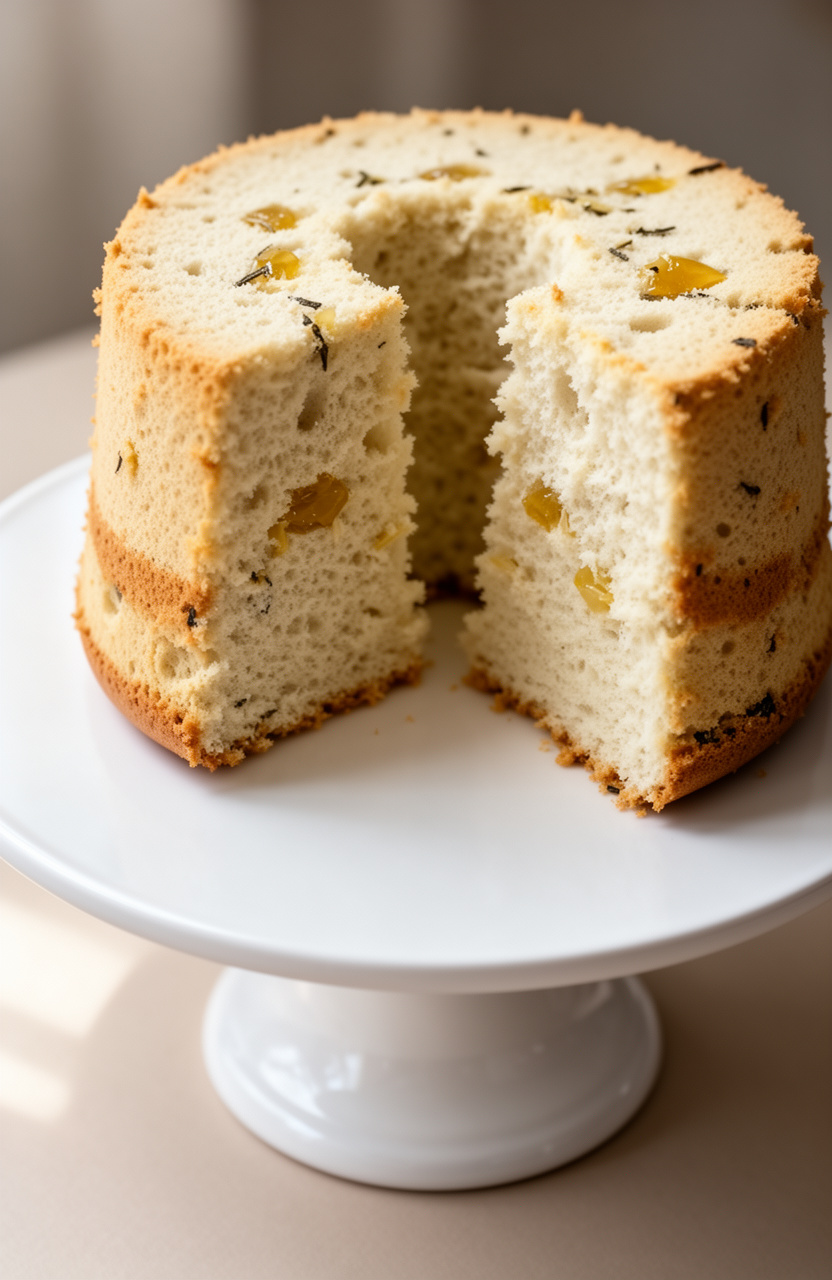
Earl Grey and jasmine green teas steep together in heated whole milk, pulling a layered floral bitterness and honeyed sweetness into every bite of this light, airy chiffon. The cloud-soft crumb sits in quiet contrast to the deep, tannin-edged tea flavor woven through it.
Jasmine Earl Grey Chiffon Cake
Tea Infusion
Cake Batter
Meringue
Chantilly Cream
Garnish
- 🍰25cm (10-inch) tube pan (ungreased angel food cake pan)
- 🔌Stand mixer with whisk attachment
- 🥣Large mixing bowl
- 🫕Medium saucepan
- 🪣Fine mesh sieve
- ⚖️Digital kitchen scale
- 🥄Rubber spatula
- 🪜Wire cooling rack
- 📍Long skewer or toothpick
- 🥄Offset spatula
- 🔌Electric hand mixer
- 🎂Piping bag with star tip
- 🍴Sifter
- 🌡️Thermometer
Infuse Tea Milk
Infuse the tea: Heat 240ml whole milk in a small saucepan over medium heat until it just begins to steam and small bubbles form around the edges, about 170°F (77°C). Do not boil.
Remove from heat, add 3 Earl Grey tea bags and 2 jasmine green tea bags, pressing them gently into the milk. Cover and steep for 30 minutes at room temperature.
After steeping, squeeze the bags firmly to extract maximum flavor, then discard. Strain through a fine mesh sieve.
You should have approximately 200ml of infused milk. Allow to cool completely to room temperature before using.
Prepare Dry Ingredients
Preheat your oven to 165°C (325°F) with the rack positioned in the lower third of the oven. Do not grease the tube pan — the batter must cling to the sides to rise properly.
In a large mixing bowl, sift together 200g cake flour, 100g of the caster sugar, 2 teaspoons baking powder, and ½ teaspoon fine sea salt. Whisk to combine evenly and set aside.
Mix Wet Ingredients
Separate 8 large eggs, placing the yolks in a large bowl and the whites in the clean, grease-free bowl of your stand mixer. Ensure no yolk contaminates the whites or the meringue will not whip properly.
To the egg yolks, add 120ml neutral oil, 200ml cooled tea-infused milk, 1 tablespoon lemon zest, and 1 teaspoon vanilla extract. Whisk vigorously until the mixture is smooth, pale, and fully emulsified, about 2 minutes.
Combine Batter
Pour the yolk mixture into the center of the dry ingredients. Using a rubber spatula, fold and stir until the batter is completely smooth with no lumps — about 1 to 2 minutes of vigorous stirring.
The batter will be slightly thick. Set aside while you prepare the meringue.
Whip Meringue
Whip the meringue: Add ½ teaspoon cream of tartar to the egg whites in the stand mixer bowl. Using the whisk attachment, beat on medium speed (speed 4) until foamy and opaque, about 2 minutes.
Increase to medium-high speed (speed 6) and gradually add the remaining 100g caster sugar in a slow, steady stream over about 1 minute. Continue beating on high speed until the meringue is glossy and holds firm, stiff peaks that curl only slightly at the very tip — approximately 5 to 7 minutes total.
Do not overbeat to a dry or grainy texture.
Fold In Meringue
Fold the meringue into the batter in three additions. Add one-third of the meringue to the batter and use a rubber spatula to stir it in completely — this lightens the batter.
Add the second third and fold gently using large, sweeping under-and-over motions, rotating the bowl a quarter turn with each fold, until almost no white streaks remain. Add the final third and fold carefully until the batter is uniform, light, and airy.
Work quickly but gently — do not deflate the meringue. The finished batter should be pale, fluffy, and ribbon-like.
Bake the Cake
Pour the batter into the ungreased 25cm tube pan in a steady stream, letting it fall from about 15cm above the pan to break any large air bubbles. Smooth the top gently with an offset spatula.
Run a thin skewer or butter knife through the batter in a zigzag pattern twice to eliminate any large air pockets. Bake in the preheated oven at 165°C (325°F) for 50 to 55 minutes, until the top is deep golden brown, springs back immediately when lightly pressed, and a skewer inserted into the thickest part comes out completely clean.
Do not open the oven during the first 40 minutes.
Cool Inverted
Immediately upon removing from the oven, invert the tube pan onto its built-in feet or over the neck of a tall bottle if your pan has no feet. Allow the cake to cool completely upside down for a minimum of 1 hour 30 minutes.
This prevents the delicate structure from collapsing under its own weight. Do not rush this step.
Once fully cooled, run a long, thin offset spatula or knife carefully around the outer edge and the inner tube to release the cake. Invert onto a wire rack.
Whip Earl Grey Cream
Prepare the Earl Grey Chantilly cream: Combine 300ml cold heavy whipping cream, 2 tablespoons sifted powdered sugar, and 1 teaspoon finely ground Earl Grey tea leaves in a chilled bowl. Using an electric hand mixer on medium-high speed, whip until the cream holds medium-firm peaks that hold their shape but remain silky and smooth, about 3 to 4 minutes.
Do not overwhip. Transfer to a piping bag fitted with a large open star tip and refrigerate until ready to serve.
Garnish and Serve
To serve, dust the top of the cooled chiffon cake lightly and evenly with 1 tablespoon powdered sugar using a fine sieve. Pipe generous rosettes of Earl Grey Chantilly cream around the top edge and center hole of the cake.
Scatter dried jasmine flowers over the cream and cake surface for an elegant, aromatic finish. Slice with a long serrated knife using a gentle sawing motion to preserve the airy texture.
Serve immediately or refrigerate uncovered for up to 4 hours before serving.
Per serving (1 slice (1/12 of cake)) — values are estimates
Trending on Amazon


11. Rhubarb Custard Floral Crown Cake
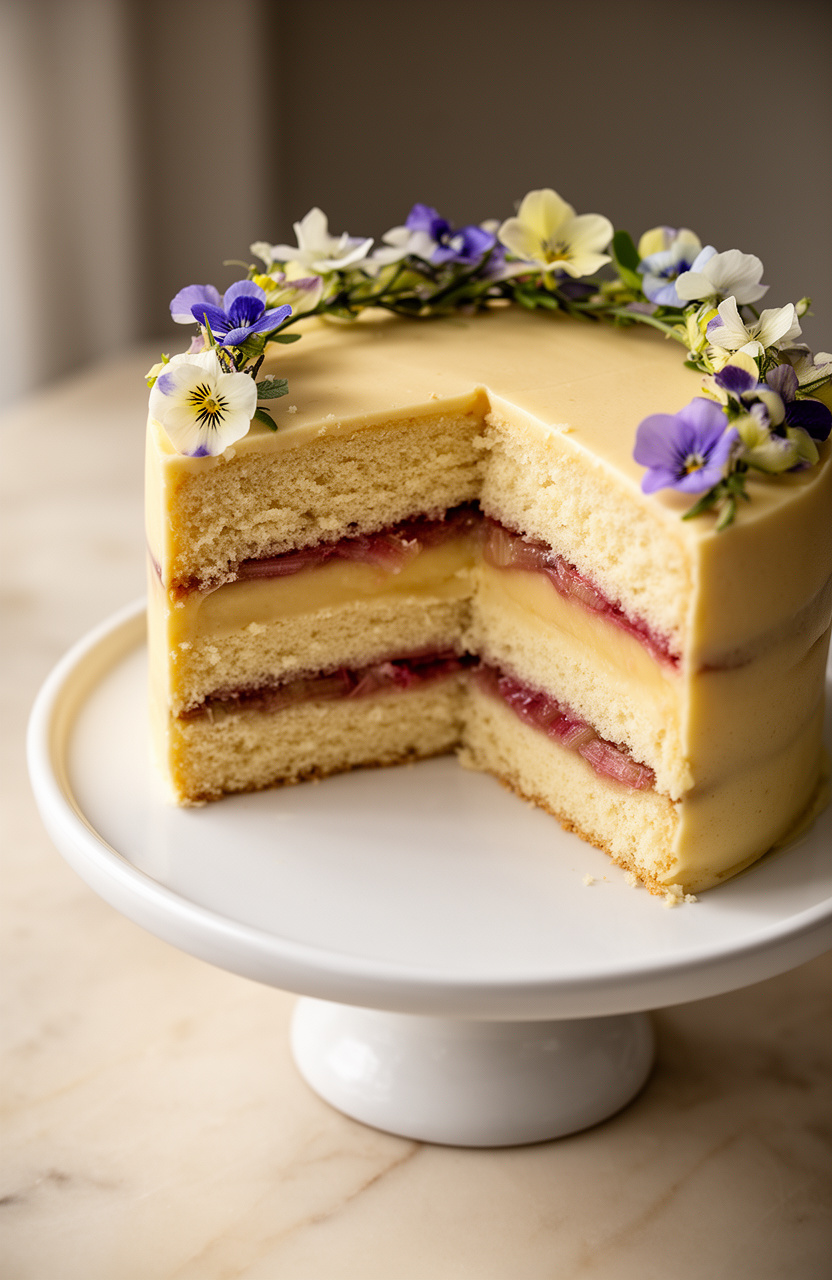
Rhubarb compote cooked down to a jammy, tart concentrate anchors the custard filling with a sharp, fruity depth that cuts cleanly through the richness of the butter-laden crumb beneath it. Soft, silky custard layered against that tender, flour-built cake creates a contrast of smooth and yielding textures crowned with delicate floral decoration across the top.
Rhubarb Custard Floral Crown Cake
Vanilla Sponge Cake
Rhubarb Compote
Vanilla Custard Filling
Whipped Cream Frosting
Floral Crown Decoration
- 🍰Three 8-inch round cake pans
- 📄Parchment paper circles
- 🔌Stand mixer with paddle and whisk attachments
- 🫕Medium heavy-bottomed saucepan
- 🪣Fine mesh sieve
- 📄Plastic wrap
- 🥄Large offset spatula
- 🍴Bench scraper
- 🍴Cake turntable
- 🎂Piping bags
- 🍴Large star piping tip (1M or 2D)
- 🔪Vegetable peeler
- 🌡️Digital kitchen thermometer
- 🪜Cooling racks
- 🥄Rubber spatula
- 🔪Serrated cake knife
- 🖌️Small pastry brush
- 🥣Mixing bowls (various sizes)
Cook Rhubarb Compote
Make the rhubarb compote first so it has time to cool completely. Combine 1 1/2 lbs cut rhubarb, 3/4 cup granulated sugar, 2 tablespoons lemon juice, and 1 teaspoon lemon zest in a medium heavy-bottomed saucepan.
Cook over medium heat, stirring occasionally, for about 15 minutes until the rhubarb breaks down and the mixture is jammy and bubbling. In a small bowl, whisk together 1 tablespoon cornstarch and 2 tablespoons cold water, then stir into the rhubarb.
Continue cooking for 3–4 more minutes until thickened. Remove from heat, stir in rosewater if using, then pour into a bowl.
Press plastic wrap directly on the surface and refrigerate until fully cold, at least 2 hours.
Prepare Vanilla Custard
Make the vanilla pastry cream. In a medium bowl, whisk together 6 egg yolks, 1/2 cup granulated sugar, and 3 tablespoons cornstarch until pale and smooth, about 2 minutes.
In a medium saucepan, heat 2 cups whole milk and 1/2 cup heavy cream over medium heat until steaming and just beginning to simmer (about 170°F). Slowly pour one-third of the hot milk mixture into the egg yolk mixture while whisking constantly to temper.
Pour the tempered mixture back into the saucepan. Cook over medium heat, whisking constantly and vigorously, for 4–6 minutes until the custard thickens and large bubbles pop on the surface.
Remove from heat and immediately whisk in 2 tablespoons butter, 1 1/2 teaspoons vanilla bean paste, and 1/4 teaspoon salt. Strain through a fine mesh sieve into a clean bowl.
Press plastic wrap directly on the surface to prevent a skin from forming. Refrigerate for at least 2 hours until completely cold and set.
Prepare Cake Pans
Preheat your oven to 350°F (175°C). Grease three 8-inch round cake pans thoroughly with butter or nonstick spray, line the bottoms with parchment paper circles, then grease the parchment as well.
Lightly dust with flour, tapping out any excess. Set aside.
Cream Butter and Sugar
In a medium bowl, whisk together 2 1/4 cups all-purpose flour, 2 teaspoons baking powder, and 1/2 teaspoon fine sea salt. Set aside.
In the bowl of a stand mixer fitted with the paddle attachment, beat 3/4 cup softened unsalted butter and 1 3/4 cups granulated sugar on medium-high speed for 4–5 minutes until very pale, light, and fluffy, scraping down the sides of the bowl as needed. Add 4 eggs one at a time, beating for 30 seconds after each addition.
Add 2 teaspoons vanilla extract and mix to combine.
Combine Cake Batter
In a small bowl or measuring cup, whisk together 1 cup whole milk and 1/4 cup sour cream until combined. With the mixer on low speed, add the flour mixture in three additions alternating with the milk-sour cream mixture in two additions, beginning and ending with the flour.
Mix only until just combined after each addition — do not overmix. Scrape down the bowl with a rubber spatula and give the batter a final gentle fold by hand to ensure everything is incorporated.
The batter should be smooth, thick, and glossy.
Bake the Cakes
Divide the batter evenly among the three prepared cake pans (approximately 480g per pan if you have a kitchen scale). Smooth the tops with an offset spatula.
Bake at 350°F for 30–35 minutes, rotating the pans halfway through at the 17-minute mark, until the tops are golden, the cakes spring back when lightly pressed in the center, and a toothpick inserted in the middle comes out clean or with just a few moist crumbs. Begin checking at 30 minutes.
Allow the cakes to rest in their pans on wire racks for 30 minutes, then run a thin knife around the edges and turn them out. Peel off the parchment and allow to cool completely on the racks before assembling.
Whip Custard Filling
Once the pastry cream is fully chilled and set, transfer it to a clean stand mixer bowl fitted with the whisk attachment. Whip on medium speed for 1–2 minutes until smooth and lightened.
In a separate chilled bowl, whip 2 cups very cold heavy cream, 3 tablespoons powdered sugar, 1 teaspoon vanilla extract, and 1 tablespoon instant vanilla pudding powder together on medium-high speed until stiff peaks form, about 3–4 minutes. Gently fold half of the whipped cream into the lightened pastry cream using a rubber spatula until fully incorporated and smooth.
Reserve the remaining whipped cream in the refrigerator for frosting the outside of the cake.
Layer and Fill Cake
If the cake layers have domed on top, use a long serrated knife to level them so all three layers are flat and even. Place the first cake layer on a cake board or serving plate set on a turntable.
Spread a generous, even layer of the custard cream (about 3/4 cup) over the surface, leaving a 1/2-inch border around the edge. Spoon half of the chilled rhubarb compote over the custard layer and gently spread it to within 1 inch of the edge, being careful not to push it through the custard.
Place the second cake layer on top and repeat with another layer of custard cream and the remaining rhubarb compote. Place the third and final cake layer on top, pressing gently to adhere.
Frost the Cake
Apply a thin crumb coat of the reserved whipped cream all over the outside of the cake using an offset spatula, covering the top and sides completely. This thin layer seals in crumbs.
Refrigerate the crumb-coated cake for 30 minutes until the coating is set and firm to the touch. After chilling, apply a final, thicker, smooth layer of the reserved whipped cream all over the cake.
Use a bench scraper held against the side of the cake while slowly rotating the turntable to achieve clean, smooth sides. Smooth the top with the offset spatula.
Refrigerate for at least 1 hour to allow the frosting to set before decorating.
Prepare Floral Decorations
Using a vegetable peeler, peel long, thin, wide ribbons from fresh rhubarb stalks. These will form curled accent pieces for the floral crown.
Gently roll or curl the ribbons into loose spirals and set them on a parchment-lined tray. Inspect all edible flowers and herb sprigs, gently rinsing and patting dry with paper towels if needed.
Lightly brush any flower stems or bases with a tiny amount of light corn syrup to help them adhere to the whipped cream surface.
Create Floral Crown
Remove the chilled cake from the refrigerator. Using a piping bag fitted with a large star tip (1M or 2D) filled with any remaining whipped cream, pipe a decorative border of rosettes or swirls around the top outer edge of the cake to create a raised crown-like ridge that will frame the floral arrangement.
Begin placing the edible flowers in a lush, clustered crown arrangement on top of the cake, concentrating them toward the outer ring and allowing some to drape slightly over the edge. Tuck rhubarb ribbon curls, small herb sprigs, and additional flowers throughout for depth and dimension.
Work quickly and confidently, varying flower sizes and colors for a natural, garden-gathered look.
Finish and Serve
Once the floral crown is complete, give the entire cake a very light dusting of powdered sugar using a fine sieve held about 12 inches above the cake for a soft, ethereal finish. Optionally, lightly mist edible flowers with an edible glaze spray to give them a fresh, dewy appearance and help preserve them slightly longer.
Refrigerate the finished cake until ready to serve. For the cleanest slices, use a long sharp knife warmed under hot water and wiped dry between each cut.
The cake is best served within 2 hours of final decoration, and will keep refrigerated for up to 2 days.
Per serving (1 slice (1/12 of cake)) — values are estimates
Recommended for You
12. Lilac Blackberry Geode Cake
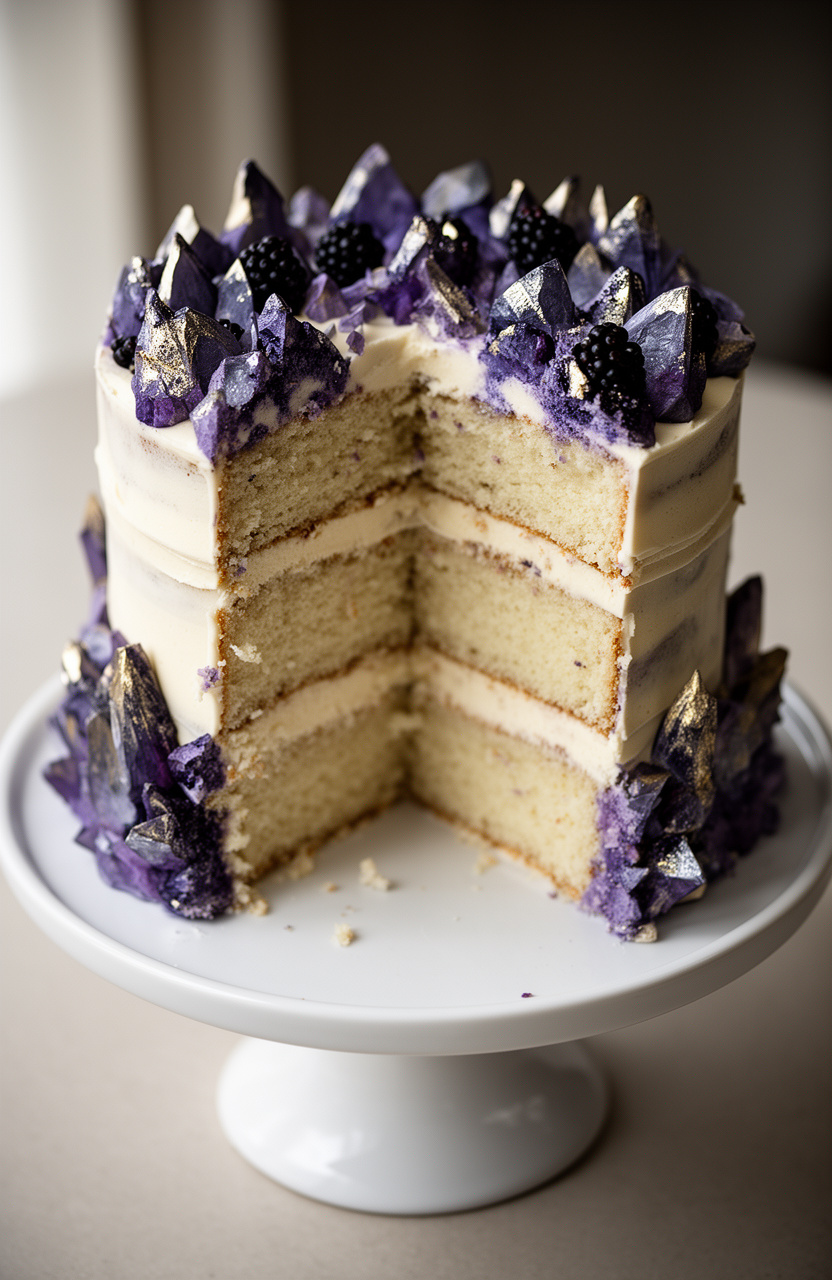
Making the geode candy first builds crystallized rock sugar formations in deep violet and blackberry hues that press into the frosted cake surface. All-purpose flour, baking powder, and baking soda work together beneath to produce a soft, even crumb that offsets the crunchy, jewel-like candy clusters.
Lilac Blackberry Geode Cake
Vanilla Cake Layers
Blackberry Compote Filling
Lilac Blackberry Buttercream
Rock Candy Geode
Decoration
- 🍰Three 8-inch round cake pans
- 🔌Stand mixer with paddle and whisk attachments
- 🫕Medium saucepan
- 🪣Fine mesh sieve
- 🥄Offset spatula
- 🍴Bench scraper
- 🍴Cake turntable
- 🔪Serrated knife or cake leveler
- 🖌️Pastry brush
- 📄Parchment paper
- 🍴Cooking spray
- ⚖️Digital kitchen scale
- 🌡️Instant-read thermometer
- 🫕Small saucepan
- 📍Wooden skewers or toothpicks
- 🖌️Paintbrush (food-safe) for luster dust
- 🎂Piping bags
- 🍽️Cake board or serving plate
- 🪜Cooling racks
- 🥄Rubber spatula
Make Geode Candy
Begin the rock candy geode at least 24 hours ahead (or up to 3 days in advance). In a medium saucepan, combine 2 cups granulated sugar and ¾ cup water over medium heat.
Stir until sugar fully dissolves, then stop stirring and bring to a boil. Cook without stirring until the syrup reaches 300°F (hard crack stage) on an instant-read thermometer, about 10-12 minutes.
Remove from heat, divide between two small heatproof bowls, and tint one portion deep purple and the other violet using gel food coloring. Pour the tinted syrups in irregular overlapping pools onto a parchment-lined baking sheet to form a geode shard shape roughly 6 inches long and 3 inches wide.
Allow to cool and harden completely at room temperature, about 30 minutes. Once hardened, brush the surface generously with edible silver and gold luster dust using a dry food-safe paintbrush.
Set aside in a cool, dry place.
Prepare Cake Pans
Preheat your oven to 350°F (175°C). Grease three 8-inch round cake pans with cooking spray, line the bottoms with parchment paper circles, then grease the parchment and lightly flour the pans, tapping out any excess flour.
Set aside.
Mix Dry Ingredients
In a large bowl, whisk together 3 cups all-purpose flour, 2½ teaspoons baking powder, ½ teaspoon baking soda, and ½ teaspoon fine sea salt until well combined. Set the dry ingredients aside.
In a small bowl or measuring cup, whisk together 1 cup buttermilk and ½ cup sour cream until smooth. Set aside.
Cream Butter and Sugar
In the bowl of a stand mixer fitted with the paddle attachment, beat 1 cup room-temperature unsalted butter on medium speed for 2 minutes until creamy and pale. Add 2 cups granulated sugar and beat on medium-high speed for 4-5 minutes until very light and fluffy, scraping down the sides of the bowl as needed.
Add the 4 eggs one at a time, beating for 30 seconds after each addition and scraping the bowl between additions. Beat in 2 teaspoons vanilla extract.
Combine Batter
With the mixer on low speed, add the flour mixture in three additions, alternating with the buttermilk-sour cream mixture in two additions (beginning and ending with flour). Mix each addition only until just combined — do not overmix.
Finish folding the batter by hand with a rubber spatula to ensure no streaks of flour remain. Divide the batter evenly among the three prepared pans (approximately 560g per pan if using a scale).
Bake Cake Layers
Bake the cake layers in the preheated 350°F oven for 30-35 minutes, until a toothpick inserted into the center comes out clean and the tops spring back when lightly pressed. Begin checking at 30 minutes.
Remove from the oven and let the cakes cool in their pans on wire racks for 30 minutes, then run an offset spatula around the edges, invert onto the racks, peel off the parchment, and allow to cool completely, about 1 additional hour at room temperature.
Cook Blackberry Compote
While the cakes cool, make the blackberry compote. Combine 2 cups fresh blackberries, ½ cup granulated sugar, and 2 tablespoons fresh lemon juice in a medium saucepan over medium heat.
Cook, stirring frequently and mashing the berries with a spoon, for about 8-10 minutes until the mixture thickens and the berries have broken down. Stir in the cornstarch slurry (1 tablespoon cornstarch mixed with 2 tablespoons cold water) and cook for an additional 2 minutes until the compote is thick and glossy.
Remove from heat, stir in 1 teaspoon vanilla extract, and press through a fine mesh sieve to remove seeds if desired (or leave seeds in for texture). Transfer to a bowl, reserve 3 tablespoons for the buttercream, and refrigerate the remainder until completely cold, at least 1 hour.
Make Lilac Buttercream
Make the lilac blackberry buttercream. In the stand mixer fitted with the paddle attachment, beat 2 cups room-temperature unsalted butter on medium-high speed for 4-5 minutes until very pale and fluffy.
Reduce speed to low and gradually add 5 cups sifted powdered sugar, one cup at a time, mixing well after each addition. Add 3 tablespoons of the reserved blackberry compote, 2 tablespoons heavy cream, 1 teaspoon vanilla extract, and ¼ teaspoon fine sea salt.
Increase speed to medium-high and beat for 3-4 minutes until light and fluffy. Divide the buttercream: set aside about 1½ cups of plain buttercream for the crumb coat.
Tint the remaining buttercream with violet and soft pink gel food coloring to achieve a soft lilac-purple tone, adjusting the ratio of colors until you reach a delicate lavender-purple shade.
Fill and Stack Cake
Once the cake layers are completely cool, use a serrated knife or cake leveler to trim any domed tops so all three layers are flat and even. Place one cake layer on a cake board or serving plate set on a turntable.
Spread a thin layer of plain buttercream around the top edge to create a dam (this prevents the compote from leaking out). Fill the center with a generous layer of the chilled blackberry compote, spreading it to the buttercream dam.
Place the second cake layer on top, pressing gently. Repeat the dam and compote filling.
Place the third cake layer on top, cut-side down.
Apply Crumb Coat
Apply a thin crumb coat of plain buttercream all over the outside of the cake using an offset spatula, sealing in all crumbs. Smooth with a bench scraper.
Refrigerate the crumb-coated cake for 30 minutes until the crumb coat is firm to the touch.
Frost the Cake
Remove the chilled cake from the refrigerator. Using an offset spatula and bench scraper, apply a thick, even final coat of the lilac buttercream all over the top and sides of the cake.
Use the bench scraper while spinning the turntable to smooth the sides. For a textured, geode-inspired look, use the tip of the offset spatula to create swirling, slightly rough strokes on the sides, suggesting natural stone texture.
Smooth the top with the offset spatula. Refrigerate for at least 2 hours until the buttercream is completely firm.
Create Geode Cavity
Once the frosted cake is firm, create the geode cavity. Using a small sharp knife or spoon, carve an irregular, curved hollow into one side of the cake, starting from the top edge and cutting down about one-third of the way, creating an organic cave-like opening roughly 3-4 inches wide and 2-3 inches deep.
Brush the interior of the cavity with melted white chocolate to create a smooth base that will help the crystals adhere. While the white chocolate is still tacky, press crushed purple and violet rock candy crystals firmly into the cavity, layering colors from deep purple at the back to lighter violet toward the edges for a realistic geode gradient.
Allow the white chocolate to set for 15 minutes.
Add Luster Dust
Brush the edges of the geode cavity and the rock candy crystals with edible silver luster dust using a dry food-safe paintbrush to add shimmer and depth. Apply a light dusting of gold luster dust to the outer edges for a luxurious transition from the cake surface to the crystal interior.
Use a clean brush to lightly dust the entire exterior of the cake with a very subtle sweep of silver luster dust to give the frosting a soft, ethereal glow.
Decorate and Garnish
Carefully position the pre-made sugar candy geode shard upright at the top edge of the geode cavity, pressing it gently into the buttercream to anchor it. Arrange fresh blackberries in a cascading cluster near the geode opening and along the base of the cavity.
Tuck edible dried lilac flowers or food-safe fresh lilac blossoms around the blackberries and along the top of the cake for a romantic, botanical finish. Brush the fresh blackberries lightly with clear piping gel to make them shine.
Chill and Serve
Refrigerate the finished cake for at least 1 hour before serving to allow all elements to set. Remove from the refrigerator 20-30 minutes before serving to allow the buttercream to soften slightly for the best texture and flavor.
To slice, use a sharp knife dipped in hot water and wiped clean between cuts. The cake will keep, covered, in the refrigerator for up to 4 days.
Per serving (1 slice (1/12 of cake)) — values are estimates
Trending on Amazon
13. Apricot Chamomile Petal Cake
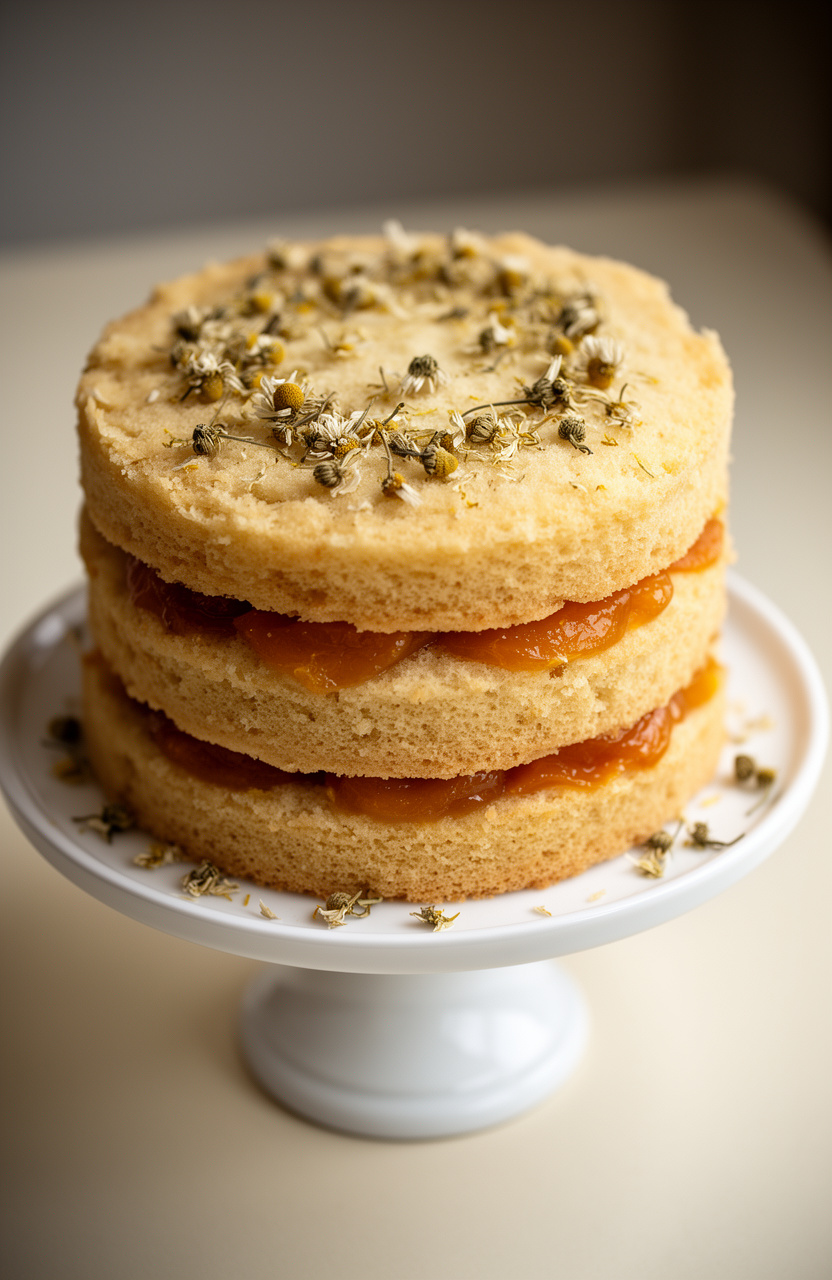
Dried chamomile flowers steep in warmed whole milk until the liquid turns golden and carries a soft, honey-edged floral depth that threads through every layer of the finished cake. The crumb bakes up tender and delicate, its mild sweetness offset by the bright, jammy apricot tucked between the layers and the dried petals scattered across the top.
Apricot Chamomile Petal Cake
Chamomile Infusion
Cake Batter
Apricot Compote
Chamomile Chantilly Cream
Chamomile Buttercream
Assembly & Decoration
- 🍰Three 8-inch round cake pans
- 📄Parchment paper
- 🔌Stand mixer with paddle and whisk attachments
- 🪣Fine-mesh sieve or cheesecloth
- 🫕Small heavy-bottomed saucepan
- 🫕Medium saucepan
- 🥣Heatproof bowl
- ⚖️Digital kitchen scale
- 🥄Offset spatula
- 🍴Bench scraper
- 🍴Cake turntable
- 🖌️Pastry brush
- 🎂Piping bag with large star tip
- 🌡️Instant-read thermometer
- 🥄Rubber spatula
- 🪜Wire cooling rack
- 🔪Serrated knife or cake leveler
Infuse Chamomile Milk
Infuse the chamomile milk: In a small heavy-bottomed saucepan, heat 1 cup whole milk over medium-low heat until it just begins to steam, about 3 to 4 minutes. Do not allow it to boil.
Remove from heat, add 4 tablespoons dried culinary chamomile flowers, stir gently, and cover the saucepan. Allow the chamomile to steep for exactly 30 minutes at room temperature.
After steeping, strain the milk through a fine-mesh sieve, pressing the flowers gently to extract maximum flavor. Discard the spent flowers.
Measure out 2 tablespoons for the Chantilly cream and 3 tablespoons for the buttercream, then set the remainder aside. Allow infused milk to cool completely before using.
Cook Apricot Compote
Prepare the apricot compote: Combine 1 pound quartered fresh apricots, 1/3 cup granulated sugar, and 2 tablespoons fresh lemon juice in a medium saucepan over medium heat. Stir to coat the apricots and cook, stirring occasionally, until the apricots begin to break down and release their juices, about 8 minutes.
Add 1 teaspoon vanilla extract and stir in the cornstarch slurry (1 tablespoon cornstarch dissolved in 2 tablespoons cold water). Continue cooking, stirring constantly, for an additional 2 minutes until the compote thickens to a jam-like consistency.
Remove from heat and transfer to a heatproof bowl. Press a sheet of plastic wrap directly onto the surface to prevent a skin from forming and refrigerate until completely cold, at least 2 hours.
Prepare Cake Pans
Preheat your oven to 350°F (175°C). Grease three 8-inch round cake pans thoroughly with butter, line the bottoms with parchment paper circles, then grease the parchment as well.
Dust each pan lightly with flour and tap out any excess. Set the prepared pans aside.
Cream Butter and Sugar
Make the cake batter: In a medium bowl, whisk together 2 cups sifted all-purpose flour, 2 teaspoons baking powder, and 1/2 teaspoon fine sea salt. Set aside.
In the bowl of a stand mixer fitted with the paddle attachment, beat 3/4 cup softened unsalted butter on medium speed for 2 minutes until pale and creamy. Gradually add 1 1/2 cups granulated sugar and continue beating on medium-high speed for a full 4 minutes, scraping down the sides of the bowl halfway through, until the mixture is very light and fluffy.
Add the 4 eggs one at a time, beating for 30 seconds after each addition and scraping the bowl between additions. Add 2 teaspoons vanilla extract and 1/2 teaspoon almond extract and beat for 30 seconds more.
Combine Batter Ingredients
With the mixer on its lowest speed, add the flour mixture in three additions, alternating with the remaining chamomile-infused milk in two additions (begin and end with flour). Mix each addition only until just combined — do not overmix.
After the final flour addition, stop the mixer and finish folding the batter by hand with a rubber spatula, scraping the bottom and sides of the bowl to ensure no flour pockets remain. The batter should be smooth, thick, and silky.
Bake the Cake Layers
Divide the batter evenly among the three prepared cake pans, using a kitchen scale for accuracy (approximately 350g per pan). Smooth the tops with an offset spatula.
Bake in the preheated 350°F oven for 30 to 35 minutes, rotating the pans halfway through at the 17-minute mark, until the cakes are golden on top, spring back lightly when pressed in the center, and a toothpick inserted in the middle comes out with just a few moist crumbs. The internal temperature should read 205°F to 210°F on an instant-read thermometer.
Cool Cake Layers
Remove the cakes from the oven and allow them to rest in their pans on a wire rack for 20 minutes — do not attempt to unmold them earlier. After 20 minutes, run a thin knife or offset spatula around the edges of each pan, invert the cakes onto the wire rack, peel off the parchment, and allow them to cool completely to room temperature before assembling.
This will take approximately 1 hour.
Prepare Chamomile Buttercream
Make the chamomile buttercream: In the bowl of a stand mixer fitted with the paddle attachment, beat 1 cup softened unsalted butter on medium-high speed for 4 minutes until very pale, light, and fluffy. Reduce speed to low and gradually add 3 cups sifted powdered sugar, 1/2 cup at a time, mixing until fully incorporated after each addition.
Add 3 tablespoons reserved chamomile-infused milk, 1 teaspoon vanilla extract, and a pinch of fine sea salt. Increase speed to medium-high and beat for an additional 3 minutes until the buttercream is silky smooth and spreadable.
If the buttercream is too stiff, add chamomile milk one teaspoon at a time. Cover and set aside at room temperature.
Whip Chantilly Cream
Make the chamomile Chantilly cream: In the bowl of a stand mixer fitted with the whisk attachment, combine 1 cup cold heavy whipping cream, 3 tablespoons sifted powdered sugar, 2 tablespoons reserved chamomile-infused milk, and 1 teaspoon vanilla extract. Whip on medium speed for 1 minute, then increase to high speed and whip until the cream holds firm, glossy peaks, about 2 to 3 minutes more.
Do not overwhip. Transfer to a piping bag fitted with a large star tip and refrigerate until needed.
Layer and Fill Cake
Level and assemble the cake: Using a serrated knife or cake leveler, trim the domed tops from each cooled cake layer to create flat, even surfaces. Place one cake layer on a cake turntable or serving plate and secure it with a small dab of buttercream.
Using a pastry brush, lightly brush the top of the first layer with 1 to 2 teaspoons of the warmed, strained apricot jam. Spread a generous, even layer of chamomile buttercream (about 1/3 cup) over the jam using an offset spatula.
Spoon half of the chilled apricot compote over the buttercream, spreading it to within 1/2 inch of the edge. Place the second cake layer on top, pressing gently to level it.
Repeat the jam, buttercream, and compote layers. Place the final cake layer on top, cut side down.
Apply Crumb Coat
Apply a crumb coat: Using an offset spatula and bench scraper, apply a thin, even layer of chamomile buttercream over the entire cake — top and sides — to seal in any crumbs. This layer should be thin enough that you can still see the cake through it.
Transfer the cake to the refrigerator and chill for at least 30 minutes until the crumb coat is firm to the touch.
Frost and Texture Cake
Apply the final buttercream coat: Remove the chilled cake from the refrigerator. Apply a generous, even final layer of chamomile buttercream over the entire cake using an offset spatula.
Use the bench scraper held perpendicular to the turntable to smooth the sides in one clean sweep as you rotate the cake. Smooth the top with the offset spatula, pulling excess buttercream inward from the edges to create clean, sharp edges.
For a petal effect, use the back of a small spoon or a teaspoon to press lightly into the sides of the buttercream and drag gently to create overlapping petal-shaped impressions around the entire cake. Refrigerate for a further 30 minutes to set.
Decorate the Cake
Decorate the cake: Remove the cake from the refrigerator. Pipe rosettes or large swirls of chamomile Chantilly cream along the top edge of the cake using the prepared piping bag.
Arrange thinly sliced fresh apricot halves in a cascading fan pattern across the top of the cake, overlapping them slightly for an elegant effect. Brush the apricot slices very lightly with a small amount of warmed apricot jam to give them a beautiful glaze and to prevent browning.
Scatter 2 tablespoons dried culinary chamomile flowers over the top and sides of the cake. If desired, apply edible gold leaf flakes with a dry brush for a luxurious finish and tuck in fresh edible flower petals.
Refrigerate the finished cake for at least 1 hour before serving to allow all components to set and flavors to meld.
Serve and Store
Serve and store: Remove the cake from the refrigerator 20 to 30 minutes before slicing to allow the buttercream to soften slightly for the best texture and flavor. Slice with a sharp, warm knife, wiping the blade clean between cuts for neat slices.
Leftover cake should be stored covered in the refrigerator for up to 3 days. Allow individual slices to come to room temperature for 15 minutes before serving.
Per serving (1 slice (1/12 of cake)) — values are estimates
Top Picks Today
14. Pistachio Rose Water Fault Line Cake
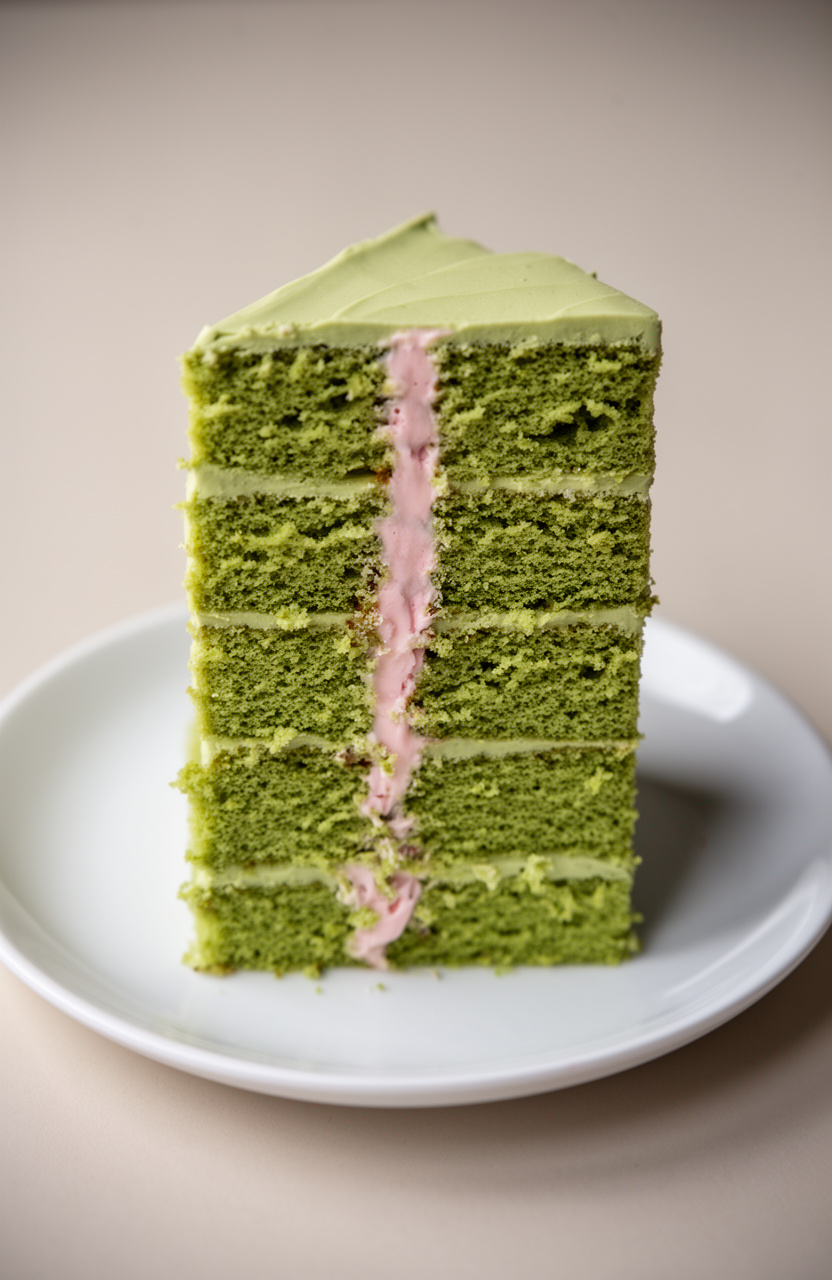
Finely ground raw pistachios fold into an all-purpose flour base alongside baking powder and baking soda, building a nutty, subtly earthy crumb that carries the soft, floral lift of rose water through every tender, fragrant layer of the finished fault line cake.
Pistachio Rose Water Fault Line Cake
Pistachio Cake Layers
Rose Water Swiss Meringue Buttercream
Fault Line Filling
Rose Water Simple Syrup
Decoration
- 🍰Three 6-inch round cake pans
- 🔌Stand mixer with whisk and paddle attachments
- 🥣Large heatproof mixing bowl
- 🫕Double boiler or saucepan for bain-marie
- 🌡️Instant-read or candy thermometer
- 🥄Offset spatula (small and large)
- 🍴Bench scraper
- 🍴Turntable cake decorating stand
- 🖌️Pastry brush
- 🎂Piping bags with round tips (1A and 2A)
- 🔪Serrated bread knife
- 📄Parchment paper
- 🪜Wire cooling racks
- ⚖️Digital kitchen scale
- 🪣Fine mesh sieve
- 🥄Rubber spatulas
Prepare Pans
Preheat your oven to 350°F (175°C). Grease three 6-inch round cake pans with butter, line the bottoms with parchment paper circles, then grease the parchment and dust lightly with flour, tapping out any excess.
Set aside.
Make Simple Syrup
Make the rose water simple syrup: Combine 1/4 cup sugar and 1/4 cup water in a small saucepan over medium heat. Stir until the sugar dissolves completely, about 3 minutes.
Remove from heat, stir in 1 teaspoon rose water, and allow to cool completely. Set aside.
Combine Dry Ingredients
In a medium bowl, whisk together the all-purpose flour, finely ground pistachios, baking powder, baking soda, and sea salt until evenly combined. Set aside.
In a small measuring cup, stir together the whole milk, sour cream, vanilla extract, and 1 tablespoon rose water until smooth.
Cream Butter and Sugar
In the bowl of a stand mixer fitted with the paddle attachment, beat 3/4 cup room-temperature butter and 1 1/2 cups granulated sugar on medium-high speed for 5 to 6 minutes until the mixture is very pale, fluffy, and nearly doubled in volume. Scrape down the sides of the bowl as needed.
Add Eggs
With the mixer on medium speed, add the 3 eggs one at a time, beating for 30 seconds after each addition and scraping down the bowl between additions. If the batter looks slightly curdled after the eggs, this is normal and will come together once the dry ingredients are added.
Add the 4 drops of green gel food coloring if using and mix briefly to incorporate.
Combine Batter
Reduce mixer speed to low. Add the flour mixture in three additions, alternating with the milk mixture in two additions (flour, milk, flour, milk, flour).
Begin and end with the flour mixture. Mix each addition only until just incorporated — do not overmix.
Remove the bowl from the mixer and use a rubber spatula to fold the batter a few times from the bottom to ensure everything is evenly combined.
Bake Cake Layers
Divide the batter evenly among the three prepared 6-inch pans, approximately 400g per pan if weighing. Smooth the tops with an offset spatula.
Tap each pan firmly on the counter 3 to 4 times to release any large air bubbles. Bake on the center rack of the preheated 350°F oven for 30 to 35 minutes, until a toothpick inserted into the center comes out with just a few moist crumbs and the edges have pulled slightly away from the sides of the pan.
Cool Cake Layers
Remove the pans from the oven and allow the cakes to cool in the pans on wire racks for 15 minutes. Then run an offset spatula around the edges of each pan, invert the cakes onto the racks, peel off the parchment, and allow them to cool completely at room temperature for at least 30 minutes before wrapping.
Once fully cooled, wrap each layer tightly in plastic wrap and refrigerate for at least 1 hour or up to 2 days. Cold layers are much easier to torte and frost.
Heat Egg Whites
Make the Swiss meringue buttercream: Combine the 6 egg whites, 1 3/4 cups granulated sugar, and 1/4 teaspoon salt in the clean, grease-free heatproof bowl of your stand mixer. Set the bowl over a saucepan of barely simmering water (bain-marie), making sure the bottom of the bowl does not touch the water.
Whisk constantly by hand until the mixture reaches 160°F (71°C) on an instant-read thermometer and the sugar is completely dissolved — rub a small amount between your fingers; it should feel completely smooth with no graininess, about 8 to 10 minutes.
Whip Meringue
Transfer the bowl to the stand mixer fitted with the whisk attachment. Beat on medium-high speed for 10 to 12 minutes until the meringue is thick, glossy, and holds stiff peaks.
The bowl should feel completely cool to the touch before you add the butter — if it still feels warm, continue beating or refrigerate the bowl for 5 minutes.
Build Buttercream
Switch to the paddle attachment. With the mixer on medium speed, add the 1 1/2 cups room-temperature butter one tablespoon at a time, waiting about 10 seconds between each addition.
The buttercream may look curdled or soupy partway through — this is completely normal. Continue adding the butter and beating; it will come together into a silky, smooth buttercream.
Once all the butter is incorporated, add the 2 tablespoons rose water and 1 teaspoon vanilla extract. Beat on medium-high for 2 to 3 more minutes until very smooth and fluffy.
Color Buttercream
Remove approximately 1 1/2 cups of the white buttercream and set aside in a separate bowl — this will be used for the crumb coat and the outer top and bottom sections of the cake. Add 4 drops of pink gel food coloring to the remaining buttercream in the mixer bowl and beat briefly to incorporate, creating a soft rose-pink color.
Transfer the pink buttercream to a separate bowl. You should now have white buttercream and pink buttercream.
Level and Soak Layers
Remove the chilled cake layers from the refrigerator. Using a long serrated knife and a turntable, level the top of each cake layer by trimming off any dome.
Brush each cut surface generously with the cooled rose water simple syrup using a pastry brush, allowing it to soak in for 2 minutes.
Stack and Fill Layers
Place the first cake layer on a cardboard cake round or directly on your turntable. Using a large offset spatula, spread approximately 1/3 cup of the pink buttercream evenly over the top of the first layer.
Sprinkle about 2 tablespoons of the finely chopped pistachios and 1 tablespoon of the dried rose petals over the buttercream, pressing them gently into the surface. Place the second cake layer on top, pressing down gently to level.
Repeat the filling process — pink buttercream, pistachios, and rose petals. Place the third and final cake layer on top, cut side down for a flat surface.
Apply Crumb Coat
Apply a thin crumb coat using the reserved white buttercream. Spread a thin, even layer of white buttercream over the entire outside of the cake — top and sides — using a large offset spatula and bench scraper.
This layer should be thin enough that you can still see the cake through it; its purpose is to seal in crumbs. Refrigerate the crumb-coated cake for 30 minutes until the buttercream is firm to the touch.
Apply Base Coat
This is the fault line technique. Remove the chilled crumb-coated cake from the refrigerator.
Using a large offset spatula, apply a generous layer of white buttercream to the TOP third of the cake and to the BOTTOM third of the cake, smoothing each section with the bench scraper as you go. Leave the MIDDLE third of the cake’s sides bare — this exposed middle band is where the fault line decorations will go.
Smooth the top and bottom sections as cleanly as possible with the bench scraper, working at eye level on the turntable.
Create Fault Line Band
Gently press the fault line decorations into the exposed middle band of the cake: press handfuls of the remaining chopped pistachios, dried rose petals, and crushed freeze-dried raspberries directly onto the bare crumb-coated surface, covering the entire middle band generously. Press them firmly so they adhere.
The decorations should extend slightly beyond the edges of the white buttercream sections above and below to create a natural, geological fault line effect.
Smooth and Blend
Fit a piping bag with a large round tip (1A or 2A) and fill with the pink buttercream. Pipe a generous ring of pink buttercream around the top edge of the fault line decoration band and around the bottom edge of the band, blending it slightly into the white buttercream sections with a small offset spatula or your fingertip.
Then apply pink buttercream over the top of the cake and smooth it with the offset spatula. Use the bench scraper to refine the sides, blending the white and pink sections where they meet above and below the fault line band into a seamless, smooth finish.
Refrigerate the cake for 1 hour until the buttercream is completely firm.
Apply Gold Accents
Prepare the gold paint by mixing 1 tablespoon gold luster dust with 1 teaspoon vodka in a small dish until it forms a smooth, paintable consistency. Using a fine pastry brush, lightly brush gold accents over the top edges of the fault line decoration band and along the top rim of the cake for a luxurious, gilded effect.
Work in thin layers and allow each layer to dry for 1 to 2 minutes before applying more.
Final Decoration
Decorate the top of the cake: arrange the whole toasted pistachios, remaining dried rose petals, and fresh or sugar-coated rose buds in an artful cluster on the top of the cake, slightly off-center. Pipe small rosettes or dollops of pink buttercream around the base of the decorations to anchor them if desired.
Refrigerate the finished cake for at least 2 hours (or up to overnight) before slicing to allow all layers to set and the flavors to meld.
Rest and Serve
To serve, remove the cake from the refrigerator 30 minutes before slicing to allow it to come to room temperature — this ensures the buttercream is soft and the cake layers are moist and tender. Use a sharp knife dipped in hot water and wiped dry between each cut for the cleanest slices.
The fault line cross-section should be visible when the cake is cut, revealing the decorative band running through the center of the exterior. Store any leftovers covered in the refrigerator for up to 4 days.
Per serving (1 slice (1/12 of cake)) — values are estimates
Highly Recommended


15. Lemon Thyme Garden Wreath Cake
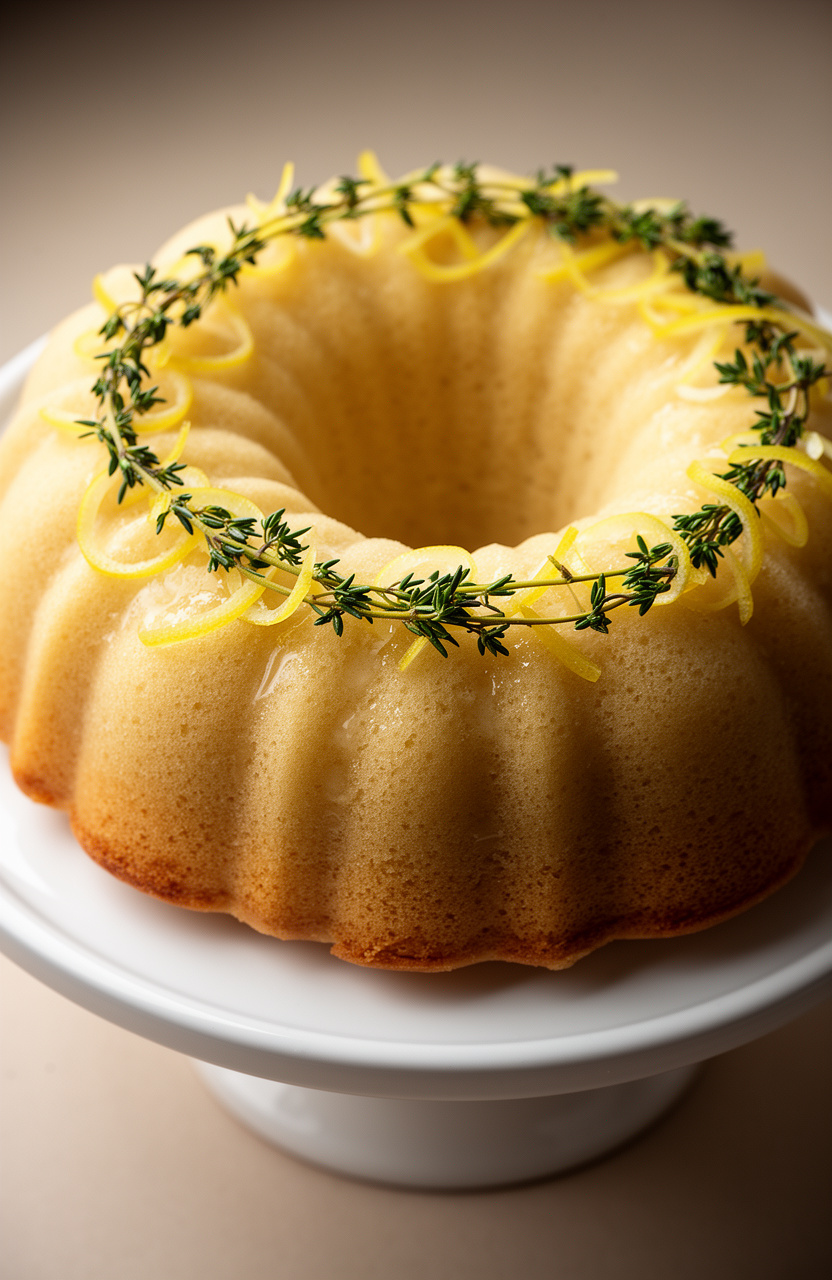
Cream infused with fresh thyme pulls a gentle herbal warmth through the batter, letting the bright citrus lift of lemon cut cleanly against it in the finished cake. All-purpose flour, baking powder, and baking soda build a soft, even crumb beneath a decorative wreath of candied herbs and zest that crowns the surface.
Lemon Thyme Garden Wreath Cake
Cake
Lemon Thyme Infusion
Frosting
Lemon Syrup
Decoration
- 🍰10-inch Bundt pan
- 🔌Stand mixer with paddle and whisk attachments
- 🥣Three mixing bowls (large, medium, small)
- 🪣Fine mesh sieve or strainer
- 🫕Small saucepan
- 🥄Rubber spatula
- 🖌️Pastry brush
- 🥄Offset spatula
- 🎂Piping bags and assorted tips (leaf tip #352, round tip #2)
- 🪜Cooling rack
- 🔪Serrated knife
- 🔪Zester or microplane
- 🍴Citrus juicer
- ⚖️Digital kitchen scale
- 🌡️Instant-read thermometer
- 📄Parchment paper
Infuse Cream
Begin with the lemon-thyme cream infusion. In a small saucepan over medium-low heat, combine 1 cup heavy cream, 6 sprigs fresh thyme, and 2 tablespoons lemon zest.
Heat until the cream just begins to steam and tiny bubbles form around the edges, about 4-5 minutes — do not boil. Remove from heat, cover with plastic wrap, and let steep for 30 minutes at room temperature.
Once infused, strain through a fine mesh sieve, pressing the solids to extract maximum flavor. Discard solids and refrigerate the infused cream until needed.
Make Lemon Syrup
While the cream infuses, make the lemon-thyme simple syrup. Combine 1/2 cup fresh lemon juice, 1/2 cup granulated sugar, and 4 thyme sprigs in a small saucepan over medium heat.
Stir until the sugar fully dissolves, about 3-4 minutes. Bring to a gentle simmer and cook for 2 more minutes until slightly thickened.
Remove from heat, let cool completely, then remove and discard the thyme sprigs. Transfer syrup to a small bowl and set aside.
Prepare Bundt Pan
Preheat your oven to 350°F (175°C). Thoroughly grease every crevice of a 10-inch Bundt pan with softened butter, then dust lightly with flour, tapping out any excess.
Alternatively, use a baking spray with flour. This step is critical for a clean release — take your time and be thorough.
Set the prepared pan aside.
Mix Dry Ingredients
In a large mixing bowl, whisk together 2 1/4 cups all-purpose flour, 2 teaspoons baking powder, 1/2 teaspoon baking soda, and 1/2 teaspoon fine sea salt until evenly combined. Set aside.
In a small bowl or measuring cup, stir together 3/4 cup whole milk, 1/4 cup fresh lemon juice, and 2 tablespoons sour cream. The mixture will curdle slightly — this is expected and acts as a buttermilk substitute.
Set aside.
Cream Butter Sugar
In the bowl of a stand mixer fitted with the paddle attachment, beat 1 cup room-temperature unsalted butter on medium speed for 2 minutes until pale and creamy. Add 1 3/4 cups granulated sugar and continue beating on medium-high for 4-5 minutes until the mixture is very light, fluffy, and almost white in color, scraping down the sides of the bowl as needed.
Add 1 tablespoon lemon zest and 1 tablespoon finely chopped fresh thyme, mixing briefly to combine.
Add Eggs
With the mixer on medium-low, add the 4 eggs one at a time, allowing each to fully incorporate before adding the next, about 30 seconds per egg. Scrape down the bowl between additions.
Add 2 teaspoons pure vanilla extract and mix for 30 seconds. The batter may look slightly curdled at this stage — that is normal and will smooth out once the flour is added.
Combine Batter
Reduce the mixer to its lowest speed. Add the flour mixture in three additions, alternating with the milk mixture in two additions, beginning and ending with the flour (flour, milk, flour, milk, flour).
Mix only until just combined after each addition — do not overmix. Use a rubber spatula to fold the batter a few times by hand to ensure no dry pockets remain at the bottom of the bowl.
The batter should be smooth, thick, and fragrant.
Bake the Cake
Pour and scrape the batter evenly into the prepared Bundt pan. Gently tap the pan on the counter 3-4 times to release any air bubbles and settle the batter into the crevices.
Smooth the top with an offset spatula. Bake on the center rack of the preheated 350°F oven for 35 minutes, or until a wooden skewer inserted into the thickest part comes out with just a few moist crumbs and the top is golden.
The internal temperature should read 205-210°F on an instant-read thermometer.
Soak and Cool
Remove the cake from the oven and place the pan on a cooling rack. While the cake is still hot, use a pastry brush to generously brush the exposed bottom of the cake with about half of the lemon-thyme simple syrup.
Let the cake rest in the pan for 30 minutes — this allows it to firm up enough to release cleanly. After 30 minutes, invert the cake onto the cooling rack set over a parchment-lined baking sheet.
Immediately brush the entire surface of the warm cake with the remaining lemon syrup, allowing it to soak in. Let the cake cool completely to room temperature, about 1 hour.
Make Buttercream
Prepare the lemon-thyme buttercream frosting. In the bowl of the stand mixer fitted with the paddle attachment, beat 1 cup room-temperature unsalted butter on medium-high speed for 3-4 minutes until very pale and fluffy.
Reduce speed to low and gradually add 4 cups sifted powdered sugar, one cup at a time, mixing until incorporated before each addition. Add 3 tablespoons of the reserved thyme-lemon infused cream, 2 tablespoons fresh lemon juice, 1 teaspoon vanilla extract, and 1/4 teaspoon salt.
Increase speed to medium-high and beat for 3 minutes until the frosting is very light and silky. If desired, add 2 drops of green gel food coloring and mix briefly for a subtle sage-green tint.
If the frosting is too stiff, add an additional teaspoon of infused cream. Transfer about 1/3 of the frosting to a piping bag fitted with a leaf tip (#352) and another small portion to a bag with a round tip (#2) for detailing.
Keep the remaining frosting in the bowl.
Apply Crumb Coat
Once the cake is fully cooled, transfer it to your serving platter or cake stand. Using an offset spatula, apply a thin, even layer of buttercream over the entire surface of the Bundt cake — this is your crumb coat.
It does not need to be perfect. Refrigerate the crumb-coated cake for 30 minutes to firm up the layer before decorating.
Final Frost and Chill
After the crumb coat has chilled for 30 minutes, apply a second, more generous layer of buttercream over the cake using the offset spatula, smoothing it into an even coating. Work the frosting into the ridges of the Bundt design.
Return the cake to the refrigerator and chill for 2 hours until the frosting is completely firm. This ensures clean edges for the garden wreath decoration.
Build Garden Wreath
Remove the chilled cake from the refrigerator. Now create the garden wreath decoration.
Using the piping bag fitted with the leaf tip (#352), pipe clusters of buttercream leaves around the top ridge of the Bundt cake in a flowing, circular wreath pattern — vary the angle and size of the leaves for a natural look. Tuck fresh thyme sprigs and small rosemary clusters into the frosting between the piped leaves, pressing gently to secure.
Arrange the edible flowers (violas or pansies) in clusters of 2-3 throughout the wreath, spacing them evenly. Add the halved lemon slices standing upright or slightly angled at intervals around the wreath.
Curl strips of fresh lemon zest and nestle them among the flowers. Use the round tip piping bag to pipe small dot accents between decorative elements.
Finally, use a fine mesh sieve to dust the entire cake lightly with powdered sugar to create a soft, garden-morning effect.
Serve and Store
Allow the decorated cake to sit at room temperature for 20-30 minutes before slicing to soften the buttercream slightly for the best texture. To slice, use a sharp serrated knife dipped in hot water and wiped clean between each cut.
Serve at room temperature for optimal flavor. Store any leftover cake covered at room temperature for up to 2 days, or refrigerated for up to 5 days — bring slices to room temperature for 30 minutes before serving.
Per serving (1 slice (1/12 of cake)) — values are estimates
Most Loved Products


From buttercream blooms to pastel-layered sponges, these spring cake designs are made for Easter gatherings, garden parties, and everything in between. Pick the one that caught your eye, save or pin your favorites for later, and then head to the comments to tell us which design you’re planning to bake first!