15 Spring Sugar Cookies Decorated for Every Springtime Occasion
Spring’s prettiest moments deserve a cookie — and this collection has one for all of them, from Easter morning to a backyard garden party in May.
You’ll find 15 decorated sugar cookies that cover the whole season, including Lemon Glazed Daisy cookies, Robin Egg Nest cookies, Pastel Watercolor Butterflies, and more. Each one brings something a little different to the table, whether you’re baking for a crowd or just treating yourself.
Go ahead and bookmark this list now — you’re going to want to come back to it all season long.
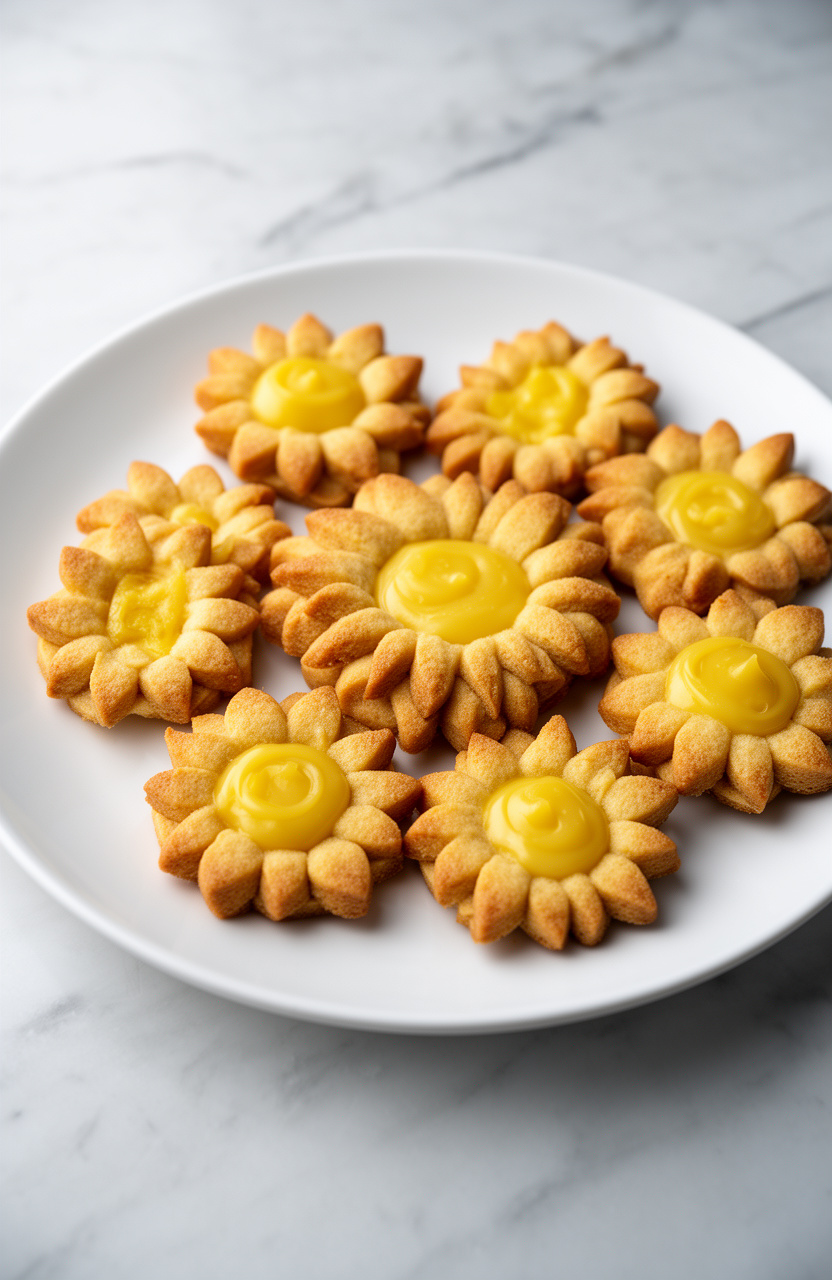
1. Lemon Glazed Daisy Sugar Cookies
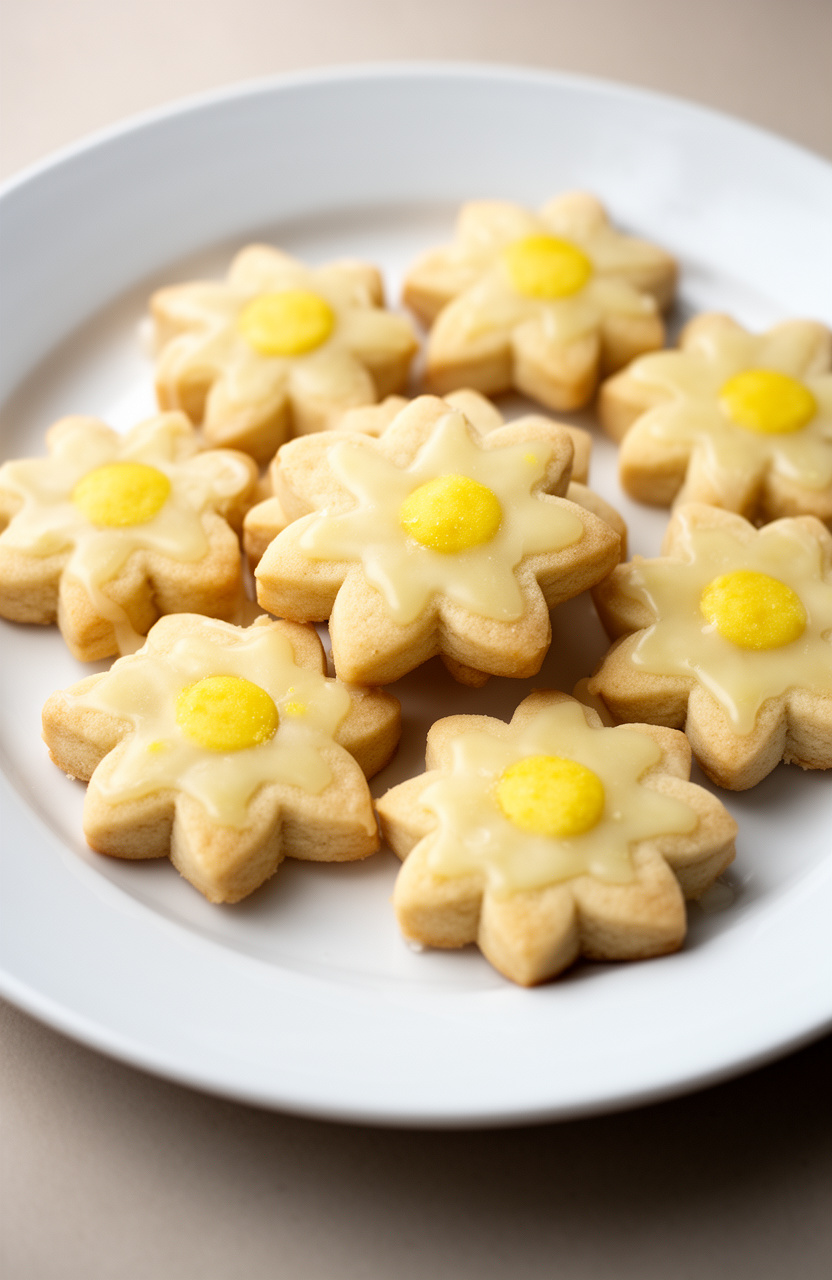
Buttery daisy-shaped sugar cookies start with whisked dry ingredients folded into softened butter for a tender, melt-in-your-mouth crumb that holds its shape beautifully. A bright lemon glaze adds a tangy, glossy finish that contrasts the rich, soft bite underneath.
Lemon Glazed Daisy Sugar Cookies
Cookie Dough
Lemon Glaze
Decoration
- 🔌Stand mixer or hand mixer
- 🥣Large mixing bowl
- 🥣Medium mixing bowl
- 🥄Rubber spatula
- 📄Plastic wrap
- 🫙Rolling pin
- 🍴Lightly floured work surface or silicone rolling mat
- 🍴Daisy-shaped cookie cutter (3-inch)
- 🥧Two large baking sheets
- 📄Parchment paper or silicone baking mats
- 🪜Wire cooling rack
- 🔪Microplane or fine zester
- 🍴Citrus juicer
- 🥄Small offset spatula or spoon for glazing
- 🍴Sifter
Whisk Dry Ingredients
In a medium bowl, whisk together 2 3/4 cups all-purpose flour, 1 teaspoon baking powder, and 1/2 teaspoon fine sea salt until well combined. Set aside.
Cream Butter and Sugar
In the bowl of a stand mixer fitted with the paddle attachment (or using a hand mixer and large bowl), beat 1 cup softened unsalted butter and 1 cup granulated sugar together on medium-high speed for 3 to 4 minutes, until the mixture is light, pale, and fluffy. Scrape down the sides of the bowl as needed.
Add Wet Ingredients
Add 1 large egg, 2 tablespoons fresh lemon zest, 2 tablespoons fresh lemon juice, and 1 teaspoon pure vanilla extract to the butter mixture. Beat on medium speed for about 1 minute until fully incorporated and smooth.
The mixture may look slightly curdled — that is normal.
Combine Dough
Reduce the mixer speed to low and gradually add the flour mixture in three additions, mixing just until the dough comes together and no dry streaks remain. Do not overmix.
The dough will be soft but not sticky.
Chill the Dough
Divide the dough in half and flatten each portion into a disk about 1-inch thick. Wrap each disk tightly in plastic wrap and refrigerate for at least 2 hours, or up to 48 hours.
Chilling is essential for clean cookie shapes and prevents excessive spreading.
Preheat and Prep
When ready to bake, preheat your oven to 350°F (175°C). Line two large baking sheets with parchment paper or silicone baking mats.
Remove one dough disk from the refrigerator and let it sit at room temperature for 5 minutes to slightly soften.
Roll and Cut Cookies
On a lightly floured surface or silicone rolling mat, roll the dough out to an even 1/4-inch thickness. Using a 3-inch daisy-shaped cookie cutter, cut out as many cookies as possible, pressing the cutter straight down without twisting.
Transfer the cut cookies to the prepared baking sheets, spacing them about 1 1/2 inches apart. Re-roll the scraps once and cut additional cookies.
Repeat with the second dough disk.
Bake the Cookies
Bake the cookies, one sheet at a time, in the preheated 350°F oven for 10 to 12 minutes, until the edges are just set and the centers look barely done — they should not brown on top. The cookies will firm up as they cool.
Remove from the oven and let the cookies cool on the baking sheet for 5 minutes before transferring to a wire rack to cool completely, about 30 minutes.
Make Lemon Glaze
While the cookies cool, prepare the lemon glaze. In a medium bowl, whisk together 2 cups sifted powdered sugar, 3 tablespoons fresh lemon juice, 1 tablespoon whole milk, and 1 teaspoon fresh lemon zest until completely smooth and glossy.
The glaze should be thick enough to coat a spoon but thin enough to spread easily. If too thick, add milk 1/2 teaspoon at a time.
If too thin, add more powdered sugar 1 tablespoon at a time. For a yellow tint, stir in 1 to 2 drops of yellow gel food coloring.
Glaze and Decorate
Once the cookies are completely cool, spoon about 1 teaspoon of lemon glaze onto the center of each cookie and use a small offset spatula or the back of the spoon to gently spread the glaze toward the petal edges, leaving a thin unglazed border. Immediately sprinkle with white nonpareils in the center and a light dusting of yellow sanding sugar on the petals before the glaze sets.
Set and Store
Allow the glazed cookies to rest at room temperature for at least 30 minutes until the glaze is fully set and no longer tacky to the touch. Store in a single layer in an airtight container at room temperature for up to 5 days, or freeze unglazed cookies for up to 2 months.
Per serving (2 cookies) — values are estimates
Editor’s Choice
2. Robin Egg Nest Cookies
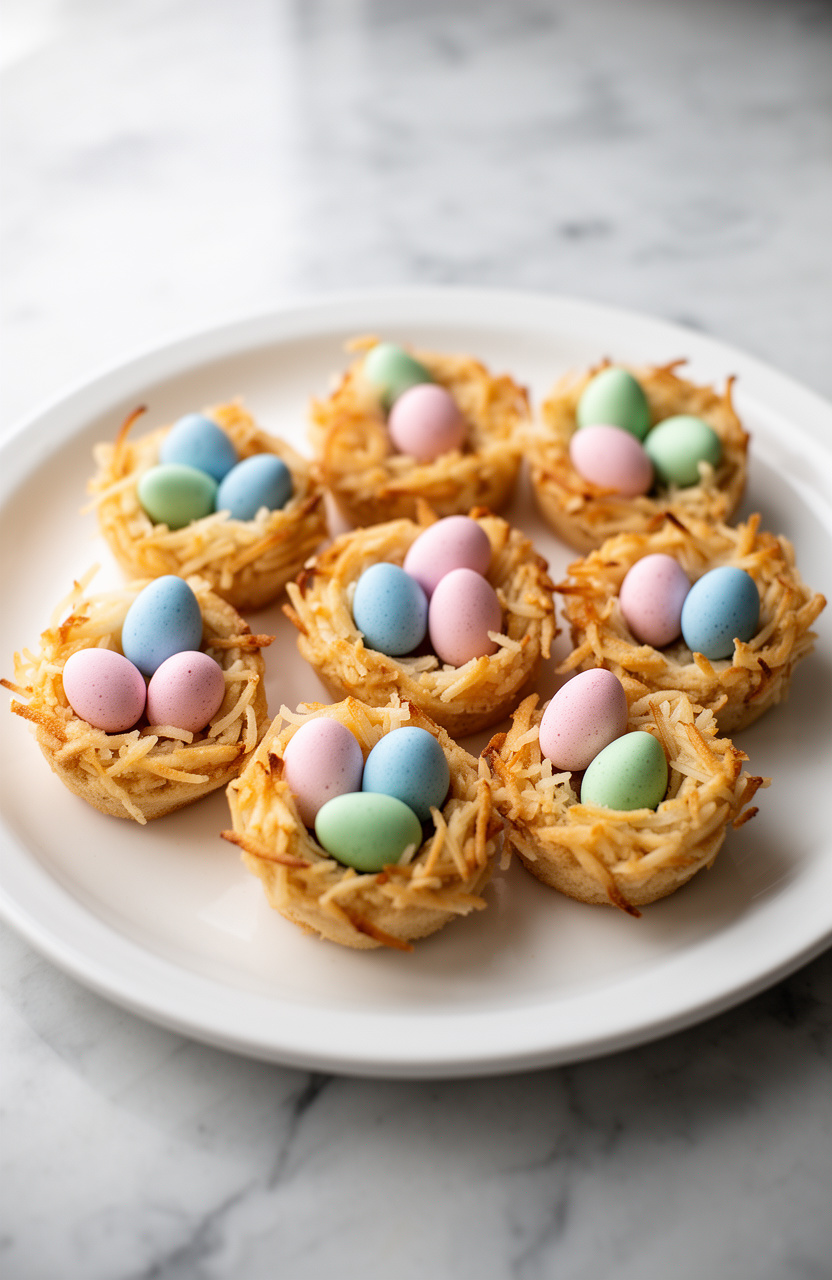
Shaped like little bird nests and topped with pastel candy eggs, these butter-rich cookies deliver a tender, slightly crisp crumb with a subtly sweet vanilla depth. Softened butter creamed into a classic flour-based dough gives them their delicate, melt-in-your-mouth texture and clean-edged structure.
Robin Egg Nest Cookies
Cookie Dough
Nest Topping
- 🔌Stand mixer or hand electric mixer
- 🥣Large mixing bowl
- 🥣Medium mixing bowl
- 🥧Baking sheets (2)
- 📄Parchment paper or silicone baking mats
- 🪜Wire cooling rack
- 🥄Tablespoon or cookie scoop
- 🍳Small saucepan or dry skillet (for toasting coconut)
- 🥄Rubber spatula
- 🥄Whisk
- 🥄Measuring cups and spoons
Preheat Oven
Preheat your oven to 375°F (190°C). Line two large baking sheets with parchment paper or silicone baking mats and set aside.
Toast Coconut
Toast the shredded coconut by spreading it in a single layer in a dry skillet over medium heat. Stir frequently for 3 to 5 minutes until it turns golden brown and fragrant.
Remove from heat and let it cool completely. If you want green ‘grass’ nests, skip toasting and instead toss the coconut with 2 tablespoons of green gel food coloring in a zip-lock bag until evenly coated.
Mix Dry Ingredients
In a medium bowl, whisk together 2 1/4 cups all-purpose flour, 1/2 teaspoon baking soda, and 1/2 teaspoon salt. Set aside.
Cream Butter Sugar
In a large bowl using a stand mixer or hand mixer, beat 1 cup softened unsalted butter with 3/4 cup granulated sugar and 3/4 cup packed brown sugar on medium-high speed for about 3 minutes until light and fluffy, scraping down the sides of the bowl as needed.
Add Eggs Vanilla
Add 2 large eggs and 2 teaspoons pure vanilla extract to the butter mixture. Beat on medium speed for 1 to 2 minutes until fully incorporated and smooth.
Combine Dough
Reduce mixer speed to low and gradually add the flour mixture in three additions, mixing just until no dry streaks remain. Do not overmix.
The dough will be soft and slightly sticky.
Shape Roll Cookies
Using a tablespoon or medium cookie scoop, portion the dough into 1.5-tablespoon balls and roll them between your palms until smooth. Roll each ball in the toasted (or green-tinted) coconut and chocolate sprinkles mixture, pressing gently so the coating adheres well.
Place the coated dough balls 2 inches apart on the prepared baking sheets.
Shape Chill Nests
Using your thumb or the back of a rounded teaspoon, press a deep indentation into the center of each dough ball to create the nest shape. The edges may crack slightly — gently pinch them back together if desired.
Place the baking sheets in the refrigerator and chill the shaped cookies for 30 minutes. This helps them hold their nest shape during baking.
Bake Cookies
Bake the chilled cookies in the preheated 375°F oven for 10 to 12 minutes, until the edges are just set and lightly golden but the centers still look slightly underdone. Do not overbake — they will firm up as they cool.
Re-Press Centers
Remove the baking sheets from the oven. If the indentations have puffed up during baking, immediately and gently re-press them with the back of a spoon while the cookies are still warm.
Let the cookies cool on the baking sheets for 5 minutes.
Add Egg Candies
Transfer the cookies to a wire cooling rack and allow them to cool completely, about 20 minutes. Once fully cooled, nestle 1 to 2 Cadbury Mini Eggs or robin egg malted milk ball candies into the indentation of each cookie nest.
Press them in gently so they sit securely.
Serve Store
Serve immediately or store the finished Robin Egg Nest Cookies in a single layer in an airtight container at room temperature for up to 4 days. For longer storage, freeze the unfilled cookie bases for up to 2 months and add the candy eggs just before serving.
Per serving (1 cookie) — values are estimates
Most Loved Products
3. Pastel Watercolor Butterfly Cookies

Softened butter worked into a flour-based dough creates tender, cleanly cut butterfly shapes that bake up with crisp edges and a delicate crumb, then get finished with hand-painted pastel watercolor details for a striking, artistic result.
Pastel Watercolor Butterfly Cookies
Sugar Cookie Dough
Royal Icing
Watercolor Decoration
- 🔌Stand mixer with paddle attachment
- 🥣Large mixing bowls
- 🍴Butterfly-shaped cookie cutters (3-inch and 2-inch)
- 🫙Rolling pin
- 📄Silicone baking mats or parchment paper
- 🥧Two large baking sheets
- 🪜Wire cooling racks
- 🎂Piping bags (at least 6)
- 🍴Coupler sets
- 🍴Size 2 and size 4 round piping tips
- 🍴Small squeeze bottles
- 🖌️Fine-tip food-safe paintbrushes (at least 4)
- 🥤Small ceramic or glass palette for mixing colors
- 📄Plastic wrap
- 🍴Sifter
- ⚖️Digital kitchen scale
- 🍴Ruler or bench scraper
- 📍Toothpicks
Combine Dry Ingredients
In a medium bowl, whisk together 2 1/4 cups (280g) all-purpose flour, 1/2 teaspoon baking powder, and 1/4 teaspoon fine sea salt until evenly combined. Set aside.
Cream Butter and Sugar
In the bowl of a stand mixer fitted with the paddle attachment, beat 3/4 cup (170g) softened unsalted butter and 3/4 cup (150g) granulated sugar on medium-high speed for 3 to 4 minutes until pale, light, and fluffy. Scrape down the sides of the bowl as needed.
Add Egg and Extracts
Add 1 large room-temperature egg, 1 1/2 teaspoons pure vanilla extract, and 1/2 teaspoon almond extract to the butter mixture. Beat on medium speed for about 1 minute until fully incorporated and smooth.
The mixture may look slightly curdled — this is normal.
Mix in Flour
Reduce the mixer to low speed and gradually add the flour mixture in three additions, mixing just until the dough comes together and no dry streaks remain. Do not overmix, as this will develop gluten and make the cookies tough.
The dough should be soft but not sticky.
Chill the Dough
Turn the dough out onto a lightly floured surface and divide it in half. Flatten each portion into a 1-inch-thick disc, wrap tightly in plastic wrap, and refrigerate for at least 2 hours or up to 48 hours.
Chilling is essential for the cookies to hold their butterfly shape during baking.
Preheat and Prep
When ready to bake, preheat your oven to 350°F (175°C). Line two large baking sheets with silicone baking mats or parchment paper.
Remove one disc of dough from the refrigerator and let it sit at room temperature for 5 minutes to soften slightly.
Roll and Cut Cookies
On a lightly floured surface, roll the dough to an even 1/4-inch thickness using a rolling pin. Use a ruler or bench scraper to check thickness for consistency.
Cut out butterfly shapes using your 3-inch and 2-inch butterfly cookie cutters. Re-roll scraps and cut additional cookies.
Transfer cut cookies to the prepared baking sheets, spacing them 1 inch apart.
Bake the Cookies
For extra-sharp edges, place the baking sheets with the cut-out cookies in the freezer for 10 minutes before baking. This helps the cookies maintain their detailed butterfly wing shape.
Bake one sheet at a time in the preheated oven for 10 to 12 minutes, until the edges are just set and the centers appear barely done — they should not be golden. The cookies will firm up as they cool.
Cool Completely
Remove the baking sheet from the oven and allow the cookies to rest on the pan for 5 minutes before carefully transferring them to a wire cooling rack. Cool completely, at least 30 minutes, before decorating.
Warm cookies will melt the royal icing.
Make Royal Icing
Make the royal icing: In the clean bowl of your stand mixer fitted with the paddle attachment, combine 4 cups (480g) sifted powdered sugar and 3 tablespoons meringue powder. With the mixer on low, add 6 tablespoons of warm water and 1 teaspoon vanilla extract.
Increase speed to medium-high and beat for 4 to 5 minutes until the icing is thick, glossy, and bright white and holds stiff peaks. This is your base stiff icing.
Prepare Icing Consistencies
Divide the stiff royal icing into two portions: roughly two-thirds for flooding (covering) and one-third for outlining. For the flood icing, thin the larger portion by stirring in warm water, 1 teaspoon at a time, until it reaches a 15-second consistency — when you drizzle a ribbon of icing back into the bowl, it should disappear in exactly 15 seconds.
Keep the outline icing thick (stiff peak). Cover all bowls tightly with plastic wrap to prevent crusting.
Outline the Cookies
Keep the base flood icing white. Transfer the stiff outline icing into a piping bag fitted with a size 2 round tip.
Using the outline icing, pipe a thin, precise border around the entire edge of each butterfly cookie, following the contours of both wings and the body. Allow the outlines to dry for 15 minutes before flooding.
Flood with White Icing
Transfer the white flood icing into a squeeze bottle or piping bag fitted with a size 4 round tip. Flood the interior of each outlined butterfly cookie, starting from the center and working outward to fill completely to the piped border.
Use a toothpick to guide the icing into corners and pop any air bubbles. Allow the flooded cookies to dry at room temperature for at least 4 hours, or ideally overnight, until the surface is completely hard and matte.
Mix Watercolor Paints
Prepare the watercolor paints: On a ceramic palette or small glass dish, place tiny drops of gel food coloring — soft pink, lavender, sky blue, mint green, and pale yellow — in separate wells. Add 1 to 2 drops of vodka or clear extract to each color well and mix with a fine-tip paintbrush to create a thin, translucent watercolor consistency.
The vodka evaporates quickly and will not affect flavor. Test each color on a spare cookie or paper towel first.
Paint Watercolor Wings
Using a clean, damp fine-tip paintbrush, apply the watercolor technique to each fully dried butterfly cookie. Begin by lightly brushing a wash of one pastel color across one wing, then while still wet, blend a second color into the edges to create a soft gradient.
Work quickly before the paint dries. Use a nearly dry brush for more defined strokes and a wet brush for soft washes.
Layer colors for depth — start lighter and build up intensity. Leave some areas white for a delicate, airy look.
Add Wing Details
For added dimension, use a very fine paintbrush dipped in a slightly more concentrated gel color (thinned minimally with vodka) to paint delicate vein lines along the wings, mimicking real butterfly wing patterns. Work from the body outward in thin, curving strokes.
You can also dot tiny accent spots near the wing edges using a toothpick dipped in concentrated color.
Add Finishing Touches
Optional finishing touches: While the watercolor paint is still slightly tacky, lightly dust the wing edges with edible gold luster dust using a dry brush for a luminous shimmer effect. Gently press a few white nonpareil sprinkles into the body area of each butterfly to suggest texture.
Allow all decorated cookies to air dry completely at room temperature for at least 1 hour before stacking or packaging.
Store and Serve
Once fully dry, store the decorated butterfly cookies in a single layer in an airtight container at room temperature for up to 1 week. If stacking is necessary, place a sheet of parchment paper between layers.
Do not refrigerate decorated cookies, as moisture will cause the royal icing to become sticky and the colors to bleed.
Per serving (2 cookies) — values are estimates
Most Loved Products
4. Strawberry Garden Trowel Cookies
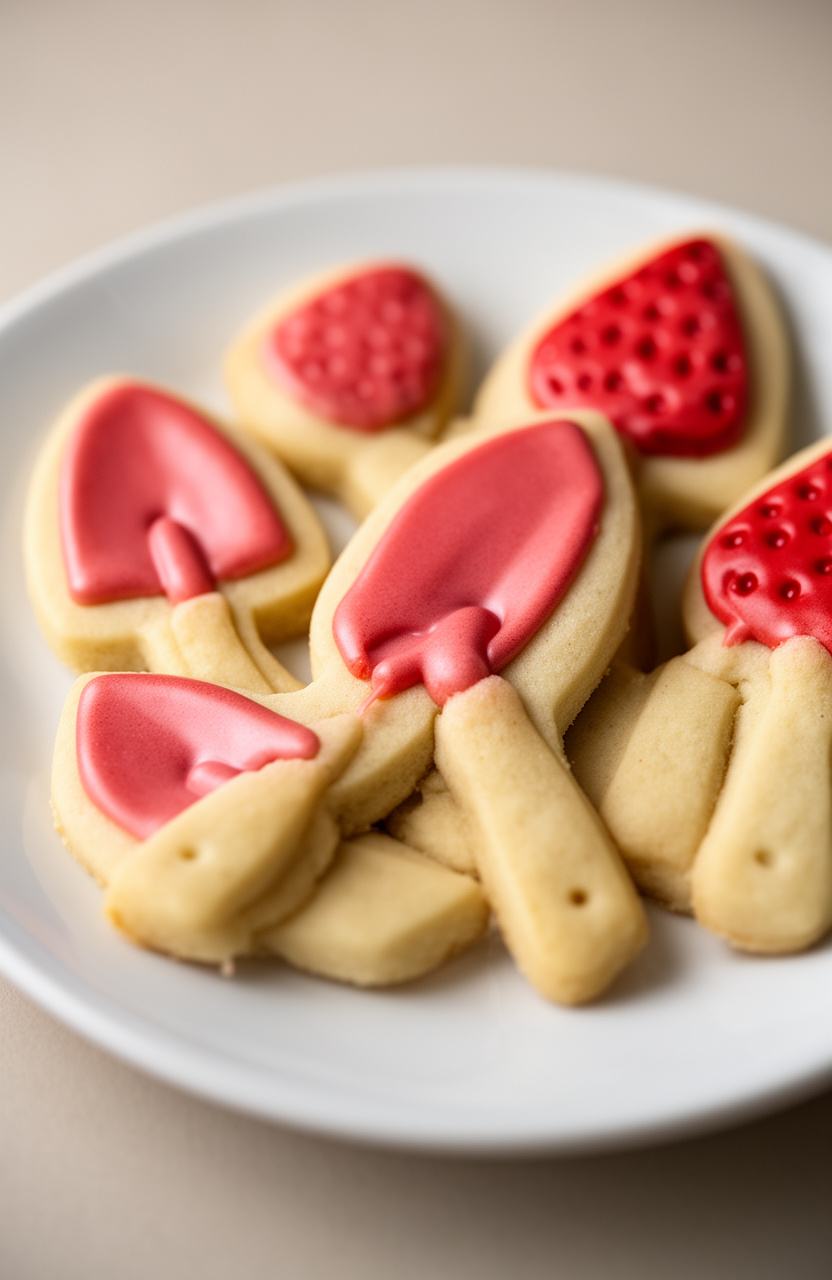
Whisked dry ingredients folded into softened butter produce garden trowel-shaped shortbread cookies with crisp, cleanly defined edges and a tender, buttery crumb that carries a delicate strawberry sweetness throughout.
Strawberry Garden Trowel Cookies
Cookie Dough
Royal Icing
Decoration
- 🔌Stand mixer or hand mixer
- 🥣Large mixing bowls
- 🍽️Trowel-shaped cookie cutter (5-inch) or cardboard template
- 🫙Rolling pin
- 🥧Parchment-lined baking sheets
- 🪜Wire cooling rack
- 🎂Piping bags
- 🍴Small round piping tips (#2 and #3)
- 📍Toothpicks or scribe tool
- 🖌️Small paint brush (food-safe, for luster dust)
- 📄Plastic wrap
- 🍴Sifter
- 🍴Ruler
Whisk Dry Ingredients
In a medium bowl, whisk together 2 1/4 cups all-purpose flour, 1/2 teaspoon baking powder, 1/4 teaspoon salt, and 2 tablespoons freeze-dried strawberry powder until evenly combined. Set aside.
Cream Butter Sugar
In the bowl of a stand mixer fitted with the paddle attachment, beat 3/4 cup softened unsalted butter and 3/4 cup granulated sugar on medium-high speed for 3-4 minutes until light and fluffy. Scrape down the sides of the bowl as needed.
Add Wet Ingredients
Add 1 large egg, 1 teaspoon vanilla extract, 1/2 teaspoon strawberry extract, and 2-3 drops of pink gel food coloring (if using) to the butter mixture. Beat on medium speed for 1-2 minutes until fully incorporated and smooth.
Combine Dough
With the mixer on low speed, gradually add the flour mixture in three additions, mixing just until no dry streaks remain. Do not overmix.
The dough will be soft but not sticky. If it feels too soft, add flour 1 tablespoon at a time.
Chill Dough
Divide the dough in half, flatten each portion into a 1-inch thick disc, and wrap tightly in plastic wrap. Refrigerate for at least 2 hours or overnight until the dough is firm enough to roll without sticking.
Preheat and Prep
Preheat your oven to 350°F (175°C). Line two baking sheets with parchment paper.
Remove one disc of dough from the refrigerator and let it sit at room temperature for 5 minutes to soften slightly.
Roll and Cut
On a lightly floured surface, roll the dough to an even 1/4-inch thickness. Use a 5-inch trowel-shaped cookie cutter (or a cardboard template and a sharp knife) to cut out trowel shapes.
Re-roll scraps once to cut additional cookies. Place cut cookies 1 inch apart on the prepared baking sheets.
Bake Cookies
Bake the cookies at 350°F for 10-12 minutes, until the edges are just set and the bottoms are very lightly golden. The centers may look slightly underdone — this is correct.
Do not overbake. Let cookies cool on the baking sheet for 5 minutes before transferring to a wire rack to cool completely, at least 30 minutes.
Make Royal Icing
While the cookies cool, make the royal icing. In a large bowl, beat 3 tablespoons meringue powder with 5-6 tablespoons warm water using a hand mixer for 1 minute.
Add 2 cups sifted powdered sugar and 1/2 teaspoon strawberry extract. Beat on medium-high for 4-5 minutes until stiff, glossy peaks form.
Color and Thin Icing
Divide the royal icing into three portions. Tint one portion bright pink-red using red and pink gel food coloring (for the strawberry blade of the trowel).
Tint the second portion brown (for the handle). Keep the third portion white or tint it a very light pink for accent details.
Thin each portion with water, one drop at a time, to flood consistency (it should flow smoothly off a spoon and settle flat within 10 seconds).
Ice Trowel Shapes
Using a #3 piping tip, outline the blade (wide, flat bottom) portion of each trowel cookie with the pink-red icing. Then flood the interior of the blade with the same icing, using a toothpick to spread it to the edges.
Immediately sprinkle with red sanding sugar if desired for texture. Repeat with the brown icing to outline and flood the handle portion of each trowel.
Allow to dry for 30 minutes until the surface is set.
Add Decorative Details
Once the base layer is dry, use a #2 piping tip with stiff white or light pink icing to pipe small strawberry seed dots across the blade of the trowel. Press small red candy pearls into the dots before the icing dries to mimic strawberry seeds.
Pipe thin brown lines along the handle to suggest wood grain texture.
Apply Luster Dust
Optional: Once all icing is completely dry (at least 1 hour), use a dry food-safe brush to lightly dust the handle portion of each cookie with silver luster dust to give a metallic garden-tool appearance. Allow the finished cookies to dry uncovered at room temperature for at least 1 hour before stacking or packaging.
Per serving (2 cookies) — values are estimates
Most Loved Products
5. Easter Basket Weave Sugar Cookies
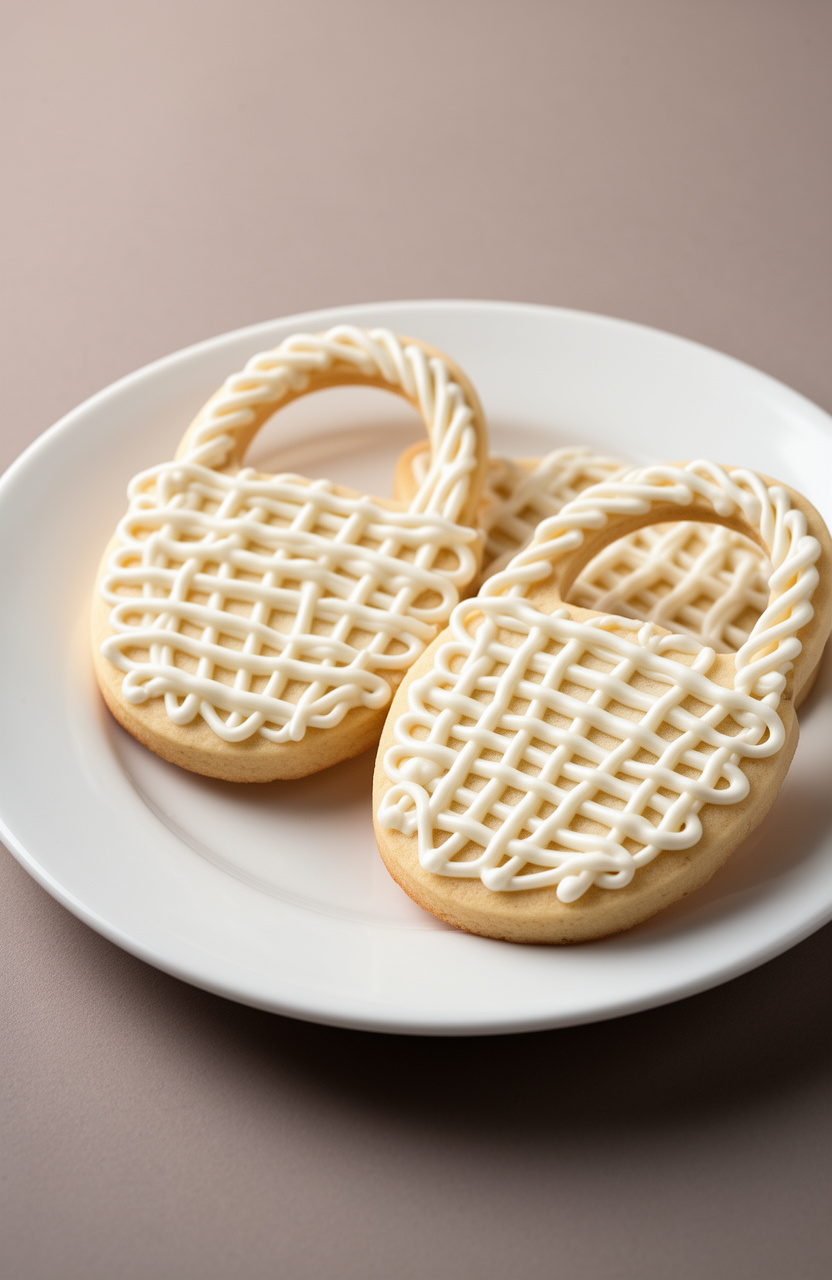
A buttery, flour-based dough mixed from dry ingredients into softened butter bakes up into crisp-edged basket-shaped cookies, then gets piped with a woven lattice of frosting that mimics the look of a woven Easter basket in fine, interlocking detail.
Easter Basket Weave Sugar Cookies
Cookie Dough
Royal Icing
Decorating
- 🔌Stand mixer with paddle attachment
- 🥣Large mixing bowls
- 🥄Whisk
- 🥄Rubber spatula
- 📄Plastic wrap
- 🫙Rolling pin
- 🍴Lightly floured surface or silicone rolling mat
- 🍴Oval or egg-shaped cookie cutters (3-inch and 4-inch)
- 🥧Baking sheets (at least 2)
- 📄Parchment paper or silicone baking mats
- 🪜Wire cooling racks
- 🔌Electric hand mixer
- 🥣Multiple small bowls for dividing icing
- 🎂Piping bags (at least 6 to 8)
- 🍴Piping tips: #2 round tip, #3 round tip, #1 fine tip, #47 basket weave tip
- 📍Toothpicks or scribe tool
- 🥄Offset spatula
- 🍴Ruler
- 🍴Bench scraper
Mix Dry Ingredients
In a medium bowl, whisk together 3 cups all-purpose flour, 1 teaspoon baking powder, and 1/2 teaspoon fine sea salt until evenly combined. Set aside.
Cream Butter and Sugar
In the bowl of a stand mixer fitted with the paddle attachment, beat 1 cup softened unsalted butter and 1 cup granulated sugar on medium-high speed for 3 to 4 minutes, scraping down the sides of the bowl as needed, until the mixture is pale, light, and fluffy.
Add Wet Ingredients
Add 1 large egg, 2 teaspoons pure vanilla extract, and 1 teaspoon almond extract to the butter mixture. Beat on medium speed for 1 to 2 minutes until fully incorporated and smooth.
Combine Dough
Reduce the mixer to low speed and gradually add the flour mixture in three additions, mixing just until no dry streaks remain. Do not overmix — the dough should be soft but not sticky.
If the dough is too sticky, add flour one tablespoon at a time.
Chill the Dough
Divide the dough into two equal discs, wrap each tightly in plastic wrap, and refrigerate for at least 2 hours or up to 48 hours. Chilling is essential for clean edges when cutting and baking.
Preheat and Prep
When ready to bake, preheat your oven to 350°F (175°C). Line two baking sheets with parchment paper or silicone baking mats.
Remove one disc of dough from the refrigerator and let it rest at room temperature for 5 minutes.
Roll and Cut Cookies
On a lightly floured surface or silicone rolling mat, roll the dough out to an even 1/4-inch thickness. Use a ruler to check the thickness for consistent baking.
Cut out shapes using 3-inch and 4-inch oval or egg-shaped cookie cutters. Re-roll scraps once and cut additional shapes.
Arrange cookies at least 1 inch apart on the prepared baking sheets.
Bake the Cookies
Bake cookies in the preheated oven for 10 to 12 minutes, until the edges are just set and the centers look slightly underdone — they should not be golden. Rotate the baking sheet halfway through baking.
Remove from the oven and let the cookies cool on the baking sheet for 5 minutes before transferring to a wire rack to cool completely, at least 30 minutes. Repeat with remaining dough.
Make Royal Icing
While cookies cool, prepare the royal icing. In the bowl of a stand mixer fitted with the whisk attachment, combine 4 cups sifted powdered sugar, 3 tablespoons meringue powder, and 6 tablespoons warm water.
Beat on medium-high speed for 5 to 7 minutes until the icing is bright white, glossy, and holds stiff peaks. Add 1 teaspoon clear vanilla extract and mix to combine.
If the icing is too stiff, add warm water one teaspoon at a time.
Divide and Color Icing
Divide the stiff royal icing among several small bowls. Color one bowl brown (for the basket weave), one green (for grass), and leave a small portion white.
Reserve the remaining icing to be tinted pastel yellow, pink, purple, and blue for Easter egg details. Cover all bowls tightly with plastic wrap or a damp towel to prevent drying.
Prepare Flood Icing
For the base flood icing: thin approximately half of each color with warm water, adding it drop by drop and stirring until the icing flows back into itself within 10 seconds when a knife is dragged through it. This is your flooding consistency.
Keep the remaining icing at stiff consistency for piping details. Transfer flood icing to piping bags fitted with #3 round tips, and stiff icing to bags fitted with #2 round tips.
Outline and Flood Basket
To create the basket weave base: using the brown stiff icing with a #2 tip, pipe an outline around the bottom two-thirds of each fully cooled cookie in the shape of a basket. Flood the outlined area with thinned brown icing using a #3 tip, using a toothpick to spread it evenly to the edges.
Let the flood layer dry for 20 to 30 minutes until a skin forms on the surface.
Pipe Basket Weave
Once the brown base has formed a skin (20 to 30 minutes), create the basket weave texture using the stiff brown icing fitted with a #47 basket weave tip. Pipe vertical lines from the top edge of the basket to the bottom, spacing them about 1/4 inch apart.
Then pipe horizontal lines, alternating over and under the vertical lines to create a woven effect. Work in small sections to keep lines crisp and even.
Let the basket weave dry for at least 30 minutes.
Add Grass Detail
Flood the top one-third of each cookie (the inside of the basket) with thinned green icing to represent grass. While the green icing is still wet, use a #1 fine tip with stiff green icing to pipe small pulled grass strands by touching the tip to the surface and pulling upward quickly to create grass texture.
Let this layer dry for 20 minutes.
Decorate Easter Eggs
Using pastel-colored stiff royal icing fitted with #2 round tips, pipe small Easter egg shapes onto the green grass area of each cookie. Decorate each egg with stripes, dots, zigzags, or swirls using contrasting colors of stiff icing.
Add mini candy-coated chocolate eggs on top of the wet icing so they adhere as it dries.
Pipe Basket Handle
Using stiff brown icing and a #2 tip, pipe a decorative handle arch from one side of the basket to the other at the top of each cookie. Pipe a second line alongside the first and twist or braid the two lines together for a rope handle effect.
Add a small bow or ribbon detail at each end of the handle using white or pastel icing.
Add Final Garnishes
While all icing is still slightly tacky, add pastel sprinkles or nonpareils to the grass area for extra color and texture. If desired, brush the basket weave area lightly with edible gold or silver luster dust using a dry food-safe brush for a shimmery finish.
Dry and Store
Allow the fully decorated cookies to dry uncovered at room temperature for a minimum of 6 to 8 hours, or overnight, until the royal icing is completely hard and set. Once fully dry, store cookies in a single layer in an airtight container at room temperature for up to 1 week, or stack between sheets of parchment paper.
Per serving (1 decorated cookie) — values are estimates
Trending on Amazon
6. Lavender Honey Bumblebee Cookies
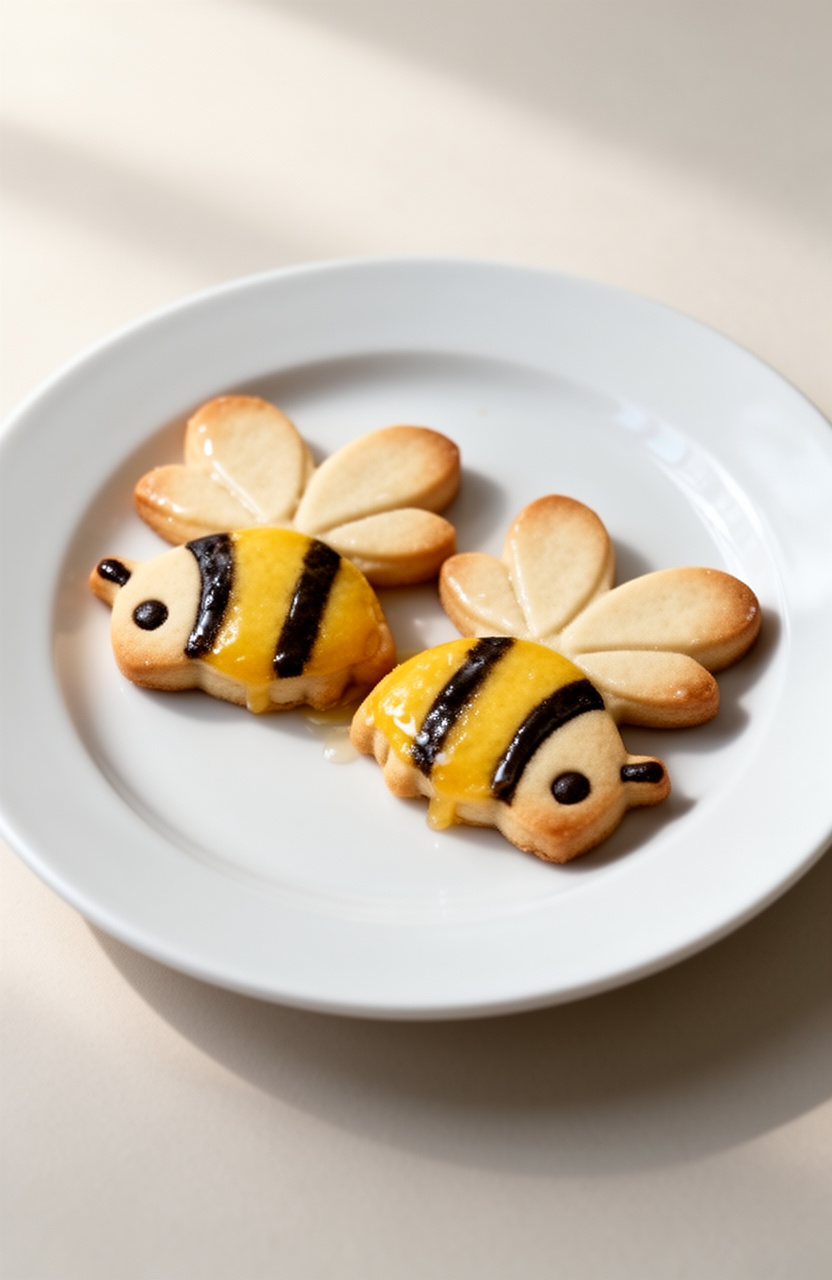
Infusing dried lavender buds directly into raw honey pulls out a floral, aromatic depth that weaves through every bite of these bumblebee-shaped cookies. Softened butter and granulated sugar give them their crisp golden edges and tender, melt-in-your-mouth center.
Lavender Honey Bumblebee Cookies
Lavender Honey Butter
Cookie Dough
Bumblebee Decoration
- 🫕Small saucepan
- 🪣Fine mesh strainer
- 🔌Stand mixer or hand electric mixer
- 🥣Large mixing bowl
- 🥣Medium mixing bowl
- 🥄Rubber spatula
- 🥄Whisk
- 🍴Oval or round cookie cutter (2.5-inch)
- 🥧Baking sheets (2 large)
- 📄Parchment paper or silicone baking mats
- 🪜Wire cooling rack
- 📄Plastic wrap
- 🛍️Piping bags or zip-top bags
- 🥄Small offset spatula
- 🥄Measuring cups and spoons
- ⚖️Kitchen scale
- 🫙Rolling pin
Infuse Lavender Honey
Infuse the honey with lavender: Combine 2 tablespoons of dried culinary lavender buds and 1/2 cup of raw honey in a small saucepan over very low heat. Warm gently for 30 minutes, stirring occasionally, keeping the temperature below 150°F (65°C) — do not boil.
Remove from heat, let cool for 5 minutes, then strain through a fine mesh strainer, pressing the buds gently to extract all the honey. Discard the lavender buds.
You should have about 6 tablespoons of lavender-infused honey. Set aside to cool completely.
Cream Butter and Sugar
Make the cookie dough: In the bowl of a stand mixer fitted with the paddle attachment (or a large bowl with a hand mixer), beat 1 cup of softened unsalted butter, 3/4 cup granulated sugar, and 1/4 cup packed light brown sugar on medium-high speed for 3 minutes until light and fluffy. Scrape down the sides of the bowl with a rubber spatula.
Add Wet Ingredients
Add 1 large room-temperature egg, 1 teaspoon pure vanilla extract, and 4 tablespoons of the cooled lavender-infused honey (reserve the remaining 2 tablespoons for brushing later). Beat on medium speed for 1 minute until fully combined and smooth.
The mixture may look slightly curdled — that is normal.
Combine Dry Ingredients
In a separate medium bowl, whisk together 2 1/4 cups all-purpose flour, 1/2 teaspoon baking soda, 1/2 teaspoon fine sea salt, and 1/4 teaspoon ground cardamom until evenly combined. With the mixer on low speed, gradually add the flour mixture to the butter mixture in three additions, mixing just until no dry streaks remain.
Do not overmix.
Chill the Dough
Turn the dough out onto a lightly floured surface and divide it into two equal portions. Flatten each portion into a disc about 3/4-inch thick.
Wrap each disc tightly in plastic wrap and refrigerate for at least 2 hours, or up to 48 hours. Chilling is essential for the cookies to hold their shape during baking.
Preheat and Prep
When ready to bake, preheat your oven to 350°F (175°C). Line two large baking sheets with parchment paper or silicone baking mats.
Remove one disc of dough from the refrigerator and let it sit at room temperature for 5 minutes to soften slightly. On a lightly floured surface, roll the dough to an even 1/4-inch thickness.
Cut Cookie Shapes
Using a 2.5-inch oval or round cookie cutter, cut out as many cookies as possible and place them 1.5 inches apart on the prepared baking sheets. Re-roll scraps once and cut additional cookies.
Repeat with the second disc of dough. You should get approximately 24 cookies total.
If the dough becomes too soft, return it to the refrigerator for 10 minutes before continuing.
Bake the Cookies
Bake the cookies one sheet at a time in the preheated 350°F oven for 10 to 12 minutes, until the edges are just barely golden and the centers look set but still slightly soft. Do not overbake — they will firm up as they cool.
Remove from the oven and let the cookies cool on the baking sheet for 5 minutes, then transfer to a wire cooling rack to cool completely, about 30 minutes.
Melt Decoration Chocolates
While the cookies cool, prepare the bumblebee decorations. Melt 1 cup of yellow candy melts (or yellow-tinted white chocolate) in a microwave-safe bowl in 30-second intervals, stirring between each, until smooth.
Melt 1/2 cup of dark chocolate chips or black candy melts separately in the same manner. Transfer each melted chocolate to a piping bag or zip-top bag and snip a very small corner off the tip.
Decorate Bee Bodies
Decorate the cookies to look like bumblebees: Using the yellow melted chocolate, pipe or spread a yellow oval body shape covering about two-thirds of each cooled cookie. While the yellow chocolate is still wet, pipe 2 to 3 thick black stripes horizontally across the yellow body using the black chocolate.
Use a toothpick to gently swirl the edges of the stripes for a natural bee look. Immediately press 1 candy eye onto the upper portion of each cookie.
Add Bee Wings
To create wings, pipe two small teardrop or oval shapes of white chocolate (or use the reserved yellow chocolate tinted lighter) on either side of the upper body of each bee. While still wet, lightly dust or press white nonpareils or white sprinkles onto the wing shapes to give them a shimmery, translucent appearance.
Allow all decorations to set completely at room temperature for 20 to 30 minutes, or refrigerate for 10 minutes to speed up setting.
Honey Glaze Finish
Once the chocolate decorations are fully set, warm the reserved 2 tablespoons of lavender-infused honey slightly (10 seconds in the microwave) and use a pastry brush or small spoon to lightly brush a thin glaze of honey over the bee bodies for a beautiful, glossy, golden shine. Allow the honey glaze to set for 5 minutes before serving or packaging.
Store cookies in an airtight container at room temperature for up to 5 days.
Per serving (1 cookie) — values are estimates
Highly Recommended
7. Spring Rain Cloud Cookies
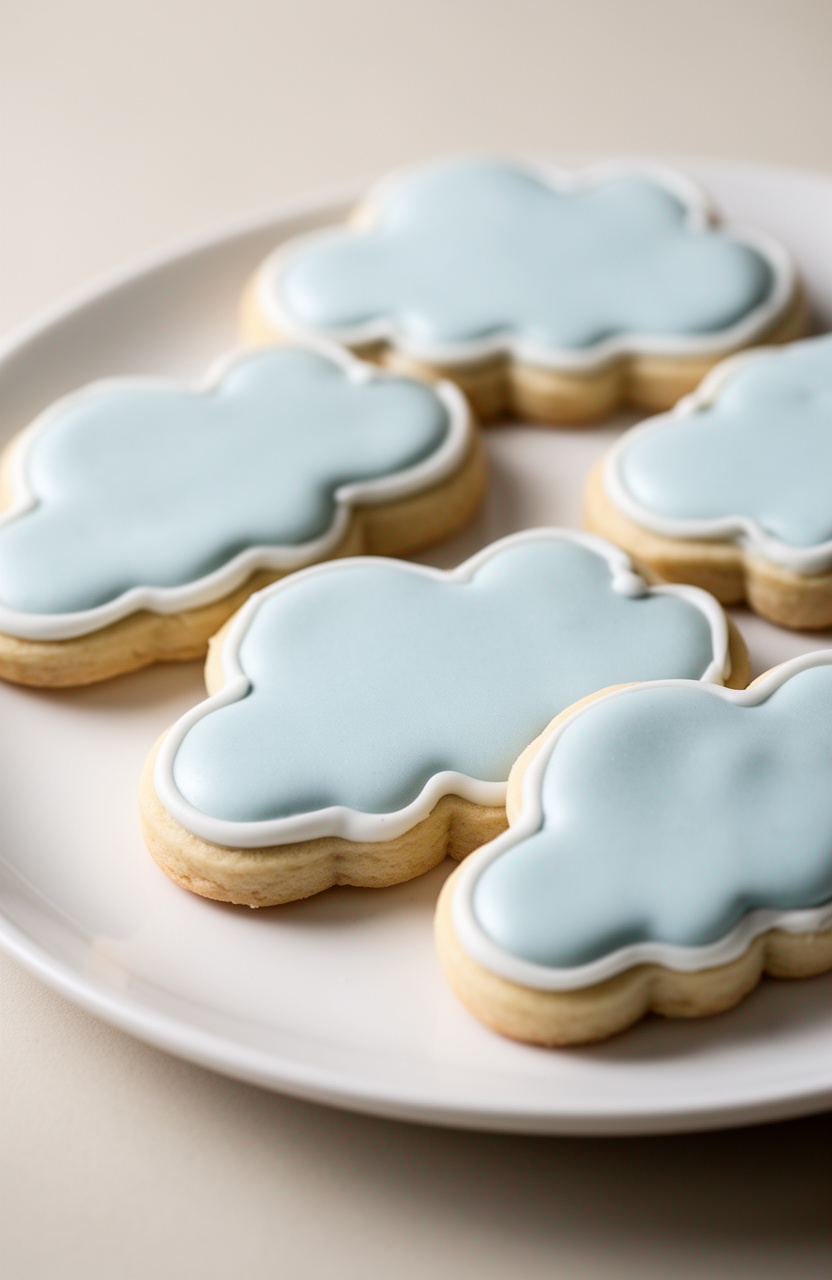
Combining flour, butter, and a touch of baking powder produces cloud-shaped cookies with a tender, pillowy crumb that holds its soft interior behind a lightly set, delicate outer edge.
Spring Rain Cloud Cookies
Cookie Dough
Royal Icing
Decoration
- 🔌Stand mixer or hand electric mixer
- 🥣Large mixing bowl
- 🥣Medium mixing bowl
- 🪣Sifter or fine mesh sieve
- 📄Plastic wrap
- 🫙Rolling pin
- 🍴Cloud-shaped cookie cutters (2-3 inch)
- 🥧Baking sheets (2 large)
- 📄Parchment paper or silicone baking mats
- 🪜Wire cooling rack
- 🎂Piping bags (3-4)
- 🍴Piping tips (size 2 and 4 round tips)
- 🥄Rubber spatula
- 🥄Small offset spatula
- 📍Toothpick or scribe tool
Combine Dry Ingredients
In a medium bowl, whisk together 2 1/4 cups all-purpose flour, 1/2 teaspoon baking powder, and 1/4 teaspoon fine sea salt until evenly combined. Set aside.
Cream Butter and Sugar
In the bowl of a stand mixer fitted with the paddle attachment (or using a hand mixer and large bowl), beat 1 cup softened unsalted butter and 3/4 cup sifted powdered sugar on medium-high speed for 3 minutes until light and fluffy, scraping down the sides of the bowl as needed.
Add Wet Ingredients
Add 1 large egg, 1 teaspoon vanilla extract, and 1/2 teaspoon almond extract to the butter mixture. Mix on medium speed for about 1 minute until fully incorporated and smooth.
Form the Dough
Reduce the mixer to low speed and gradually add the flour mixture in three additions, mixing just until the dough comes together and no dry streaks remain. Do not overmix.
Add 2-3 drops of sky blue gel food coloring and mix briefly until a soft, uniform pale blue dough forms.
Chill the Dough
Divide the dough into two equal portions. Flatten each into a disc about 3/4 inch thick, wrap tightly in plastic wrap, and refrigerate for at least 30 minutes until firm.
This resting time is critical for clean cookie edges.
Make Royal Icing
While the dough chills, prepare the royal icing. In a large bowl, combine 3 cups sifted powdered sugar, 3 tablespoons meringue powder, 6 tablespoons warm water, and 1 teaspoon clear vanilla extract.
Beat with a hand mixer on medium-high speed for 5-7 minutes until stiff, glossy peaks form. The icing should hold its shape and look bright white.
Prepare Icing Colors
Divide the royal icing into three portions. Keep one portion bright white (add a tiny drop of white gel coloring to intensify).
Tint the second portion a soft sky blue using light blue gel food coloring. Thin the third portion with water, adding it one teaspoon at a time, until it reaches a flood consistency (a ribbon of icing dropped back into the bowl disappears in about 10 seconds).
Cover all portions tightly with plastic wrap pressed directly onto the surface to prevent crusting.
Preheat and Roll Dough
Preheat your oven to 350°F (175°C). Line two large baking sheets with parchment paper or silicone baking mats.
Remove one disc of dough from the refrigerator and place it between two sheets of parchment paper. Roll to an even 1/4-inch thickness.
Cut Cloud Shapes
Using cloud-shaped cookie cutters (2-3 inch), cut out as many shapes as possible, pressing firmly and cleanly. Transfer the cut cookies to the prepared baking sheets, spacing them about 1 1/2 inches apart.
Gather scraps, re-roll between parchment, and cut additional cookies. Repeat with the second dough disc.
You should get approximately 24 cookies total.
Bake the Cookies
Bake the cookies in the preheated 350°F oven for 10-12 minutes, until the edges are just barely set and the tops look matte but not golden. The cookies should not brown.
Bake one sheet at a time on the center rack for the most even results. Remove from the oven and allow cookies to cool on the baking sheet for 5 minutes before transferring to a wire rack to cool completely, about 20 minutes.
Outline the Cookies
Once cookies are completely cool, fill a piping bag fitted with a size 2 round tip with the stiff white royal icing. Pipe an outline around the edge of each cloud cookie, following the bumpy cloud shape carefully.
Let the outline set for 5 minutes.
Flood and Decorate
Fill a second piping bag fitted with a size 4 round tip with the flood-consistency white royal icing. Flood the inside of each outlined cookie, using a toothpick or scribe tool to guide the icing into the curves and edges.
While the icing is still wet, add small dots of sky blue flood icing to create a soft, misty rain-cloud effect. Use the toothpick to gently swirl the colors together for a dreamy, watercolor look.
Add Final Touches
Immediately while the icing is still wet, sprinkle light blue sanding sugar lightly over the lower half of each cookie to suggest falling rain, then add a few white nonpareils or pearl sprinkles scattered across the cloud tops to mimic raindrops. Finish with a very light dusting of silver edible glitter over each cookie for a shimmery, dewy spring effect.
Dry and Store
Allow the decorated cookies to dry and set completely at room temperature for at least 2 hours, or ideally overnight, before stacking or packaging. The royal icing should be fully hardened and no longer tacky to the touch.
Store in an airtight container at room temperature for up to 1 week.
Per serving (2 cookies) — values are estimates
Shop Our Must-Haves
8. Tulip Bouquet Vanilla Cookies
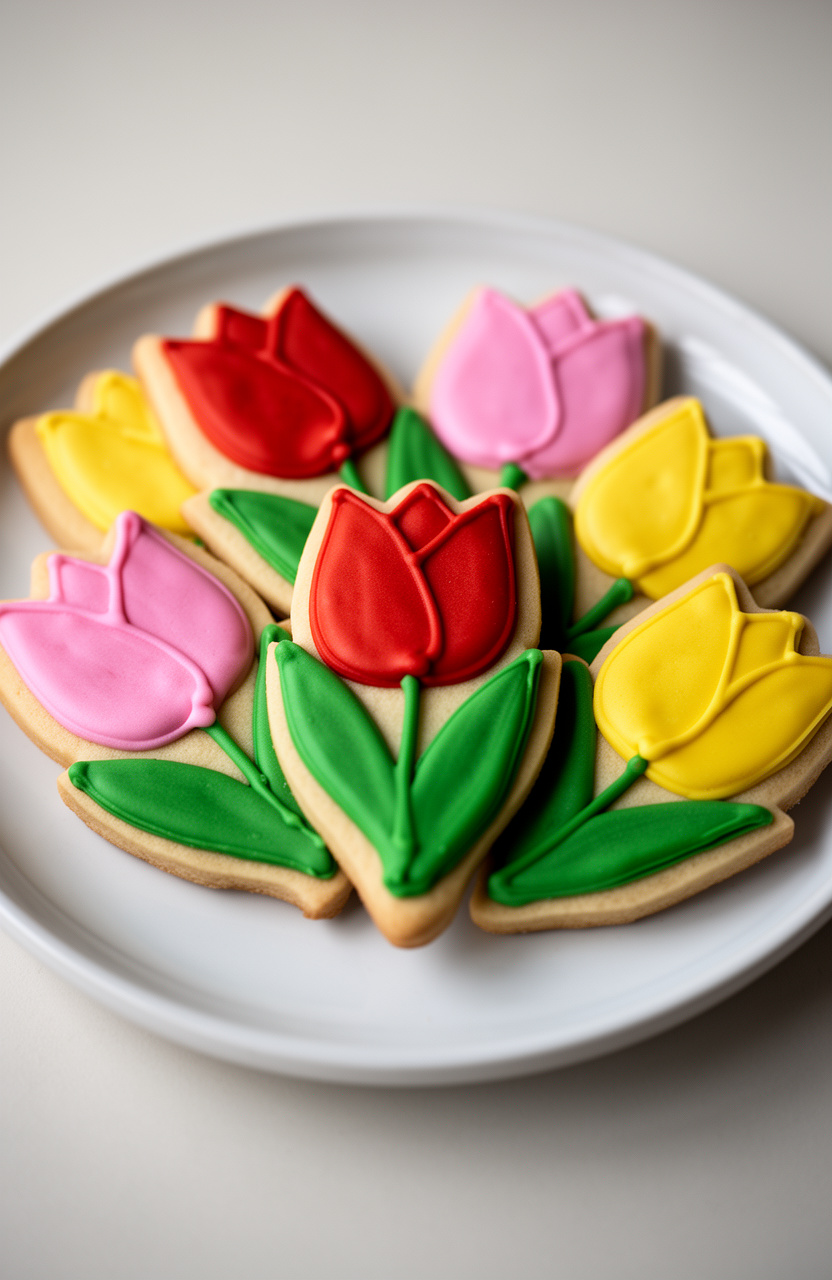
Dry ingredients whisked together and worked into softened butter produce tulip-shaped vanilla cookies with cleanly defined petal edges and a tender, buttery crumb that stays slightly soft at the center behind a thin, lightly crisped outer edge.
Tulip Bouquet Vanilla Cookies
Cookie Dough
Royal Icing
Decoration
- 🔌Stand mixer or hand mixer
- 🥣Large mixing bowls
- 🍴Tulip-shaped cookie cutter (3-inch)
- 🍴Leaf-shaped cookie cutter (2-inch)
- 🫙Rolling pin
- 🥧Baking sheets (2 large)
- 📄Parchment paper
- 🪜Wire cooling rack
- 🎂Piping bags (4-6)
- 🍴Piping tips: #2 round and #1 fine round
- 🥄Small rubber spatulas
- 📄Plastic wrap
- 🍴Ruler or bench scraper
- 📍Toothpicks or scribe tool
Whisk Dry Ingredients
In a medium bowl, whisk together 2 1/4 cups all-purpose flour, 1/2 teaspoon baking powder, and 1/4 teaspoon salt. Set aside.
Cream Butter and Sugar
In the bowl of a stand mixer fitted with the paddle attachment, beat 1 cup softened unsalted butter and 3/4 cup granulated sugar on medium-high speed for 3 minutes until light and fluffy, scraping down the sides of the bowl halfway through.
Add Wet Ingredients
Add 1 large egg, 2 teaspoons pure vanilla extract, and 1 teaspoon almond extract to the butter mixture. Beat on medium speed for 1 minute until fully combined and smooth.
Combine Dough
Reduce mixer speed to low and gradually add the flour mixture in three additions, mixing just until a soft dough forms and no dry streaks remain. Do not overmix.
Chill the Dough
Divide the dough into two equal portions. Flatten each into a 1-inch thick disk, wrap tightly in plastic wrap, and refrigerate for at least 2 hours or up to 48 hours.
The dough must be thoroughly chilled to hold its shape when cut.
Preheat and Prep
When ready to bake, preheat your oven to 350°F (175°C). Line two large baking sheets with parchment paper.
Remove one disk of dough from the refrigerator and let it rest at room temperature for 5 minutes.
Roll and Cut Cookies
On a lightly floured surface, roll the dough out to an even 1/4-inch thickness. Use a 3-inch tulip-shaped cookie cutter to cut out tulip shapes and a 2-inch leaf-shaped cutter for leaves.
Re-roll scraps once to cut additional cookies. Arrange cookies 1 inch apart on the prepared baking sheets.
Bake the Cookies
Bake the cookies for 10 to 12 minutes, until the edges are just set and the bottoms are very lightly golden. The centers may look slightly underdone — this is correct.
Do not overbake. Let cookies cool on the baking sheet for 5 minutes, then transfer to a wire cooling rack and cool completely, about 30 minutes, before decorating.
Make Royal Icing
Make the royal icing: In a clean stand mixer bowl fitted with the whisk attachment, combine 3 cups sifted powdered sugar, 2 tablespoons meringue powder, and 6 tablespoons warm water. Beat on medium-high speed for 5 minutes until thick, glossy, and bright white.
Add 1/2 teaspoon vanilla extract and mix briefly. The icing should hold stiff peaks at this stage.
Color the Icing
Divide the royal icing into 5 portions. Tint one portion red, one pink, one yellow, and one green using gel food coloring, mixing until color is fully incorporated.
Leave one portion white. Cover all bowls tightly with plastic wrap to prevent drying.
Thin Flood Icing
For flood consistency icing (used to fill in large areas), thin each colored portion by stirring in warm water, one teaspoon at a time, until a ribbon of icing dropped from a spatula disappears back into the bowl within 10 seconds. Reserve a small amount of each color at stiff consistency for outlining and detail piping.
Outline the Cookies
Fill piping bags fitted with a #2 round tip with the stiff-consistency icing. Outline each tulip cookie with your chosen flower color (red, pink, or yellow), tracing just inside the cookie edge.
Outline the leaf cookies with green stiff icing. Let outlines set for 5 minutes.
Flood and Fill
Switch to flood-consistency icing in the same color. Fill the interior of each outlined tulip cookie, flooding the surface and using a toothpick or scribe tool to guide the icing into the corners and pop any air bubbles.
Flood the leaf cookies with green flood icing. Allow flooded cookies to dry at room temperature for at least 1 hour before adding detail work.
Pipe Petal Details
Once the base layer is dry to the touch, use stiff white icing in a piping bag fitted with a #1 fine round tip to pipe delicate petal detail lines on each tulip — draw 3 to 5 curved lines from the base of the tulip upward to the petal tips. Pipe a center vein line on each leaf cookie using darker green stiff icing.
Immediately add white nonpareil sprinkles to the tulip centers if desired, then let dry completely for 1 additional hour.
Finish and Display
Optional: Once fully dry, use a dry soft brush to dust the tulip petals lightly with edible gold luster dust for a luminous, bouquet-worthy finish. Arrange the tulip and leaf cookies together on a platter or gift box to mimic a blooming bouquet presentation.
Store in an airtight container at room temperature for up to 7 days.
Per serving (2 decorated cookies) — values are estimates
Top Picks Today
9. Carrot Patch Easter Cookies

Flour and butter whisked into a lightly leavened dough bake up into carrot patch-shaped cookies with a tender, golden crumb and cleanly defined edges that hold their festive shape. They’re crisp at the border and soft through the center, with a rich, buttery depth that makes every bite feel intentional and indulgent.
Carrot Patch Easter Cookies
Cookie Dough
Royal Icing
Decoration
- 🔌Stand mixer or hand electric mixer
- 🥣Large mixing bowl
- 🥣Medium mixing bowl
- 🍴Carrot-shaped cookie cutter (3-inch)
- 🫙Rolling pin
- 🥧Baking sheets (2)
- 📄Parchment paper or silicone baking mats
- 📄Plastic wrap
- 🪜Wire cooling rack
- 🎂Piping bags (3-4)
- 🍴Small round piping tips (#2 and #3)
- 📍Toothpicks or scribe tool
- 🥣Small bowls for dividing icing
- 🪣Sifter or fine mesh strainer
- 🥄Offset spatula
Whisk Dry Ingredients
In a medium bowl, whisk together 2 1/4 cups all-purpose flour, 1/2 teaspoon baking powder, and 1/4 teaspoon salt until well combined. Set aside.
Cream Butter Sugar
In the bowl of a stand mixer fitted with the paddle attachment (or using a hand mixer and large bowl), beat 3/4 cup softened unsalted butter and 3/4 cup granulated sugar on medium-high speed for 3 minutes until light and fluffy, scraping down the sides of the bowl as needed.
Add Wet Ingredients
Add 1 large egg, 1 teaspoon vanilla extract, and 1/2 teaspoon almond extract to the butter mixture. Mix on medium speed for about 1 minute until fully incorporated.
Scrape down the sides of the bowl.
Form Cookie Dough
Reduce mixer speed to low and gradually add the flour mixture in two additions, alternating with 2 tablespoons of whole milk. Mix just until a soft dough forms — do not overmix.
The dough should pull away cleanly from the sides of the bowl.
Chill the Dough
Divide the dough in half and flatten each portion into a disc about 1-inch thick. Wrap each disc tightly in plastic wrap and refrigerate for at least 1 hour, or up to 48 hours.
Chilling is essential for clean-cut shapes that hold their carrot form during baking.
Preheat and Prep
When ready to bake, preheat your oven to 350°F (175°C). Line two baking sheets with parchment paper or silicone baking mats.
Remove one disc of dough from the refrigerator and let it sit at room temperature for 5 minutes to soften slightly.
Cut Cookie Shapes
On a lightly floured surface, roll the dough out to an even 1/4-inch thickness. Using a 3-inch carrot-shaped cookie cutter, cut out as many shapes as possible, pressing firmly and straight down.
Transfer cut cookies to the prepared baking sheets, spacing them about 1 inch apart. Gather scraps, re-roll, and cut again.
Repeat with the second disc of dough.
Bake the Cookies
Bake the cookies in the preheated oven for 10 to 12 minutes, until the edges are just set and the bottoms are very lightly golden — the tops should still look pale and matte. Do not overbake.
Let cookies cool on the baking sheet for 5 minutes, then transfer to a wire cooling rack and allow to cool completely, at least 30 minutes, before decorating.
Make Royal Icing
Make the royal icing: In the clean bowl of a stand mixer fitted with the whisk attachment, combine 3 tablespoons meringue powder and 6 tablespoons warm water. Whisk on medium speed for 1 minute until foamy.
Add 3 cups sifted powdered sugar and 1/2 teaspoon vanilla extract. Beat on medium-high speed for 4 to 5 minutes until the icing is thick, glossy, and holds stiff peaks (stiff-consistency icing).
Color the Icing
Divide the royal icing into three bowls: place about two-thirds of the icing in one bowl for the orange carrot body, one-quarter in a second bowl for the green carrot tops, and keep a small amount in a third bowl as white for any accent details. Tint the first bowl with orange gel food coloring and the second with green gel food coloring, mixing thoroughly until the colors are even and vibrant.
Thin Icing for Flooding
Thin the orange and green icings separately to a flooding consistency by adding warm water a few drops at a time, stirring gently after each addition. The icing is ready when a ribbon of icing drizzled from a spoon disappears back into the surface within 10 seconds (the ’10-second rule’).
Transfer each color to a separate piping bag fitted with a #3 round tip for outlining and flooding.
Decorate Carrot Bodies
Decorate the carrot body: Using the orange icing, pipe an outline around the lower carrot-shaped portion of each cookie (leaving the leafy top section uniced for now). Then flood the interior by piping orange icing inside the outline and using a toothpick or scribe tool to spread it evenly to the edges.
While the icing is still wet, immediately sprinkle orange sanding sugar over the surface for a sparkly, textured look. Gently tap off any excess sugar.
Decorate Carrot Tops
Allow the orange icing to set for at least 15 minutes until it is no longer wet to the touch. Then, using the green icing, pipe and flood the leafy top portion of each carrot cookie.
While the green icing is still wet, add a few green sprinkles or nonpareils to represent the carrot greens. Use a toothpick to gently swirl or shape the green icing to mimic feathery carrot tops.
Add Detail Lines
For optional detail work, switch to a #2 piping tip with any remaining orange icing (thickened back to stiff consistency if needed) and pipe thin horizontal lines across the carrot body to mimic the ridged texture of a real carrot. Allow all decorated cookies to dry uncovered at room temperature for at least 4 hours, or overnight, until the royal icing is fully set and hard.
Store and Serve
Once completely dry, stack and store the finished Carrot Patch Easter Cookies in an airtight container at room temperature, layered between sheets of parchment paper, for up to 1 week. For gifting, arrange in a cellophane bag tied with an orange or green ribbon.
Per serving (1 decorated cookie) — values are estimates
Shop Our Must-Haves
10. Mint Frosted Dragonfly Cookies
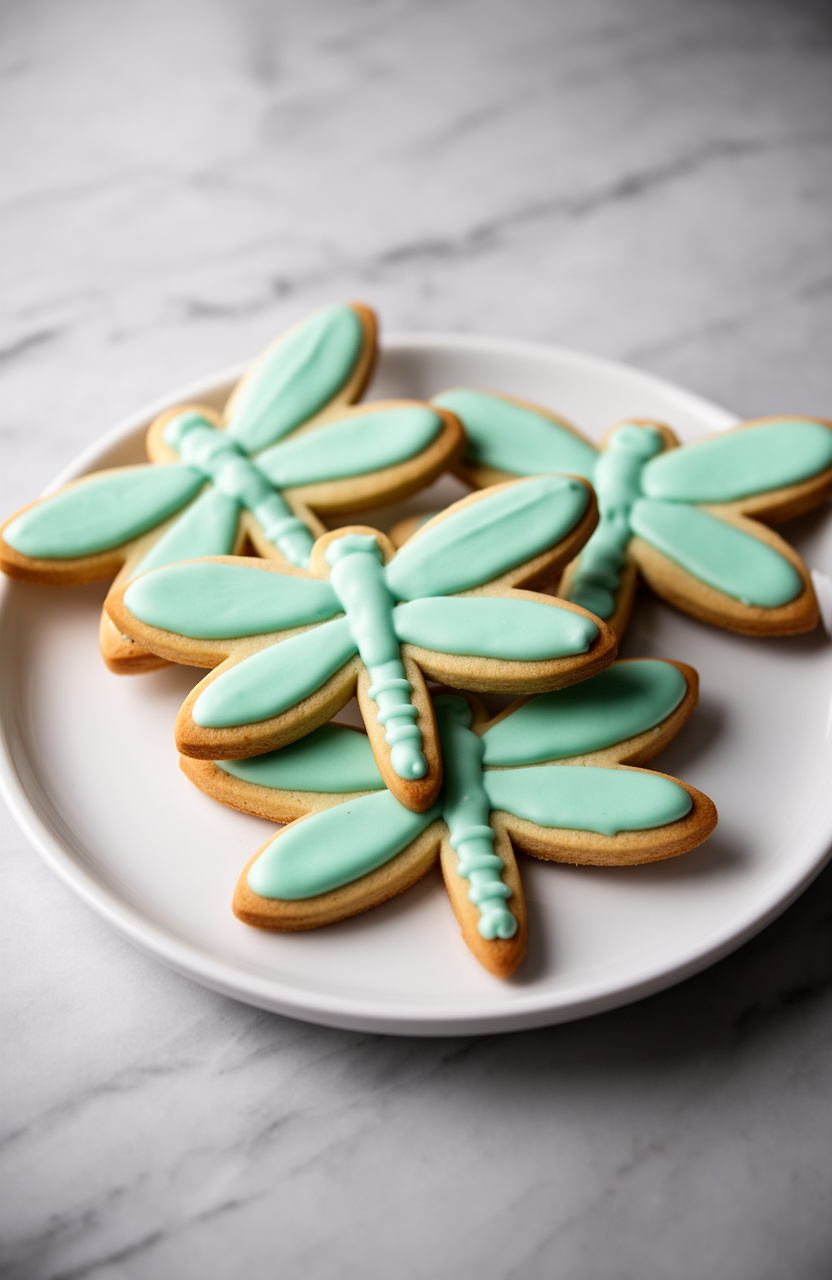
Blending dry ingredients into softened butter builds a structured, lightly leavened dough that bakes into crisp-edged dragonfly cookies with a tender, buttery crumb at the center, then a cool mint frosting adds a refreshing, herbal sweetness that contrasts the rich, golden bite beneath.
Mint Frosted Dragonfly Cookies
Cookie Dough
Mint Frosting
Decoration
- 🔌Stand mixer or hand electric mixer
- 🥣Large mixing bowl
- 🥣Medium mixing bowl
- 🍴Dragonfly-shaped cookie cutter (3 to 4 inches)
- 🫙Rolling pin
- 🥧Baking sheets (2)
- 📄Parchment paper or silicone baking mats
- 🪜Wire cooling rack
- 🔪Offset spatula or butter knife
- 🎂Piping bags with fine round tips
- 📄Plastic wrap
- 🪣Sifter or fine mesh strainer
- 🍴Ruler or bench scraper
Combine Dry Ingredients
In a medium bowl, whisk together 2 1/4 cups all-purpose flour, 1/2 teaspoon baking powder, and 1/4 teaspoon salt. Set aside.
Cream Butter and Sugar
In a large bowl using a stand mixer or hand mixer on medium speed, beat 3/4 cup softened unsalted butter and 3/4 cup granulated sugar together for about 2 to 3 minutes until light and fluffy. Scrape down the sides of the bowl as needed.
Add Egg and Extracts
Add 1 large egg, 1 teaspoon vanilla extract, and 1/2 teaspoon almond extract to the butter mixture. Beat on medium speed for about 1 minute until fully combined and smooth.
Mix Cookie Dough
Reduce mixer speed to low and gradually add the flour mixture to the wet ingredients in three additions, mixing just until the dough comes together and no dry streaks remain. Do not overmix.
Chill the Dough
Divide the dough into two equal discs, wrap each tightly in plastic wrap, and refrigerate for at least 1 hour until firm. This chilling step is essential for clean, sharp cookie shapes.
Preheat Oven
Preheat your oven to 350°F (175°C). Line two baking sheets with parchment paper or silicone baking mats.
Roll and Cut Cookies
On a lightly floured surface, roll out one disc of chilled dough to about 1/4-inch thickness. Use your dragonfly-shaped cookie cutter to cut out shapes, pressing firmly and cleanly.
Transfer cutouts to the prepared baking sheets, spacing them about 1 inch apart. Re-roll scraps once to cut additional cookies.
Repeat with the second disc.
Bake the Cookies
Bake the cookies in the preheated oven for 10 to 12 minutes, until the edges are just barely golden and the centers look set but not browned. Rotate the baking sheets halfway through for even baking.
Do not overbake — they will firm up as they cool.
Cool the Cookies
Remove baking sheets from the oven and allow the cookies to cool on the pan for 5 minutes before transferring to a wire cooling rack. Let them cool completely, about 20 minutes, before frosting.
Make Mint Frosting
To make the mint frosting, beat 4 tablespoons softened unsalted butter with 3 cups sifted powdered sugar in a medium bowl using a mixer on low speed. Add 1 teaspoon peppermint extract and 3 tablespoons milk, then increase speed to medium and beat until smooth and creamy.
Add an additional tablespoon of milk if needed to reach a spreadable consistency. Mix in 2 to 3 drops of teal or blue-green gel food coloring until evenly blended.
Frost the Cookies
Using an offset spatula or butter knife, spread a generous layer of mint frosting over each completely cooled dragonfly cookie, covering the wings and body smoothly. Work from the center outward for the cleanest finish.
Pipe Wing Details
While the frosting is still slightly soft, use a piping bag fitted with a fine round tip filled with white royal icing or white decorating gel to pipe delicate vein patterns on the wings of each dragonfly. Pipe thin lines radiating outward from the body to mimic natural wing veining.
Add Final Decorations
Immediately sprinkle iridescent or holographic edible glitter over the wings while the icing is still wet so it adheres well. Tap off any excess glitter gently.
Use a black edible ink pen or black royal icing to draw or pipe a segmented body and head on each dragonfly. Press one or two small edible pearls or dragees onto the head area to create eyes.
Set and Store
Allow the decorated cookies to set at room temperature for at least 30 minutes until the frosting and icing are fully dry and firm before stacking or packaging. Store in an airtight container at room temperature for up to 5 days.
Per serving (1 cookie) — values are estimates
Most Loved Products
11. Sunflower Lemon Curd Cookies
Bright lemon curd folded into a buttery, lightly leavened dough gives these sunflower-shaped cookies a tangy, citrus-forward flavor that cuts through the rich, golden base. They bake up with crisp, defined petal edges and a tender, slightly soft center that holds the lemon’s sharp brightness in every bite.
Sunflower Lemon Curd Cookies
Cookie Dough
Lemon Curd
Garnish
- 🔌Stand mixer or hand electric mixer
- 🫕Medium heavy-bottomed saucepan
- 🪣Fine mesh strainer
- 🥧Two large baking sheets
- 📄Parchment paper
- 🍦1.5-inch round cookie scoop
- 🥄Small round teaspoon or thumb for indentation
- 🥣Mixing bowls (large and medium)
- 🥄Whisk
- 🥄Rubber spatula
- 🪜Wire cooling rack
- 🔪Zester or microplane
- 📄Plastic wrap
- 🥄Piping bag or small spoon
Combine Curd Ingredients
Make the lemon curd first so it has time to chill. In a medium heavy-bottomed saucepan, whisk together 3 egg yolks, 1/2 cup granulated sugar, 1/3 cup fresh lemon juice, and 1 tablespoon lemon zest until smooth and well combined.
Cook the Curd
Place the saucepan over medium-low heat and cook, stirring constantly with a rubber spatula or whisk, for about 10-12 minutes until the curd thickens enough to coat the back of a spoon. Do not let it boil.
Remove from heat and stir in 4 tablespoons cubed butter and a pinch of salt until fully melted and smooth.
Strain and Chill
Pour the lemon curd through a fine mesh strainer into a clean bowl to remove any cooked egg bits and zest. Press a sheet of plastic wrap directly onto the surface of the curd to prevent a skin from forming.
Refrigerate for at least 2 hours until fully set and cold.
Mix Dry Ingredients
Once the curd has about 30 minutes left to chill, begin the cookie dough. In a large mixing bowl, whisk together 2 1/4 cups all-purpose flour, 1/2 teaspoon baking powder, and 1/4 teaspoon fine sea salt.
Set aside.
Cream Butter and Sugar
In the bowl of a stand mixer fitted with the paddle attachment (or using a hand mixer), beat 3/4 cup softened unsalted butter and 3/4 cup granulated sugar on medium-high speed for 3-4 minutes until light and fluffy, scraping down the sides of the bowl as needed.
Add Wet Ingredients
Add 1 large egg, 1 teaspoon vanilla extract, 1 tablespoon lemon zest, and 1/4 cup sunflower seed butter to the butter mixture. Beat on medium speed for about 1 minute until fully incorporated and smooth.
Form the Dough
Reduce mixer speed to low and gradually add the flour mixture in three additions, mixing just until a soft dough forms. Do not overmix.
Fold in 1/2 cup finely chopped roasted sunflower seeds using a rubber spatula.
Preheat and Portion
Preheat your oven to 350°F (175°C). Line two large baking sheets with parchment paper.
Using a 1.5-inch cookie scoop, portion the dough into balls (about 1.5 tablespoons each) and place them 2 inches apart on the prepared baking sheets.
Create Cookie Wells
Using your thumb or the back of a small round teaspoon, press a deep indentation into the center of each dough ball, creating a well about 1/2 inch deep and 3/4 inch wide. Reshape the edges if they crack by gently pressing them back together.
Bake the Cookies
Bake the cookies in the preheated 350°F oven for 12-14 minutes, until the edges are just set and lightly golden but the centers still look slightly underdone. If the wells have puffed up during baking, re-press them gently with the back of a spoon immediately after removing from the oven.
Cool Completely
Allow the cookies to cool on the baking sheets for 5 minutes, then transfer them to a wire cooling rack to cool completely, about 20 minutes. Do not fill with curd while warm or the curd will melt.
Fill with Curd
Once the cookies are completely cool, remove the chilled lemon curd from the refrigerator. Using a piping bag or a small spoon, fill each cookie well with approximately 1 teaspoon of lemon curd, mounding it slightly above the surface.
Garnish and Serve
Garnish each filled cookie with 3-4 roasted sunflower seeds pressed lightly into the curd, and finish with a light dusting of powdered sugar over the cookies. Serve immediately or refrigerate in an airtight container for up to 3 days.
Per serving (2 cookies) — values are estimates
Trending on Amazon
12. Baby Chick Hatching Cookies
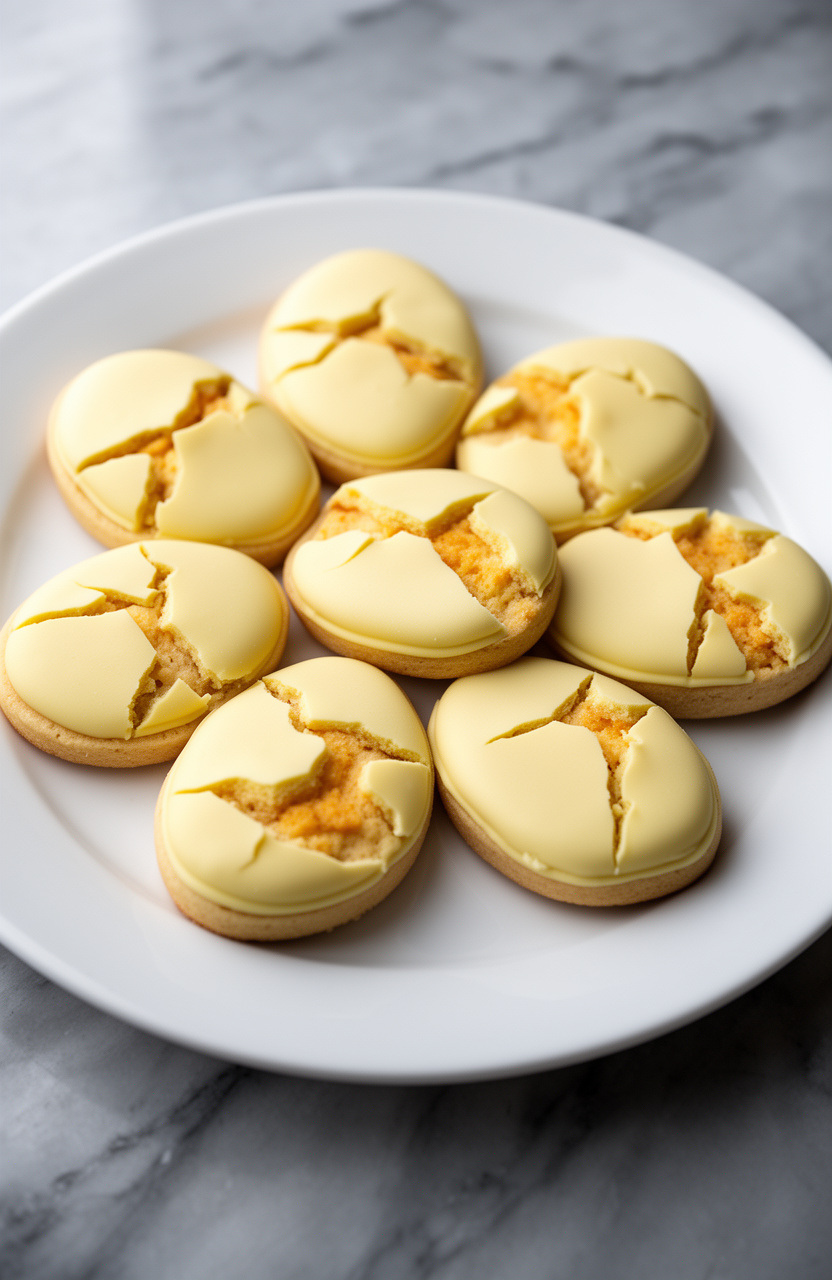
Softened butter worked into a lightly leavened flour dough shapes into hatching chick cookies with cleanly defined cracked-shell edges and a tender, golden crumb. Decorated with pale yellow royal icing, they deliver a rich, buttery base beneath a smooth, sweet shell that makes each bite feel festive and deliberate.
Baby Chick Hatching Cookies
Sugar Cookie Dough
Royal Icing
Decorating
- 🔌Stand mixer or hand mixer
- 🥣Large mixing bowl
- 🥣Medium mixing bowl
- 🍴Oval or egg-shaped cookie cutter (3-inch)
- 🫙Rolling pin
- 🥧Baking sheets (2)
- 📄Parchment paper or silicone baking mats
- 🪜Wire cooling rack
- 🎂Piping bags (4–5)
- 🍴Coupler sets
- 🍴Piping tips: #2 round tip, #1 round tip
- 📍Toothpicks or scribe tool
- 📄Plastic wrap
- 🪣Fine-mesh sieve
- 🥣Small bowls for dividing icing
- 🥄Offset spatula
- 🍴Ruler or bench scraper
Whisk Dry Ingredients
In a medium bowl, whisk together 3 cups all-purpose flour, 1 teaspoon baking powder, and 1/2 teaspoon salt. Set aside.
Cream Butter Sugar
In the bowl of a stand mixer fitted with the paddle attachment, beat 1 cup softened unsalted butter and 1 cup granulated sugar on medium-high speed for 3–4 minutes until light and fluffy. Scrape down the sides of the bowl as needed.
Add Wet Ingredients
Add 1 large egg, 2 teaspoons pure vanilla extract, and 1 tablespoon whole milk to the butter mixture. Beat on medium speed for 1 minute until fully combined and smooth.
Form Cookie Dough
With the mixer on low speed, gradually add the flour mixture in three additions, mixing just until a soft dough forms and no dry streaks remain. Do not overmix.
The dough should be smooth and slightly tacky.
Chill the Dough
Divide the dough in half. Flatten each portion into a disk about 1-inch thick, wrap tightly in plastic wrap, and refrigerate for at least 2 hours or up to 48 hours.
Chilling prevents the cookies from spreading and helps them hold their shape.
Preheat and Prep
When ready to bake, preheat your oven to 350°F (175°C). Line two baking sheets with parchment paper or silicone baking mats.
Remove one disk of dough from the refrigerator and let it sit at room temperature for 5 minutes to soften slightly.
Roll and Cut
On a lightly floured surface, roll the dough out to an even 1/4-inch thickness. Use a 3-inch oval or egg-shaped cookie cutter to cut out cookies, pressing firmly and straight down.
Re-roll scraps once to cut additional cookies. Place cookies 2 inches apart on the prepared baking sheets.
Repeat with the second disk of dough.
Bake the Cookies
Bake the cookies at 350°F for 10–12 minutes, until the edges are just set and the centers look barely done — they should not be golden brown on top. The cookies will firm up as they cool.
Rotate the baking sheet halfway through baking. Remove from the oven and let cookies cool on the baking sheet for 5 minutes before transferring to a wire rack to cool completely, about 30 minutes.
Make Royal Icing
While the cookies cool, make the royal icing. In the bowl of a stand mixer fitted with the whisk attachment, combine 4 cups sifted powdered sugar, 3 tablespoons meringue powder, 1 teaspoon clear vanilla extract, and 6 tablespoons warm water.
Beat on medium-high speed for 5–7 minutes until the icing is thick, glossy, and holds stiff peaks.
Color the Icing
Divide the royal icing into 4 small bowls. Color one large portion bright yellow using yellow gel food coloring.
Leave one portion white. Color a small portion orange using orange gel food coloring.
Color a very small portion black using black gel food coloring. Keep all bowls covered with a damp towel or plastic wrap to prevent drying.
Thin Flood Icing
For flooding (filling in large areas), thin the yellow and white icings separately by adding warm water, one teaspoon at a time, stirring gently after each addition. The icing is the right consistency when a line drawn through it with a toothpick disappears in 10–15 seconds (also called ’15-second icing’).
Keep the piping-consistency icing (thicker, for outlines) in separate piping bags fitted with a #2 round tip.
Pipe Egg Outline
Using the thicker white piping icing in a bag fitted with a #2 tip, pipe a jagged, cracked zigzag line across the lower third of each oval cookie to represent the broken eggshell. This line should look like a lightning bolt or cracked egg edge — not a straight line.
Let the outline set for 2 minutes.
Flood Eggshell Bottom
Flood the bottom third of each cookie (below the cracked line) with the thinned white flood icing using a piping bag or squeeze bottle. Use a toothpick or scribe tool to spread the icing into the corners.
Sprinkle white sanding sugar over the wet white icing immediately if desired for texture. Let set for 10 minutes.
Flood Chick Body
Flood the top two-thirds of each cookie (above the cracked line) with the thinned yellow flood icing to create the baby chick’s body peeking out of the egg. Use a toothpick to guide the icing to the edges.
Immediately sprinkle yellow sanding sugar over the wet yellow icing for a fluffy texture. Let the cookies dry undisturbed for at least 30 minutes until the surface is set enough to add details.
Add Chick Details
Once the flood icing is set, use the thicker yellow piping icing in a bag fitted with a #1 tip to pipe small wing outlines or feather details on the chick’s body. Pipe two small rounded bumps at the top of the yellow section to form the chick’s head and a tiny tuft of feathers on top.
Add Beak and Eyes
Using the orange icing in a bag fitted with a #1 tip, pipe a small triangle or place an orange candy-coated sunflower seed in the center of the chick’s face area to create the beak. Press gently to secure.
Using the black icing or tweezers, place two black nonpareil sprinkles or small edible candy eyes on either side of the beak for the chick’s eyes.
Enhance Eggshell Detail
Using the thick white icing, pipe a small ‘W’ or zigzag shape along the cracked line between the chick and eggshell to enhance the cracked egg effect and add dimension. Optionally, pipe tiny dots around the eggshell section to mimic speckled Easter eggs.
Dry and Store
Allow the fully decorated cookies to dry at room temperature, uncovered, for a minimum of 6–8 hours or overnight until the royal icing is completely hard and no longer tacky. Once dry, store the cookies in an airtight container at room temperature, layered between sheets of parchment paper, for up to 1 week.
Per serving (1 decorated cookie) — values are estimates
Trending on Amazon
13. Floral Wreath Almond Cookies
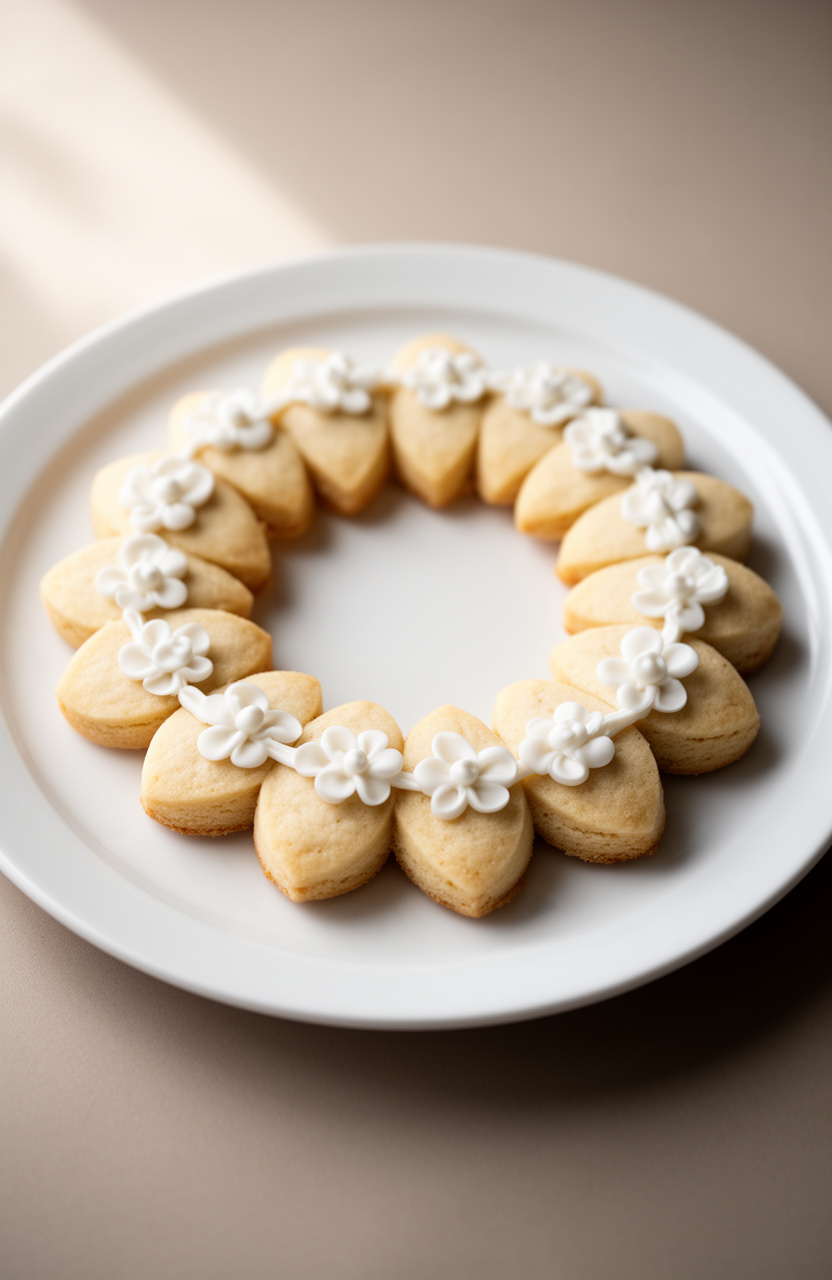
Floral wreath almond cookies deliver a delicate, nutty sweetness with cleanly defined petal edges and a tender, golden crumb. Dry ingredients combined first, then worked into softened butter, build the lightly leavened structure that keeps the center soft while crisping the intricate outer edges.
Floral Wreath Almond Cookies
Dough
Royal Icing
Decoration
- 🔌Stand mixer or hand mixer with paddle attachment
- 🥣Large mixing bowl
- 🥣Medium mixing bowl
- 🥄Whisk
- 🥄Rubber spatula
- 📄Plastic wrap
- 🫙Rolling pin
- 🍴Lightly floured work surface or silicone pastry mat
- 🍴3-inch round wreath-shaped or fluted round cookie cutter
- 🍴1-inch round cookie cutter (for center cutout)
- 🥧Baking sheets (2)
- 📄Parchment paper or silicone baking mats
- 🪜Wire cooling rack
- 🎂Piping bags with fine round tips (#1 or #2)
- 🥣Small bowls for dividing icing
- 📍Toothpicks or skewers for detail work
- 🍴Sifter
- ⚖️Kitchen scale (optional)
Combine Dry Ingredients
In a medium bowl, whisk together 2 1/4 cups all-purpose flour, 1/2 teaspoon baking powder, 1/4 teaspoon fine sea salt, and 1/4 cup finely ground blanched almonds until evenly combined. Set aside.
Cream Butter and Sugar
In the bowl of a stand mixer fitted with the paddle attachment (or using a hand mixer), beat 1 cup softened unsalted butter and 3/4 cup granulated sugar on medium-high speed for 3–4 minutes until the mixture is pale, light, and fluffy. Scrape down the sides of the bowl as needed.
Add Egg and Extracts
Add 1 large egg, 1 teaspoon almond extract, and 1/2 teaspoon vanilla extract to the butter mixture. Beat on medium speed for about 1 minute until fully incorporated and smooth.
Mix in Flour
Reduce the mixer speed to low and gradually add the flour mixture in three additions, mixing just until no dry streaks remain after each addition. Do not overmix — stop as soon as a soft dough forms.
Chill the Dough
Turn the dough out onto a lightly floured surface and divide it into two equal portions. Flatten each portion into a 1-inch thick disk, wrap tightly in plastic wrap, and refrigerate for at least 2 hours or up to 24 hours.
Chilling is essential for clean-cut shapes.
Preheat Oven
When ready to bake, preheat your oven to 350°F (175°C). Line two baking sheets with parchment paper or silicone baking mats.
Remove one disk of dough from the refrigerator and let it sit at room temperature for 5 minutes to soften slightly.
Cut Wreath Shapes
On a lightly floured surface, roll the dough to an even 1/4-inch thickness. Use a 3-inch fluted round or wreath-shaped cookie cutter to cut out rounds, then use a 1-inch round cutter to cut out the center of each cookie to create a wreath shape.
Re-roll scraps once and repeat. Arrange the cookies 1 inch apart on the prepared baking sheets.
Bake the Cookies
Bake the cookies in the preheated oven for 10–12 minutes, until the edges are just barely golden and the centers appear set but not browned. Rotate the baking sheet halfway through baking.
Watch carefully — these cookies should stay pale for the best appearance.
Cool Completely
Remove the baking sheets from the oven and allow the cookies to cool on the pan for 5 minutes before transferring them to a wire cooling rack. Let the cookies cool completely to room temperature, about 30 minutes, before decorating.
Make Royal Icing
To make the royal icing, combine 2 cups sifted powdered sugar and 3 tablespoons meringue powder in a large bowl. Add 5 tablespoons warm water and 1/2 teaspoon almond extract.
Beat with a hand mixer on medium-high speed for 4–5 minutes until the icing is thick, glossy, and holds stiff peaks. Add additional water, 1 teaspoon at a time, to reach a pipeable but not runny consistency.
Color and Thin Icing
Divide the royal icing into 4–5 small bowls. Tint one portion green for the wreath base, one pink, one lavender, and one yellow for flowers.
Leave a small portion white. To thin the icing for flooding, add warm water a few drops at a time until it flows smoothly when drizzled and settles flat within 10 seconds.
Flood Wreath Base
Transfer the green icing to a piping bag fitted with a #2 round tip. Pipe an outline around the wreath ring of each cooled cookie, then flood the interior with thinned green icing using a toothpick to spread it evenly to the edges.
Allow the base layer to dry for at least 30 minutes until set.
Decorate Floral Details
Once the green base is set, use the pink, lavender, and yellow icings in piping bags with #1 tips to pipe small floral rosettes and dots around the wreath ring. Pipe tiny leaves with the green icing.
While the icing is still wet, gently press edible flowers or flower-shaped sprinkles, white nonpareils, and a few toasted sliced almond ‘petals’ into the design to complete the floral wreath effect.
Dry and Store
Allow the decorated cookies to dry completely at room temperature for at least 1 hour until the icing is fully hardened. Store the finished cookies in a single layer in an airtight container at room temperature for up to 5 days, or freeze undecorated cookies for up to 2 months.
Per serving (1 cookie) — values are estimates
Trending on Amazon
14. Pastel Rainbow Kite Cookies

Combining dry ingredients first builds a lightly leavened, structured dough that bakes into kite-shaped cookies with crisp, cleanly defined edges and a tender, buttery crumb beneath pastel-tinted royal icing. Flour, baking powder, and softened butter work together to deliver that balance of snap at the border and a soft, melt-in-your-mouth pull through the center.
Pastel Rainbow Kite Cookies
Cookie Dough
Royal Icing
Decorating
- 🔌Stand mixer or hand electric mixer
- 🥣Large mixing bowl
- 🥣Medium mixing bowl
- 🍴Kite-shaped cookie cutter (3-4 inch)
- 🫙Rolling pin
- 📄Parchment paper
- 🥧Two large baking sheets
- 🪜Wire cooling rack
- 🎂Piping bags (at least 6)
- 🍴Small round piping tips (#2 and #3)
- 📍Toothpicks or scribe tool
- 🍴Small squeeze bottles (optional)
- 📄Plastic wrap
- 🍴Ruler or bench scraper
- 🪣Fine mesh sieve
Combine Dry Ingredients
In a medium bowl, whisk together 2 3/4 cups all-purpose flour, 1 teaspoon baking powder, and 1/4 teaspoon salt. Set aside.
Cream Butter and Sugar
In the bowl of a stand mixer fitted with the paddle attachment, beat 1 cup softened unsalted butter and 1 cup granulated sugar together on medium-high speed for 3-4 minutes until light and fluffy, scraping down the sides of the bowl as needed.
Add Egg and Extracts
Add 1 large egg, 1 1/2 teaspoons vanilla extract, and 1/2 teaspoon almond extract to the butter mixture. Beat on medium speed for 1-2 minutes until fully combined and smooth.
Mix in Flour
Reduce mixer speed to low and gradually add the flour mixture in three additions, mixing just until a soft dough forms and no dry streaks remain. Do not overmix.
Chill the Dough
Divide the dough in half, flatten each portion into a 1-inch thick disc, and wrap tightly in plastic wrap. Refrigerate for at least 2 hours or up to overnight until firm.
This chilling step is essential for clean cookie edges.
Preheat Oven
Preheat your oven to 350°F (175°C). Line two large baking sheets with parchment paper.
Remove one disc of dough from the refrigerator and let it sit at room temperature for 5 minutes to soften slightly.
Roll and Cut Cookies
On a lightly floured surface, roll the dough out to an even 1/4-inch thickness. Using a 3-4 inch kite-shaped cookie cutter, cut out shapes and transfer them carefully to the prepared baking sheets, spacing 1 inch apart.
Re-roll scraps once and cut additional kites. Repeat with the second disc of dough.
Bake the Cookies
Bake the cookies one sheet at a time in the preheated 350°F oven for 10-12 minutes, until the edges are just set and the bottoms are very lightly golden. The tops should look matte and not wet.
Do not overbake — they will firm up as they cool.
Cool Completely
Allow the cookies to cool on the baking sheet for 5 minutes, then transfer to a wire cooling rack and let them cool completely to room temperature, about 30 minutes, before decorating. Decorating warm cookies will cause the icing to melt.
Make Royal Icing
Make the royal icing: In the bowl of a stand mixer fitted with the whisk attachment, combine 3 cups sifted powdered sugar, 3 tablespoons meringue powder, 6 tablespoons warm water, and 1/2 teaspoon clear vanilla extract. Beat on medium-high speed for 5-7 minutes until the icing is glossy, stiff, and holds firm peaks.
This is your stiff consistency icing.
Tint the Icing
Divide the stiff royal icing into 6 portions. Tint five portions with pastel gel food coloring — one each of pink, lavender, yellow, mint green, and sky blue — adding color a tiny drop at a time and mixing well to achieve soft pastel shades.
Leave the sixth portion white. Keep all bowls covered with damp paper towels to prevent drying.
Thin Icing for Flooding
Thin each color of icing separately to flood consistency by adding warm water one teaspoon at a time, stirring gently until a ribbon of icing drizzled back into the bowl disappears in about 10-12 seconds. Transfer each color to a separate piping bag fitted with a #2 tip for outlining, or a small squeeze bottle for flooding.
Outline and Flood Cookies
To decorate each kite cookie, first pipe an outline around the entire kite shape using your chosen pastel color and a #2 tip. Then flood the interior of the kite with the same color, using a toothpick or scribe tool to guide the icing into the corners and edges for even coverage.
Create Rainbow Pattern
While the base flood icing is still wet, pipe thin horizontal stripes across the kite using 2-3 contrasting pastel colors. Immediately drag a toothpick vertically through the stripes, alternating direction up and down, to create a feathered rainbow chevron pattern.
Work quickly before the icing sets.
Add Sprinkles and Dry
While the icing is still wet, sprinkle a few white nonpareils or edible pearl sprinkles lightly over each cookie for a sparkly finish. Allow the decorated cookies to dry and set at room temperature for at least 4-6 hours, or overnight, until the icing is completely hardened.
Attach Ribbon Tails
Once the icing is fully set, use a small dot of stiff white royal icing to attach a 4-inch piece of thin white satin ribbon to the bottom tip of each kite cookie to represent the kite’s tail. Allow to dry for 15 minutes before serving or packaging.
Per serving (1 cookie) — values are estimates
Highly Recommended
15. Cherry Blossom Branch Cookies
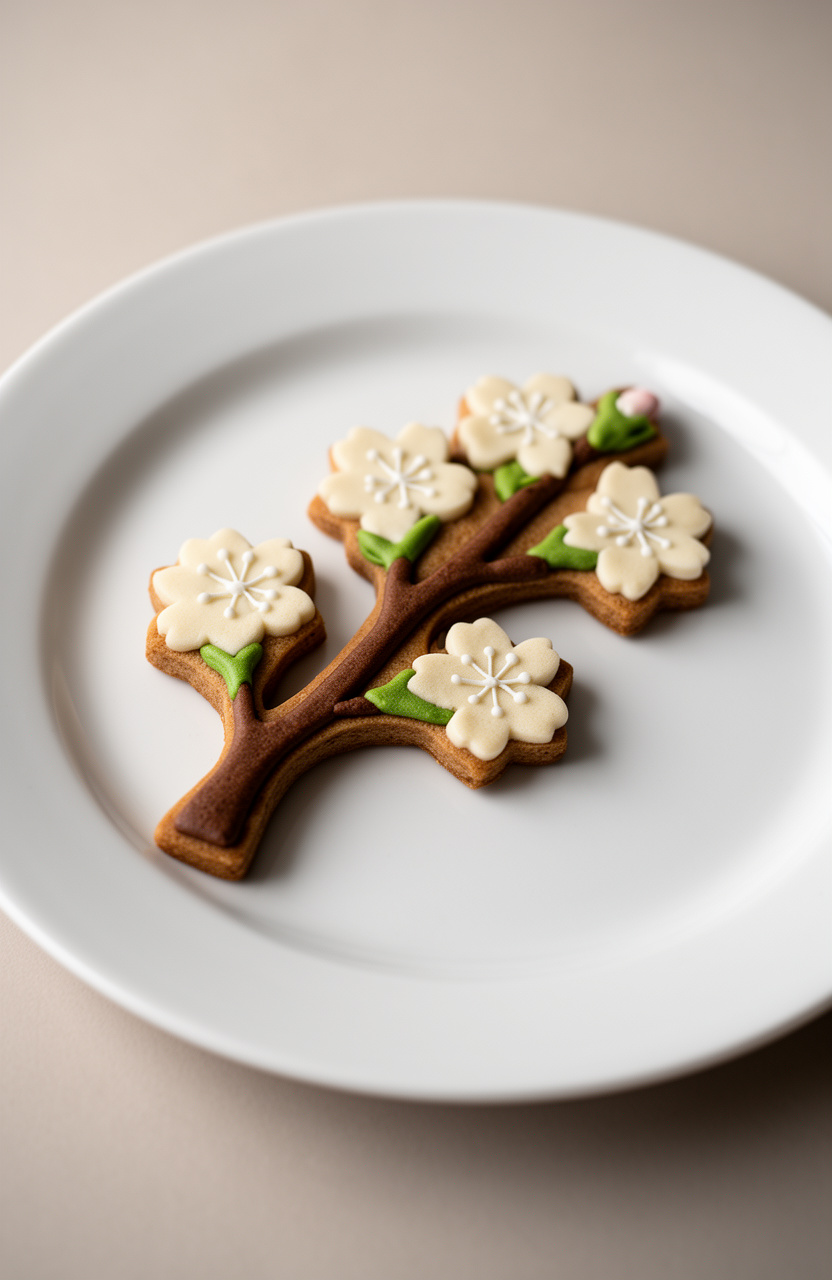
Delicate cherry blossom branch cookies deliver a buttery, lightly leavened crumb with cleanly defined petal and branch edges that hold their shape through the bake. Dry ingredients mixed first, then folded into softened butter, create the structured dough that keeps the center tender while crisping the intricate outer lines.
Cherry Blossom Branch Cookies
Cookie Dough
Royal Icing
Decoration
- 🔌Stand mixer with paddle attachment
- 🍴Cherry blossom branch cookie cutter set (branch shape and 5-petal blossom shape)
- 🫙Rolling pin with 1/4-inch thickness guides
- 📄Parchment paper
- 🥧Two large baking sheets
- 🪜Wire cooling rack
- 🎂Piping bags (at least 6)
- 🍴Piping tips: #1, #2, #3 round tips
- 🥄Offset spatula (small)
- 📍Toothpicks or scribe tool
- 🖌️Fine paintbrush for luster dust
- 📄Plastic wrap
- 🍴Bench scraper
- ⚖️Digital kitchen scale
- 🪣Sifter or fine mesh strainer
- 🫙Airtight containers for icing storage
Mix Dry Ingredients
In a medium bowl, whisk together 2 1/4 cups (280g) all-purpose flour, 1/2 teaspoon baking powder, and 1/4 teaspoon fine sea salt. Set aside.
Remove 1/4 cup (35g) of this flour mixture into a small bowl and whisk in 1 tablespoon sifted matcha powder and 2 teaspoons cocoa powder — this will create the earthy brown-green tone for the branch dough.
Cream Butter Sugar
In the bowl of a stand mixer fitted with the paddle attachment, beat 3/4 cup (170g) softened unsalted butter and 3/4 cup (150g) granulated sugar together on medium-high speed for 3-4 minutes until light and fluffy, scraping down the sides halfway through. Add 1 large room-temperature egg, 1 teaspoon pure vanilla extract, and 1/2 teaspoon almond extract.
Beat on medium speed for 1 minute until fully combined and smooth.
Divide and Color Dough
With the mixer on low speed, gradually add the plain flour mixture and mix just until the dough comes together and no dry streaks remain, about 30-45 seconds. Do not overmix.
Remove approximately one-third of the dough (about 200g) and transfer it to a separate bowl. Add the matcha-cocoa flour mixture to this smaller portion and knead gently by hand until the color is fully incorporated and the dough is uniform in its earthy brown-green hue.
This will be your branch dough.
Chill Dough
Flatten each portion of dough into a disk about 1 inch thick. Wrap the plain (blossom) dough tightly in plastic wrap and the branch dough separately.
Refrigerate both portions for at least 2 hours, or up to overnight, until very firm. This chilling step is critical for clean cookie cutter edges and preventing spreading during baking.
Roll Branch Cookies
Preheat your oven to 350°F (175°C). Line two large baking sheets with parchment paper.
Remove the branch dough from the refrigerator and let it rest at room temperature for 5 minutes to soften very slightly. On a lightly floured surface, roll the branch dough to exactly 1/4-inch thickness using a rolling pin with thickness guides.
Use the branch-shaped cookie cutter to cut out 12 branch shapes, re-rolling scraps once. Transfer to the prepared baking sheets, spacing 1 1/2 inches apart.
Cut Blossom Shapes
Remove the plain dough from the refrigerator and let it rest for 5 minutes. Roll to 1/4-inch thickness on a lightly floured surface.
Use the 5-petal blossom cookie cutter to cut out 24-30 small blossom shapes. Arrange them on the second parchment-lined baking sheet, spacing 1 inch apart.
Place both baking sheets in the freezer for 10 minutes before baking to ensure the cookies hold their shape perfectly.
Bake the Cookies
Bake the branch cookies and blossom cookies in the preheated 350°F (175°C) oven for 10-12 minutes, one sheet at a time on the center rack, until the edges are just barely set and the centers appear slightly underdone. Do not allow browning.
The branch cookies may need the full 12 minutes while the smaller blossoms may be done closer to 10 minutes — watch carefully. Remove from the oven and let cookies rest on the baking sheet for 5 minutes before transferring to a wire rack to cool completely, about 30 minutes.
Make Royal Icing
While cookies cool, prepare the royal icing. In the clean bowl of a stand mixer fitted with the paddle attachment, combine 3 cups (360g) sifted powdered sugar, 4 tablespoons meringue powder, 6 tablespoons warm water, and 1 teaspoon clear vanilla extract.
Mix on low for 1 minute, then increase to medium-high and beat for 4-5 minutes until the icing is thick, glossy, and forms stiff peaks. This is your base stiff icing.
Divide into four portions: one large portion for white blossoms, one for pink blossoms, one for brown branch detailing, and one small portion for white accent highlights.
Color and Thin Icing
Color each icing portion: tint the first large portion with dusty rose or soft pink gel food coloring, mixing until you achieve a soft, muted sakura-pink. Tint the second large portion with brown gel food coloring for the branch detailing.
Leave the third portion white and add a drop of white gel food coloring to brighten it. Add 1 tablespoon sakura extract or rose water to the pink icing for authentic flavor.
For flooding consistency (used to fill cookie surfaces), thin each color by adding warm water 1/2 teaspoon at a time, stirring gently, until the icing flows slowly off a spoon and a line drawn through it disappears in 10-12 seconds.
Outline and Flood Branches
Transfer each icing color to separate piping bags. Using a #2 round tip, outline the branch cookies with stiff brown icing, tracing the outer edge and adding thin inner lines to suggest bark texture and smaller branching lines.
Let the outline set for 5 minutes. Then switch to flood-consistency brown icing in a piping bag with a #3 tip and flood the interior of the branch cookies, using a toothpick or scribe tool to guide the icing into corners and pop any air bubbles.
Allow to dry for 20 minutes.
Decorate Blossom Cookies
While the branch cookies dry, decorate the blossom cookies. Using a #2 tip and stiff pink icing, outline each 5-petal blossom, tracing each petal individually.
Let set for 3 minutes. Flood with soft pink flood-consistency icing, using a scribe tool to ease icing to the petal edges.
While the pink icing is still wet, use a toothpick to drag thin white icing lines from the center outward on each petal to create delicate veining, a classic sakura detail. Immediately press one pink sugar pearl or dragee into the center of each blossom.
Allow to dry completely for at least 30 minutes.
Add Branch Details
Once the branch cookies are dry to the touch (about 20-30 minutes), use a #1 round tip with stiff white icing to pipe fine accent lines along the branch edges to suggest highlights and depth. Use a #2 tip with stiff brown icing to pipe additional fine branch lines and tiny knot details onto the surface of the branch cookies for a realistic bark appearance.
Using a fine dry paintbrush, lightly dust the branch cookies with edible gold luster dust along the raised icing lines for a luminous, painterly effect.
Assemble Branch Cookies
To assemble the final presentation cookies, arrange the fully dried blossom cookies artfully onto the branch cookies while the branch icing is still slightly tacky, or use a tiny dot of stiff royal icing as glue to adhere 3-5 blossoms per branch at natural-looking positions along the tips and joints of the branches. Hold each blossom in place for 10-15 seconds.
Using a fine dry paintbrush, lightly dust the blossom cookies with pink edible glitter for a soft shimmer reminiscent of falling sakura petals.
Dry and Store
Allow the fully assembled Cherry Blossom Branch Cookies to dry uncovered at room temperature for a minimum of 1 hour, or ideally overnight, until the royal icing is completely hardened and the blossoms are firmly attached. Store in a single layer in an airtight container at room temperature for up to 7 days.
Do not refrigerate decorated royal icing cookies as condensation will damage the icing surface.
Per serving (1 decorated branch cookie with blossoms) — values are estimates
Most Loved Products
From Easter egg designs to floral arrangements fit for a spring bridal shower, these decorated sugar cookies cover every occasion the season brings. Pick the one that’s calling your name, give it a try, and drop a comment below letting us know which design you’re making first. Pin your favorites now so they’re ready when you need them!