15 Cute Easter Dessert Ideas Everyone Will Love
Easter calls for desserts that are just as cheerful and colorful as the holiday itself. This collection brings together adorable treats that capture all the springtime joy—from fluffy bunny cupcakes to delicate pastel cookies.
You’ll find everything from elegant Carrot Cake Cheesecake Bars to whimsical Strawberry Cream Puff Chicks. Each recipe celebrates the season with bright colors, playful shapes, and flavors everyone at your table will enjoy.
These 15 desserts range from simple no-bake treats to showstopping centerpieces. Bookmark this list now so you’re ready to fill your Easter basket (and dessert table) with sweet surprises.
1. Carrot Cake Cheesecake Bars
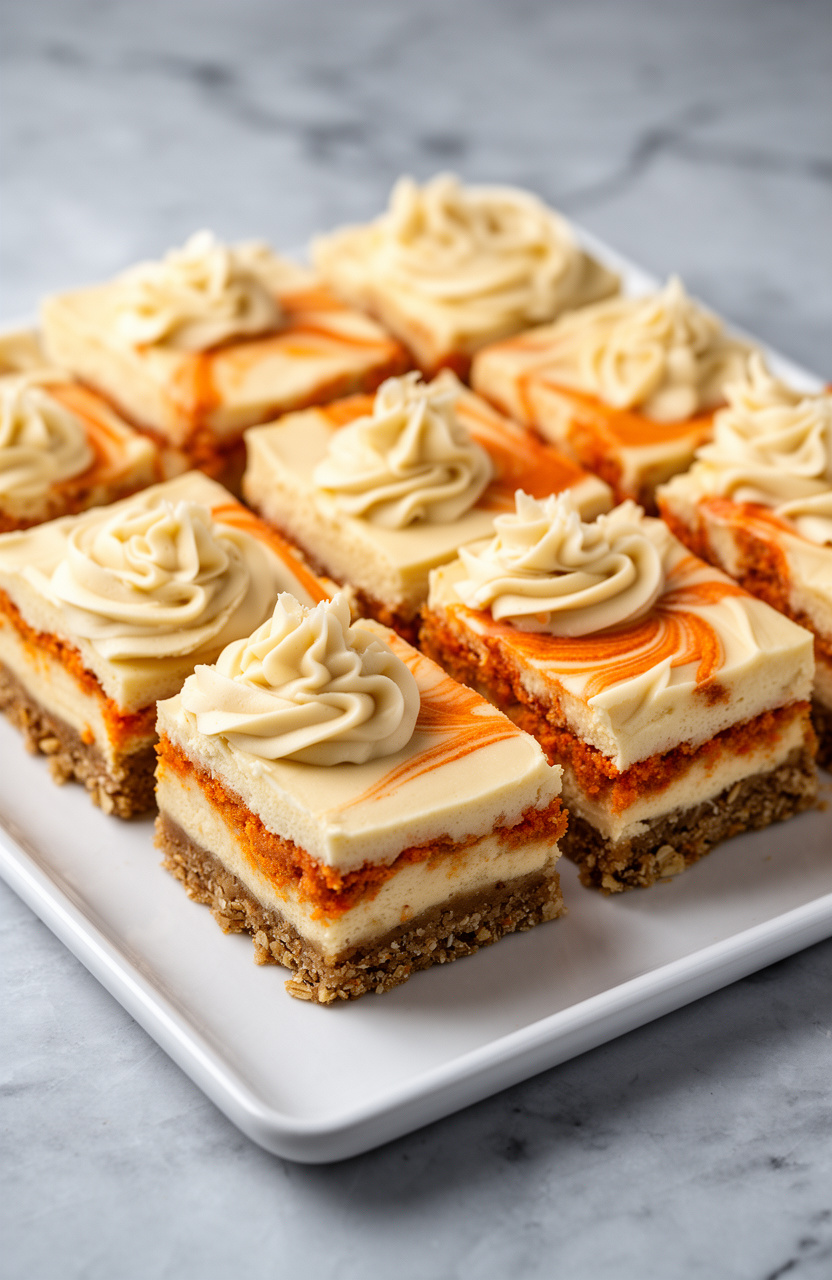
Carrot cake meets creamy cheesecake in a layered bar with a spiced oat crust that brings together warm cinnamon and brown sugar flavors. The crumbly base contrasts with a silky cream cheese filling studded with tender shredded carrots throughout.
Carrot Cake Cheesecake Bars
Crust
Cheesecake
Carrot Cake
Frosting
- 🍰9×13 inch baking pan
- 📄Parchment paper
- 🥣Mixing bowls
- 🔌Electric mixer
- 🔪Grater
- 🥄Measuring cups and spoons
- 🥄Spatula
Prepare pan
Preheat oven to 350°F (175°C). Line a 9×13 inch baking pan with parchment paper, leaving overhang on the sides for easy removal.
Make crust
In a medium bowl, combine 1 cup flour, oats, brown sugar, 1/2 teaspoon cinnamon, nutmeg, and 1/4 teaspoon salt. Stir in melted butter until mixture is crumbly.
Press firmly into the bottom of prepared pan.
Bake crust
Bake crust for 15 minutes until lightly golden. Remove from oven and let cool slightly while preparing the cheesecake layer.
Make cheesecake layer
Using an electric mixer, beat 16 ounces cream cheese and 1/2 cup granulated sugar until smooth and creamy, about 2-3 minutes. Add 2 eggs one at a time, beating well after each addition.
Mix in 1 teaspoon vanilla extract and sour cream until fully combined.
Add cheesecake layer
Pour cheesecake mixture over the warm crust and spread evenly with a spatula. Set aside.
Make carrot cake
In another bowl, whisk together grated carrots, 1/2 cup flour, 1/3 cup granulated sugar, vegetable oil, 1 egg, 1 teaspoon cinnamon, baking powder, and 1/4 teaspoon salt until well combined. Fold in nuts if using.
Layer and swirl
Drop spoonfuls of carrot cake batter over the cheesecake layer. Gently swirl with a knife or skewer to create a marbled effect.
Bake bars
Bake for 35 minutes until the center is just set and edges are lightly golden. The center should still have a slight jiggle.
Cool and chill
Remove from oven and cool completely at room temperature for 1 hour, then refrigerate for at least 4 hours or overnight until fully chilled and set.
Make frosting
For the frosting, beat 4 ounces cream cheese and 2 tablespoons butter until fluffy. Gradually add powdered sugar and 1/2 teaspoon vanilla, beating until smooth.
Add milk 1 tablespoon at a time until desired consistency is reached.
Frost and serve
Lift bars from pan using parchment overhang. Spread frosting over the top or pipe decoratively.
Cut into 12 bars and serve chilled.
Per serving (1 bar) — values are estimates
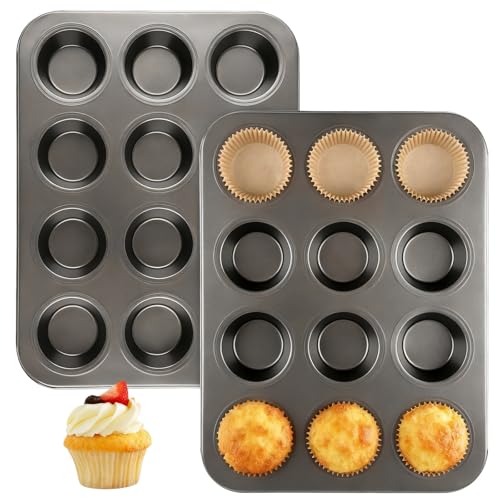
Most Loved Products


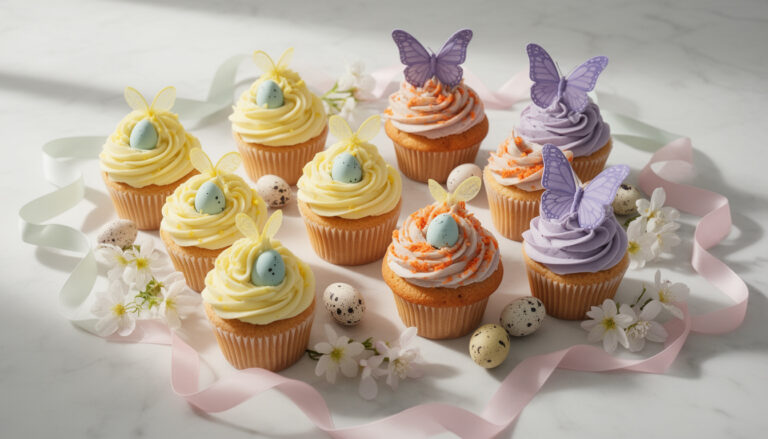
2. Lemon Blueberry Bunny Cupcakes
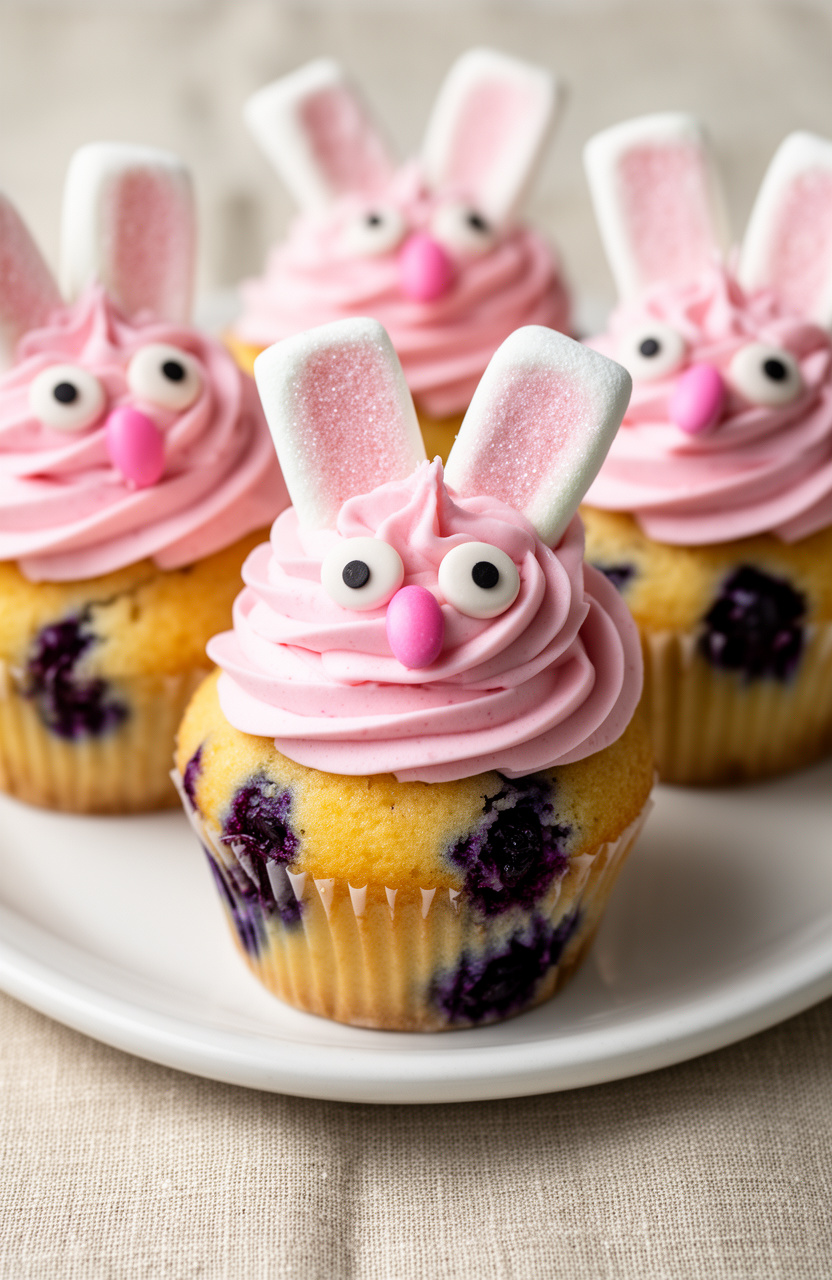
Baking these adorable bunny-shaped cupcakes starts with a light lemon batter studded with fresh blueberries that burst during baking. The tender crumb pairs with sweet-tart fruit while fluffy buttercream and marshmallow ears create soft texture contrast.
Lemon Blueberry Bunny Cupcakes
Cupcakes
Frosting
Decoration
- 🍰Muffin tin
- 🍴Paper cupcake liners
- 🥣Mixing bowls
- 🔌Electric mixer
- 🥄Measuring cups and spoons
- 🥄Whisk
- 🥄Spatula
- 🎂Piping bag with round tip
- ✂️Kitchen scissors
Preheat and prepare
Preheat oven to 350°F (175°C). Line a 12-cup muffin tin with paper cupcake liners.
Mix dry ingredients
In a medium bowl, whisk together 1 3/4 cups flour, 1 1/2 teaspoons baking powder, and 1/4 teaspoon salt. Set aside.
Cream butter and sugar
In a large bowl, beat 1/2 cup softened butter and 1 cup sugar with an electric mixer on medium speed for 3 minutes until light and fluffy.
Add wet ingredients
Add 2 eggs one at a time, beating well after each addition. Mix in 2 teaspoons lemon zest, 3 tablespoons lemon juice, and 1 teaspoon vanilla extract.
Combine mixtures
Alternate adding the flour mixture and 1/2 cup milk to the butter mixture, beginning and ending with flour. Mix until just combined.
Fold in blueberries
Gently fold in the flour-coated blueberries using a spatula until evenly distributed.
Bake cupcakes
Divide batter evenly among the 12 cupcake liners, filling each about 2/3 full. Bake for 18 minutes or until a toothpick inserted in the center comes out clean.
Cool completely.
Make pink frosting
For frosting, beat 1 cup softened butter with an electric mixer until creamy. Gradually add 4 cups powdered sugar, 2 tablespoons heavy cream, and 1 teaspoon vanilla extract.
Beat for 3 minutes until fluffy. Add pink food coloring to achieve desired shade.
Pipe frosting
Transfer frosting to a piping bag with a round tip. Pipe a large swirl on top of each cooled cupcake to create the bunny face.
Create bunny ears
Cut each mini marshmallow in half diagonally with kitchen scissors. Dip the sticky side in pink sanding sugar.
Press two halves onto each cupcake for bunny ears.
Add facial features
Add two candy eyes and one pink jelly bean or candy piece for the nose to complete each bunny face. Serve immediately or refrigerate up to 3 days.
Per serving (1 cupcake) — values are estimates
Highly Recommended

3. Pastel Meringue Kiss Cookies
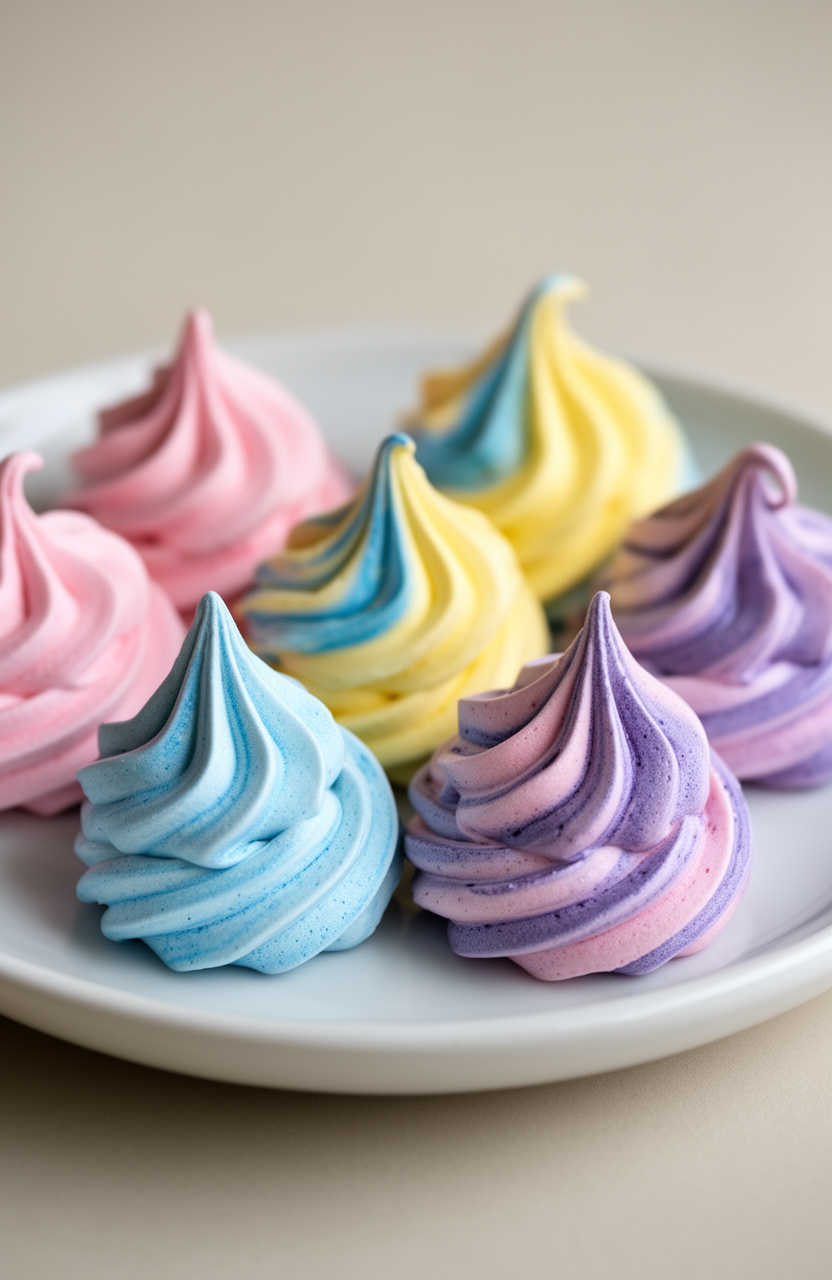
Light-as-air meringue cookies baked from whipped egg whites and sugar create delicate pastel-tinted treats that dissolve on your tongue. The crisp outer shell gives way to a cloud-like interior that melts instantly.
Pastel Meringue Kiss Cookies
- 🔌Stand mixer or hand mixer
- 🥧Baking sheets
- 📄Parchment paper
- 🎂Piping bags
- 🍴Large star tip
- 🥄Rubber spatula
Preheat and prepare
Preheat oven to 200°F (93°C). Line 2-3 baking sheets with parchment paper and set aside.
Beat egg whites
In the bowl of a stand mixer fitted with the whisk attachment, beat egg whites on medium speed until foamy, about 1 minute. Add cream of tartar and salt, and continue beating until soft peaks form, about 2-3 minutes.
Add sugar gradually
Gradually add sugar, 1 tablespoon at a time, while continuing to beat on medium-high speed. Once all sugar is incorporated, add vanilla extract and beat on high speed until stiff, glossy peaks form, about 5-7 minutes.
The meringue should be thick and hold its shape.
Color the meringue
Divide meringue evenly into 4 small bowls. Add 2-3 drops of different gel food coloring to each bowl (pink, blue, yellow, and purple), and gently fold with a rubber spatula until color is evenly distributed.
Fill piping bag
Fit a piping bag with a large star tip. Place small dollops of each colored meringue inside the piping bag, creating stripes along the sides.
This will create a marbled pastel effect when piped.
Pipe cookies
Pipe 1-inch kiss-shaped swirls onto the prepared baking sheets, spacing them about 1 inch apart. Hold the piping bag vertically and apply even pressure, then quickly pull up to create a point.
Bake and cool
Bake for 1 hour 30 minutes, rotating pans halfway through. The meringues should be dry to the touch and easily lift off the parchment paper.
Turn off the oven and let meringues cool completely inside the oven with the door closed for at least 1 hour.
Store cookies
Once completely cooled, carefully remove meringues from parchment paper. Store in an airtight container at room temperature for up to 2 weeks.
Per serving (1 cookie) — values are estimates
Most Loved Products

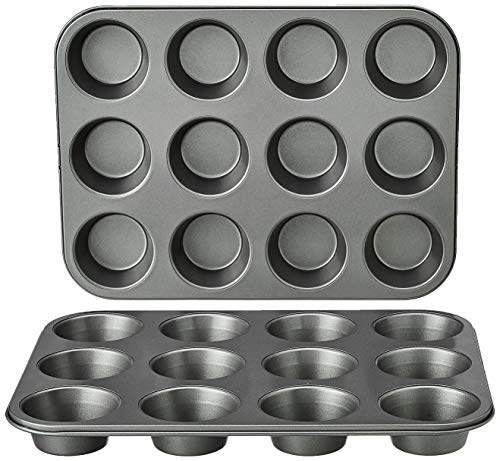
4. Mini Egg Nest Rice Treats
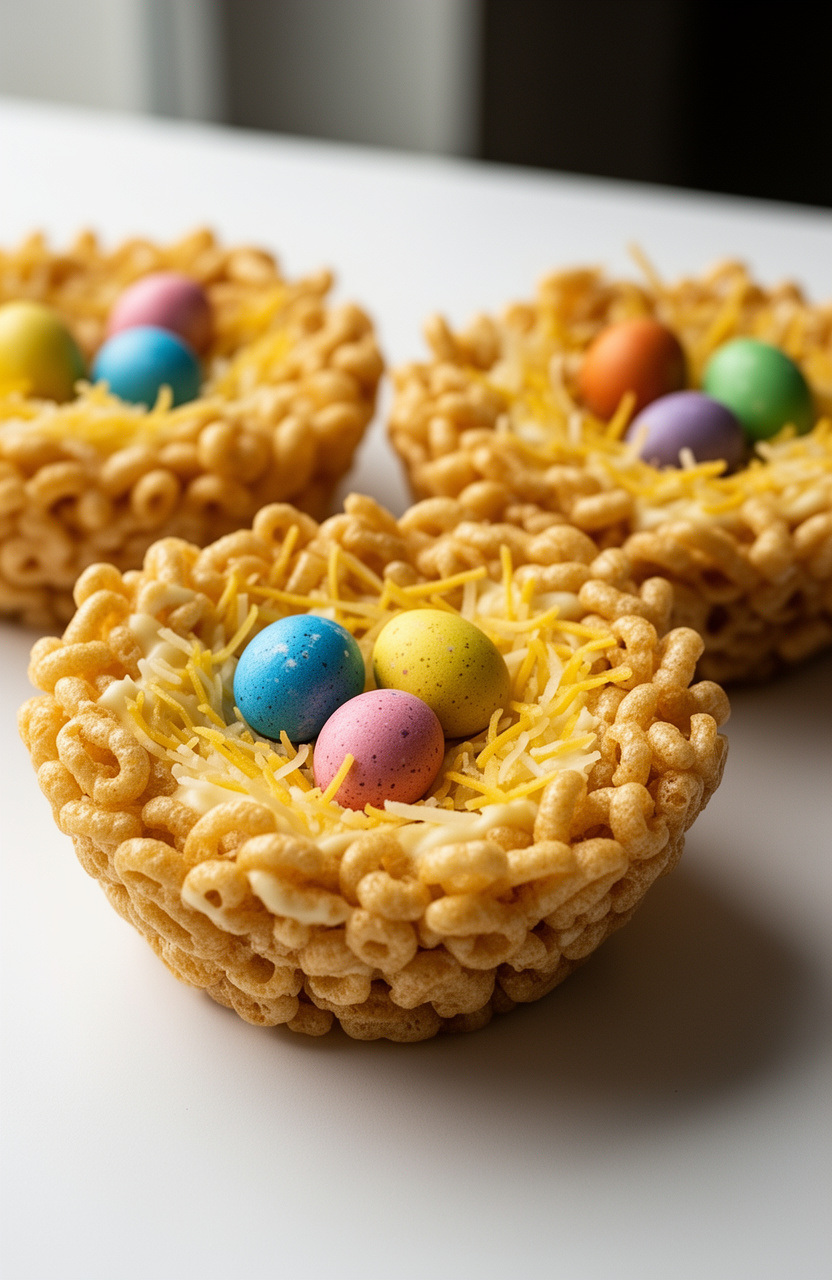
Melting butter with marshmallows creates a sticky binder that coats crispy rice cereal before it’s pressed into muffin cups and shaped into nests. The mixture firms up at room temperature into chewy, crunchy clusters with pockets ready to cradle candy eggs.
Mini Egg Nest Rice Treats
Topping
- 🍰12-cup muffin tin
- 🥣Large microwave-safe bowl
- 🍴Cooking spray
- 🥄Rubber spatula
- 🥣Small bowl
- 🍴Measuring cups
- 🥄Measuring spoons
Prepare muffin tin
Spray a 12-cup muffin tin generously with cooking spray and set aside.
Melt butter
Place 3 tablespoons butter in a large microwave-safe bowl and microwave on high for 30 seconds until melted.
Melt marshmallows
Add 4 cups mini marshmallows to the melted butter and microwave on high for 90 seconds, stirring halfway through, until marshmallows are completely melted and smooth.
Add flavorings
Stir in 1/4 teaspoon vanilla extract and 1/8 teaspoon salt until well combined.
Mix cereal
Add 5 cups crispy rice cereal to the marshmallow mixture and fold together with a rubber spatula until cereal is completely coated.
Fill muffin cups
Working quickly while mixture is still warm, spray your hands with cooking spray and divide the rice cereal mixture evenly among the 12 muffin cups, using about 1/3 cup per cup.
Shape nests
Using your greased fingers or the back of a greased spoon, press the mixture firmly into each cup and create a deep indentation in the center to form a nest shape.
Tint coconut
In a small bowl, combine 2 tablespoons shredded coconut with 1-2 drops yellow food coloring if using, and mix until coconut is evenly tinted to resemble straw.
Add coconut
Sprinkle a small amount of tinted coconut into the center indentation of each nest.
Add eggs
Place 3 mini chocolate eggs or jelly beans in the center of each nest, pressing gently into the coconut.
Chill nests
Refrigerate the nests for 30 minutes until completely set and firm.
Remove and serve
Carefully remove the nests from the muffin tin by running a butter knife around the edges and gently lifting out. Serve immediately or store in an airtight container at room temperature for up to 3 days.
Per serving (1 nest) — values are estimates
Recommended for You


5. Strawberry Cream Puff Chicks
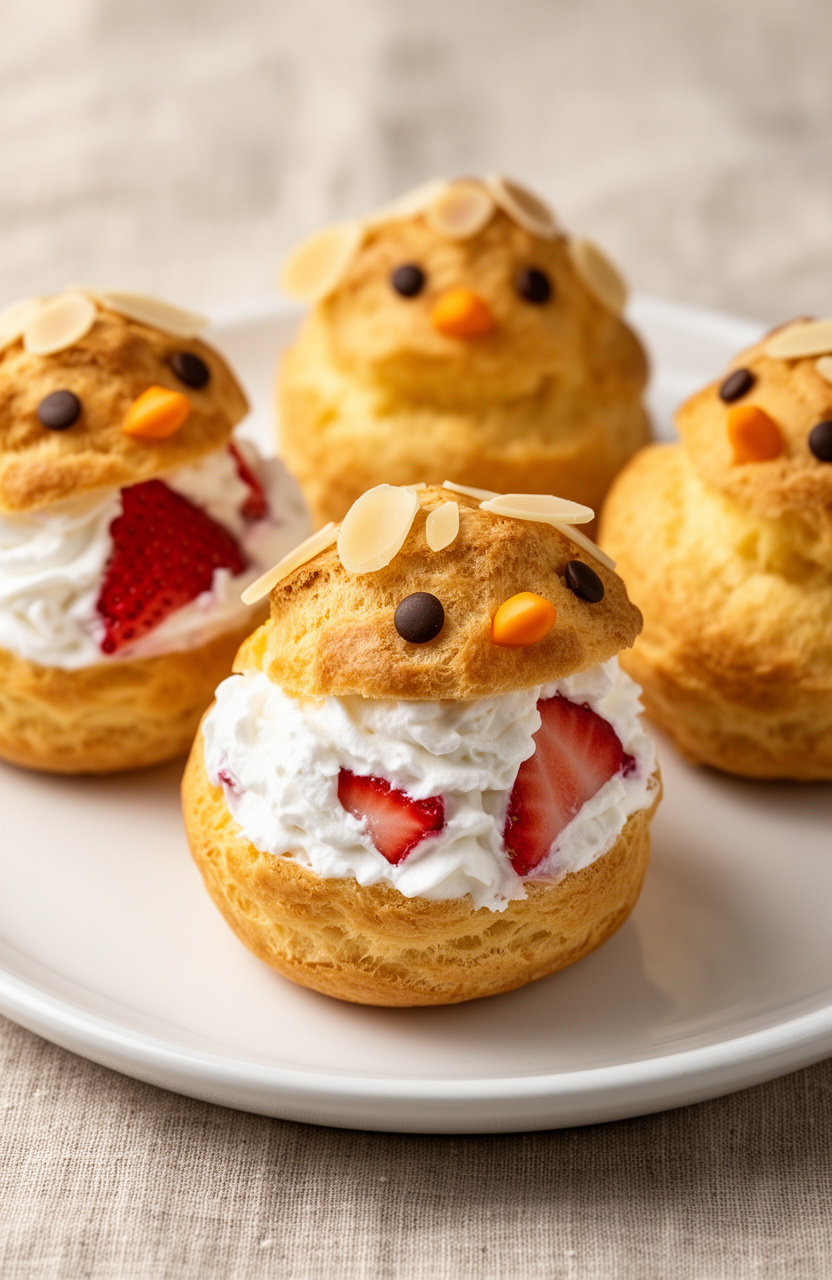
Choux pastry baked with butter and flour puffs into golden hollow shells that get filled with strawberry-studded whipped cream. The crispy exterior shatters to reveal airy pockets filled with billowy cream and fresh fruit.
Strawberry Cream Puff Chicks
Choux Pastry
Filling
Decoration
- 🫕Medium saucepan
- 🥄Wooden spoon
- 🔌Electric mixer
- 🎂Piping bag with round tip
- 🥧Baking sheets
- 📄Parchment paper
- 🪜Wire cooling rack
- 🥣Mixing bowls
- 🖌️Small paintbrush
Preheat oven
Preheat oven to 400°F (200°C). Line two baking sheets with parchment paper.
Boil butter mixture
In a medium saucepan, combine 1 cup water, 1/2 cup butter, and 1/4 teaspoon salt. Bring to a rolling boil over medium-high heat, stirring occasionally until butter melts completely.
Add flour
Remove from heat and add 1 cup flour all at once. Stir vigorously with a wooden spoon until mixture forms a smooth ball and pulls away from sides of pan, about 1 minute.
Incorporate eggs
Transfer dough to a mixing bowl and let cool for 5 minutes. Add 4 eggs one at a time, beating well after each addition until dough is smooth and glossy.
Pipe choux pastry
Transfer dough to a piping bag fitted with a large round tip. Pipe 12 large mounds (about 2 inches wide) for bodies and 12 smaller mounds (about 1 inch wide) for heads onto prepared baking sheets, spacing 2 inches apart.
Add decorations
Brush each mound lightly with egg wash. Insert 2 sliced almonds into each head piece for ears.
Press 2 mini chocolate chips into each head for eyes.
Bake puffs
Bake for 30 minutes until golden brown and puffed. Do not open oven door during baking.
Turn off oven, crack door slightly, and let puffs dry for 10 minutes. Remove and cool completely on wire rack.
Make strawberry cream
In a chilled bowl, beat 2 cups heavy cream, 1/4 cup powdered sugar, and 1 teaspoon vanilla extract with electric mixer on high speed until stiff peaks form, about 3-4 minutes. Gently fold in diced strawberries.
Chill cream
Refrigerate cream for 1 hour until well chilled and firm.
Fill puffs
Cut each cooled puff horizontally in half. Fill bottom halves generously with strawberry cream using a piping bag or spoon.
Replace tops.
Assemble chicks
Use orange food coloring or melted orange candy melts to paint small beaks on the head pieces. Attach heads to bodies using a small dollop of cream.
Serve
Serve immediately or refrigerate for up to 4 hours before serving. Best enjoyed within 24 hours.
Per serving (1 cream puff chick) — values are estimates
Most Loved Products


6. White Chocolate Coconut Truffles
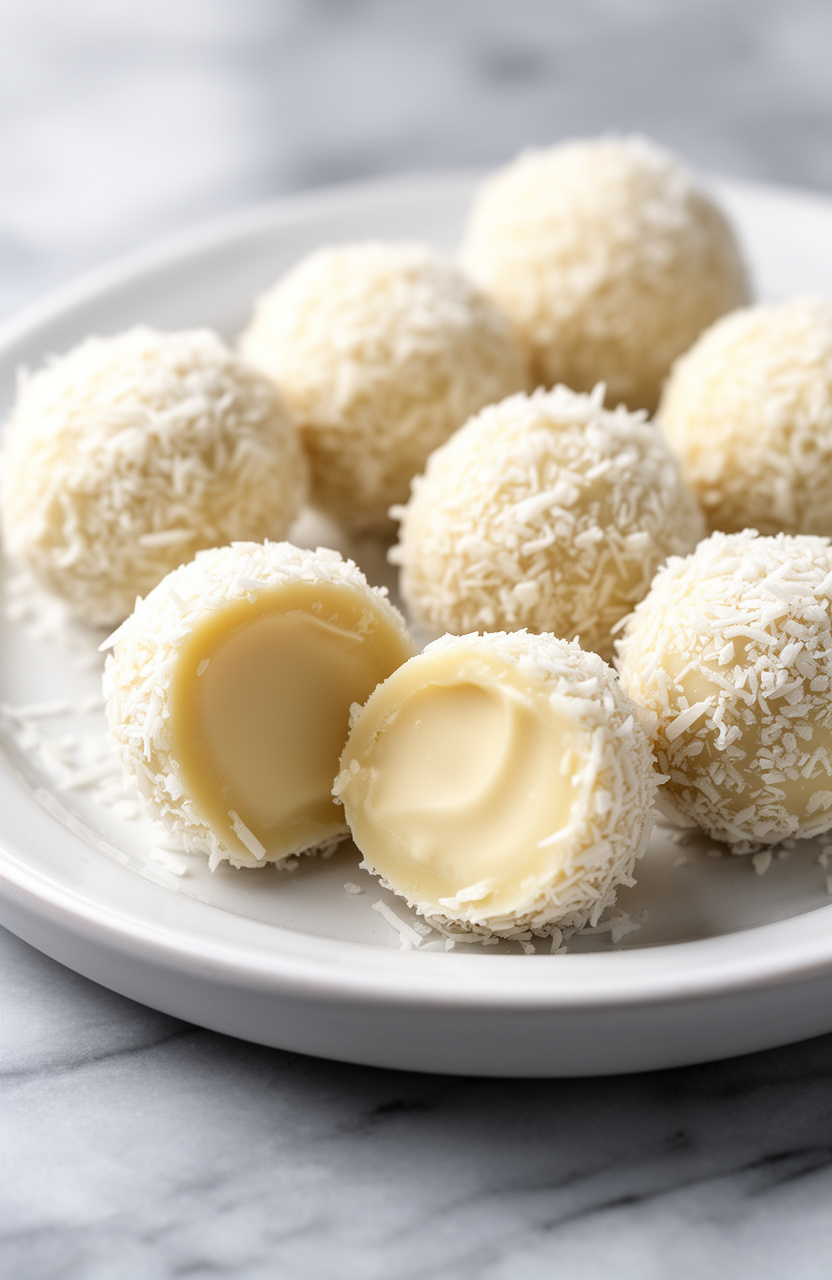
Creamy white chocolate ganache mixed with shredded coconut and vanilla creates bite-sized truffles with tropical sweetness. Chilling the mixture firms it into scoopable balls that hold their shape while staying silky inside.
White Chocolate Coconut Truffles
Coating
- 🥣Medium mixing bowl
- 🥣Small microwave-safe bowl
- 🥄Whisk
- 📄Plastic wrap
- 🥧Baking sheet
- 📄Parchment paper
- 🥄Small cookie scoop or spoon
Prepare chocolate mixture
Place 8 oz finely chopped white chocolate in a medium mixing bowl. In a small microwave-safe bowl, heat 1/4 cup heavy cream in the microwave for 30-45 seconds until hot but not boiling.
Pour the hot cream over the chopped white chocolate and let sit for 2 minutes to soften the chocolate.
Mix truffle base
Whisk the chocolate and cream together until completely smooth and well combined. Add 1/2 cup sweetened shredded coconut, 1/2 teaspoon vanilla extract, and 1/8 teaspoon salt.
Stir until evenly mixed throughout.
Chill mixture
Cover the bowl with plastic wrap and refrigerate for 2 hours until the mixture is firm enough to scoop and shape into balls.
Shape truffles
Line a baking sheet with parchment paper. Spread 1 cup sweetened shredded coconut on a plate.
Using a small cookie scoop or spoon, scoop about 1 tablespoon of the chilled mixture and quickly roll between your palms to form a smooth ball.
Coat with coconut
Roll each truffle ball in the shredded coconut until completely coated on all sides. Place coated truffles on the prepared baking sheet.
Repeat with remaining mixture to make 12 truffles total.
Final chill
Refrigerate the finished truffles for at least 15 minutes before serving to firm up. Store in an airtight container in the refrigerator for up to 1 week.
Per serving (1 truffle) — values are estimates
Most Loved Products

7. Spring Flower Sugar Cookies
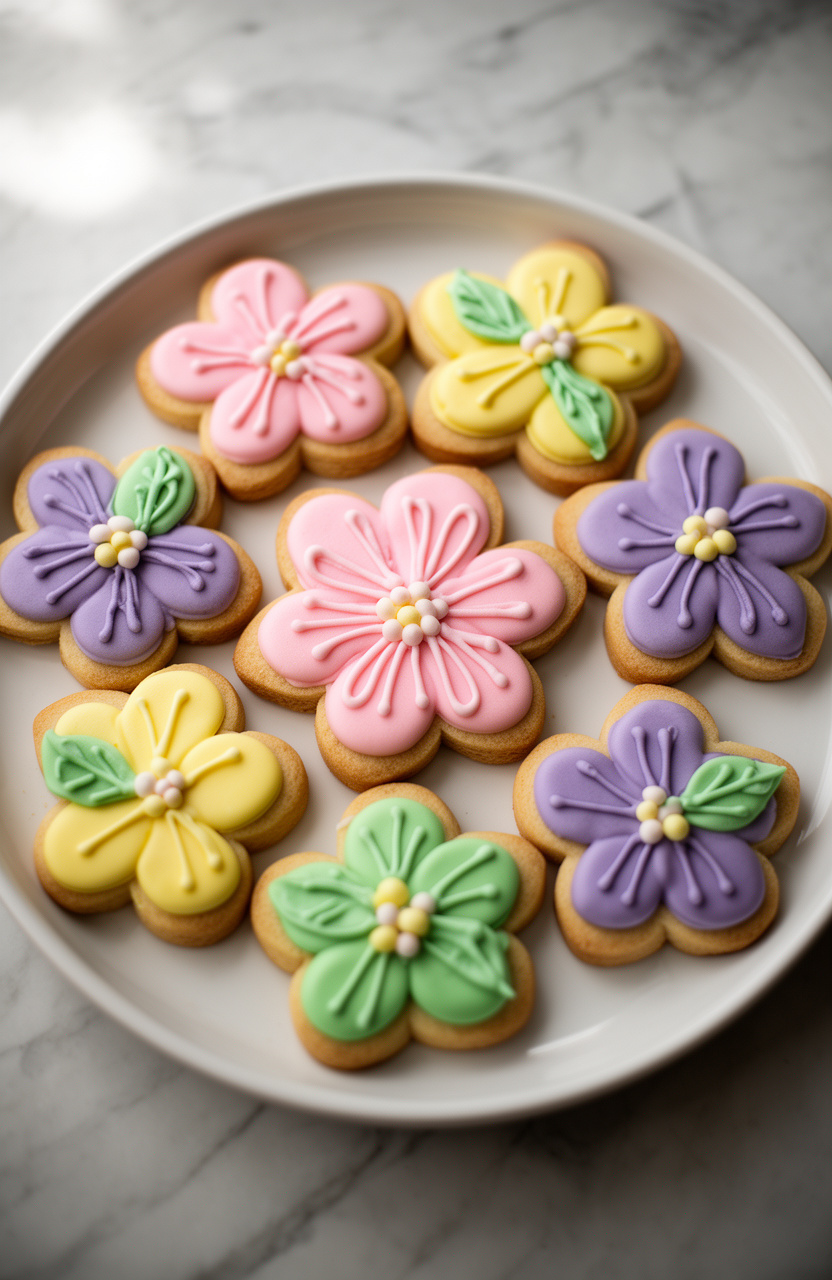
Mixing flour with baking soda and baking powder creates a balanced base for rolled sugar cookies that hold their shape when cut into flower designs. The baked cookies develop crisp edges with tender centers that provide a sturdy canvas for buttercream frosting and springtime decorations.
Spring Flower Sugar Cookies
Cookie Dough
Royal Icing
- 🔌Stand mixer or hand mixer
- 🥣Large mixing bowls
- 🥄Whisk
- 🫙Rolling pin
- 🍴Flower-shaped cookie cutters (assorted sizes)
- 🥧Baking sheets
- 📄Parchment paper
- 📄Plastic wrap
- 🎂Piping bags
- 🍴Piping tips (small round tips)
- 🪜Cooling rack
Mix dry ingredients
In a medium bowl, whisk together 2 3/4 cups all-purpose flour, 1 teaspoon baking soda, 1/2 teaspoon baking powder, and 1/2 teaspoon salt. Set aside.
Cream butter and sugar
In a large bowl using an electric mixer, cream together 1 cup softened butter and 1 1/2 cups granulated sugar on medium speed for 3-4 minutes until light and fluffy.
Add wet ingredients
Beat in 1 egg, 1 teaspoon vanilla extract, and 1/2 teaspoon almond extract until well combined, about 1 minute.
Combine dough
Gradually add the flour mixture to the butter mixture on low speed, mixing until just combined and a dough forms. Do not overmix.
Chill dough
Divide dough in half, shape each half into a flat disc, wrap tightly in plastic wrap, and refrigerate for 2 hours or until firm.
Preheat oven
Preheat oven to 375°F (190°C). Line baking sheets with parchment paper.
Roll and cut cookies
On a lightly floured surface, roll out one disc of dough to 1/4-inch thickness. Cut out flower shapes using cookie cutters and place cookies 2 inches apart on prepared baking sheets.
Bake cookies
Bake for 8-10 minutes until edges are just set but not browned. Remove from oven and let cool on baking sheet for 5 minutes before transferring to a wire rack to cool completely.
Prepare royal icing
To make royal icing, combine 3 cups powdered sugar and 2 tablespoons meringue powder in a large bowl. Add 5 tablespoons warm water and beat on low speed for 7-10 minutes until stiff peaks form.
Color icing
Divide icing into separate bowls and tint with food coloring in pink, yellow, purple, and green. Adjust consistency with water for flooding (thinner) or piping (thicker) as needed.
Decorate cookies
Transfer icing to piping bags fitted with small round tips. Outline each cookie with icing, then flood the interior.
Add details like centers, petals, and leaves. Let icing dry completely for 4-6 hours before serving or stacking.
Per serving (1 cookie) — values are estimates
Editor’s Choice


8. Raspberry Swirl Pavlova Nests
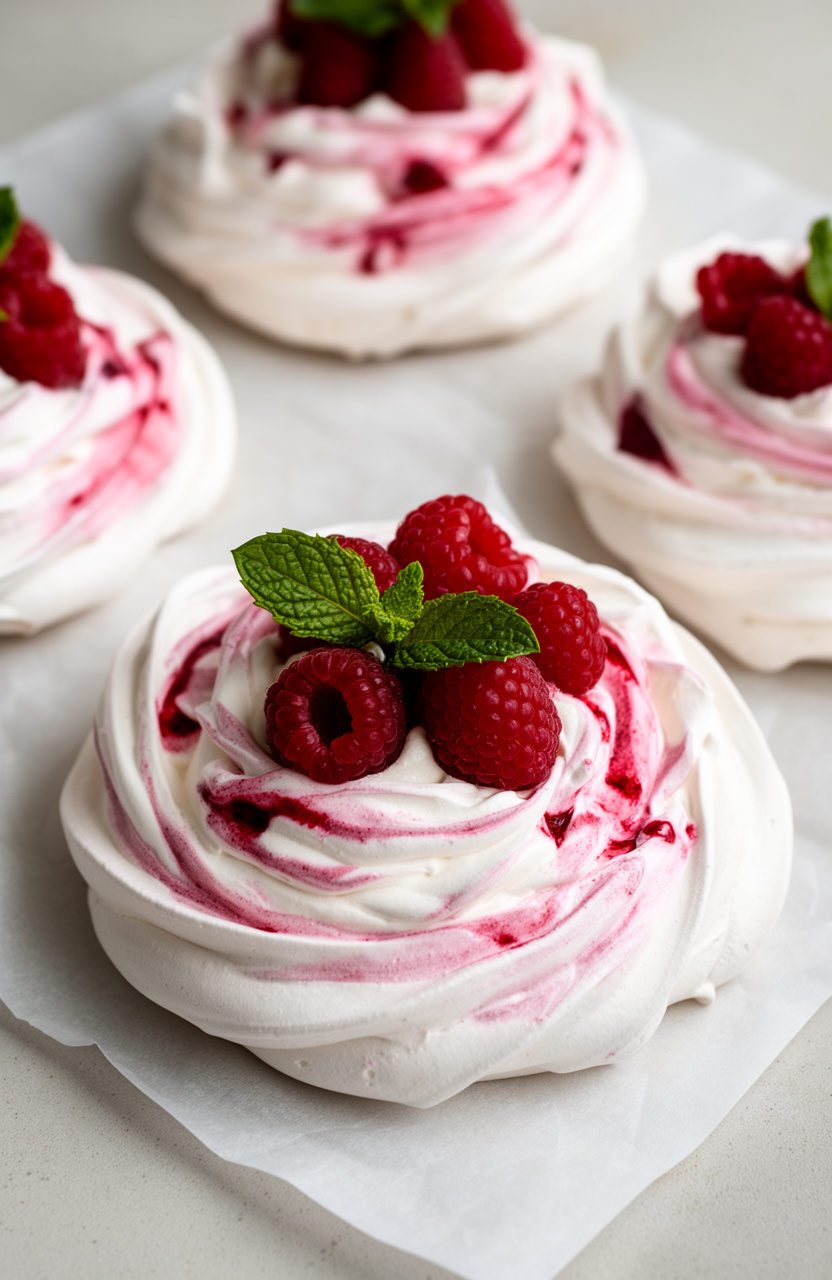
Whipping egg whites with caster sugar and cornstarch creates glossy meringue nests that bake into crisp shells with marshmallow-soft centers. The raspberry swirl adds tart fruitiness to contrast the sweet, cloud-like texture.
Raspberry Swirl Pavlova Nests
Meringue
Raspberry Swirl
Topping
- 🔌Electric mixer
- 🥣Large mixing bowl
- 🥧Baking sheet
- 📄Parchment paper
- 🥄Spatula
- 🥄Piping bag or spoon
- 🥣Small bowl
- 🪣Fine mesh sieve
Preheat and prepare
Preheat oven to 250°F (120°C). Line a baking sheet with parchment paper and draw 8 circles (about 3 inches diameter) as guides for the nests.
Make raspberry coulis
In a small bowl, mash 1/2 cup raspberries with 2 tablespoons icing sugar until smooth. Strain through a fine mesh sieve to remove seeds, creating a raspberry coulis.
Set aside.
Beat egg whites
In a large mixing bowl, beat egg whites with an electric mixer on medium speed until soft peaks form, about 3 minutes.
Add sugar gradually
Gradually add caster sugar one tablespoon at a time while continuing to beat, increasing speed to high. Beat for 8-10 minutes until mixture is thick, glossy, and sugar is completely dissolved.
Test by rubbing a small amount between your fingers – it should feel smooth, not gritty.
Add stabilizers
Add vinegar, cornstarch, and vanilla extract to the meringue. Beat for 1 minute more until fully incorporated and mixture holds stiff, glossy peaks.
Shape meringue nests
Spoon or pipe the meringue onto the prepared circles on the baking sheet, creating nest shapes with raised edges and a depression in the center. Each nest should be about 3 inches wide.
Create raspberry swirl
Drizzle a small amount of raspberry coulis over each meringue nest and use a toothpick or skewer to gently swirl it through the meringue, creating a marbled effect.
Bake and cool
Bake in the preheated oven for 1 hour 30 minutes. The pavlovas should be crisp on the outside but still slightly soft inside.
Turn off the oven and leave pavlovas inside with the door closed for an additional 30 minutes to cool completely.
Whip cream
While pavlovas cool, whip the heavy cream with 2 tablespoons icing sugar and 1 teaspoon vanilla extract until soft peaks form, about 3-4 minutes.
Assemble and serve
Once pavlova nests are completely cool, carefully remove from parchment paper. Spoon whipped cream into the center of each nest and top generously with fresh raspberries.
Garnish with mint leaves and serve immediately.
Per serving (1 pavlova nest) — values are estimates
Editor’s Choice

9. Bunny Butt Peanut Butter Cups
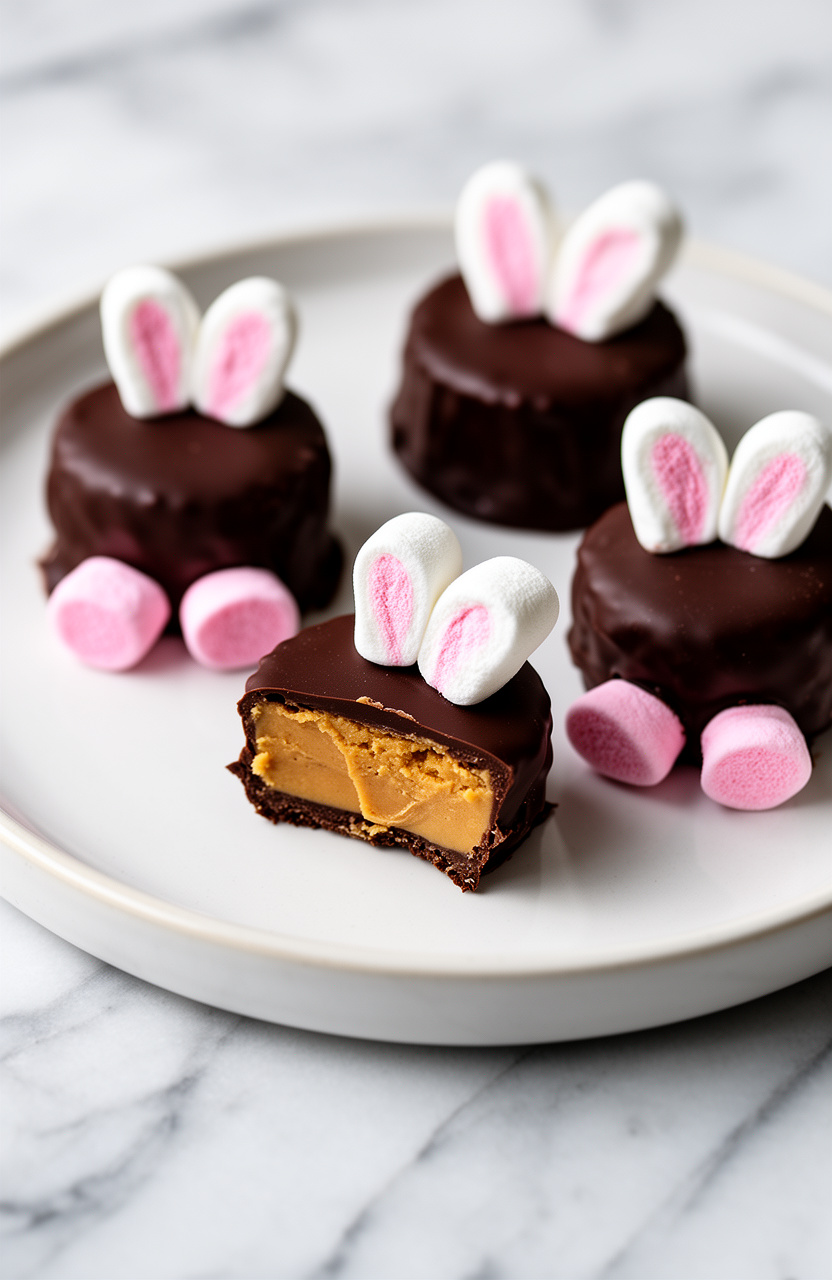
Chocolate shells filled with sweetened peanut butter get topped with marshmallow halves and white chocolate “tails” to create adorable bunny-themed treats. Chilling in the fridge sets the layers into firm, bite-sized cups with creamy centers that contrast the snappy chocolate coating.
Bunny Butt Peanut Butter Cups
Decoration
- 🍰Muffin tin
- 🍴Paper cupcake liners
- 🥣Microwave-safe bowl
- 🥄Spoon
- 🖌️Small brush or toothpick
Prepare muffin tin
Line a standard muffin tin with 12 paper cupcake liners and set aside.
Melt chocolate base
Place 1 and 1/2 cups of chocolate chips in a microwave-safe bowl and microwave in 30-second intervals, stirring between each interval, until completely melted and smooth, about 90 seconds total.
Create chocolate layer
Spoon about 1 tablespoon of melted chocolate into the bottom of each lined muffin cup, spreading it slightly up the sides. Refrigerate for 15 minutes until firm.
Mix peanut butter
In a medium bowl, mix together the peanut butter and powdered sugar until smooth and well combined.
Add peanut butter
Spoon about 1 tablespoon of the peanut butter mixture onto the center of each chilled chocolate cup, leaving space around the edges. Gently press down to flatten slightly.
Seal with chocolate
Melt the remaining 1/2 cup chocolate chips in the microwave using 30-second intervals, stirring until smooth. Spoon the melted chocolate over the peanut butter layer, spreading to cover completely and seal the edges.
Refrigerate for 1 hour until firm.
Create bunny feet
Cut each large marshmallow in half crosswise to create 24 round pieces. Using a small brush or toothpick, apply pink food coloring gel to the cut side of each marshmallow half to create bunny paw pads, or dip in melted pink candy melts and let excess drip off.
Assemble bunny butts
Remove the peanut butter cups from the refrigerator. Press 2 mini marshmallows onto the top center of each cup to create bunny tails.
Position 2 pink-decorated marshmallow halves below the tail on each cup to create bunny feet. Refrigerate for 45 minutes until decorations are set.
Serve and store
Remove from muffin tin and peel away paper liners before serving. Store in an airtight container in the refrigerator for up to 1 week.
Per serving (1 bunny butt cup) — values are estimates
Our Best Picks


10. Lavender Honey Panna Cotta
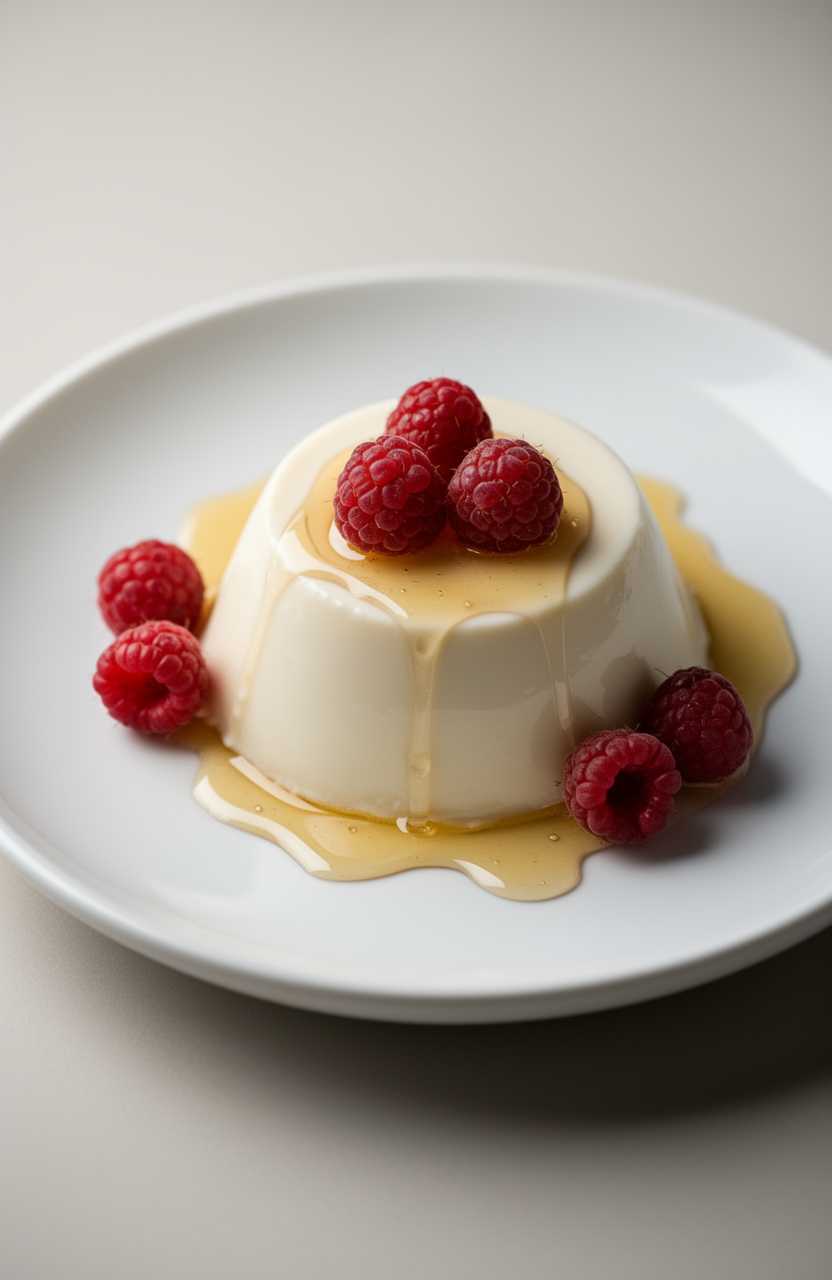
Blooming gelatin in lavender-infused cream and honey creates a silky Italian custard with delicate floral notes. The set panna cotta develops a smooth, spoonable texture that wobbles gently on the plate.
Lavender Honey Panna Cotta
Garnish
- 🫕Medium saucepan
- 🪣Fine-mesh strainer
- 🍴Cheesecloth
- 🥤6 ramekins or dessert glasses
- 🥣Small bowl
- 🥄Whisk
- 🥄Measuring cups and spoons
Bloom gelatin
Pour 3 tablespoons cold water into a small bowl and sprinkle the gelatin powder evenly over the surface. Let it bloom for 5 minutes until softened and spongy.
Heat cream mixture
In a medium saucepan, combine 2 cups heavy cream, 1 cup whole milk, 1/3 cup honey, 2 tablespoons dried lavender buds, and a pinch of salt. Heat over medium heat, stirring occasionally, until the mixture just begins to simmer (do not boil), about 8-10 minutes.
Infuse lavender
Remove the saucepan from heat, cover, and let the lavender infuse for 30 minutes. The mixture should be fragrant and slightly cooled.
Strain mixture
Strain the cream mixture through a fine-mesh strainer lined with cheesecloth into a clean bowl or measuring cup, pressing on the lavender buds to extract all the flavor. Discard the lavender buds.
Rewarm cream
Return the strained cream mixture to the saucepan and warm gently over low heat until it reaches about 110°F (warm to the touch but not hot), about 2-3 minutes.
Dissolve gelatin
Add the bloomed gelatin to the warm cream mixture and whisk continuously until the gelatin is completely dissolved, about 1-2 minutes. Stir in 1/4 teaspoon vanilla extract.
Pour into molds
Divide the mixture evenly among 6 ramekins or dessert glasses, pouring about 1/2 cup into each. Let cool to room temperature for about 20 minutes.
Chill panna cotta
Cover each ramekin with plastic wrap and refrigerate for at least 4 hours or overnight until fully set and firm to the touch.
Unmold and serve
To serve, either serve directly in the glasses or unmold by running a thin knife around the edge, dipping the bottom of the ramekin in warm water for 5 seconds, and inverting onto a plate. Garnish with fresh berries, a drizzle of honey, and fresh lavender sprigs if desired.
Per serving (1 serving) — values are estimates
Our Best Picks

11. Carrot Patch Dirt Pudding Cups
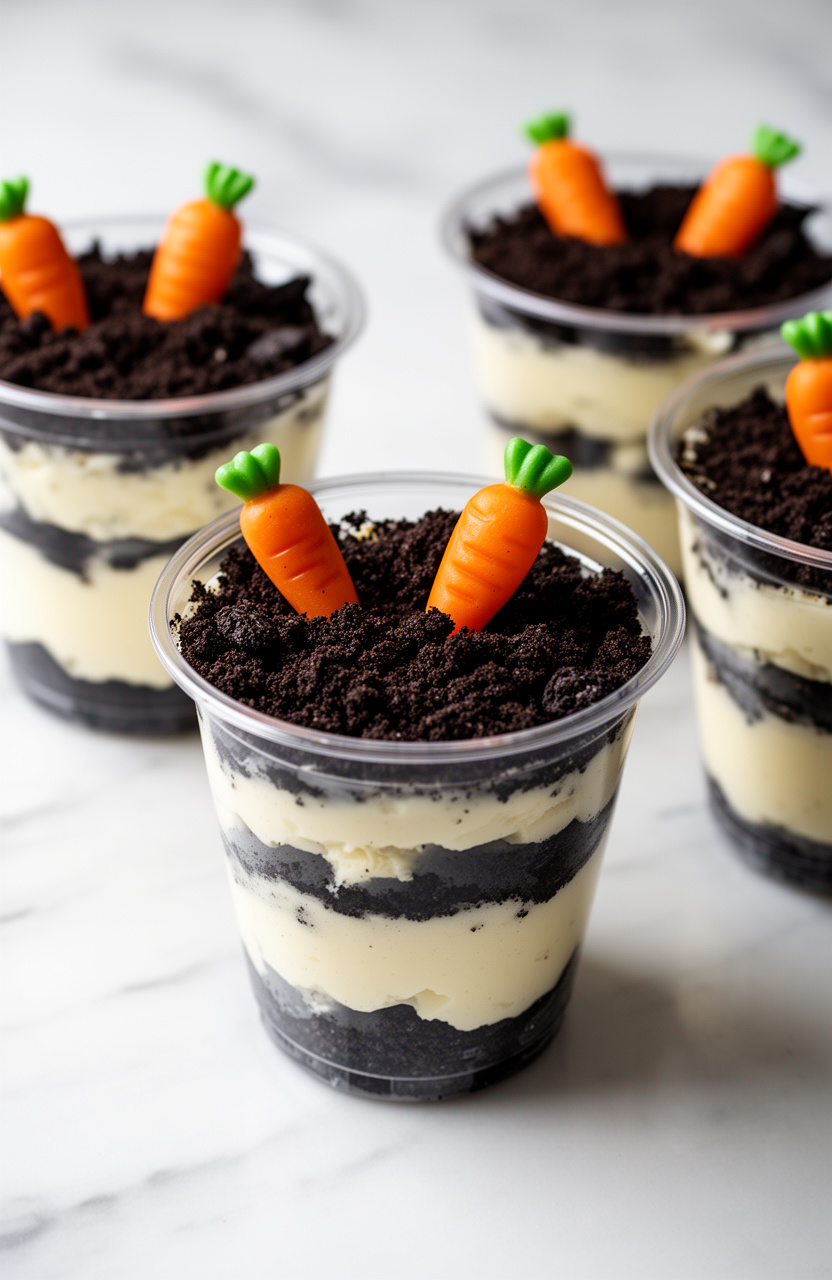
Crushing chocolate sandwich cookies into fine crumbs creates edible “dirt” that layers with sweetened cream cheese and butter for playful pudding cups topped with candy carrots. Chilling sets the creamy filling into a mousse-like texture that contrasts the crunchy cookie layer beneath.
Carrot Patch Dirt Pudding Cups
Toppings
- 🛍️Food processor or zip-top bag with rolling pin
- 🥣Large mixing bowl
- 🔌Electric mixer
- 🥣Medium mixing bowl
- 🥄Whisk
- 🥄Rubber spatula
- 🍴12 clear plastic cups (8-10 oz each)
- 🥄Spoon
Crush cookies
Place chocolate sandwich cookies in a food processor and pulse until finely crushed into crumbs, or place cookies in a zip-top bag and crush with a rolling pin until fine crumbs form. Set aside.
Cream butter mixture
In a large mixing bowl, beat together 8 oz softened cream cheese and 1/4 cup softened butter with an electric mixer on medium speed for 2 minutes until smooth and creamy.
Add powdered sugar
Add 1 cup powdered sugar to the cream cheese mixture and beat on low speed for 1 minute until fully combined and fluffy. Set aside.
Prepare pudding
In a medium mixing bowl, whisk together 2 packages instant vanilla pudding mix and 3 cups cold milk for 2 minutes until pudding thickens. Let stand for 5 minutes.
Combine pudding mixture
Fold the thickened pudding into the cream cheese mixture using a rubber spatula until well combined and smooth.
Fold in topping
Gently fold 8 oz thawed whipped topping into the pudding mixture until fully incorporated and no white streaks remain.
Layer cookie crumbs
Spoon 2 tablespoons of crushed cookie crumbs into the bottom of each of 12 clear plastic cups, creating the first dirt layer.
Add pudding layer
Spoon or pipe approximately 1/3 cup of the pudding mixture over the cookie crumbs in each cup, filling about two-thirds full.
Top with crumbs
Top each cup with remaining crushed cookie crumbs, covering the pudding completely to create the dirt appearance.
Chill pudding cups
Cover cups with plastic wrap and refrigerate for 2 hours until fully chilled and set.
Decorate with carrots
Before serving, press 1 candy carrot into the top of each cup at a slight angle to resemble carrots growing in a garden patch. Add mint leaves or green candy as carrot tops if desired.
Per serving (1 cup) — values are estimates
Top Picks Today
12. Pastel Rainbow Layer Cake
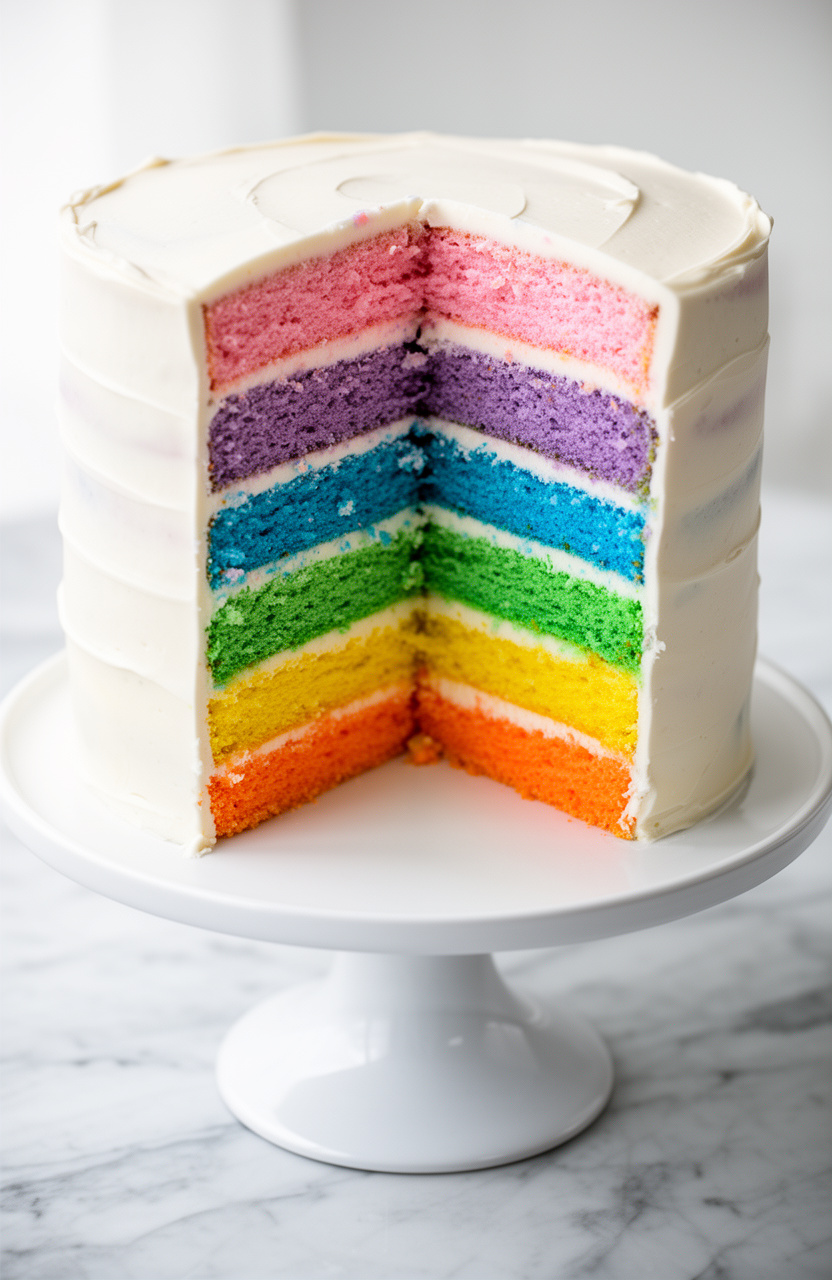
Dividing vanilla cake batter into separate bowls and tinting each with gel food coloring creates soft pastel layers that stack into a towering rainbow effect. The butter-based crumb stays moist and tender while the layers hold their distinct colors when sliced.
Pastel Rainbow Layer Cake
Cake
Frosting
- 🍰Six 8-inch round cake pans
- 🔌Electric mixer
- 🥣Mixing bowls
- 🥄Whisk
- 🥄Spatula
- 🪜Cooling racks
- 🥄Offset spatula
- 🍴Cake turntable
- 📍Toothpicks
Prepare pans
Preheat oven to 350°F (175°C). Grease and line six 8-inch round cake pans with parchment paper.
Mix dry ingredients
In a medium bowl, whisk together 3 cups flour, 1 tablespoon baking powder, and 1/2 teaspoon salt. Set aside.
Cream butter and sugar
In a large bowl using an electric mixer, cream 1 cup softened butter and 2 cups sugar on medium-high speed for 4-5 minutes until light and fluffy.
Add eggs and vanilla
Add 4 eggs one at a time, beating well after each addition. Mix in 1 tablespoon vanilla extract.
Combine wet and dry
Alternately add the flour mixture and 1 cup milk to the butter mixture in three additions, beginning and ending with flour. Mix on low speed until just combined.
Color the batters
Divide batter evenly among 6 bowls (about 1 cup each). Add a small amount of gel food coloring to each bowl to create pastel pink, purple, blue, green, yellow, and orange shades.
Mix each color thoroughly.
Bake cake layers
Pour each colored batter into a prepared pan, spreading evenly. Bake for 22-25 minutes until a toothpick inserted in the center comes out clean.
Cool cakes
Cool cakes in pans for 10 minutes, then turn out onto cooling racks. Cool completely for at least 1 hour before frosting.
Make buttercream frosting
For the buttercream, beat 2 cups softened butter on medium speed for 3 minutes until creamy. Gradually add 8 cups powdered sugar, 1 cup at a time, alternating with 1/4 cup heavy cream.
Finish frosting
Add 2 teaspoons vanilla extract and 1/4 teaspoon salt to frosting. Beat on high speed for 3-4 minutes until light and fluffy.
Stack cake layers
Place the first cake layer on a cake turntable. Spread 1/2 cup frosting evenly on top.
Repeat with remaining layers in rainbow order, stacking each layer with frosting between.
Apply crumb coat
Apply a thin crumb coat of frosting over the entire cake. Refrigerate for 30 minutes until firm.
Final frosting layer
Apply a final thick layer of frosting over the entire cake using an offset spatula, smoothing the sides and top. Refrigerate for at least 1 hour 30 minutes before serving.
Per serving (1 slice) — values are estimates
Editor’s Choice


13. Chocolate Covered Peeps S’mores
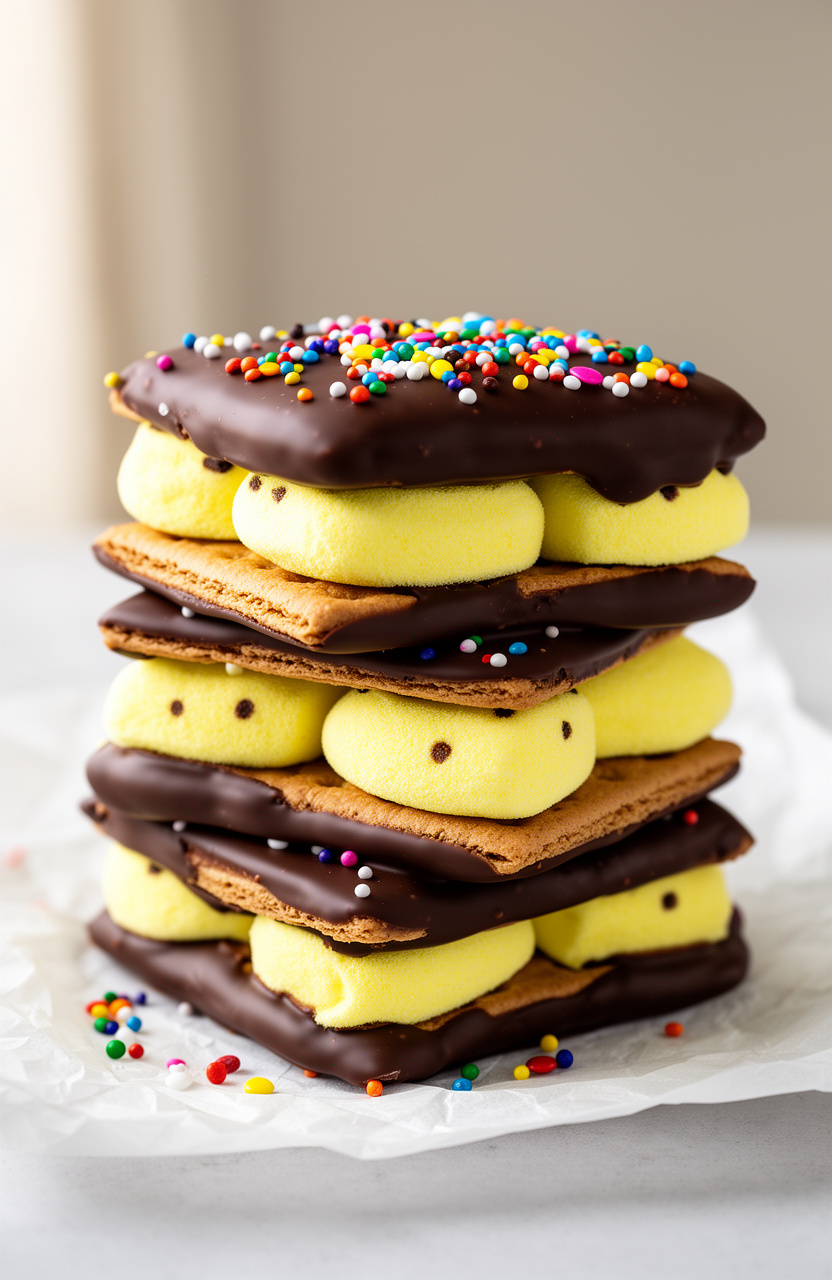
Dipping graham cracker-sandwiched Peeps into melted chocolate chips and coconut oil creates a glossy coating that hardens into a candy-shell crunch. The marshmallow chicks stay soft and gooey inside while the chocolate sets firm around the crisp crackers.
Chocolate Covered Peeps S’mores
- 🥧Baking sheet
- 📄Parchment paper
- 🥣Microwave-safe bowl
- 🍴Fork or dipping tool
- 🪜Wire cooling rack
Prepare baking sheet
Line a baking sheet with parchment paper and set aside. Arrange 12 graham cracker squares on your work surface.
Assemble base
Place one Peeps marshmallow on top of each graham cracker square. Press down gently to help it adhere.
Melt chocolate
In a microwave-safe bowl, combine 12 ounces chocolate chips and 2 tablespoons coconut oil. Microwave in 30-second intervals, stirring between each interval, until completely melted and smooth, about 2 minutes total.
Dip in chocolate
Using a fork or dipping tool, carefully dip each Peeps-topped graham cracker into the melted chocolate, coating it completely. Allow excess chocolate to drip off.
Add toppings
Place the chocolate-covered s’more on the prepared baking sheet. Immediately add sprinkles or crushed graham crackers on top if desired.
Complete all s’mores
Repeat the dipping process with all remaining Peeps and graham crackers.
Add top cracker
Top each chocolate-covered s’more with a second graham cracker square, pressing gently to create a sandwich.
Chill to set
Refrigerate the s’mores for 30 minutes until the chocolate is completely set and hardened.
Serve
Remove from refrigerator and serve immediately, or store in an airtight container at room temperature for up to 3 days.
Per serving (1 s’more) — values are estimates
Trending on Amazon
14. Lemon Curd Tart Shells
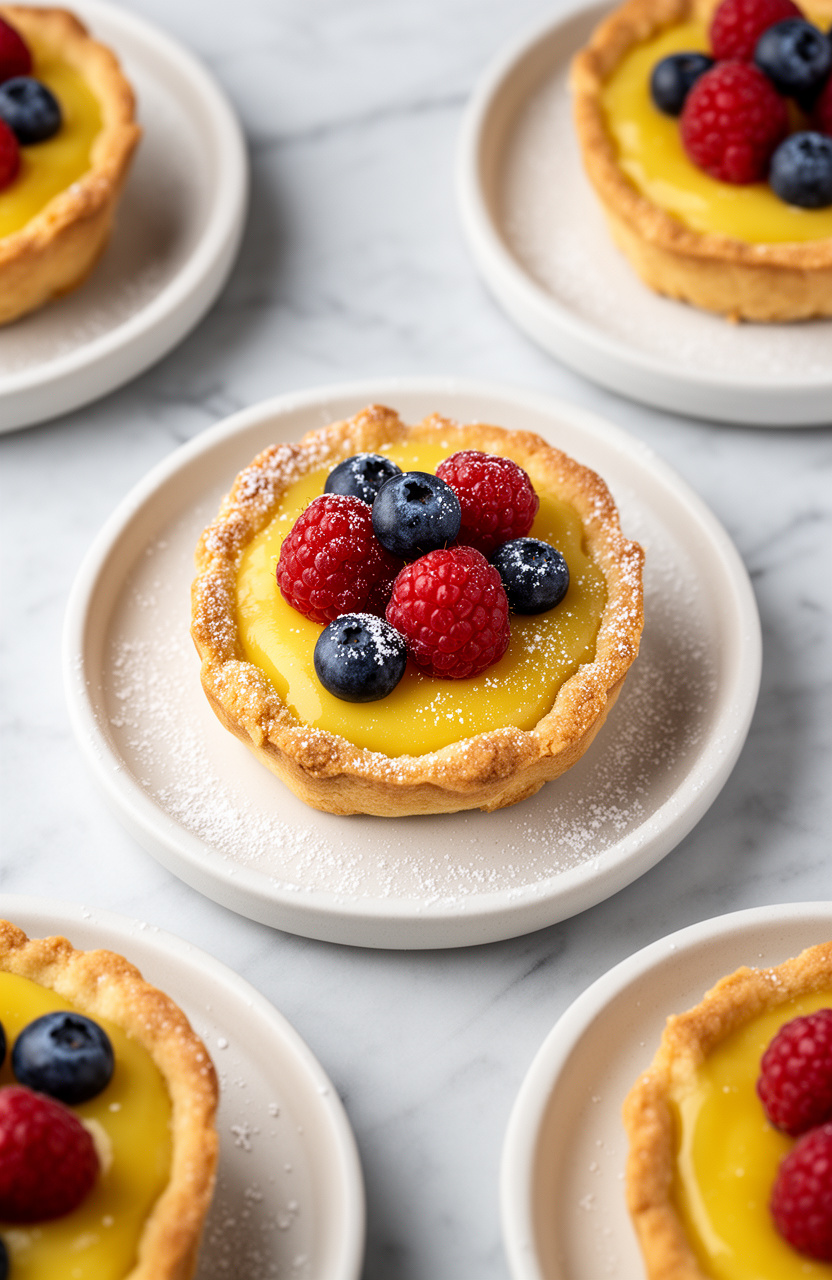
Buttery shortcrust pastry made with icing sugar bakes into delicate shells designed to cradle tangy lemon curd filling. The crisp, cookie-like cases shatter gently under a fork while providing structure for the smooth, citrus-bright custard.
Lemon Curd Tart Shells
Pastry
Lemon Curd
Garnish
- 🥣Food processor or mixing bowl
- 🫙Rolling pin
- 🍴12-hole tart tin or individual tart tins
- 🍴Baking beans or rice
- 📄Parchment paper
- 🫕Medium saucepan
- 🪣Fine mesh sieve
- 🥄Whisk
- 🥄Spatula
Make pastry dough
In a food processor, pulse together 225g plain flour, 50g icing sugar, and 100g cold cubed butter until the mixture resembles fine breadcrumbs. Add 1 egg yolk and pulse briefly, then add 2-3 tablespoons cold water, one at a time, until the dough just comes together.
Chill pastry
Turn the dough onto a lightly floured surface and knead gently for 30 seconds until smooth. Flatten into a disc, wrap in cling film, and refrigerate for 30 minutes.
Line tart tins
Preheat the oven to 190°C (375°F/Gas Mark 5). Roll out the chilled pastry on a floured surface to 3mm thickness.
Cut circles slightly larger than your tart tins and press gently into each tin, trimming excess pastry.
Blind bake shells
Prick the bases with a fork, line each shell with parchment paper, and fill with baking beans. Blind bake for 15 minutes, then remove beans and paper and bake for another 5 minutes until golden.
Remove from oven and cool completely.
Combine curd ingredients
For the lemon curd, place 150ml lemon juice, lemon zest, 200g caster sugar, and 4 eggs in a medium saucepan. Whisk together until well combined.
Cook lemon curd
Place the saucepan over medium-low heat and cook, whisking constantly, for 12-15 minutes until the mixture thickens enough to coat the back of a spoon. Do not let it boil.
Strain and finish
Remove from heat and immediately whisk in 100g cubed butter until completely melted and smooth. Strain the curd through a fine mesh sieve into a clean bowl to remove any lumps and zest.
Fill and chill
Allow the lemon curd to cool for 15 minutes, then spoon or pipe into the cooled tart shells, filling them to just below the rim. Refrigerate for at least 2 hours until set.
Garnish and serve
Before serving, dust lightly with icing sugar and garnish with fresh berries if desired. Store in the refrigerator for up to 3 days.
Per serving (1 tart shell) — values are estimates
Most Loved Products


15. Speckled Malted Milk Fudge
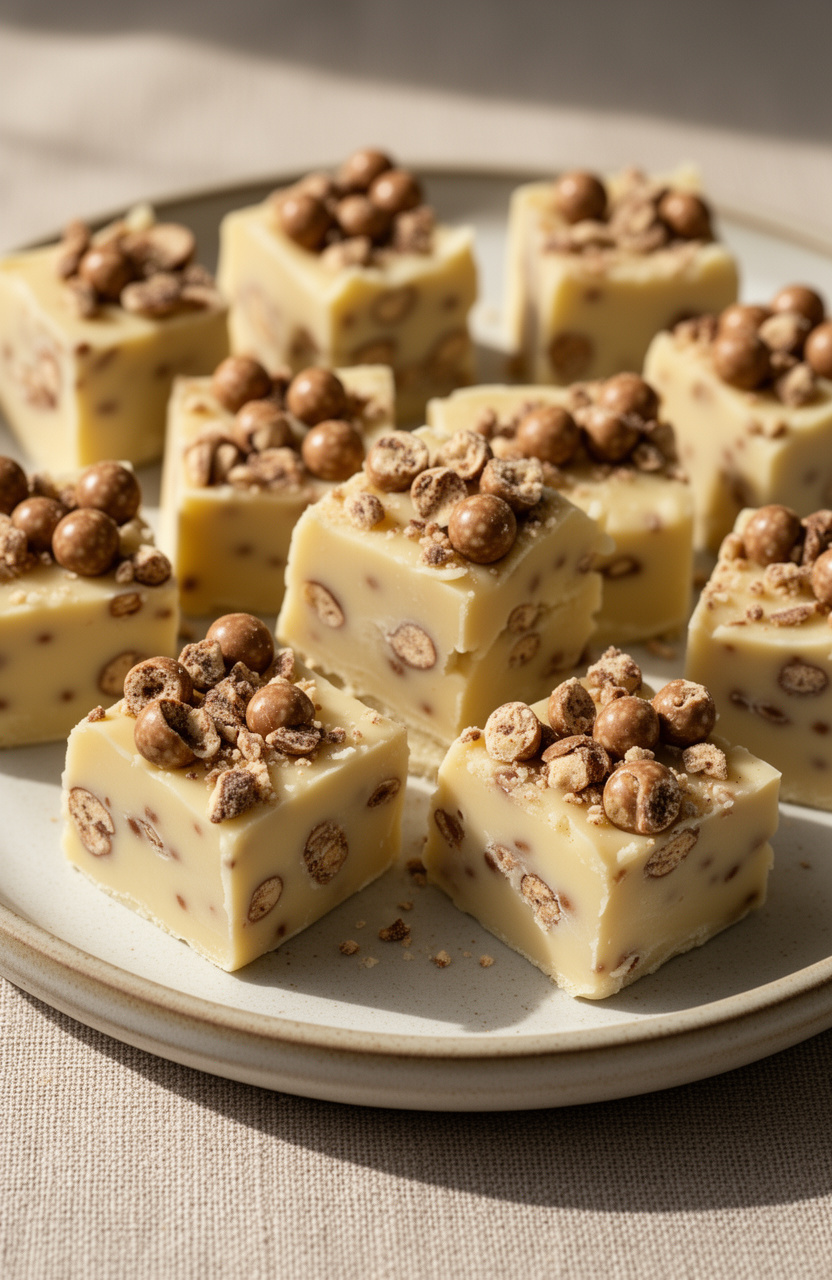
Boiling sugar with butter and evaporated milk forms a smooth white chocolate fudge base studded with malted milk balls. The confection sets into creamy, melt-in-your-mouth squares with pockets of crunchy malt throughout.
Speckled Malted Milk Fudge
- 🍰9×13 inch baking pan
- 📄Parchment paper
- 🫕Heavy-bottomed saucepan
- 🌡️Candy thermometer
- 🥄Wooden spoon
- 🥣Mixing bowl
Prepare pan
Line a 9×13 inch baking pan with parchment paper, leaving overhang on the sides for easy removal. Lightly grease the parchment with butter or cooking spray.
Combine base ingredients
In a heavy-bottomed saucepan, combine the granulated sugar, butter, and evaporated milk. Cook over medium heat, stirring constantly, until the mixture comes to a rolling boil.
Boil to temperature
Continue boiling for 15 minutes, stirring constantly to prevent scorching. The mixture should reach 234°F on a candy thermometer (soft-ball stage).
Add chocolate mixture
Remove from heat immediately. Quickly stir in the white chocolate chips, marshmallow creme, malted milk powder, and vanilla extract.
Stir vigorously until the chocolate is completely melted and the mixture is smooth and well combined.
Fold in candy
Fold in 1 cup of the crushed malted milk balls, reserving 1/2 cup for topping. Mix until evenly distributed throughout the fudge.
Pour and top
Pour the fudge mixture into the prepared pan, spreading it evenly with a spatula. Immediately sprinkle the remaining 1/2 cup crushed malted milk balls over the top, pressing them gently into the surface.
Chill fudge
Refrigerate for at least 2 hours or until completely firm and set. Once set, lift the fudge from the pan using the parchment overhang.
Cut and store
Cut into 48 small squares using a sharp knife. Store in an airtight container at room temperature for up to 1 week or refrigerate for up to 2 weeks.
Per serving (1 serving (4 pieces)) — values are estimates
Recommended for You
These adorable Easter treats will bring smiles to your spring celebration, from pastel-frosted cookies to bunny-shaped cakes and egg-shaped confections. Pick your favorite recipe to try this weekend and save a few extras to your Pinterest board for next year’s gathering. Drop a comment below telling us which sweet creation you’re most excited to make first!