20 DIY Chocolate Easter Treats
Have you ever thought about how fun it would be to create your own chocolate Easter treats? Picture yourself delighting friends and family with sweet surprises that come straight from your kitchen! Get ready to enjoy 20 delicious recipes packed with flavor, creativity, and a sprinkle of Easter magic. Whether you’re a beginner or a seasoned baker, these treats are designed to bring joy to your celebration!
Shop Our Must-Haves

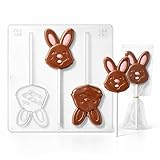


1 Chocolate Bunny Bark Bonanza

Get ready for a sweet treat this Easter with Chocolate Bunny Bark Bonanza! This delightful recipe combines creamy chocolate with colorful sprinkles and adorable chocolate bunnies, making it perfect for sharing with family and friends. It’s easy to make and even more fun to eat!
Prep Time: 15 minutes
Additional Time: 1 hour
Total Time: 1 hour 15 minutes
Servings: 12
Ingredients:
- 8 ounces of milk chocolate chips
- 4 ounces of white chocolate chips
- 1 cup of colorful sprinkles
- 12 chocolate bunny candies (mini size)
- Optional: 1 teaspoon of coconut oil (for smoother chocolate)
Instructions:
Begin by lining a baking sheet with parchment paper. This will make it easier to remove the chocolate bark later. Set it aside for now.
In a microwave-safe bowl, add the milk chocolate chips. If using, stir in the coconut oil. Heat in the microwave in 30-second increments, stirring in between until completely melted and smooth.
Next, pour the melted milk chocolate onto the prepared baking sheet. Use a spatula to spread it evenly into a rectangle. Make sure it’s not too thick, about ¼ inch thick is perfect.
In a separate bowl, melt the white chocolate chips in the same way as the milk chocolate. Once it’s melted, drizzle it over the top of the milk chocolate. Use a toothpick or the tip of a knife to swirl the two chocolates together for a pretty pattern.
Now it’s time to make it festive! Sprinkle the colorful sprinkles evenly over the chocolate mixture. Press in the chocolate bunny candies so they’re nestled in the chocolate.
Allow the chocolate to harden at room temperature for about an hour, or you can speed up the process by placing it in the refrigerator for 30 minutes.
Once the chocolate is set, use a sharp knife to break it into bark-sized pieces. Serve and enjoy immediately, or gift it in cute bags for a lovely Easter treat!
Tips:
- For a fun twist, try adding nuts or dried fruits for extra texture and flavor.
- You can use dark chocolate instead of milk chocolate for a richer taste.
- Make sure the bunnies are properly spaced out when pressing them into the chocolate to ensure every piece has some.
Nutrition Facts:
- Calories: 160 per serving
- Fat: 7g
- Carbohydrates: 24g
- Protein: 2g
- Sugars: 15g
2 Easter Egg Truffle Surprise

This Easter Egg Truffle Surprise is a fun and tasty treat for the holiday! These delightful chocolate truffles are filled with surprises and are perfect for decorating your Easter table. Let’s get started on making these delicious little goodies.
Prep Time: 20 minutes
Total Time: 1 hour 20 minutes
Servings: 12 truffles
Ingredients:
- 8 oz cream cheese, softened
- 2 cups powdered sugar
- 2 cups crushed chocolate cookies (like Oreos)
- 1 cup chocolate chips (semisweet or milk chocolate)
- 1 tsp vanilla extract
- 1 cup melted chocolate for coating
- Rainbow sprinkles or crushed nuts for decoration
Instructions:
Start by mixing the cream cheese and vanilla extract in a large bowl until it’s smooth. This will be the base of your truffles.
Next, gradually add the powdered sugar and mix until fully combined. The mixture will start to thicken. After that, stir in the crushed chocolate cookies. This gives the truffles a yummy crunch.
Then, fold in the chocolate chips to add more chocolate flavor. You want to make sure everything is mixed well. Once that’s done, cover the bowl and put it in the fridge for about 1 hour. This helps the mixture firm up a little.
After the chilling time, take the mixture out of the fridge. Use your hands to scoop out a tablespoon of the mixture and roll it into a ball. Aim for a size similar to a small egg. Repeat this until you have used up all the mixture.
Now, melt your chocolate for coating in the microwave or over a double boiler. Dip each truffle into the melted chocolate, making sure it’s fully coated. Allow any excess chocolate to drip off before placing the truffles on a baking sheet lined with parchment paper.
While the chocolate is still wet, sprinkle your choice of rainbow sprinkles or crushed nuts on top for decoration. Allow the truffles to sit at room temperature until the chocolate hardens.
Tips:
- You can customize the filling! Try adding peanut butter or shredded coconut for a different flavor.
- Use white chocolate for coating if you want a different look and taste.
- Store the truffles in an airtight container in the fridge to keep them fresh for longer.
Nutrition Facts:
- Calories: 120
- Protein: 2g
- Fat: 7g
- Carbohydrates: 13g
- Sugars: 10g
- Cholesterol: 10mg
3 Creamy Chocolate-Covered Almond Nests

These Creamy Chocolate-Covered Almond Nests are a delightful treat that combines the crunch of almonds with the rich creaminess of chocolate. They are perfect for Easter celebrations or anytime you want to indulge in a sweet snack. Let’s hop into the kitchen and create these yummy nests!
Prep Time: 20 minutes
Additional Time: 30 minutes
Total Time: 50 minutes
Servings: 12 nests
Ingredients:
- 1 cup almond butter
- 1 cup powdered sugar
- 2 cups rolled oats
- 1 teaspoon vanilla extract
- 1 cup milk chocolate chips
- 1 tablespoon coconut oil
- 1/2 cup whole almonds
- Pinch of salt
Instructions:
Start by mixing together the almond butter and powdered sugar in a large bowl. Stir until it is well combined and smooth.
Add the rolled oats, vanilla extract, and a pinch of salt to the mixture. Combine them well until everything is evenly mixed.
Once your mixture is ready, take a scoop and form small nests on a tray lined with parchment paper. Make sure to press down the center to create a little well for the chocolate later.
Now, it’s time to melt the milk chocolate chips and coconut oil together. You can do this in the microwave or on the stove using a double boiler. Stir until smooth and fully melted.
Pour the melted chocolate over each almond nest, filling the center gently. Place one whole almond on top of each nest for added crunch and decoration.
Refrigerate the nests for about 30 minutes or until the chocolate has set completely.
Once ready, take them out and enjoy these delicious treats!
Tips:
- For a different flavor, try using dark chocolate or white chocolate instead of milk chocolate.
- Add some sprinkles or coconut flakes on top of the chocolate before it sets for extra fun!
- These nests can be stored in an airtight container in the fridge for up to one week.
Nutrition Facts:
- Calories: 150 per nest
- Protein: 4g
- Fat: 8g
- Carbohydrates: 19g
- Sugar: 7g
4 Marshmallow Peep Chocolate Cups

Get ready to enjoy a fun and easy treat that is perfect for Easter! These Marshmallow Peep Chocolate Cups are not only delicious but also super cute. Perfect for kids and adults alike, they make a great addition to your holiday festivities.
Prep Time: 15 minutes
Additional Time: 30 minutes
Total Time: 45 minutes
Servings: 12 cups
Ingredients:
- 12 chocolate cups (store-bought or homemade)
- 1 cup milk chocolate chips
- 12 Marshmallow Peeps (any color)
- Sprinkles (optional, for decoration)
Instructions:
Start by melting the milk chocolate chips. You can do this in a microwave-safe bowl, heating them in 30-second increments until smooth. Stir well between each interval to prevent burning.
Once melted, carefully spoon into each chocolate cup, filling them about halfway. Make sure to spread the chocolate up the sides for a nice coating. Place the filled cups in the refrigerator for about 10 minutes to let them harden.
After the first layer of chocolate has set, remove the cups from the fridge. Gently press a Marshmallow Peep into the center of each cup. You want it snug, but make sure it doesn’t touch the bottom!
Now, melt a little more chocolate and drizzle it on top of each Peep for extra decoration. If you like, you can also add sprinkles at this point for a fun touch.
Finally, put the cups back into the fridge for about 20 minutes. This way, the chocolate will fully harden. When ready to serve, pop them out of the mold and watch everyone enjoy your delightful treats!
Tips:
- Try using different flavors of chocolate, like white chocolate or dark chocolate, for variety.
- Adding a touch of food coloring to the melted chocolate can make your treats even more festive!
- If you want to get creative, stick mini candies on the Peep for extra decoration.
Nutrition Facts:
- Calories: 100 per cup
- Total Fat: 5g
- Saturated Fat: 3g
- Cholesterol: 5mg
- Sodium: 10mg
- Total Carbohydrates: 13g
- Dietary Fiber: 0g
- Sugars: 10g
- Protein: 1g
5 Decadent Chocolate Carrot Cake Bites

These Decadent Chocolate Carrot Cake Bites are the perfect mix of rich chocolate and sweet carrot cake. They are great for dessert or even a fun snack! Not only are they delicious, but they are also easy to make and perfect for sharing.
Prep Time: 20 minutes
Additional Time: 30 minutes
Total Time: 50 minutes
Servings: 12
Ingredients:
- 1 cup shredded carrots
- 1/2 cup all-purpose flour
- 1/2 cup granulated sugar
- 1/2 cup brown sugar
- 1/3 cup unsweetened cocoa powder
- 1/4 cup vegetable oil
- 2 large eggs
- 1 teaspoon vanilla extract
- 1 teaspoon baking powder
- 1/2 teaspoon baking soda
- 1/2 teaspoon salt
- 1/2 teaspoon ground cinnamon
- 1/4 cup mini chocolate chips (optional)
- 1/2 cup melted dark chocolate for coating
Instructions:
In a large bowl, combine the shredded carrots, flour, sugar, brown sugar, and cocoa powder. Mix them well until everything is combined. This is where the flavors start to meld together.
Next, add in the vegetable oil, eggs, and vanilla extract. Stir them in until you have a smooth batter. Don’t worry if there are some clumps; it adds to the texture!
Now, sprinkle the baking powder, baking soda, salt, and cinnamon into the mix. Fold everything together gently. If you like chocolate, this is the moment to add the optional mini chocolate chips. They’ll make the bites even more indulgent!
Preheat your oven to 350°F (175°C). Line a mini muffin tin with paper liners or spray it with non-stick cooking spray. Use a tablespoon to fill each muffin cup about 2/3 full with the batter.
Bake for about 15-18 minutes until a toothpick inserted into the center comes out clean. Let them cool for a few minutes before transferring them to a wire rack.
Once the bites are completely cool, dip each one in the melted dark chocolate to coat them fully. Place the coated bites back on the wire rack and let the chocolate set in the fridge for 30 minutes.
Tips:
- For extra flavor, you can add nuts or raisins to the batter.
- Store your cake bites in an airtight container in the fridge to keep them fresh longer.
- If you want a sweeter coating, use milk chocolate instead of dark chocolate.
Nutrition Facts:
- Calories: 150 per bite
- Total Fat: 7g
- Saturated Fat: 2g
- Cholesterol: 25mg
- Sodium: 80mg
- Total Carbohydrates: 20g
- Dietary Fiber: 1g
- Sugars: 10g
- Protein: 2g
6 Coconut Cream Egg Delights

Coconut Cream Egg Delights are a fun and tasty treat you can make for Easter or any special occasion! These sweet little eggs are filled with creamy coconut goodness and coated in chocolate. They are sure to bring joy to your festivities!
Prep Time: 20 minutes
Additional Time: 1 hour
Total Time: 1 hour 20 minutes
Servings: 12 eggs
Ingredients:
- 1 cup sweetened shredded coconut
- 1/4 cup sweetened condensed milk
- 1 teaspoon vanilla extract
- 1 cup chocolate chips
- 1 tablespoon coconut oil
Instructions:
In a mixing bowl, combine the sweetened shredded coconut, sweetened condensed milk, and vanilla extract. Stir the mixture until it’s well blended.
Next, cover the bowl with plastic wrap and chill in the refrigerator for about 30 minutes. This will help the mixture firm up, making it easier to shape.
Once chilled, take out the coconut mixture and shape it into small egg shapes using your hands. Place the formed eggs on a lined baking sheet and return them to the fridge for another 30 minutes.
Meanwhile, melt the chocolate chips with coconut oil in a microwave-safe bowl. Heat in short intervals, stirring in between, until smooth.
Once the eggs are firm and the chocolate is melted, dip each coconut egg into the chocolate mixture. Make sure they are fully coated. Use a fork to lift the eggs out, allowing any excess chocolate to drip off before placing them back on the baking sheet.
Return the chocolate-coated eggs to the fridge for a final chill of 15 to 20 minutes until the chocolate sets.
Tips:
- Use parchment paper on the baking sheet to prevent sticking.
- For a fun twist, try adding a few drops of food coloring to the coconut mixture for brighter eggs.
- Store any leftovers in an airtight container in the refrigerator to keep them fresh.
Nutrition Facts:
- Calories: 180
- Total Fat: 11g
- Saturated Fat: 7g
- Cholesterol: 5mg
- Sodium: 20mg
- Total Carbohydrates: 22g
- Dietary Fiber: 1g
- Sugars: 16g
- Protein: 2g
7 Chocolate-Dipped Pretzel Nests

These Chocolate-Dipped Pretzel Nests are a fun and delicious treat that brings a delightful crunch to your Easter celebrations. They are super easy to make and are perfect for kids and adults alike. Let’s dive into how you can create these tasty little nests!
Prep Time: 15 minutes
Additional Time: 30 minutes
Total Time: 45 minutes
Servings: 12 nests
Ingredients:
- 2 cups pretzel sticks
- 1 cup chocolate chips (milk or dark chocolate)
- 1 tablespoon coconut oil (optional, for smoothness)
- 1 cup candy eggs (like Cadbury Mini Eggs or jelly beans)
- Sea salt (optional, for sprinkling)
Instructions:
Start by gathering all your ingredients. Then, line a baking sheet with parchment paper. This will prevent your nests from sticking.
Next, melt the chocolate chips in a microwave-safe bowl. Heat them in the microwave in 30-second intervals, stirring in between, until the chocolate is completely melted and smooth. For an extra glossy finish, add coconut oil into the melted chocolate and stir well.
Once the chocolate is ready, add the pretzel sticks into the bowl and mix them until they are fully coated in chocolate. Be sure to cover each pretzel stick evenly for a delicious taste!
Now it’s time to form the nests. Pour the chocolate-coated pretzel mixture onto the lined baking sheet. Create small circular shapes, leaving a little hollow in the center for your candy eggs. Use about 2-3 pretzel sticks for each nest.
After shaping the nests, sprinkle a pinch of sea salt on top for extra flavor, if desired. Then, place the baking sheet in the refrigerator for about 30 minutes or until the chocolate has hardened.
Once the nests are firm, gently place candy eggs in the center of each pretzel nest. They’re now ready to enjoy!
Tips:
- For a fun twist, you can use white chocolate instead of dark chocolate.
- Make sure you let the nests cool completely before adding candy eggs to prevent melting.
- These nests can be stored in an airtight container for up to a week, but they taste best when fresh!
Nutrition Facts:
- Calories: 150 per nest
- Total Fat: 8g
- Saturated Fat: 5g
- Cholesterol: 0mg
- Sodium: 80mg
- Total Carbohydrates: 18g
- Dietary Fiber: 1g
- Sugars: 10g
- Protein: 2g
8 Surprise Chocolate Egg Filled Treats

Surprise Chocolate Egg Filled Treats are a fun and exciting treat perfect for any occasion. These delightful creations are filled with a sweet surprise, making them great for Easter or any celebration! Kids and adults alike will love revealing the treasure hidden inside each egg.
Prep Time: 30 minutes
Total Time: 30 minutes
Servings: 12
Ingredients:
- 1 cup of semi-sweet chocolate chips
- 1 cup of white chocolate chips
- 12 small chocolate eggs (or any candy you prefer)
- 1/2 cup of crushed cookies (like Oreos or Graham crackers)
- 2 tablespoons of sprinkles (optional)
- Mini cupcake liners (for serving)
Instructions:
Start by melting the semi-sweet chocolate chips in a microwave-safe bowl. Heat them in the microwave in 30-second intervals, stirring in between until the chocolate is smooth.
Next, take a muffin tin and line each cup with a mini cupcake liner. Spoon a little melted chocolate into each liner. Use a small spoon to spread it up the sides to make a little cup.
Once you fill all the liners, place them in the fridge for about 10 minutes to let the chocolate harden. After it sets, take them out and press a chocolate egg or your chosen candy into the center of each chocolate cup.
Then, cover the chocolate egg with more melted chocolate. Make sure the egg is completely covered. If you want, you can sprinkle some crushed cookies or sprinkles on top before it sets.
Put the treats back in the fridge for another 10-15 minutes until the chocolate is firm. When they’re ready, carefully remove each treat from the liners and serve them on a platter.
Tips:
- You can use colored chocolate melts for a fun twist.
- Experiment with different types of candy in the center to keep it exciting.
- Remember to let the chocolate cool slightly before covering the eggs to avoid melting them.
Nutrition Facts:
- Calories: 120 per treat
- Total Fat: 7g
- Saturated Fat: 4g
- Carbohydrates: 15g
- Sugar: 10g
- Protein: 1g
9 Creamy Chocolate Mousse Eggs

Indulge in the delightful experience of making Creamy Chocolate Mousse Eggs this Easter! These sweet treats are not only delicious but also fun to create. With their creamy texture and rich chocolate flavor, they are sure to impress your family and friends.
Prep Time: 15 minutes
Additional Time: 2 hours
Total Time: 2 hours 15 minutes
Servings: 12 eggs
Ingredients:
- 2 cups heavy whipping cream
- 1 cup semi-sweet chocolate chips
- 3 large egg whites
- 1/4 cup granulated sugar
- 1 teaspoon vanilla extract
- Pinch of salt
- Chocolate shell or molds (for egg shapes)
Instructions:
Start by melting the semi-sweet chocolate chips in a microwave-safe bowl. Heat them in short bursts of 20-30 seconds, stirring in between, until fully melted and smooth. Set the melted chocolate aside to cool slightly.
In another large mixing bowl, pour in the heavy whipping cream. Use an electric mixer to whip the cream until it forms soft peaks. Once you have the right consistency, gently fold in the melted chocolate. Be careful to keep the mixture light and airy.
In a separate bowl, whisk the egg whites until they start to become frothy. Gradually add the granulated sugar while continuing to whip until stiff peaks form. This will take a few minutes. Once done, gently fold the egg whites into the chocolate mixture. Remember to be gentle to prevent the mousse from losing its airiness.
Next, add the vanilla extract and a pinch of salt to the mousse, and mix until incorporated. Once everything is well combined, it’s time to fill your chocolate molds.
Scoop the mousse into the chocolate shell or eggs molds. Make sure to tap the molds gently to remove any air bubbles. After filling the molds, place them in the refrigerator and let the mousse set for at least 2 hours.
Once the mousse has set, carefully remove the eggs from the molds. They should come out easily. Your Creamy Chocolate Mousse Eggs are now ready to serve!
Tips:
- For added flavor, you can mix in a tablespoon of espresso powder or coffee with the melted chocolate.
- If you’re looking for fun colors, consider decorating the eggs with sprinkles or edible glitter before serving.
- To make it a special treat, you can also add a small surprise candy in the center of each egg before filling them with mousse.
Nutrition Facts:
- Calories: 180 per egg
- Protein: 3g
- Total Fat: 14g
- Saturated Fat: 8g
- Carbohydrates: 12g
- Fiber: 1g
- Sugar: 8g
10 Mini Chocolate Easter Cheesecakes

These Mini Chocolate Easter Cheesecakes are perfect for your holiday celebrations! They are small, delicious, and full of chocolatey goodness. Your family and friends will love these delightful treats.
Prep Time: 20 minutes
Total Time: 2 hours 20 minutes
Servings: 12
Ingredients:
- 1 cup chocolate cookie crumbs
- 4 tablespoons butter, melted
- 2 packages (8 oz each) cream cheese, softened
- 1 cup powdered sugar
- 1 teaspoon vanilla extract
- 2 eggs
- 1 cup semi-sweet chocolate chips
- Whipped cream or chocolate shavings, for topping (optional)
Instructions:
Preheat your oven to 325°F (160°C). Line a 12-cup muffin tin with cupcake liners.
In a mixing bowl, combine the chocolate cookie crumbs and melted butter. Stir until the mixture looks like wet sand. Press a spoonful of this mixture into the bottom of each cupcake liner to form the crust.
In another bowl, beat the cream cheese until smooth. Gradually add the powdered sugar and vanilla extract, mixing until well combined. Add in the eggs, one at a time, mixing just until combined. Do not overmix.
Melt the chocolate chips in the microwave or on the stove, then let them cool slightly. Fold the melted chocolate into the cream cheese mixture until fully incorporated.
Spoon the cheesecake mixture into the lined muffin tin, filling each cup about three-quarters full. Bake for 20 minutes or until set around the edges. The center may still look a little soft, but it will firm up as it cools.
Once baked, remove from the oven and let the cheesecakes cool. Transfer them to the refrigerator and chill for at least 2 hours before serving.
When ready to serve, you can top each cheesecake with some whipped cream or chocolate shavings if you like.
Tips:
- Use a food processor to crush the cookies easily.
- If you want colorful toppings, add Easter-themed candy or sprinkles on top!
- Make sure the cream cheese is at room temperature for a smooth filling.
Nutrition Facts:
- Calories: 210
- Protein: 3g
- Carbohydrates: 18g
- Fat: 15g
- Sugar: 9g
11 Bunny Paw Chocolate Clusters

Bunny Paw Chocolate Clusters are a fun and easy treat to make for Easter! They’re cute, delicious, and perfect for sharing with friends and family. Kids will love helping out to create these charming chocolate goodies!
Prep Time: 15 minutes
Total Time: 15 minutes
Servings: 12 clusters
Ingredients:
- 1 cup of milk chocolate chips
- 1 cup of white chocolate chips
- 1 cup of mini marshmallows
- 1/2 cup of peanut butter
- 1/2 cup of crushed pretzels
- 1/4 cup of mini chocolate candies (like M&M’s)
Instructions:
First, start by melting the milk chocolate chips in a microwave-safe bowl. Heat them for 30 seconds at a time, stirring in between, until the chocolate is smooth.
Next, add in the peanut butter and stir well until the mixture is creamy. Slowly mix in the mini marshmallows and crushed pretzels. This will give your clusters a fun texture.
Now, prepare a baking sheet by lining it with parchment paper. Take spoonfuls of the chocolate mixture and drop them onto the parchment, shaping them into small paw shapes. Make sure each cluster has a few pretzel pieces sticking out to resemble bunny toes.
After shaping the clusters, melt the white chocolate chips in another bowl, following the same microwave method as before. Drizzle the melted white chocolate over the top of each paw cluster for added sweetness and decoration.
Finally, sprinkle some mini chocolate candies on top before the white chocolate sets. Let them sit at room temperature to cool and harden for about 10 minutes. Enjoy your adorable Bunny Paw Chocolate Clusters!
Tips:
- For extra fun, use colored chocolate melts instead of white chocolate to create colorful bunny paws.
- Make sure to stir the chocolate thoroughly to avoid any lumps.
- Store any leftovers in an airtight container for up to a week.
Nutrition Facts:
- Calories: 120 per cluster
- Total Fat: 6g
- Saturated Fat: 3g
- Cholesterol: 1mg
- Sodium: 50mg
- Total Carbohydrates: 15g
- Dietary Fiber: 1g
- Sugars: 8g
- Protein: 2g
12 Chocolate-Covered Strawberry Eggs

Chocolate-Covered Strawberry Eggs are a fun and tasty treat to make for Easter! They look like little eggs and are super easy to prepare. Get ready to enjoy this delightful combination of strawberries and chocolate!
Prep Time: 20 minutes
Additional Time: 30 minutes
Total Time: 50 minutes
Servings: 12
Ingredients:
- 12 fresh strawberries
- 1 cup semi-sweet chocolate chips
- 1 tablespoon coconut oil (optional for smoothness)
- Sprinkles or chopped nuts for decoration (optional)
Instructions:
Start by washing the fresh strawberries gently under cold water. Pat them dry with a paper towel. Make sure they are completely dry, as any water can cause the chocolate to seize up.
Next, place the semi-sweet chocolate chips in a microwave-safe bowl. If you want your chocolate to be extra smooth, add the coconut oil as well. Heat the chocolate in the microwave in 30-second intervals, stirring after each interval until fully melted and smooth.
Once the chocolate is melted, hold each strawberry by the stem and dip it into the chocolate. Make sure to coat the strawberry fully and allow any excess chocolate to drip off. Place the chocolate-dipped strawberry on a parchment-lined baking sheet.
After dipping all the strawberries, you can add decorations like sprinkles or chopped nuts while the chocolate is still wet. This will help them stick better! Once decorated, place the baking sheet in the refrigerator.
Let the chocolate-covered strawberries chill for about 30 minutes or until the chocolate has completely set. Once ready, take them out and arrange on a plate to serve.
Tips:
- Make sure the strawberries are at room temperature; this helps the chocolate stick better.
- You can use white chocolate or dark chocolate for a different flavor!
- Feel free to experiment with your favorite toppings to make them unique!
Nutrition Facts:
- Calories: 70 per strawberry
- Protein: 1g
- Carbohydrates: 10g
- Fat: 3g
- Fiber: 1g
13 Nutty Chocolate Bunny Pops

These Nutty Chocolate Bunny Pops are a fun and delicious treat perfect for Easter celebrations! Made with creamy chocolate and crunchy nuts, they’re sure to put a smile on everyone’s face. Plus, they’re easy to make, which means you can whip them up in no time!
Prep Time: 15 minutes
Additional Time: 30 minutes
Total Time: 45 minutes
Servings: 12 pops
Ingredients:
- 1 cup semi-sweet chocolate chips
- 1/2 cup creamy peanut butter
- 1 cup chopped nuts (like almonds or walnuts)
- 12 lollipop sticks
- 1/2 cup sprinkles (optional)
- 1 teaspoon vanilla extract
Instructions:
Start by melting the chocolate chips in a microwave-safe bowl. Heat them in the microwave in 30-second bursts, stirring in between until the chocolate is completely smooth. This should take about 1 to 2 minutes.
Next, stir the peanut butter and vanilla extract into the melted chocolate until well combined. Make sure the mixture is smooth and creamy.
Now, it’s time to add the chopped nuts. Mix them in gently, ensuring they’re evenly distributed throughout the chocolate mixture.
Prepare a baking sheet by lining it with parchment paper. Spoon the chocolate mixture onto the sheet, shaping it into bunny heads. Insert a lollipop stick into the bottom of each pop.
If you want to make them even more fun, sprinkle some sprinkles on top of the chocolate before it sets.
Put the baking sheet in the fridge for about 30 minutes to let the pops firm up. Once they’re set, they’re ready to enjoy!
Tips:
- You can substitute the peanut butter with any nut butter or even sunbutter for a nut-free version.
- Try using different types of chocolate for varying flavors. Milk chocolate, dark chocolate, or even white chocolate works great!
- To add a fun twist, let your kids decorate the bunny pops with edible markers or more sprinkles once they’ve set.
Nutrition Facts:
- Calories: 150 per pop
- Protein: 4g
- Fat: 9g
- Carbohydrates: 16g
- Sugar: 10g
- Fiber: 1g
14 Triple-Layer Chocolate Easter Cake
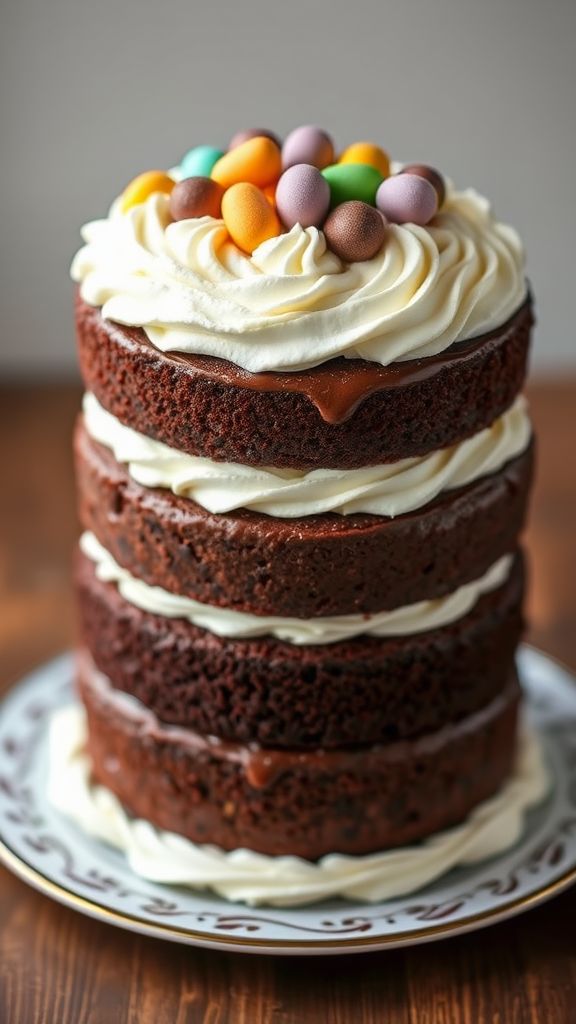
This Triple-Layer Chocolate Easter Cake is a delightful centerpiece for your Easter celebration. With rich chocolate flavors and fluffy layers, it’s sure to impress your family and friends. Let’s get baking!
Prep Time: 30 minutes
Cook Time: 30 minutes
Additional Time: 2 hours (to cool and decorate)
Total Time: 3 hours
Servings: 12
Ingredients:
- 1 ¾ cups all-purpose flour
- 1 ½ cups granulated sugar
- ¾ cup unsweetened cocoa powder
- 1 ½ teaspoons baking powder
- 1 ½ teaspoons baking soda
- 1 teaspoon salt
- 2 large eggs
- 1 cup whole milk
- ½ cup vegetable oil
- 2 teaspoons vanilla extract
- 1 cup boiling water
- 1 cup heavy whipping cream
- 2 cups powdered sugar
- ½ cup semi-sweet chocolate chips
- Chocolate Easter candies (for decoration)
Instructions:
Preheat your oven to 350°F (175°C). Grease and flour three 9-inch round cake pans.
In a large bowl, mix the flour, granulated sugar, cocoa powder, baking powder, baking soda, and salt. Stir until combined.
Next, add the eggs, milk, vegetable oil, and vanilla extract to the dry ingredients. Mix on medium speed for about 2 minutes. Then, carefully stir in the boiling water. The batter will be thin, but that’s okay!
Pour the batter evenly into the prepared cake pans. Bake for about 30 minutes, or until a toothpick inserted in the center comes out clean. Once done, let the cakes cool in the pans for 10 minutes, then remove them and transfer to wire racks to cool completely.
While the cakes are cooling, whip the heavy cream in a medium bowl. Once it starts to thicken, gradually add the powdered sugar until soft peaks form.
Once the cakes are completely cool, place the first layer on a serving plate. Spread a layer of whipped cream on top, then sprinkle with chocolate chips. Add the second cake layer and repeat the process. Finally, top with the last cake layer and frost the entire cake with the remaining whipped cream.
Decorate the top with Chocolate Easter candies to give it that festive look.
Refrigerate the cake for about 1 hour before serving to set the layers.
Tips:
- For added flavor, consider mixing in 1 teaspoon of coffee into the boiling water before adding it to the cake batter.
- You can use any type of chocolate candies for decoration according to your taste.
- Make sure all ingredients are at room temperature for the best baking results.
Nutrition Facts:
- Calories: 360 per slice
- Fat: 18g
- Carbohydrates: 49g
- Protein: 4g
- Sugar: 30g
15 Chocolate Pudding Easter Parfaits

Looking for a fun and delicious Easter dessert? These Chocolate Pudding Easter Parfaits are perfect for the holiday! Layered with creamy chocolate pudding, fluffy whipped cream, and colorful candies, they’ll delight everyone at your Easter celebration.
Prep Time: 15 minutes
Total Time: 15 minutes
Servings: 4
Ingredients:
- 2 cups chocolate pudding (store-bought or homemade)
- 1 cup whipped cream (store-bought or homemade)
- 1 cup chocolate cookies, crushed
- 1/2 cup Easter-themed candies (like mini eggs or jelly beans)
- Mint leaves for garnish (optional)
Instructions:
Start by preparing your parfait glasses or cups. You can use clear cups to show off the beautiful layers of the dessert.
Next, spoon 1/4 cup of chocolate pudding into the bottom of each cup. Make sure the pudding is evenly spread to create a smooth base.
Now, add a layer of crushed chocolate cookies on top of the pudding. Use about 2 tablespoons of crushed cookies for each parfait. This will give a nice crunch.
Then, add a layer of whipped cream. Spoon in 1/4 cup of whipped cream over the cookie layer, spreading it gently to avoid mixing the layers.
Repeat the layers until you’ve used up all the ingredients. You should be able to create 2 layers of pudding, cookies, and whipped cream.
Finish by topping each parfait with a sprinkle of colorful Easter candies. You can also add a mint leaf on top for a pop of color.
Chill the parfaits in the refrigerator for about 30 minutes if you want them extra cool before serving.
Tips:
- For a richer chocolate flavor, consider using dark chocolate pudding.
- Feel free to mix in your favorite candies or even fruit for added flavor and texture.
- Use different colored candies to make the parfaits more festive and fun!
Nutrition Facts:
- Calories: 320 per serving
- Total Fat: 15g
- Saturated Fat: 8g
- Cholesterol: 30mg
- Sodium: 160mg
- Total Carbohydrate: 45g
- Dietary Fiber: 2g
- Sugars: 20g
- Protein: 4g
16 Chocolate Peanut Butter Egg Bliss

Sink into the deliciousness of Chocolate Peanut Butter Egg Bliss! This amazing treat combines the creaminess of peanut butter with rich chocolate, making it the perfect sweet snack. Get ready to impress your family and friends with this simple yet delightful recipe!
Prep Time: 15 minutes
Additional Time: 30 minutes
Total Time: 45 minutes
Servings: 12
Ingredients:
- 1 cup creamy peanut butter
- 1/4 cup powdered sugar
- 1/4 cup unsweetened cocoa powder
- 1/2 teaspoon vanilla extract
- 1 1/2 cups semi-sweet chocolate chips
- 1 tablespoon coconut oil (optional for smoothness)
Instructions:
Start by mixing the peanut butter, powdered sugar, cocoa powder, and vanilla extract in a bowl. Stir until everything is fully combined and creamy.
Next, shape the mixture into small egg-shaped forms using your hands. Place these on a baking sheet lined with parchment paper. After shaping, pop the tray into the fridge for 30 minutes to let them firm up.
While the peanut butter eggs are chilling, prepare the chocolate coating. In a microwave-safe bowl, combine the chocolate chips and coconut oil. Microwave in 30-second intervals, stirring in between, until the chocolate is completely melted and smooth.
Once the peanut butter eggs are set, dip each one into the melted chocolate. Make sure they are fully coated. Place the chocolate-covered eggs back onto the parchment paper.
After you finish coating all the eggs, return them to the fridge again for about 10 minutes to allow the chocolate to set completely.
Tips:
- You can add sprinkles or crushed nuts on top of the chocolate coating for extra flair.
- If you prefer a darker taste, use dark chocolate instead of semi-sweet chocolate chips.
- Store any leftovers in an airtight container in the fridge for up to one week.
Nutrition Facts:
- Calories: 150 per egg
- Total Fat: 10g
- Saturated Fat: 4g
- Cholesterol: 0mg
- Sodium: 50mg
- Total Carbohydrates: 15g
- Dietary Fiber: 1g
- Sugars: 5g
- Protein: 4g
17 Choco-Crispy Marshmallow Treats

Choco-Crispy Marshmallow Treats are a fun and easy dessert to make, especially during Easter! They combine the sweetness of marshmallows with the crunch of crispy rice cereal, all coated in delicious chocolate. These treats are perfect for sharing with family and friends.
Prep Time: 15 minutes
Total Time: 15 minutes
Servings: 12 treats
Ingredients:
- 3 cups crispy rice cereal
- 2 cups mini marshmallows
- 1 cup chocolate chips (milk or dark chocolate)
- 2 tablespoons butter
- 1/2 teaspoon vanilla extract
- Sprinkles (optional, for decoration)
Instructions:
Start by greasing a 9×9 inch baking pan with butter or cooking spray to prevent sticking. Set it aside for later.
Next, melt the 2 tablespoons of butter in a large saucepan over low heat. Once the butter is melted, add in the 2 cups of mini marshmallows and stir continuously until they are completely melted and smooth.
Remove the saucepan from the heat and mix in the 1/2 teaspoon of vanilla extract. Then, gradually add the 3 cups of crispy rice cereal to the melted marshmallow mixture. Stir until all the cereal is well coated.
Now, pour the mixture into the prepared baking pan. Press it down firmly with a spatula or your hands to create an even layer. Let it cool for about 5-10 minutes.
While the treats cool, melt the 1 cup of chocolate chips in a microwave-safe bowl. Heat them in the microwave in 30-second intervals, stirring in between, until the chocolate is completely melted and smooth.
Once the treats have cooled and firmed up, pour the melted chocolate over the top. Use a spatula to spread it evenly. If you like, sprinkle some colorful sprinkles on top for a festive touch.
Allow the chocolate to set for a few minutes. Then, cut the cooled treats into squares and enjoy!
Tips:
- For extra flavor, you can add a pinch of salt to the chocolate before melting it.
- You can substitute chocolate chips with butterscotch or white chocolate for different flavors.
- Store any leftovers in an airtight container at room temperature for up to 3 days.
Nutrition Facts:
- Calories: 150
- Total Fat: 7g
- Saturated Fat: 4g
- Cholesterol: 10mg
- Sodium: 20mg
- Total Carbohydrates: 22g
- Dietary Fiber: 0g
- Sugars: 10g
- Protein: 1g
18 Easter Egg Cookie Sandwiches

Easter Egg Cookie Sandwiches are a fun and delicious treat to celebrate the holiday. These colorful cookies filled with sweet frosting will surely impress both kids and adults alike! Get ready to sprinkle some joy into your Easter festivities!
Prep Time: 30 minutes
Total Time: 1 hour
Servings: 12 sandwiches
Ingredients:
- 1 cup unsalted butter, softened
- 1 cup granulated sugar
- 1 cup brown sugar, packed
- 2 large eggs
- 2 tsp vanilla extract
- 3 cups all-purpose flour
- 1 tsp baking soda
- 1/2 tsp salt
- 1 cup chocolate chips
- 1/2 cup colorful sprinkles
- 1 cup buttercream frosting (store-bought or homemade)
- 1/2 cup mini chocolate eggs (for decorating)
Instructions:
Start by preheating your oven to 350°F (175°C). In a large mixing bowl, cream together the softened butter, granulated sugar, and brown sugar until the mixture is light and fluffy. This should take about 2-3 minutes.
Next, add in the eggs one at a time, mixing well after each addition. Then, stir in the vanilla extract. In another bowl, whisk together the flour, baking soda, and salt. Gradually add this dry mixture to the wet ingredients, mixing until just combined. Carefully fold in the chocolate chips and colorful sprinkles.
Now, scoop out tablespoon-sized amounts of dough and roll them into balls. Place the dough balls onto a baking sheet lined with parchment paper, leaving some space between each. Bake for about 10-12 minutes, or until the edges are just golden. Let the cookies cool completely on the baking sheet.
Once the cookies are cool, take half of them and spread a generous layer of buttercream frosting on the flat side. Place another cookie, flat side down, on top of the frosted cookie to create a sandwich. For a festive touch, decorate the cookies with mini chocolate eggs on top and more colorful sprinkles if you like.
Tips:
- For extra flavor, you can add 1/2 tsp of almond extract to the cookie dough.
- If you want a chewier cookie, slightly underbake them by a minute or two.
- Store leftover sandwiches in an airtight container for up to a week.
Nutrition Facts:
- Calories: 250 per sandwich
- Total Fat: 12g
- Saturated Fat: 7g
- Cholesterol: 30mg
- Sodium: 100mg
- Total Carbohydrates: 35g
- Dietary Fiber: 1g
- Sugars: 20g
- Protein: 2g
19 Chocolate-Dipped Fruit Kabobs

These Chocolate-Dipped Fruit Kabobs are a fun and tasty way to enjoy fruit, plus they’re super easy to make! Perfect for parties or just a fun snack, these kabobs bring together fresh fruit and delicious chocolate. Your kids will love helping out!
Prep Time: 15 minutes
Total Time: 15 minutes
Servings: 6 kabobs
Ingredients:
- 1 cup strawberries, hulled and whole
- 1 cup bananas, sliced
- 1 cup pineapple chunks
- 1 cup grapes, whole
- 1 cup chocolate chips (milk, dark, or semi-sweet)
- 1 tablespoon coconut oil (optional, for a smoother chocolate)
- Wooden skewers
Instructions:
Start by preparing your fruits. Make sure your strawberries are hulled, your bananas are sliced, your pineapple is cut into chunks, and your grapes are washed. This will make the fruit ready to be skewered.
Next, take the wooden skewers and begin assembling your kabobs. Thread the fruits onto the skewers in any order you like. Get creative with patterns or use a rainbow approach!
Now, it’s time to melt the chocolate. In a microwave-safe bowl, combine the chocolate chips and coconut oil. Heat in the microwave in 30-second intervals, stirring in between until it’s completely melted and smooth.
Once your chocolate is melted, dip each fruit kabob into the chocolate. You can choose to dip the whole kabob or just the tip, depending on your preference.
For the final touch, place the dipped kabobs on a tray lined with parchment paper. Allow them to set for a few minutes or pop them in the fridge for faster hardening.
Tips:
- Feel free to mix and match any of your favorite fruits for the kabobs.
- Use white chocolate for a different flavor and fun look.
- You can sprinkle some nuts or sprinkles over the chocolate while it’s still wet for added flair.
Nutrition Facts:
- Calories: 150 per kabob
- Total Fat: 6g
- Saturated Fat: 3g
- Cholesterol: 0mg
- Sodium: 5mg
- Total Carbohydrates: 22g
- Dietary Fiber: 2g
- Sugars: 12g
- Protein: 2g
20 Silky Smooth Chocolate Fondue Fest
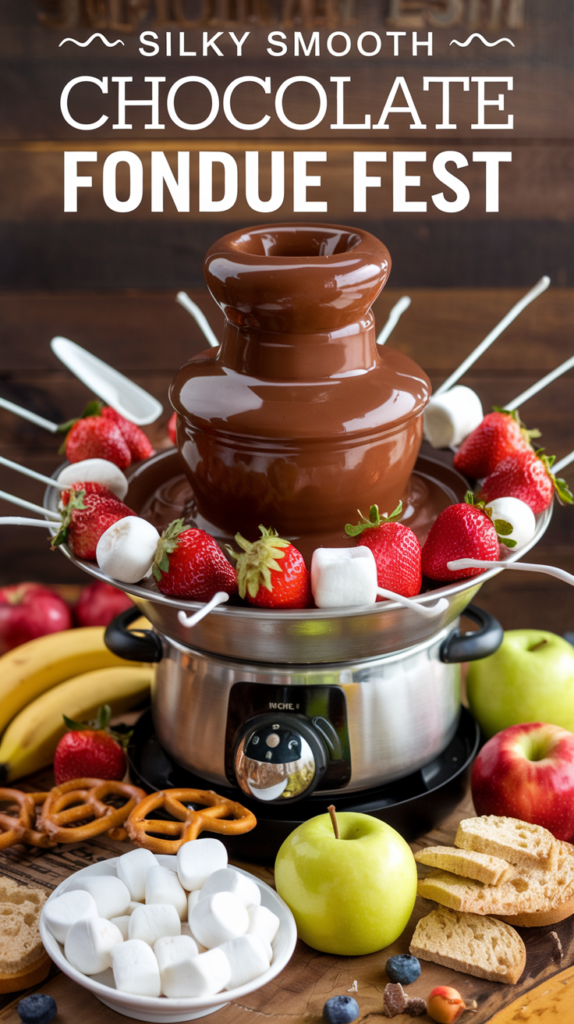
Indulge in the decadent experience of a Silky Smooth Chocolate Fondue Fest! This recipe is perfect for gatherings with family and friends, where delicious dippings meet delightful chocolate. Get ready to dip fruits, marshmallows, and more into a dreamy chocolate fountain of happiness.
Prep Time: 10 minutes
Total Time: 10 minutes
Servings: 4-6
Ingredients:
- 1 cup heavy cream
- 8 oz semi-sweet chocolate, chopped
- 2 tablespoons unsalted butter
- 1 teaspoon vanilla extract
- Fresh fruits (strawberries, bananas, apples)
- Marshmallows
- Pretzels
- Biscotti or cookies
Instructions:
Start by heating the heavy cream in a medium saucepan over medium heat. Stir it occasionally until it begins to simmer, but be careful not to let it boil.
Once the cream is simmering, remove the saucepan from the heat. Add the chopped chocolate, unsalted butter, and vanilla extract to the warm cream. Stir the mixture until everything is well combined and the chocolate has melted completely.
Make sure to keep stirring until you have a silky smooth consistency. If the chocolate seems a little thick, you can add a bit more warm cream to achieve your desired texture.
Transfer the melted chocolate into a fondue pot or a heatproof bowl. If you’re using a fondue pot, keep the heat on low to keep the chocolate warm.
Now, arrange your dippers on a large platter. You can use fresh fruits, marshmallows, pretzels, and cookies to dip into the luscious chocolate. Enjoy warm with friends and family!
Tips:
- For a flavor twist, try adding a scoop of your favorite liqueur to the chocolate mixture.
- To keep the chocolate from cooling, use a candle warmer or hot plate underneath your fondue pot.
- Experiment with different types of chocolate like milk chocolate or white chocolate for more variety.
Nutrition Facts:
- Calories: 250
- Total Fat: 15g
- Saturated Fat: 9g
- Cholesterol: 35mg
- Sodium: 50mg
- Total Carbohydrates: 30g
- Dietary Fiber: 2g
- Sugars: 20g
- Protein: 3g