15 Spring Dinner Party Recipes That Will Impress Every Guest
Spring finally gives you an excuse to cook with ingredients that do half the work for you — bright lemon, tender asparagus, fresh peas, and strawberries that actually taste like strawberries.
This collection leans into that seasonal momentum with dishes like a honey glazed duck breast with crispy rendered skin and a ricotta crostini that comes together in under ten minutes.
The techniques stay approachable — roasting, quick pan searing, simple assembly — so you’re not chained to the stove when guests arrive.
Every recipe here earns its place at a dinner party table without making you feel like you need a culinary degree to pull it off.
1. Lemon Herb Roasted Salmon
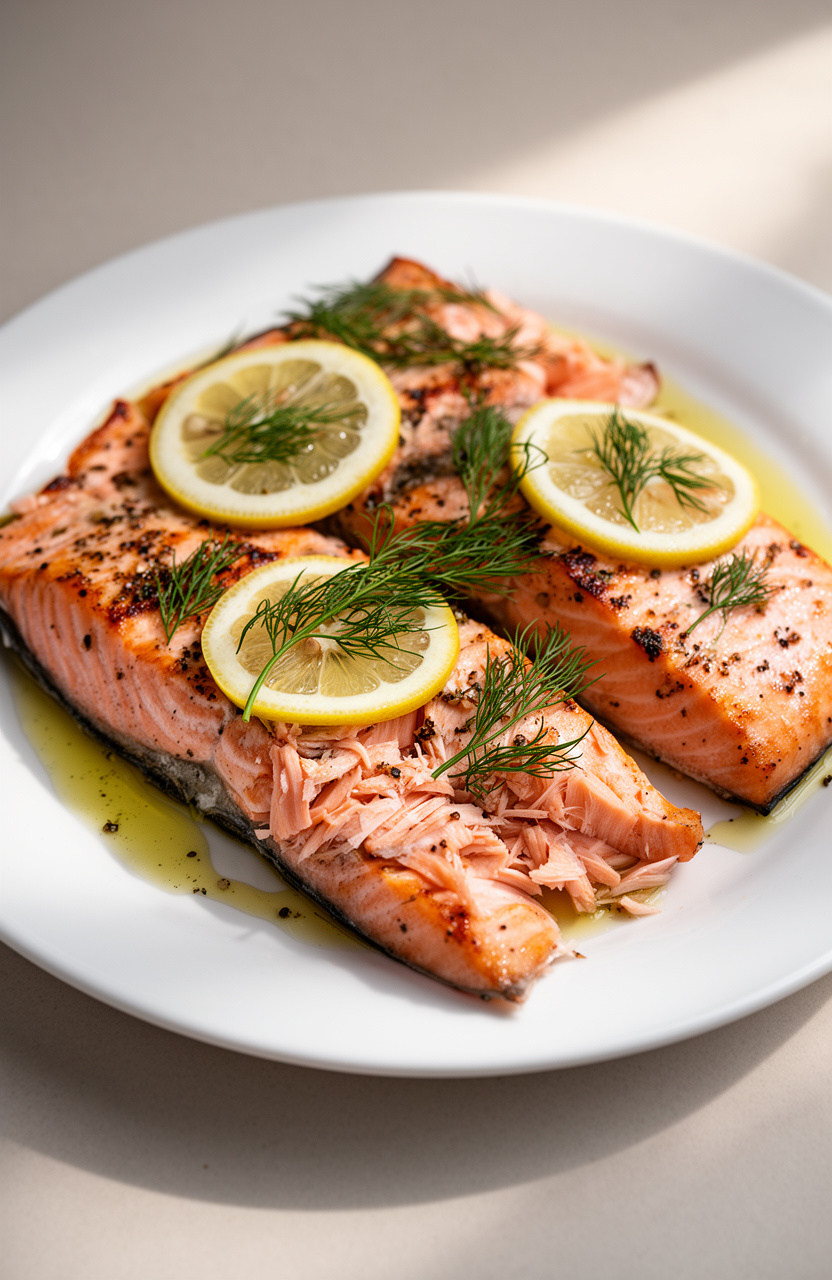
Salmon fillets get a quick soak in a garlic-lemon herb marinade before roasting, which drives bright citrus flavor into the flesh while the skin crisps against the pan. The zest keeps the lemon sharp and aromatic rather than tart, and the olive oil carries the herbs into every flake.
Lemon Herb Roasted Salmon
Garnish
- 🥧Rimmed baking sheet
- 📄Parchment paper or aluminum foil
- 🥣Small mixing bowl
- 🥄Whisk
- 🔪Zester or microplane
- 🔪Sharp knife
- 🪵Cutting board
- 🥄Pastry brush or spoon
- 🌡️Instant-read thermometer
- 🥄Fish spatula
Make Herb Marinade
In a small mixing bowl, whisk together 3 tablespoons olive oil, minced garlic, lemon zest, 2 tablespoons fresh lemon juice, chopped dill, parsley, thyme, 1 teaspoon kosher salt, 1/2 teaspoon black pepper, smoked paprika, and red pepper flakes (if using) until well combined.
Marinate the Salmon
Pat the 4 salmon fillets completely dry with paper towels and place them skin-side down on a parchment-lined baking sheet. Spoon or brush the herb marinade generously over the top and sides of each fillet.
Arrange 2–3 lemon rounds on top of each fillet. Let the salmon marinate at room temperature for 15 minutes to allow the flavors to penetrate the fish.
Preheat the Oven
While the salmon marinates, position an oven rack in the center of the oven and preheat to 400°F (205°C). Allow the oven to fully preheat before roasting.
Roast the Salmon
Transfer the baking sheet with the marinated salmon to the preheated oven. Roast at 400°F for 18–20 minutes, depending on the thickness of the fillets (approximately 4–5 minutes per 1/2 inch of thickness), until the salmon is opaque throughout and flakes easily with a fork.
An instant-read thermometer inserted into the thickest part should read 125°F (52°C) for medium or 145°F (63°C) for well done.
Rest Before Serving
Remove the salmon from the oven and let it rest on the baking sheet for 5 minutes. This allows the juices to redistribute throughout the fillets, keeping them moist and flavorful.
Garnish and Serve
Using a fish spatula, carefully transfer the salmon fillets to serving plates. Garnish each fillet with fresh dill sprigs and serve immediately with lemon wedges on the side for squeezing over the top.
Per serving (1 salmon fillet (6 oz)) — values are estimates


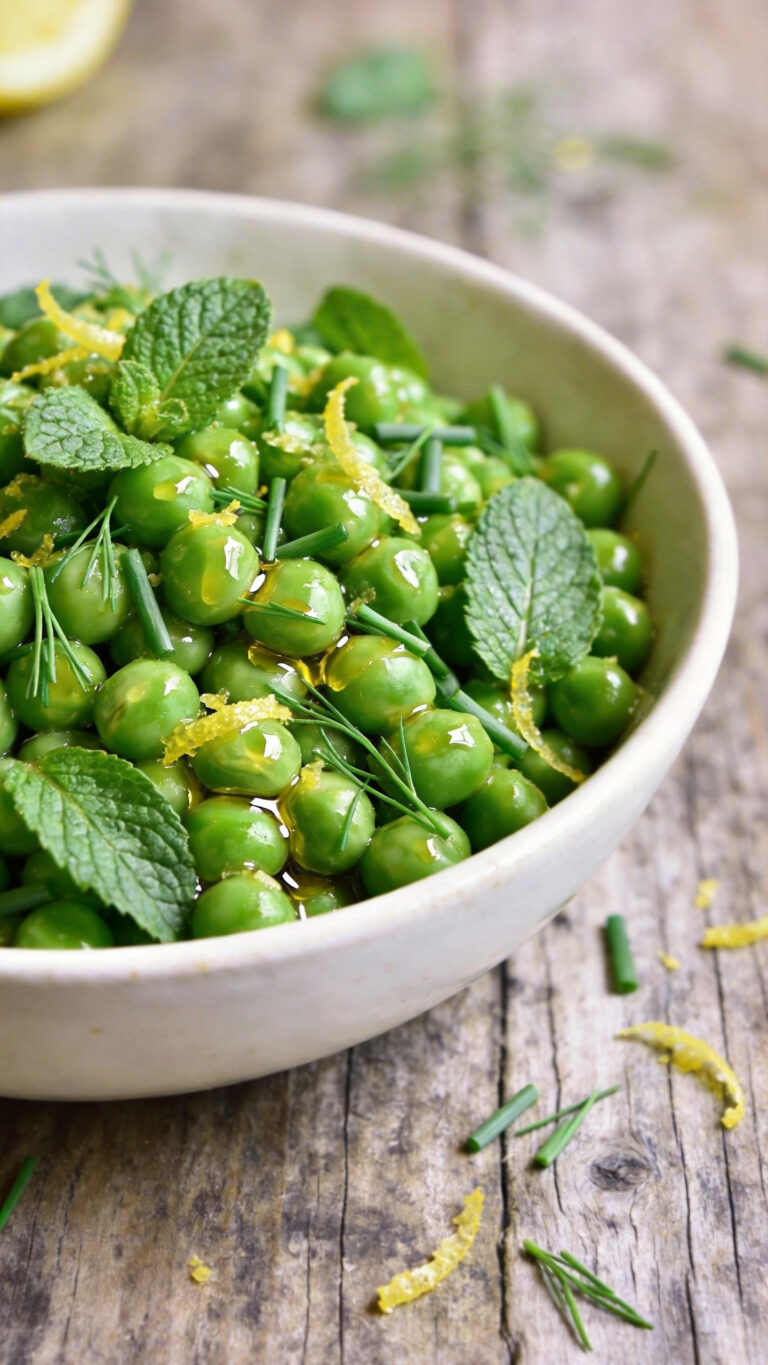
2. Spring Pea and Ricotta Crostini
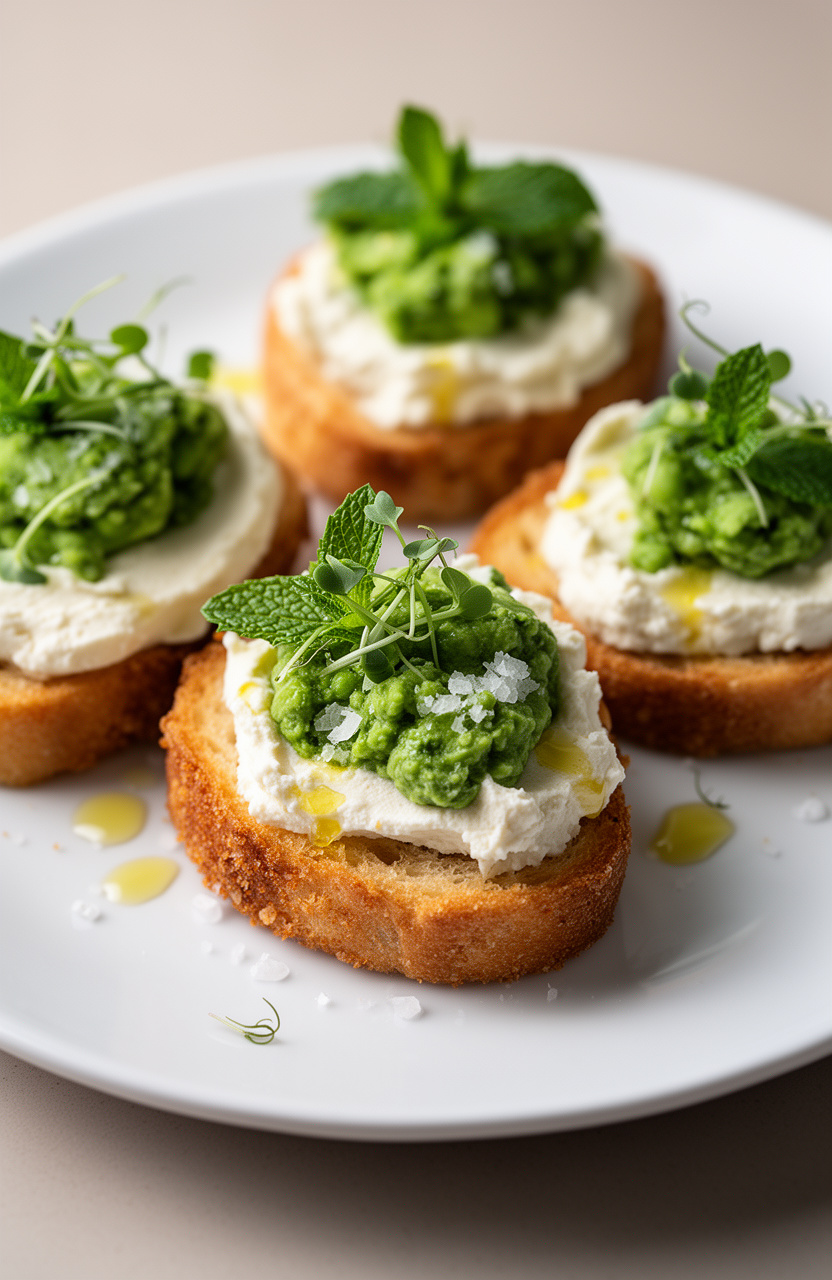
Toasted baguette rounds spread with whipped ricotta and bright smashed peas make a visually striking bite, the white-and-green contrast catching the eye before the creamy, grassy flavor combination does the rest. A drizzle of olive oil and flaky salt sharpen the sweetness of the peas against the mild, pillowy cheese.
Spring Pea and Ricotta Crostini
Crostini
Pea Topping
Garnish
- 🥧Baking sheet
- 🖌️Pastry brush
- 🫕Medium saucepan
- 🪣Colander
- 🌀Food processor or blender
- 🥣Mixing bowl
- 🥄Rubber spatula
- 🔪Microplane or zester
- 🔪Chef’s knife
- 🪵Cutting board
- 🍽️Serving platter
Preheat the Oven
Preheat your oven to 400°F (200°C). Line a large baking sheet with parchment paper or leave it unlined for crispier results.
Prepare the Crostini
Arrange the baguette slices in a single layer on the prepared baking sheet. Using a pastry brush, brush both sides of each slice with 3 tablespoons of extra-virgin olive oil.
Sprinkle the tops lightly with flaky sea salt.
Bake Until Golden
Bake the baguette slices at 400°F for 10 minutes, flipping halfway through at the 5-minute mark, until the crostini are golden brown and crisp on both sides. Remove from the oven and set aside to cool slightly.
Blanch the Peas
Bring a medium saucepan of salted water to a boil over high heat. Add the fresh or thawed peas and cook for 2 minutes until bright green and just tender.
Immediately drain through a colander and rinse under cold running water for 30 seconds to stop cooking and preserve the vibrant green color. This cook step takes approximately 5 minutes including bringing water to a boil.
Blend the Pea Mixture
Transfer the blanched peas to a food processor. Add the ricotta cheese, Parmesan, fresh lemon juice, lemon zest, minced garlic, fresh mint leaves, kosher salt, and black pepper.
Pulse 8 to 10 times until you achieve a chunky, spreadable consistency — you want some texture remaining, not a completely smooth puree. Taste and adjust seasoning with additional salt, pepper, or lemon juice as needed.
Assemble the Crostini
Spoon approximately 1 to 1 1/2 tablespoons of the pea and ricotta mixture onto each toasted baguette slice, spreading it gently to the edges with the back of the spoon or a small spatula.
Garnish and Serve
Arrange the assembled crostini on a serving platter. Top each piece with a few fresh pea shoots or microgreens and a small fresh mint leaf.
Drizzle the platter generously with the remaining 2 tablespoons of extra-virgin olive oil and sprinkle with red pepper flakes if desired. Serve immediately while the crostini are still crisp.
Per serving (3 crostini) — values are estimates

3. Honey Glazed Duck Breast
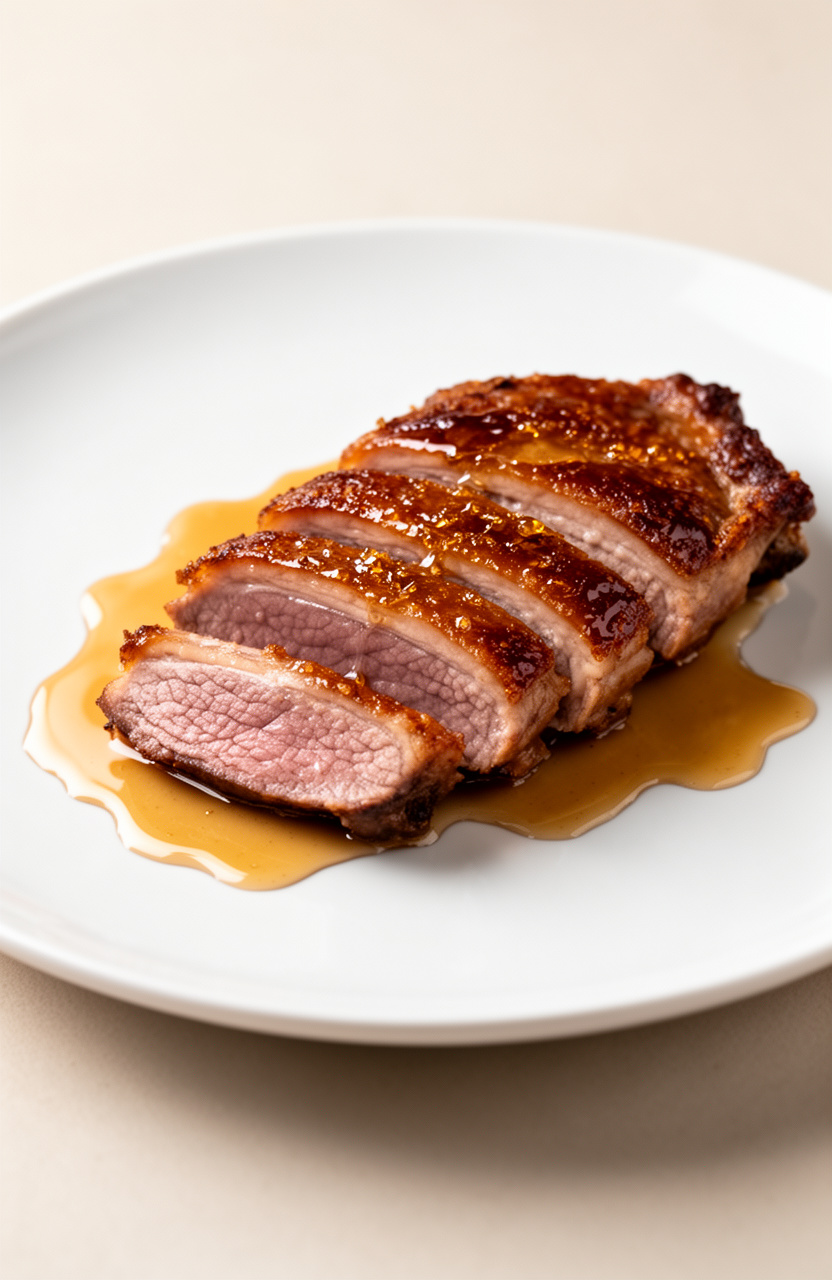
Scoring the skin on duck breasts before searing renders the fat evenly, leaving a shatteringly crisp layer beneath a sticky honey glaze warmed with five-spice powder. The meat stays rosy and tender at the center, with a caramelized crust that carries faint bitterness against the floral sweetness.
Honey Glazed Duck Breast
Honey Glaze
Garnish
- 🔪Sharp chef’s knife
- 🪵Cutting board
- 🥣Small mixing bowl
- 🥄Whisk
- 🍳Oven-safe skillet or cast iron pan
- 🍴Paper towels
- 🌡️Meat thermometer
- 🥢Tongs
- 🥄Spoon or pastry brush for glazing
- 📄Aluminum foil
Score the Skin
Pat the duck breasts completely dry with paper towels. Using a sharp knife, score the skin in a crosshatch pattern at 1/2-inch intervals, cutting through the fat but not into the meat.
This allows the fat to render properly and helps the glaze penetrate. Season both sides generously with 1 teaspoon kosher salt, 1/2 teaspoon black pepper, and 1/2 teaspoon five-spice powder.
Prepare the Glaze
In a small bowl, whisk together 3 tablespoons raw honey, 2 tablespoons tamari (or soy sauce), 1 tablespoon balsamic vinegar, 2 cloves minced garlic, 1 teaspoon grated fresh ginger, and 1/2 teaspoon crushed red pepper flakes until fully combined. Reserve half of the glaze for serving and set the other half aside for basting during cooking.
Marinate the Duck
Place the seasoned duck breasts in a shallow dish or zip-lock bag. Pour half of the prepared honey glaze over the duck, turning to coat evenly.
Let the duck marinate at room temperature for 30 minutes. Do not refrigerate during this short marinate — room temperature marinating ensures even cooking later.
Render the Fat
Preheat your oven to 400°F (200°C). Remove the duck from the marinade and pat the skin side lightly dry with a paper towel.
Place the duck breasts skin-side down in a cold, dry oven-safe skillet or cast iron pan — do not preheat the pan. Turn the heat to medium and cook skin-side down for 8–10 minutes, allowing the fat to slowly render and the skin to turn deep golden brown and crispy.
Pour off excess rendered fat halfway through as needed.
Sear and Glaze
Once the skin is deeply golden and crispy, flip the duck breasts flesh-side down and cook for 2 minutes. Using a spoon or pastry brush, generously apply the reserved basting glaze over the skin.
Flip back to skin-side down and brush the flesh side with glaze as well.
Finish in Oven
Transfer the skillet to the preheated 400°F (200°C) oven with the duck breasts skin-side up. Roast for 6–8 minutes, basting with glaze once more halfway through, until an instant-read thermometer inserted into the thickest part reads 135°F (57°C) for medium-rare or 145°F (63°C) for medium.
The glaze should be caramelized and sticky.
Rest Before Slicing
Remove the duck from the oven and transfer to a cutting board. Tent loosely with aluminum foil and allow the duck breasts to rest for 5 minutes.
Resting is essential — it allows the juices to redistribute throughout the meat so each slice is moist and tender.
Slice and Serve
After resting, slice each duck breast crosswise on a slight diagonal into 1/2-inch thick slices. Fan the slices on warmed plates, drizzle with the reserved honey glaze, scatter fresh thyme leaves over the top, and finish with a pinch of flaky sea salt.
Serve immediately alongside roasted vegetables, mashed potatoes, or a simple green salad.
Per serving (1 duck breast (approx. 6 oz cooked)) — values are estimates


4. Asparagus and Gruyère Tart
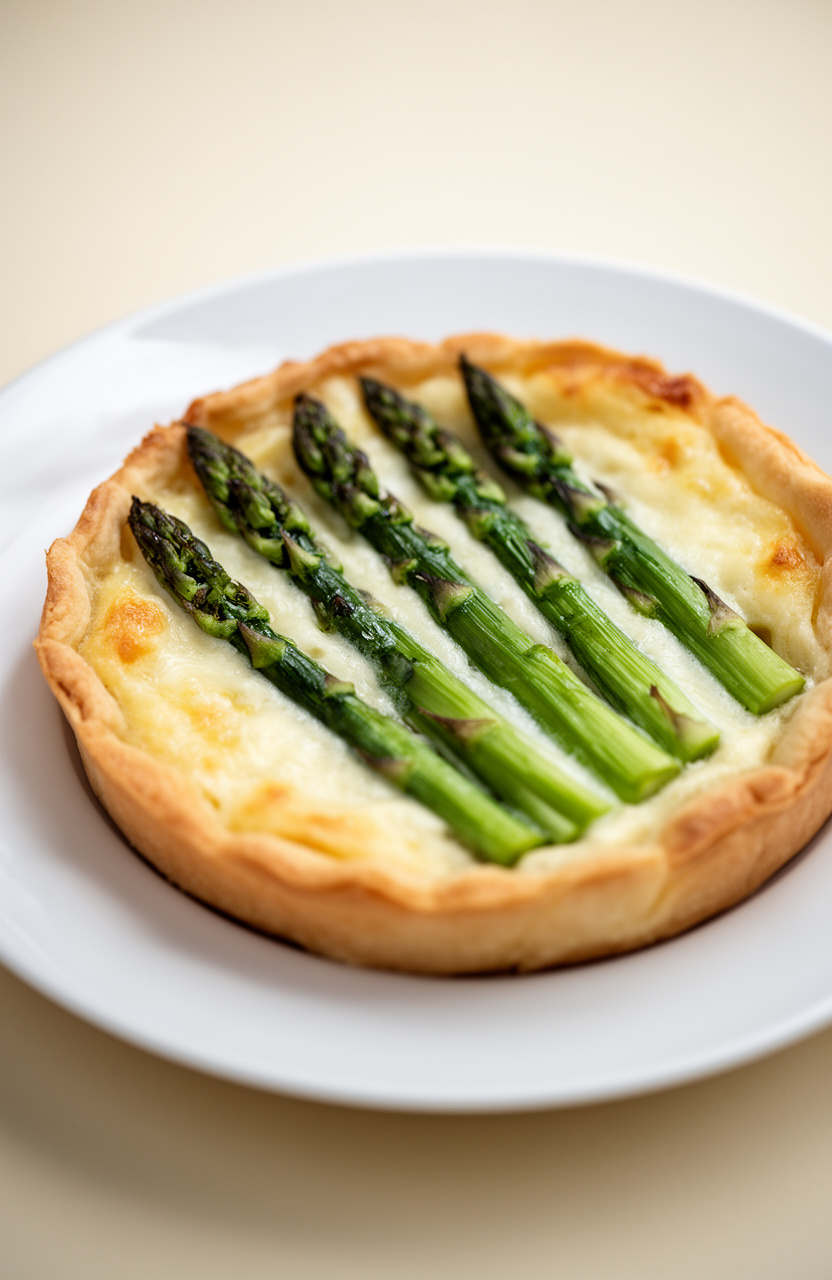
Buttery homemade pastry dough, worked cold and rested before blind baking, forms a crisp, flaky shell that holds a layer of nutty, melted Gruyère beneath tender asparagus spears roasted to a slight char at the tips.
Asparagus and Gruyère Tart
Pastry
Filling
- 🍰9-inch tart pan with removable bottom
- ⚙️food processor or pastry cutter
- 🫙rolling pin
- 🥧baking sheet
- 📄parchment paper
- 🍴pie weights or dried beans
- 🍳large skillet
- 🥣mixing bowl
- 🥄whisk
- 🔪box grater
- 🔪chef’s knife
- 🪵cutting board
- 🪜wire cooling rack
Make Pastry Dough
In a food processor, pulse together 1 1/4 cups all-purpose flour and 1/2 teaspoon fine sea salt until combined. Add the cold cubed butter and pulse 8–10 times until the mixture resembles coarse pea-sized crumbs.
With the processor running, drizzle in ice water one tablespoon at a time, pulsing just until the dough begins to come together and holds when pinched — do not overwork. Turn the dough out onto a lightly floured surface, shape into a flat disc, wrap tightly in plastic wrap, and refrigerate for 30 minutes.
Blanch the Asparagus
While the dough chills, bring a large skillet of salted water to a boil over medium-high heat. Add the trimmed asparagus and blanch for 2 minutes until bright green and just barely tender.
Transfer immediately to a bowl of ice water to stop cooking. Drain well, pat dry with paper towels, then toss with 1 tablespoon olive oil, 1/4 teaspoon kosher salt, and 1/8 teaspoon black pepper.
Set aside.
Blind Bake Shell
Preheat your oven to 375°F (190°C). On a lightly floured surface, roll the chilled dough into an 11-inch circle about 1/8-inch thick.
Carefully fit it into a 9-inch tart pan with a removable bottom, pressing it gently into the edges and trimming any overhang flush with the rim. Prick the base all over with a fork.
Line with parchment paper and fill with pie weights or dried beans. Place on a baking sheet and bake for 20 minutes.
Remove the parchment and weights, then bake for an additional 5 minutes until the crust is pale golden and dry. Remove from oven and set aside.
Prepare Custard Filling
In a medium mixing bowl, whisk together 3 large eggs and 1 cup heavy cream until smooth. Add the minced shallot, fresh thyme leaves, 1/4 teaspoon nutmeg, remaining 1/4 teaspoon kosher salt, and remaining 1/8 teaspoon black pepper.
Stir in 1 cup of the shredded Gruyère and mix to combine.
Assemble the Tart
Sprinkle the remaining 1/2 cup of shredded Gruyère evenly over the bottom of the blind-baked tart shell. Pour the custard mixture over the cheese, spreading it evenly.
Arrange the blanched asparagus spears in a single layer on top of the custard, alternating tips and ends or fanning them in a decorative pattern. Sprinkle the 2 tablespoons of Parmesan evenly over the top.
Bake the Tart
Place the assembled tart (still on the baking sheet) back into the 375°F (190°C) oven and bake for 30–35 minutes, until the custard is just set in the center with only a slight jiggle, and the top is golden and lightly puffed. If the edges of the crust begin to brown too quickly, tent them loosely with foil.
Rest and Serve
Remove the tart from the oven and allow it to rest on a wire rack for 5 minutes before removing the outer ring of the tart pan. Slice into 6 wedges and serve warm or at room temperature, garnished with additional fresh thyme if desired.
Per serving (1 slice (1/6 of tart)) — values are estimates


5. Strawberry Balsamic Chicken Thighs
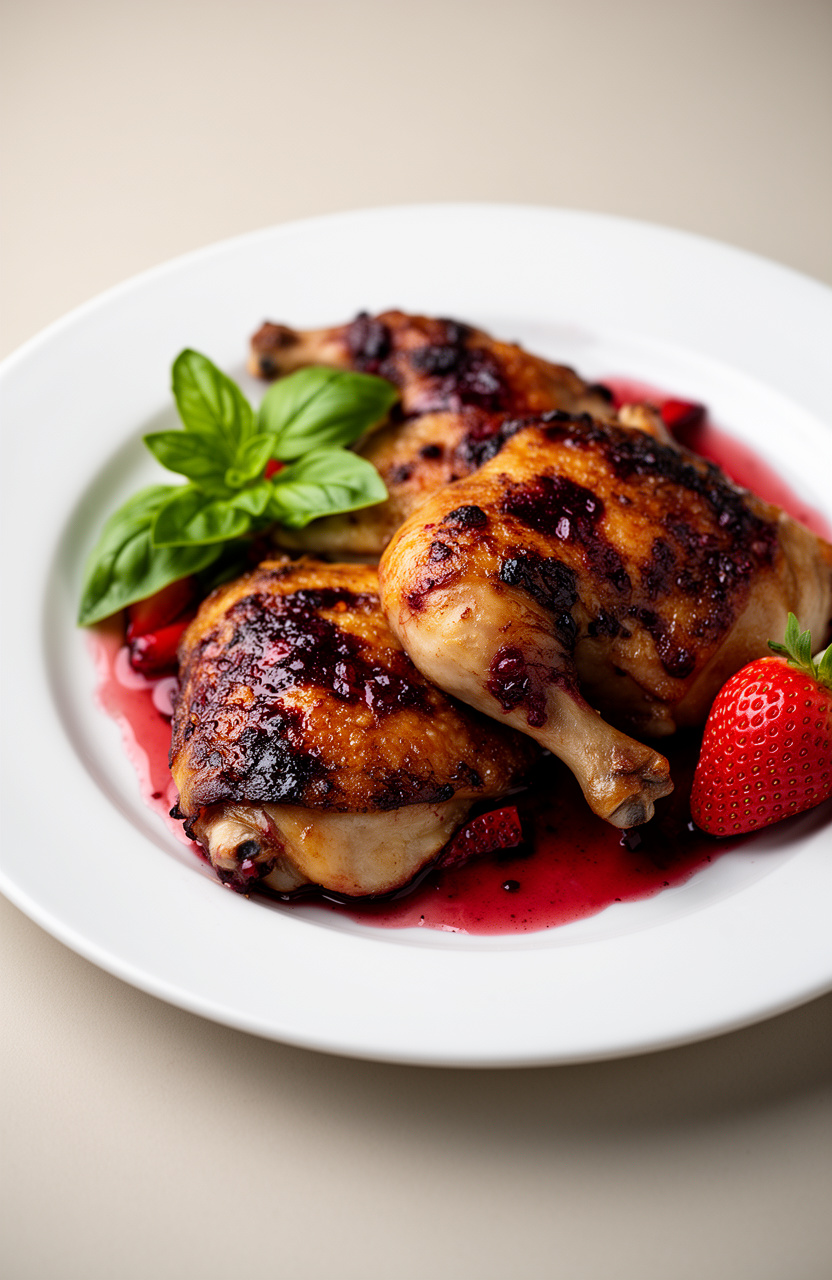
Marinating bone-in chicken thighs in balsamic vinegar and fresh strawberries draws the sweet-tart flavors deep into the meat before it ever hits the pan, leaving the skin lacquered and slightly sticky with a sauce that balances fruity brightness against rich, caramelized vinegar.
Strawberry Balsamic Chicken Thighs
Strawberry Balsamic Sauce
Garnish
- 🍳Large oven-safe skillet or cast iron pan
- 🥣Small mixing bowl
- 🥄Measuring cups and spoons
- 🥢Tongs
- 🥄Wooden spoon or silicone spatula
- 🌡️Instant-read thermometer
- 🪵Cutting board
- 🔪Chef’s knife
- 📄Aluminum foil
Marinate the Chicken
In a small bowl, combine kosher salt, black pepper, garlic powder, and smoked paprika. Pat the chicken thighs completely dry with paper towels, then rub the spice mixture evenly over all sides of each thigh, including under the skin where possible.
Place on a plate, cover loosely, and let marinate at room temperature for 30 minutes. This allows the seasoning to penetrate and helps the skin crisp better during cooking.
Prepare the Sauce
While the chicken marinates, prepare the strawberry balsamic sauce. In a small bowl, combine the halved strawberries, balsamic vinegar, honey, minced garlic, fresh thyme, Dijon mustard, and red pepper flakes.
Stir to coat the strawberries evenly and set aside, allowing the flavors to begin melding together.
Sear the Chicken
Preheat your oven to 400°F (200°C). Heat 2 tablespoons of olive oil in a large oven-safe skillet or cast iron pan over medium-high heat until shimmering, about 2 minutes.
Place the chicken thighs skin-side down in the pan without crowding. Sear undisturbed for 7–8 minutes until the skin is deeply golden brown and releases easily from the pan.
Flip and sear the other side for 3 minutes. Transfer the chicken to a plate temporarily.
Build the Sauce
Reduce the heat to medium. Carefully pour off all but 1 tablespoon of fat from the skillet.
Add the strawberry balsamic mixture to the hot pan. Using a wooden spoon, scrape up any browned bits from the bottom of the pan.
Cook the sauce for 3–4 minutes, stirring occasionally, until the strawberries begin to soften and break down and the sauce starts to thicken slightly.
Finish in Oven
Nestle the seared chicken thighs skin-side up back into the skillet, resting them on top of the strawberry balsamic sauce. Spoon a little sauce over the sides of each thigh, keeping the skin dry for crispness.
Transfer the skillet to the preheated 400°F oven and roast for 18–20 minutes, until the chicken reaches an internal temperature of 165°F (74°C) when measured at the thickest part away from the bone, and the skin is crispy and caramelized.
Rest and Serve
Remove the skillet from the oven and let the chicken rest in the pan for 5 minutes — this allows the juices to redistribute throughout the meat. The sauce will continue to thicken slightly as it cools.
Spoon the glossy strawberry balsamic sauce generously over each chicken thigh. Garnish with freshly sliced basil and a whole strawberry on the side.
Serve immediately with your choice of roasted vegetables, mashed potatoes, or crusty bread to soak up the sauce.
Per serving (1 chicken thigh with sauce) — values are estimates

6. Saffron Seafood Paella
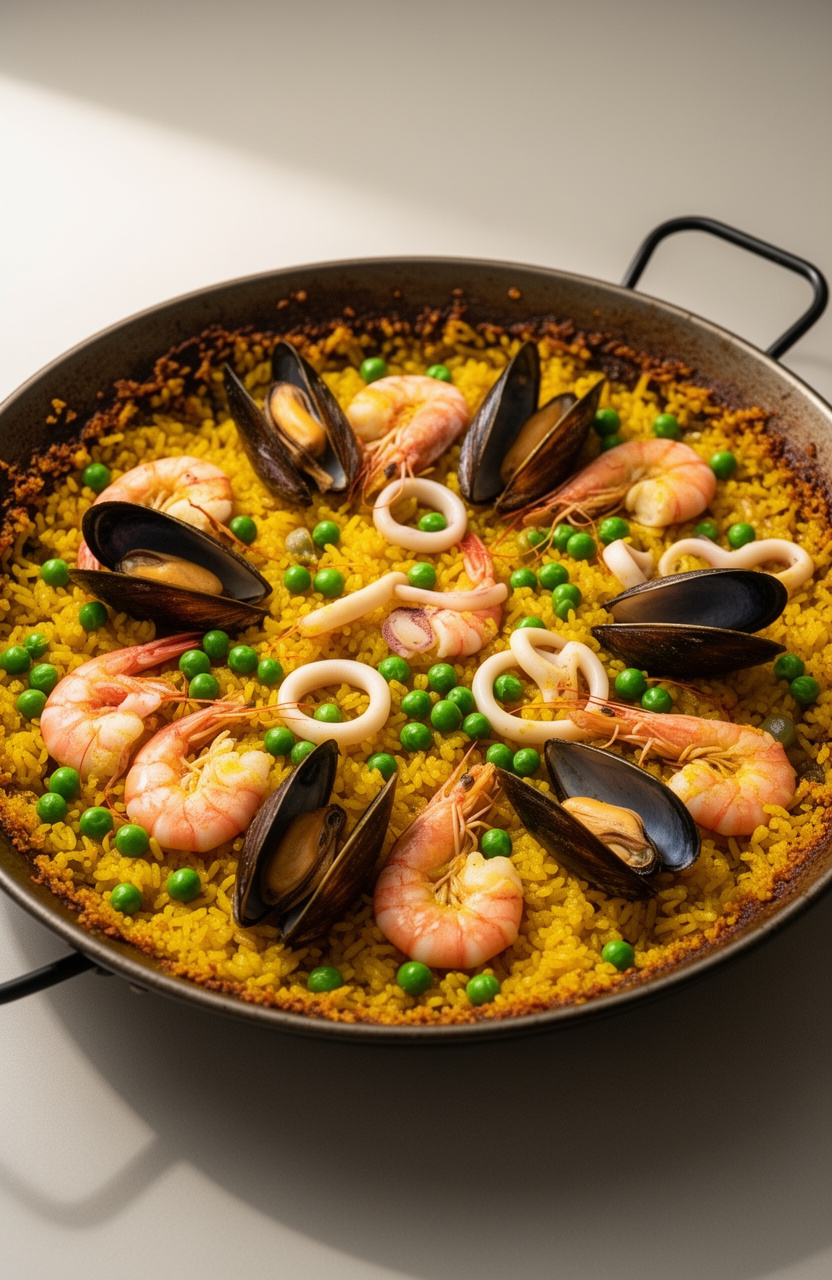
Saffron threads bloom in warm water before hitting the pan, releasing their floral, faintly metallic depth into a base of softened onion and olive oil that stains the rice a deep, unmistakable gold.
Saffron Seafood Paella
Saffron Infusion
Seafood
Seasoning
Garnish
- 🍳15-inch paella pan or wide shallow skillet
- 🥣small bowl
- 🥄ladle
- 🥢kitchen tongs
- 🔪chef’s knife
- 🪵cutting board
- 🔪box grater
- 🥄measuring cups and spoons
- 📄aluminum foil
Infuse the Saffron
Place 1/2 teaspoon saffron threads in a small bowl and pour 1/2 cup warm water (about 120°F) over them. Gently crush the threads with the back of a spoon.
Let steep for 10 minutes until the water turns a deep golden-orange color. This infusion is critical for both color and flavor.
Prepare the Sofrito
Heat 3 tablespoons of extra-virgin olive oil in a 15-inch paella pan over medium-high heat. Add the diced onion and red bell pepper.
Cook, stirring occasionally, for 6–8 minutes until softened and beginning to caramelize. Add the minced garlic and cook for 1 minute until fragrant.
Build the Base
Add the grated tomatoes, 1 teaspoon smoked paprika, and 1/4 teaspoon cayenne pepper to the pan. Stir to combine and cook over medium-high heat for 5–7 minutes, stirring frequently, until the mixture darkens and most of the liquid has evaporated.
This concentrated sofrito is the flavor foundation of the paella.
Toast the Rice
Add 2 cups Bomba rice to the pan and stir to coat every grain in the sofrito. Toast the rice for 2 minutes, stirring constantly, until the edges of the grains look slightly translucent.
Season with 1 teaspoon kosher salt and 1/2 teaspoon black pepper.
Deglaze and Add Liquid
Pour in 1 cup dry white wine and stir, scraping up any bits from the bottom of the pan. Allow the wine to reduce for 2 minutes.
Add the saffron infusion (water and threads) and all 4 cups of warm seafood stock. Stir once to distribute evenly, then spread the rice in a single even layer.
Do not stir again after this point.
Simmer the Rice
Bring the liquid to a vigorous boil over high heat, then reduce to medium and cook uncovered for 10 minutes. The liquid should be visibly bubbling throughout.
Do not stir — this allows the coveted socarrat (crispy rice crust) to form on the bottom.
Add the Seafood
Arrange the mussels and clams hinge-side down in the rice, pressing them in slightly. Nestle the shrimp and calamari rings evenly across the surface.
Scatter the thawed peas over the top. Season the seafood lightly with the remaining 1/2 teaspoon kosher salt.
Continue cooking over medium heat for 10–12 minutes, until the shrimp are pink and curled, the mussels and clams have opened, and most of the liquid has been absorbed. Discard any shellfish that do not open.
Develop the Socarrat
Increase heat to medium-high for the final 2–3 minutes to develop the socarrat — the golden, slightly crispy rice crust on the bottom. Listen for a faint crackling sound.
To check, use a spoon to carefully lift a small edge of rice from the bottom. It should be golden and slightly crispy, not burnt.
Remove from heat immediately once the socarrat is achieved.
Rest and Serve
Remove the paella pan from heat and tent loosely with aluminum foil. Let rest for 5 minutes — this allows the residual steam to finish cooking the rice and meld the flavors.
Uncover, garnish generously with fresh chopped parsley, and serve directly from the pan with lemon wedges on the side for squeezing.
Per serving (1/6 of paella) — values are estimates


7. Whipped Feta Stuffed Lamb Chops
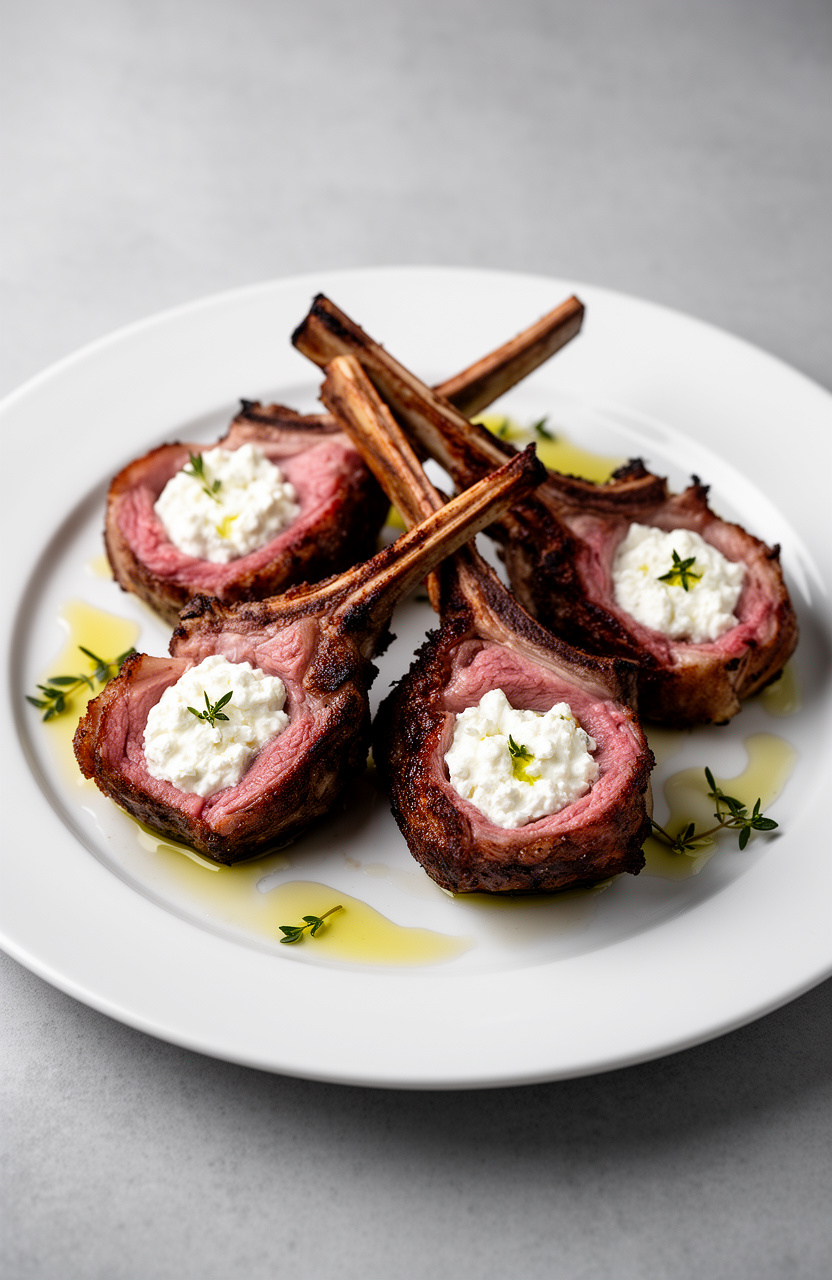
Whipping feta until silky and tangy gives you a creamy filling that melts into thick-cut lamb loin chops as they sear, while minced garlic and fresh rosemary pressed into the meat leave a sharp, herby crust on the outside.
Whipped Feta Stuffed Lamb Chops
Lamb
Whipped Feta
Garnish
- ⚙️Food processor
- 🥣Mixing bowl
- 🔪Sharp boning or paring knife
- 📄Plastic wrap
- 🍳Large cast-iron skillet or heavy oven-safe pan
- 🌡️Meat thermometer
- 🥢Tongs
- 🛍️Piping bag or zip-lock bag with corner snipped
- 🫕Small saucepan
- 🪵Cutting board
- 📍Toothpicks or kitchen twine
Make Whipped Feta
Add 8 oz crumbled feta and 4 oz softened cream cheese to a food processor. Process for 1 minute until the mixture begins to come together.
With the processor running, drizzle in 2 tablespoons olive oil and 1 tablespoon lemon juice. Continue processing for 2–3 minutes until completely smooth and creamy.
Transfer to a bowl and fold in 1 minced garlic clove, 1 tablespoon fresh dill, 1/4 teaspoon black pepper, 2 tablespoons finely chopped sun-dried tomatoes, and 2 tablespoons finely chopped Kalamata olives. Cover and refrigerate for 30 minutes to allow the flavors to meld and the filling to firm slightly.
Prepare Lamb Marinade
In a small bowl, whisk together 3 tablespoons olive oil, 4 minced garlic cloves, 2 teaspoons chopped rosemary, 1 teaspoon thyme leaves, 1 teaspoon smoked paprika, 1 teaspoon ground cumin, 1/2 teaspoon black pepper, 1 teaspoon kosher salt, and 1 tablespoon lemon zest until a paste forms. Set aside.
Pocket and Marinate Chops
Using a sharp boning or paring knife, cut a deep pocket into each lamb loin chop horizontally through the meaty side, being careful not to cut all the way through — you want a pocket roughly 2 inches deep and 1.5 inches wide. Rub the marinade paste all over the outside of each chop, including inside the pocket.
Place chops in a shallow dish, cover tightly with plastic wrap, and marinate in the refrigerator for 2 hours to allow the herbs and spices to penetrate the meat.
Stuff the Chops
Remove the marinated lamb chops from the refrigerator 20 minutes before cooking to take the chill off. Transfer the chilled whipped feta filling to a piping bag or a zip-lock bag with one corner snipped.
Pipe approximately 1.5–2 tablespoons of whipped feta into the pocket of each chop, pressing gently to fill evenly without overstuffing. Secure the opening of each pocket with 1–2 toothpicks or a short length of kitchen twine to prevent the filling from escaping during cooking.
Sear the Chops
Heat a large cast-iron skillet over high heat for 2–3 minutes until smoking hot. Add 1 tablespoon olive oil and swirl to coat.
Working in batches of 4 chops at a time to avoid crowding, sear the stuffed lamb chops for 3–4 minutes per side without moving them, until a deep mahogany crust forms. Reduce heat to medium and sear the fat cap edge for 1–2 minutes.
Repeat with remaining chops. For medium-rare, the internal temperature should read 130–135°F (54–57°C) on an instant-read thermometer inserted into the thickest part of the meat, away from the filling.
Rest the Meat
Transfer the seared lamb chops to a clean cutting board or warm plate. Tent loosely with aluminum foil and allow them to rest for 10 minutes.
This resting period is essential — it allows the juices to redistribute throughout the meat and the internal temperature to rise to approximately 135–140°F (57–60°C) for a perfect medium-rare to medium doneness. Do not skip this step or the chops will lose their juices when cut.
Garnish and Serve
Remove toothpicks or twine from each chop before plating. Arrange 2 stuffed lamb chops per plate.
Drizzle lightly with a thread of good olive oil, scatter fresh chopped parsley and a pinch of lemon zest over the top, and finish with a pinch of flaky sea salt. Serve immediately, ideally alongside roasted vegetables, warm pita, or a simple arugula salad.
Per serving (2 stuffed lamb chops) — values are estimates


8. Minted Green Goddess Pasta
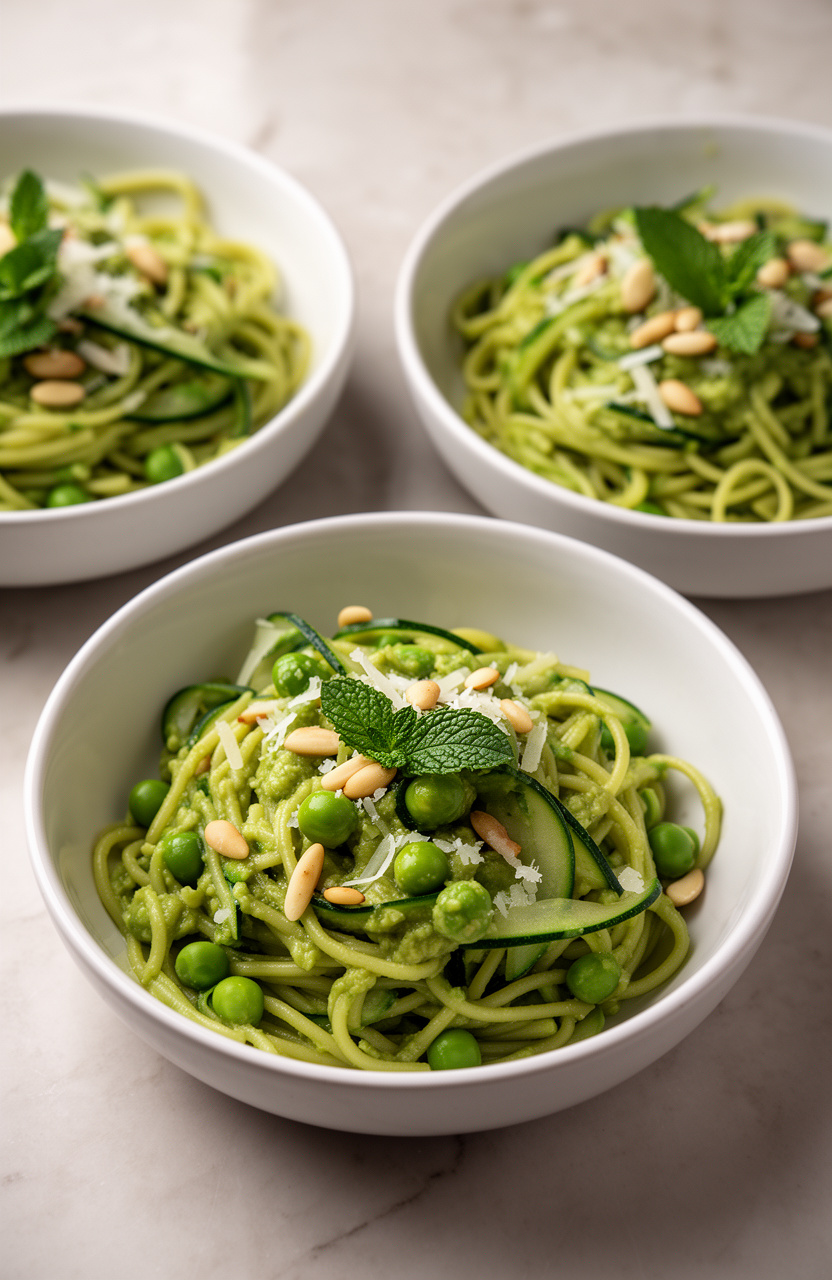
Linguine gets coated in a blender sauce of ripe avocado and packed basil, where toasted pine nuts add a warm, nutty crunch that keeps the creamy green base from feeling too rich. Fresh mint cuts through with a cool, herbal brightness.
Minted Green Goddess Pasta
Pasta
Green Goddess Sauce
Toppings
- 🫕Large pot
- 🪣Colander
- 🌀Blender or food processor
- 🍳Large skillet or sauté pan
- 🥄Measuring cups and spoons
- 🔪Microplane or zester
- 🔪Chef’s knife
- 🪵Cutting board
- 🥄Ladle or heatproof cup (for pasta water)
- 🥢Tongs or pasta fork
Toast the Pine Nuts
Place a small dry skillet over medium heat. Add 1/4 cup pine nuts and toast, stirring frequently, for 3-4 minutes until golden and fragrant.
Watch carefully as they burn quickly. Remove from heat immediately and transfer to a small plate to cool.
Set aside for garnish.
Boil the Pasta
Bring a large pot of water to a rolling boil over high heat. Add 1 tsp kosher salt.
Cook 12 oz linguine according to package directions until al dente, typically 9-11 minutes. Before draining, use a ladle or heatproof cup to scoop out 1/2 cup of starchy pasta water and set aside.
Drain the pasta in a colander and return it to the pot off the heat.
Blend Green Goddess Sauce
While the pasta cooks, combine the 2 peeled and pitted avocados, 1 cup basil leaves, 1/2 cup mint leaves, 1/4 cup parsley, 3 garlic cloves, 3 tbsp lemon juice, 1 tsp lemon zest, 1/3 cup olive oil, 1/2 cup Parmesan, 1/2 tsp salt, 1/4 tsp black pepper, and optional 1/4 tsp red pepper flakes in a blender or food processor. Blend on high for 60-90 seconds until completely smooth and vibrant green.
Taste and adjust seasoning. Add 2-3 tbsp of the reserved pasta water to loosen the sauce to a pourable, creamy consistency.
Warm the Peas
In a large skillet over medium-low heat, add the thawed peas with 2 tbsp of reserved pasta water. Warm for 1-2 minutes, stirring gently, just until heated through.
Do not overcook — you want them bright green and slightly firm. Remove from heat.
Toss Pasta with Sauce
Pour the blended green goddess sauce over the drained pasta in the pot. Using tongs, toss thoroughly to coat every strand, adding additional reserved pasta water 1 tbsp at a time if the sauce seems too thick.
The starchy water helps the sauce cling to the pasta and creates a silky texture. Add the warmed peas and toss gently to combine.
Plate and Garnish
Divide the pasta evenly among 4 bowls. Top each portion with a few cucumber pieces, a sprinkle of toasted pine nuts, fresh mint leaves, and extra grated Parmesan.
Serve immediately with lemon wedges on the side for squeezing. The sauce is avocado-based and is best enjoyed right away to preserve the bright green color.
Per serving (1/4 of recipe (approx. 2 cups)) — values are estimates


9. Champagne Butter Poached Lobster
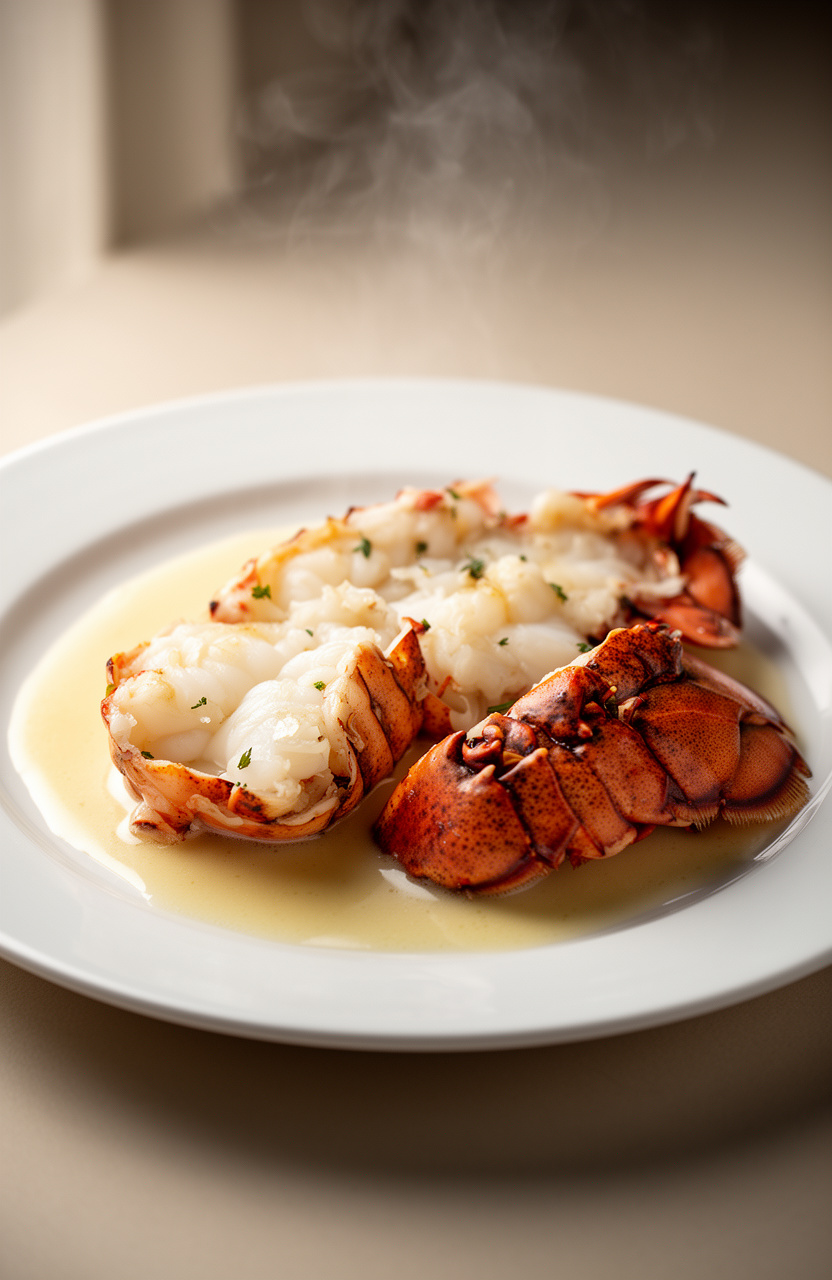
Champagne-poached lobster relies on a beurre monté technique — cold butter whisked into reduced sparkling wine — that keeps the meat tender and silky rather than rubbery, with a sauce carrying faint acidity and shallot depth beneath the richness.
Champagne Butter Poached Lobster
Aromatics
Seasoning
Garnish
- 🫕Large stockpot (8-quart)
- 🍳Large wide saucepan or straight-sided skillet
- 🌡️Instant-read thermometer
- 🔪Sharp chef’s knife or cleaver
- ✂️Kitchen shears
- 🥢Tongs
- 🪣Fine mesh strainer
- 🫕Small saucepan
- 🥄Whisk
- 🪵Cutting board
- 🍽️Serving plates
Prepare the Lobsters
Fill a large 8-quart stockpot with enough salted water to submerge the lobsters and bring to a rolling boil over high heat. Humanely dispatch each lobster by placing it in the freezer for 15 minutes to sedate it, then swiftly insert a chef’s knife through the cross mark on the head.
Using kitchen shears, cut along the underside of the tail to expose the meat. Separate the tails, claws, and knuckles from the body.
Reserve the bodies for stock if desired.
Parboil the Claws
Lower the claws and knuckles into the boiling salted water and parboil for exactly 4 minutes. Remove with tongs and transfer immediately to an ice bath for 2 minutes to stop cooking.
Once cooled, crack the shells using the back of a chef’s knife and carefully extract the claw and knuckle meat in whole pieces. Pat dry with paper towels and set aside.
Discard the shells or reserve for stock.
Make the Champagne Reduction
In a large wide saucepan over medium heat, combine the minced shallots, minced garlic, 1 cup of Champagne, tarragon sprigs, thyme sprigs, bay leaf, and 1/2 teaspoon white pepper. Bring to a simmer and reduce the liquid by two-thirds, about 8-10 minutes, until approximately 3 tablespoons of syrupy liquid remain.
Remove the herb sprigs and bay leaf. Add 2 tablespoons of heavy cream and stir to combine — this stabilizes the butter emulsion.
Build the Beurre Blanc
Reduce the heat to the lowest possible setting — the pan should be barely warm, around 160°F (71°C). Begin adding the cold butter cubes one or two at a time, whisking constantly and vigorously after each addition.
The butter should melt slowly into a creamy, emulsified sauce rather than separating into grease. Continue adding butter cubes over 10-12 minutes until all 4 sticks are incorporated.
The finished sauce should be pale, velvety, and coat the back of a spoon. Season with 1 teaspoon kosher salt and 1 tablespoon lemon juice.
Maintain temperature between 150-160°F (65-71°C) — do not allow to boil.
Poach the Lobster Tails
Using kitchen shears, cut the underside of each tail shell and gently pull the raw tail meat free in one piece, keeping it intact. Score the top of each tail lightly with a knife.
Submerge the tail meat and the reserved claw and knuckle meat directly into the warm Champagne butter sauce. Maintain the sauce temperature at 150-160°F (65-71°C) and poach gently for 6-8 minutes, turning the tails once at the 3-minute mark, until the lobster meat is just opaque throughout and an instant-read thermometer inserted into the thickest part of the tail reads 140°F (60°C).
Do not allow the butter to boil or the sauce will break.
Rest the Lobster
Using tongs, carefully lift the lobster tails, claws, and knuckles from the butter sauce and transfer to a warm plate. Tent loosely with foil and allow to rest for 5 minutes.
This allows the residual heat to finish cooking the meat evenly and lets the juices redistribute throughout the lobster.
Finish and Plate
Whisk the lemon zest into the remaining warm Champagne butter sauce and taste for seasoning, adjusting salt and white pepper as needed. Strain the sauce through a fine mesh strainer if a smoother consistency is desired.
Place one lobster tail on each warmed serving plate, arranged alongside the claws and knuckle meat. Spoon 3-4 generous tablespoons of the warm Champagne butter sauce over and around the lobster.
Garnish with freshly chopped chives, a pinch of flaky sea salt, and lemon wedges on the side. Serve immediately.
Per serving (1 lobster (approx. 8 oz meat) with sauce) — values are estimates


10. Roasted Carrot and Lentil Salad
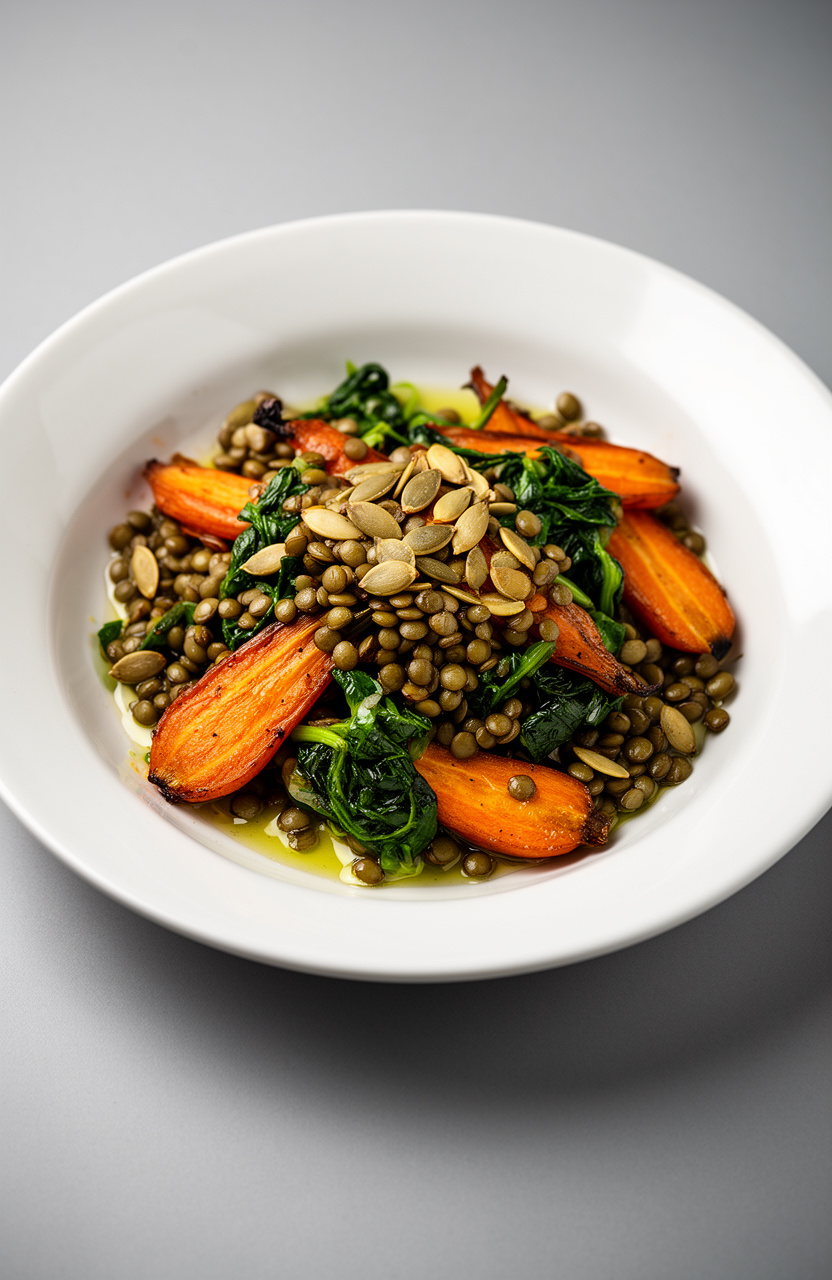
Carrots roasted with cumin and smoked paprika until their edges caramelize and their centers turn tender get tossed with earthy lentils and a bright lemon dressing that cuts through the smoky depth.
Roasted Carrot and Lentil Salad
Roasted Carrots
Lentils
Dressing
Salad
- 🥧Large rimmed baking sheet
- 🫕Medium saucepan with lid
- 🥣Large mixing bowl
- 🥣Small bowl or jar with lid
- 🥄Whisk
- 🪵Cutting board
- 🔪Chef’s knife
- 🔪Vegetable peeler
- 🪣Colander
- 🥄Measuring cups and spoons
Preheat the Oven
Preheat your oven to 425°F (220°C). Line a large rimmed baking sheet with parchment paper or lightly grease it with oil to prevent sticking.
Season the Carrots
Peel and cut 1.5 lbs of carrots into 1-inch pieces, keeping them roughly uniform in size for even roasting. Place them on the prepared baking sheet.
Drizzle with 2 tablespoons of olive oil, then sprinkle with 1 teaspoon ground cumin, 1 teaspoon smoked paprika, 1/2 teaspoon ground coriander, 1/2 teaspoon salt, and 1/4 teaspoon black pepper. Toss everything together directly on the pan until the carrots are evenly coated, then spread them out in a single layer.
Roast the Carrots
Roast the carrots in the preheated 425°F (220°C) oven for 25–30 minutes, flipping them once halfway through at the 15-minute mark, until they are tender, caramelized, and lightly charred at the edges. Remove from the oven and set aside to cool slightly while you prepare the remaining components.
Cook the Lentils
While the carrots roast, combine 1 cup of rinsed green or French lentils with 3 cups of vegetable broth (or water), 1 bay leaf, and 1/2 teaspoon salt in a medium saucepan. Bring to a boil over high heat, then reduce the heat to low, cover, and simmer for 18–20 minutes until the lentils are tender but still hold their shape — they should not be mushy.
Drain any excess liquid through a colander, discard the bay leaf, and spread the lentils on a plate or tray to cool to room temperature for about 10 minutes.
Whisk the Dressing
In a small bowl or a jar with a lid, combine 3 tablespoons extra-virgin olive oil, 2 tablespoons red wine vinegar, 1 tablespoon freshly squeezed lemon juice, 1 teaspoon Dijon mustard, 1 minced garlic clove, 1/2 teaspoon ground cumin, and 1/2 teaspoon honey or maple syrup. Whisk vigorously (or shake the jar) until fully emulsified and smooth.
Season with salt and black pepper to taste. Set aside.
Toast the Pumpkin Seeds
If your pumpkin seeds are not already toasted, place them in a dry skillet over medium heat. Toast for 3–4 minutes, stirring frequently, until they are golden and begin to pop.
Remove from heat immediately and transfer to a plate to cool. This step can be done simultaneously while the lentils cool.
Assemble the Salad
In a large mixing bowl, combine the cooled lentils and the roasted carrots. Pour about two-thirds of the dressing over them and toss gently to coat.
Add the 3 cups of arugula or baby spinach, 1/4 thinly sliced red onion, 1/3 cup dried cranberries or raisins, and the fresh parsley and mint. Toss everything together gently, adding more dressing as desired.
Taste and adjust seasoning with additional salt, pepper, or lemon juice.
Plate and Serve
Transfer the salad to a large serving platter or individual bowls. Scatter the toasted pumpkin seeds over the top just before serving to keep them crunchy.
Serve immediately while the carrots are still slightly warm, or at room temperature. This salad also keeps well — store any leftovers in an airtight container in the refrigerator for up to 3 days, keeping the pumpkin seeds separate to maintain their texture.
Per serving (1 of 4 servings (approx. 400g)) — values are estimates
11. Prosciutto Wrapped Halibut Fillets
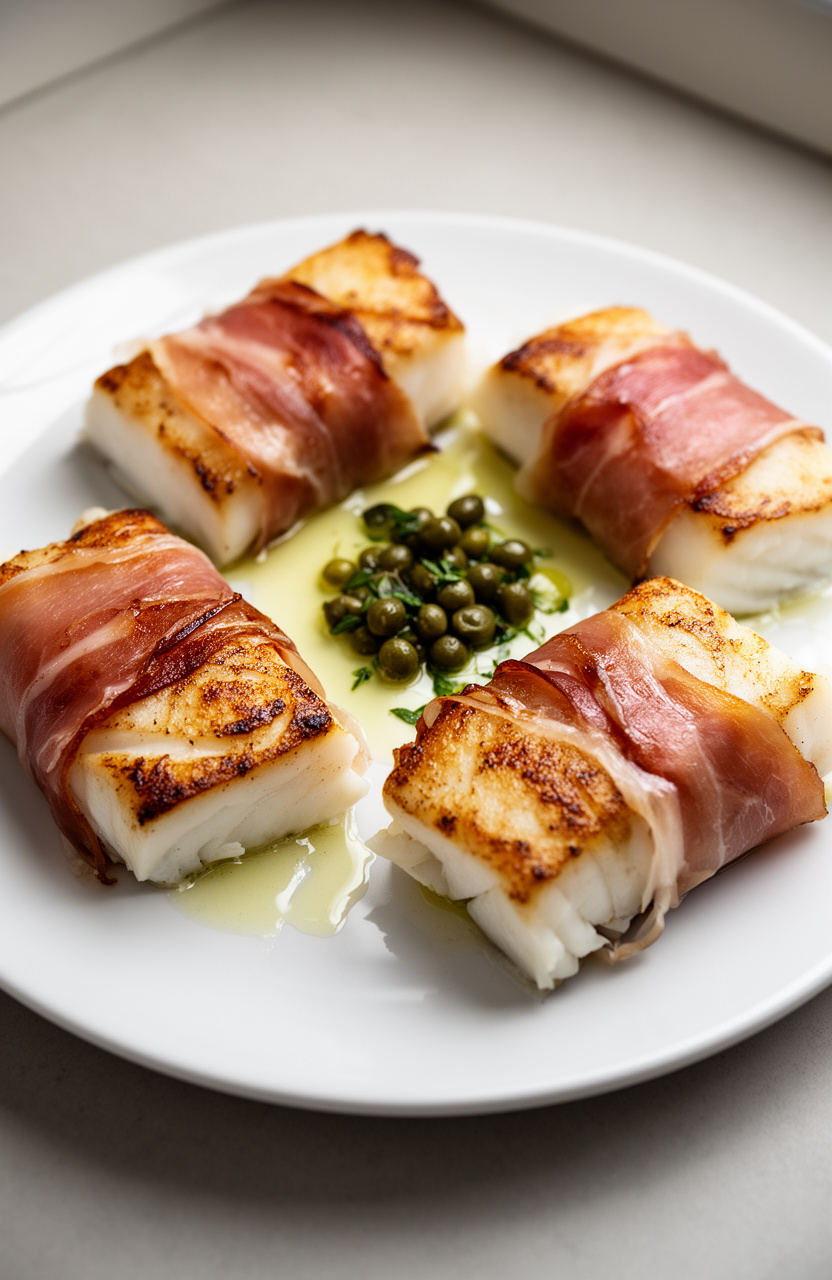
Wrapping halibut fillets in thin slices of prosciutto di Parma before searing creates a salty, crispy outer layer that locks in the fish’s delicate, flaky interior. Fresh thyme and olive oil cut through the richness of the cured meat with an herbal brightness.
Prosciutto Wrapped Halibut Fillets
Lemon Caper Sauce
Garnish
- 🍳Large oven-safe skillet or cast iron pan
- 🥣Small mixing bowl
- 🥄Whisk
- 🍴Paper towels
- 🥢Tongs
- 🌡️Meat thermometer
- 🪵Cutting board
- 🔪Sharp knife
- 🔪Microplane or zester
- 🍽️Serving platter
Prepare the Halibut
Pat the 4 halibut fillets thoroughly dry with paper towels — this is essential for a good sear and for the prosciutto to adhere properly. In a small bowl, combine 2 tablespoons extra-virgin olive oil, 1 tablespoon fresh thyme leaves, 1 tablespoon finely chopped rosemary, 2 minced garlic cloves, and 1 teaspoon lemon zest.
Brush this herb mixture lightly over all sides of each halibut fillet. Season very lightly with 1/4 teaspoon sea salt and 1/2 teaspoon black pepper, keeping in mind the prosciutto adds significant saltiness.
Wrap with Prosciutto
Lay 2 slices of prosciutto on a clean cutting board, slightly overlapping lengthwise to create a wider wrap. Place one halibut fillet at one end of the prosciutto and roll it firmly to wrap the fillet completely, tucking the ends under as you go.
The prosciutto should fit snugly around the fish with no gaps. Repeat with the remaining 3 fillets and 6 prosciutto slices.
Place wrapped fillets seam-side down on the cutting board and allow to sit at room temperature for 5 minutes while you preheat the pan — this helps the prosciutto adhere and promotes even cooking.
Make the Lemon Caper Sauce
In a small bowl, whisk together 2 tablespoons fresh lemon juice, 3 tablespoons extra-virgin olive oil, 1/2 teaspoon Dijon mustard, and 1 finely minced shallot until emulsified, about 1 minute. Stir in 2 tablespoons drained capers and 1 tablespoon finely chopped flat-leaf parsley.
Season with salt and black pepper to taste. Set sauce aside at room temperature — it will be drizzled over the fish just before serving and does not require cooking.
Sear the Fillets
Preheat a large oven-safe skillet or cast iron pan over medium-high heat for 2 minutes. Add 2 tablespoons olive oil and heat until shimmering but not smoking.
Carefully place the prosciutto-wrapped fillets seam-side down in the pan, leaving at least 1 inch between each fillet. Sear undisturbed for 3 minutes until the prosciutto is golden and crisp on the bottom.
Using tongs, carefully turn each fillet onto the opposite side and sear for another 3 minutes. Then stand each fillet on its narrow edge and sear each remaining side for about 1 minute each to crisp all surfaces.
Total searing time is approximately 8–10 minutes.
Finish Cooking Through
Reduce heat to medium and continue cooking the fillets for an additional 2 minutes, turning once if needed, until the internal temperature of the halibut reaches 130–135°F (54–57°C) on a meat thermometer — halibut is done when it flakes easily but is still moist at the center. Avoid overcooking, as halibut dries out quickly.
Total cook time from start to finish should be 10–12 minutes depending on the thickness of your fillets (about 1 inch thick fillets cook in 10 minutes total).
Rest and Serve
Transfer the cooked prosciutto-wrapped halibut fillets to a warm serving platter and let them rest for 3 minutes — this allows the juices to redistribute and the prosciutto to firm up slightly for a cleaner presentation. Whisk the lemon caper sauce once more and drizzle generously over each fillet or serve on the side.
Garnish with fresh thyme sprigs and lemon wedges. Serve immediately.
Per serving (1 wrapped halibut fillet with sauce) — values are estimates
12. Ramp and Truffle Risotto
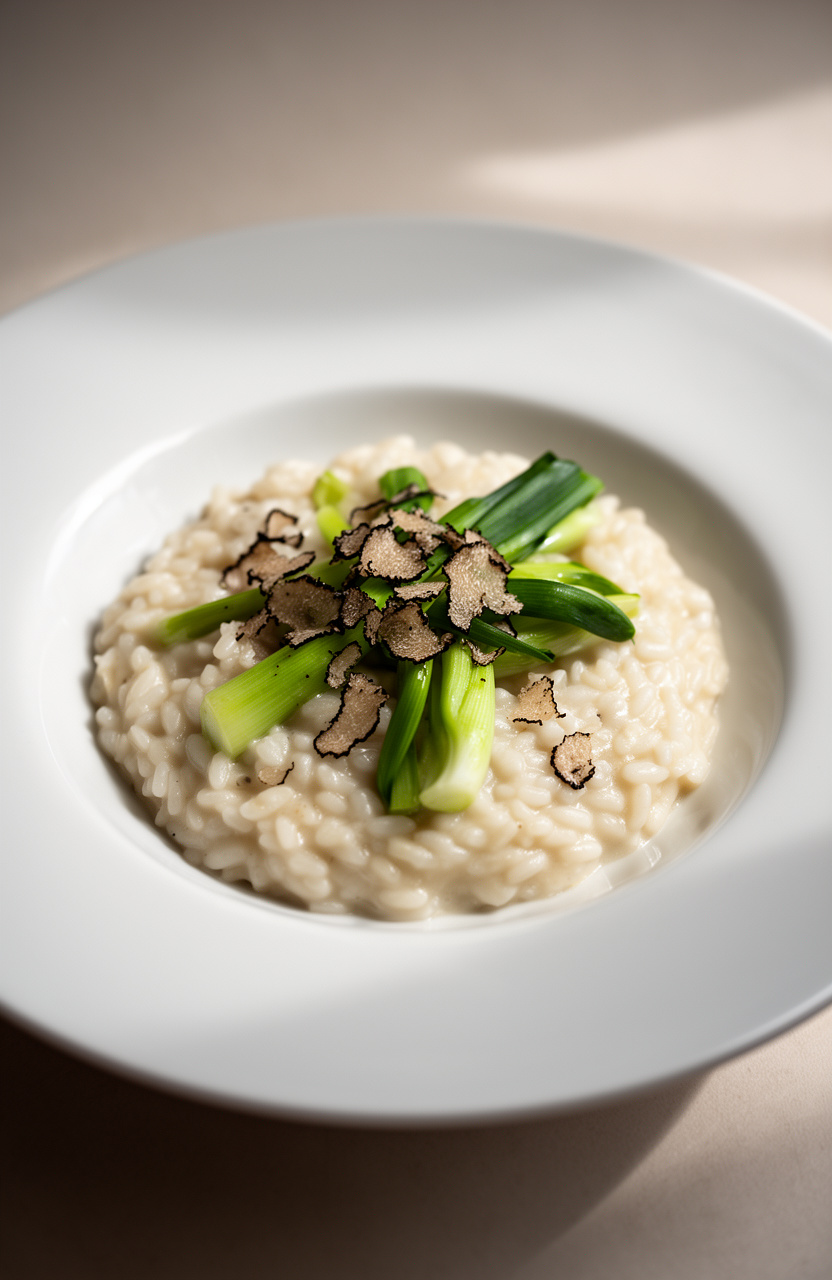
Fresh ramps, sautéed until their garlicky bite softens into something almost sweet, get folded into Arborio rice that’s been coaxed with white wine and warm broth into a loose, starchy creaminess, finished with earthy truffle.
Ramp and Truffle Risotto
Garnish
- 🫕Large heavy-bottomed saucepan or Dutch oven
- 🫕Medium saucepan (for warming broth)
- 🥄Ladle
- 🥄Wooden spoon or silicone spatula
- 🔪Sharp chef’s knife
- 🪵Cutting board
- 🔪Truffle shaver or mandoline
- 🔪Microplane or box grater
- 🥄Measuring cups and spoons
Prepare the Ramps
Separate the ramp bulbs and green leaves. Finely slice the white and light-pink bulb portions (about 1/2 cup) and roughly chop the green leafy tops (about 1 cup).
Keep them separate, as the bulbs will be cooked longer and the greens added near the end to preserve their bright color and delicate flavor. Set aside.
Warm the Broth
Pour 6 cups of vegetable broth into a medium saucepan and heat over medium-low heat until steaming, about 5 minutes. Keep the broth at a gentle simmer throughout the risotto cooking process — adding cold broth will shock the rice and slow cooking.
Season the broth with a pinch of salt if it is unsalted.
Sauté Aromatics
In a large heavy-bottomed saucepan or Dutch oven, heat 2 tablespoons olive oil and 1 tablespoon butter over medium heat until the butter is melted and foamy. Add the diced onion and sliced ramp bulbs and cook, stirring frequently, for 6-8 minutes until softened, translucent, and fragrant.
Season with 1/2 teaspoon kosher salt. Do not allow the aromatics to brown.
Toast the Rice
Add the 1 1/2 cups Arborio rice to the pan with the softened aromatics. Stir constantly with a wooden spoon for 2-3 minutes over medium heat until the rice grains are lightly toasted and the edges appear slightly translucent.
This step develops a nutty flavor and helps the rice maintain its structure during cooking.
Deglaze with Wine
Pour in the 1/2 cup dry white wine and stir continuously until it is fully absorbed by the rice, about 2 minutes. The alcohol will evaporate and the wine will leave behind a pleasant acidity that balances the richness of the finished risotto.
Add Broth Gradually
Begin adding the warm broth one ladleful (about 3/4 cup) at a time, stirring constantly and allowing each addition to be almost fully absorbed before adding the next. Maintain a medium heat so the risotto bubbles gently throughout.
Continue this process for approximately 22-25 minutes, until the rice is al dente — tender with a slight bite in the center. You may not need all 6 cups of broth.
Fold in Ramp Greens
When the rice is al dente and the risotto has a creamy, flowing consistency, stir in the chopped ramp greens. Cook for 1-2 minutes, just until the greens are wilted and bright green.
If using black truffle paste instead of fresh truffle, stir it in now along with the ramp greens.
Mantecare the Risotto
Remove the pan from the heat. Add the remaining 2 tablespoons cold unsalted butter and 3/4 cup grated Parmigiano-Reggiano.
Stir vigorously in a circular motion for 1-2 minutes to emulsify the butter and cheese into the rice, creating a glossy, creamy sauce — this technique is called mantecatura. Adjust seasoning with remaining kosher salt and 1/2 teaspoon black pepper.
The risotto should flow like lava when the pan is tilted.
Rest Briefly
Cover the pan loosely and let the risotto rest for 2 minutes. This short rest allows the flavors to meld and the texture to settle into the ideal consistency for serving.
Plate and Garnish
Spoon the risotto into warm shallow bowls. Immediately shave fresh black truffle generously over each portion using a truffle shaver or mandoline.
Drizzle 1/4 teaspoon black truffle oil over each bowl. Finish with extra grated Parmigiano-Reggiano, a pinch of flaky sea salt, freshly cracked black pepper, and optional ramp blossoms or microgreens.
Serve immediately.
Per serving (1 bowl (approximately 1 1/2 cups)) — values are estimates
13. Ginger Sesame Glazed Pork Tenderloin
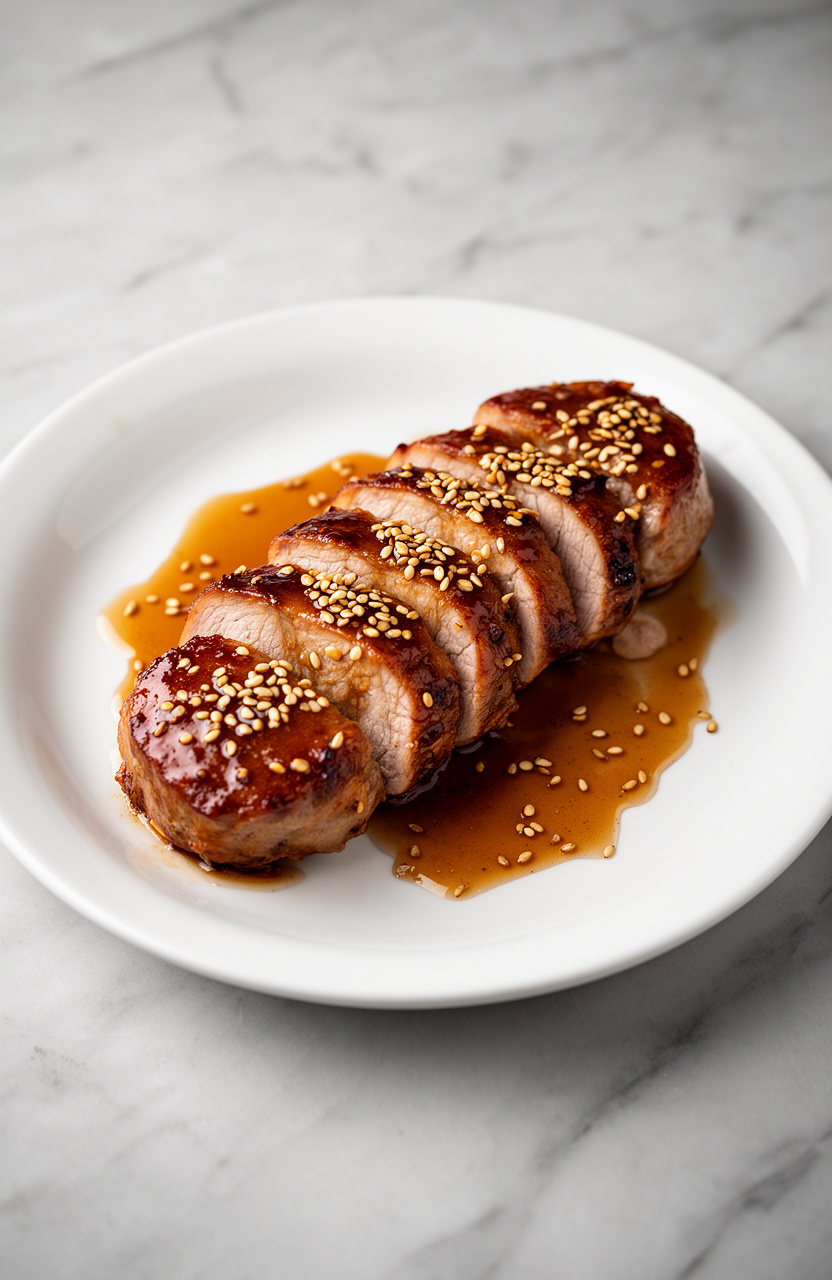
Pork tenderloin marinates in sesame oil and ginger before roasting, pulling in those flavors as the exterior caramelizes into a lacquered, slightly sticky glaze with a nutty depth that the toasted sesame seeds on top sharpen into something almost savory-sweet.
Ginger Sesame Glazed Pork Tenderloin
Glaze & Marinade
- 🍰Large zip-top bag or shallow baking dish
- 🫕Small saucepan
- 🥄Whisk
- 🍳Oven-safe skillet or cast iron pan
- 🌡️Instant-read meat thermometer
- 🥢Tongs
- 🪵Cutting board
- 🔪Chef’s knife
- 🖌️Basting brush
- 📄Aluminum foil
Make the Marinade
In a small bowl, whisk together the soy sauce, honey, hoisin sauce, rice vinegar, 1 tablespoon sesame oil, grated ginger, minced garlic, and sriracha until fully combined. Reserve half of the marinade (about 1/2 cup) in a separate small saucepan and set aside for the glaze.
Pour the remaining half into a large zip-top bag or shallow baking dish.
Marinate the Pork
Pat both pork tenderloins dry with paper towels and place them into the zip-top bag with the marinade. Seal the bag, pressing out excess air, and turn to coat the pork evenly.
Refrigerate for at least 1 hour, turning the bag once halfway through. For deeper flavor, marinate up to 8 hours.
Remove the pork from the refrigerator 15 minutes before cooking to take the chill off.
Prepare the Glaze
While the pork marinates, prepare the glaze using the reserved marinade. Whisk 1 teaspoon of cornstarch into the saucepan with the reserved marinade until dissolved.
Heat over medium heat, stirring constantly, for 3 to 4 minutes until the glaze thickens slightly and coats the back of a spoon. Remove from heat and set aside.
This glaze will be used for basting and serving.
Preheat Oven and Sear
Preheat your oven to 425°F (220°C). Remove the pork from the marinade and discard the used marinade.
Heat 1 tablespoon vegetable oil and 1 tablespoon sesame oil in a large oven-safe skillet or cast iron pan over medium-high heat until shimmering. Add the tenderloins and sear for 2 to 3 minutes per side, turning with tongs, until nicely browned on all sides, about 8 to 10 minutes total.
Glaze and Roast
Once the pork is seared on all sides, use a basting brush to coat the tenderloins generously with half of the prepared glaze. Transfer the skillet directly to the preheated 425°F oven.
Roast for 18 to 20 minutes, basting with additional glaze halfway through cooking, until an instant-read thermometer inserted into the thickest part reads 145°F (63°C). Do not overcook, as pork tenderloin is very lean and will dry out quickly.
Rest the Pork
Remove the skillet from the oven and transfer the tenderloins to a cutting board. Tent loosely with aluminum foil and allow the pork to rest for 5 minutes.
This resting period allows the juices to redistribute throughout the meat, ensuring each slice is moist and tender.
Slice and Serve
After resting, slice the pork tenderloin into 1/2-inch medallions at a slight diagonal angle. Arrange on a serving platter and drizzle with the remaining warm glaze.
Garnish generously with toasted sesame seeds and thinly sliced green onions. Serve immediately alongside steamed jasmine rice, stir-fried vegetables, or roasted bok choy.
Per serving (approximately 6 oz pork with glaze) — values are estimates


14. Edamame and Snap Pea Tartare
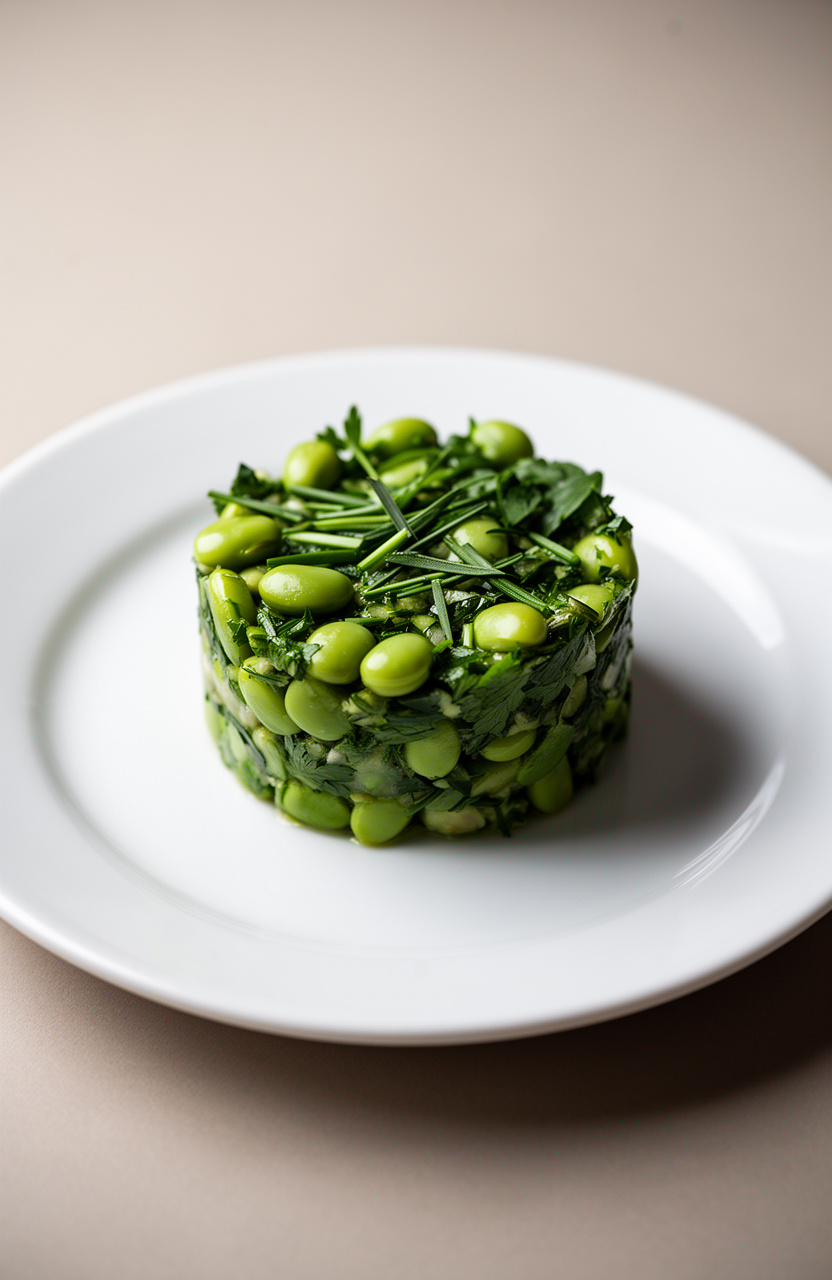
Blanched edamame and crisp snap peas get finely chopped and tossed with briny capers and sharp shallots, building a tartare with clean vegetal bite and a firm, almost meaty chew that holds its shape on the plate.
Edamame and Snap Pea Tartare
Dressing
Garnish
- 🫕Large pot
- 🪣Colander
- 🥣Ice bath bowl
- 🔪Sharp chef’s knife
- 🪵Cutting board
- 🥣Small mixing bowl
- 🥣Large mixing bowl
- 🥄Whisk
- 🍴Cylindrical ring mold (3-inch) or ramekin
- 🔪Microplane or fine grater
- 🍽️Serving plates
Blanch the Edamame
Bring a large pot of salted water to a rolling boil over high heat. Add the 2 cups of shelled edamame and cook for 3 minutes until just tender but still bright green.
Use a slotted spoon to transfer the edamame immediately to a bowl of ice water. Let them sit in the ice bath for 2 minutes to stop the cooking process, then drain thoroughly in a colander.
Pat dry with a clean kitchen towel.
Blanch the Snap Peas
Return the same pot of salted water to a boil. Add the 1 1/2 cups of snap peas (strings removed) and blanch for exactly 1 minute — they should remain crisp and vivid green.
Immediately transfer to the same ice bath for 2 minutes, then drain and pat dry thoroughly. This quick blanching brightens their color and softens the raw edge while preserving their satisfying crunch.
Chop the Vegetables
On a clean cutting board, finely dice the blanched edamame into rough 1/4-inch pieces — you want texture, not a puree, so use a sharp knife rather than a food processor. Slice the snap peas crosswise into thin 1/8-inch rounds.
Transfer both to a large mixing bowl. Add the 1/4 cup finely diced shallots, 2 tablespoons chopped capers, 1 tablespoon each of chives, tarragon, and parsley, and 1 teaspoon lemon zest.
Toss gently to combine.
Whisk the Dressing
In a small bowl, whisk together 2 tablespoons fresh lemon juice, 1 tablespoon rice wine vinegar, 1 teaspoon Dijon mustard, 1 teaspoon toasted sesame oil, 2 tablespoons extra-virgin olive oil, 1 teaspoon tamari, 1/2 teaspoon sea salt, 1/4 teaspoon black pepper, and 1 teaspoon sriracha if using. Whisk vigorously for about 30 seconds until the dressing emulsifies and looks slightly creamy.
Taste and adjust seasoning — it should be bright, savory, and slightly tangy.
Dress and Chill
Pour the dressing over the edamame and snap pea mixture and fold gently with a spatula until everything is evenly coated. Cover the bowl with plastic wrap and refrigerate for 15 minutes.
This short chill allows the flavors to meld and the dressing to be fully absorbed into the vegetables, giving the tartare a cohesive, restaurant-quality flavor profile.
Plate and Serve
Remove the tartare from the refrigerator and taste once more, adjusting salt or lemon juice as needed. Place a 3-inch cylindrical ring mold in the center of each chilled serving plate.
Pack the tartare firmly into the mold, pressing down gently with the back of a spoon to compact it into a neat cylinder. Carefully lift the mold straight up to release the tartare.
Drizzle 1 teaspoon of cold-pressed avocado oil around the base of each tartare, scatter toasted sesame seeds over the top, and finish with a small nest of microgreens or pea shoots. Serve immediately alongside toasted gluten-free bread or rice crackers.
Per serving (1 molded tartare (approximately 3/4 cup)) — values are estimates


15. Lavender Honey Cornish Hens
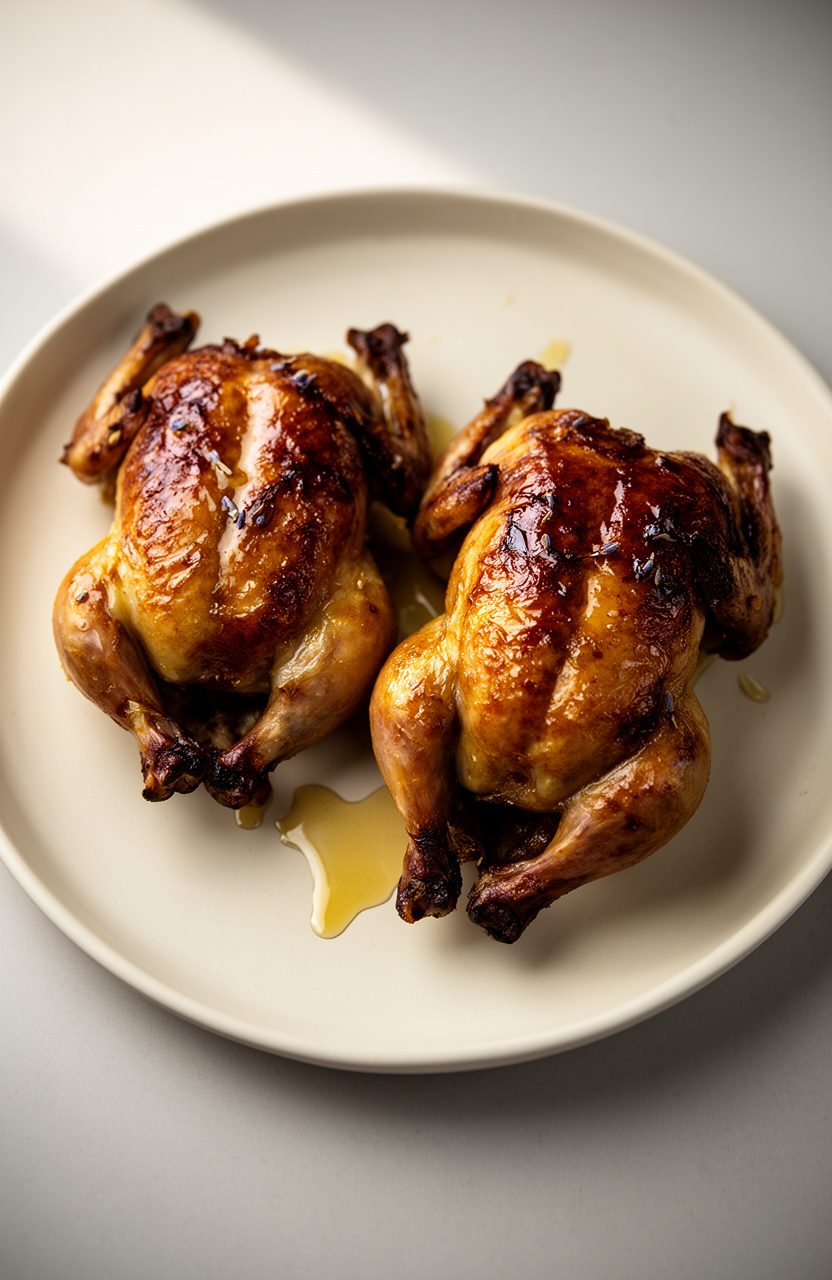
Dried lavender buds steeped directly into warmed honey pull out the floral oils before the mixture coats the hens, so the glaze caramelizes into a burnished, faintly perfumed crust with a sticky-sweet pull against the crisp skin.
Lavender Honey Cornish Hens
Lavender Honey Glaze
Seasoning
Cavity Stuffing
Garnish
- 🫕Small saucepan
- 🪣Fine mesh strainer
- 🥣Mixing bowl
- 🥄Whisk
- 🥧Roasting pan with rack
- 🖌️Basting brush
- 🌡️Meat thermometer
- 📄Aluminum foil
- 🍴Kitchen twine
- 🪵Cutting board
- 🔪Sharp knife
- 🔪Zester
Infuse the Honey
In a small saucepan over low heat, combine 1/2 cup raw honey and 2 tablespoons dried culinary lavender buds. Warm gently over low heat for 15 minutes, stirring occasionally, until the honey is fragrant and infused with lavender.
Do not let it boil. Remove from heat and strain through a fine mesh strainer into a mixing bowl, pressing on the lavender to extract maximum flavor.
Discard the spent lavender buds.
Build the Glaze
To the strained lavender honey, whisk in 3 tablespoons olive oil, 4 minced garlic cloves, 1 tablespoon fresh lemon juice, 1 teaspoon lemon zest, 1 teaspoon fresh thyme leaves, 1/2 teaspoon kosher salt, and 1/4 teaspoon black pepper until fully combined. Reserve about 3 tablespoons of the glaze in a separate small bowl for basting during the final stage of roasting.
Set the remainder aside for marinating.
Prepare the Hens
Pat both Cornish hens thoroughly dry with paper towels — this is essential for crispy skin. Mix together 1 teaspoon kosher salt, 1/2 teaspoon black pepper, and 1/2 teaspoon garlic powder.
Season the hens generously inside the cavity and all over the exterior with the dry seasoning blend. Stuff each cavity with half a lemon, 2 sprigs of fresh thyme, 2 smashed garlic cloves, and half a shallot.
Tie the legs together with kitchen twine to ensure even cooking.
Marinate the Hens
Brush the lavender honey glaze (the larger portion, not the reserved basting glaze) generously all over both hens, getting under the breast skin where possible. Place the hens in a roasting pan, cover loosely with plastic wrap, and refrigerate to marinate for 4 hours.
If time allows, marinating overnight will deepen the flavor. Remove the hens from the refrigerator 30 minutes before baking to take the chill off.
Preheat and Position
Preheat your oven to 425°F (220°C). Place a roasting rack inside the roasting pan and arrange the marinated hens breast-side up on the rack.
This elevates them so heat circulates underneath for even browning. Tent loosely with aluminum foil to prevent the honey glaze from burning in the first half of roasting.
Roast the Hens
Place the roasting pan in the preheated 425°F oven and roast with the foil tent for 35 minutes. After 35 minutes, carefully remove the foil, brush the hens generously with the reserved basting glaze, and continue roasting uncovered for an additional 25 minutes, basting once more halfway through, until the skin is deep golden brown and caramelized.
Total bake time is 60 minutes.
Check for Doneness
Insert a meat thermometer into the thickest part of the thigh, avoiding the bone. The internal temperature must reach 165°F (74°C) for food safety.
If the skin is browning too quickly before the temperature is reached, tent loosely with foil and continue roasting. The juices should run clear when the thigh is pierced with a knife.
Rest and Serve
Transfer the roasted hens to a clean cutting board and tent loosely with aluminum foil. Allow them to rest for 10 minutes — this allows the juices to redistribute throughout the meat, ensuring moist, flavorful results.
After resting, remove the kitchen twine and discard the cavity stuffing. Halve each hen along the breastbone using a sharp knife or kitchen shears.
Arrange on a serving platter, garnish with fresh lavender sprigs and lemon wedges, and serve immediately.
Per serving (1/2 Cornish hen) — values are estimates