15 Spring Snacks That Are Light, Fresh, and Totally Delicious
Spring produce hits different when you stop cooking it and just let it shine — crisp snap peas filled with whipped lemon ricotta, radishes sliced thin over cold herb butter, strawberries macerated just long enough to get jammy on top of toasted bread.
Every snack on this list leans into that early-season brightness: cool, a little acidic, nothing heavy.
You’ll find a cucumber mint yogurt dip that’s almost more herb than dairy, rice cakes topped with smoked salmon and avocado that somehow feel like a proper bite.
Most of these come together in under 15 minutes — no oven required, just good ingredients treated simply.
1. Lemon Ricotta Stuffed Snap Peas
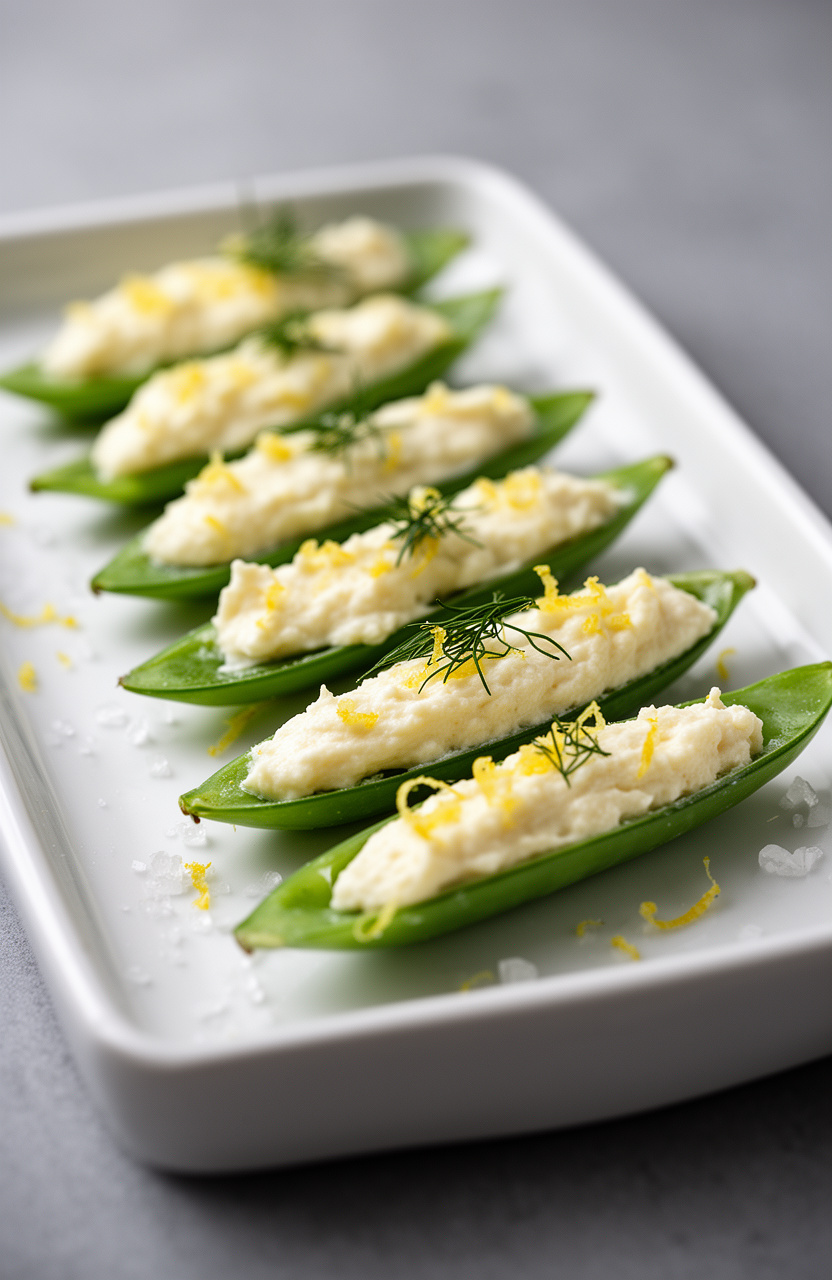
Bright green snap peas split open and piped full of whipped ricotta and cream cheese create a clean, jewel-like bite that catches the eye immediately. The filling’s tangy lemon edge cuts through the dairy’s richness while the raw pea shell delivers a firm, grassy snap.
Lemon Ricotta Stuffed Snap Peas
Filling
Garnish
- 🥣Medium mixing bowl
- 🔌Hand mixer or rubber spatula
- 🔪Zester or microplane
- 🔪Paring knife
- 🛍️Piping bag or zip-lock bag
- 🍴Small star or round piping tip
- 🍽️Serving platter
- 🍴Paper towels
Prepare the Ricotta Filling
In a medium mixing bowl, combine 1 cup whole-milk ricotta cheese, 2 oz softened cream cheese, 1 tablespoon fresh lemon juice, 1 teaspoon lemon zest, 1 finely grated garlic clove, 1/4 teaspoon kosher salt, 1/8 teaspoon black pepper, and a pinch of red pepper flakes. Using a hand mixer on medium speed or a rubber spatula, beat the mixture until completely smooth and creamy, about 2 minutes.
Fold in 1 tablespoon minced chives and 1 tablespoon chopped dill. Taste and adjust seasoning as needed.
Chill the Filling
Transfer the ricotta filling to a piping bag fitted with a small star or round tip, or use a zip-lock bag with one corner snipped off. Place the filled piping bag in the refrigerator and chill for 15 minutes.
Chilling the filling firms it up slightly, making it much easier to pipe cleanly into the snap peas and helping it hold its shape on the platter.
Prep the Snap Peas
While the filling chills, rinse 24 large snap peas under cold running water and pat them completely dry with paper towels. Using a paring knife, carefully run the blade along the straight seam (the inner curved edge) of each snap pea to open it like a canoe, creating a pocket without splitting the pod in half.
Remove any visible inner strings as you go. Arrange the opened snap peas on a clean paper towel to ensure they are fully dry before filling.
Fill the Snap Peas
Remove the piping bag from the refrigerator. Hold each opened snap pea gently in one hand and pipe approximately 1 to 1.5 teaspoons of the lemon ricotta filling into the pocket of each pod, filling it just slightly above the rim.
Work steadily and avoid overfilling, which can cause the peas to split. Arrange each filled snap pea on a serving platter as you go, placing them in a single layer.
Garnish and Serve
Once all 24 snap peas are filled and arranged on the platter, garnish each one with a small pinch of extra lemon zest, a tiny sprig of fresh dill, and a light flake of sea salt. Serve immediately at room temperature for the best flavor and texture, or refrigerate uncovered for up to 1 hour before serving.
Do not cover tightly with plastic wrap as it can flatten the filling.
Per serving (2 stuffed snap peas) — values are estimates


2. Strawberry Basil Bruschetta Bites
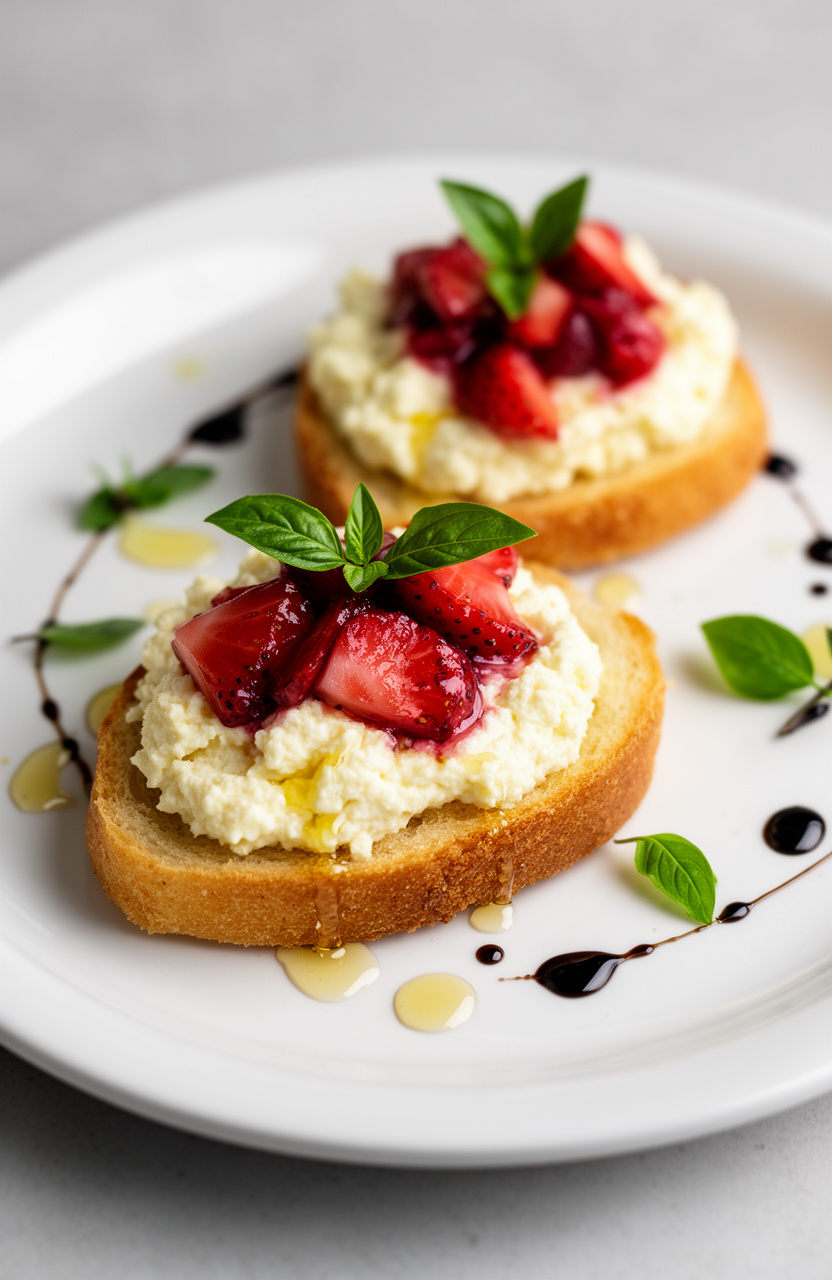
Toasted baguette rounds rubbed with raw garlic form the crisp, golden base for a strawberry-basil topping where the fruit’s natural sweetness cuts against the herb’s slight pepperiness and a drizzle of olive oil ties both together.
Strawberry Basil Bruschetta Bites
Base
Topping
Spread
- 🥧Baking sheet
- 🖌️Pastry brush
- 🥣Mixing bowls (2)
- 🔪Sharp knife
- 🪵Cutting board
- 🔥Broiler or oven
- 🥄Small spoon or offset spatula
- 🔪Zester or microplane
Prepare Strawberry Topping
In a medium mixing bowl, combine the finely diced strawberries, chiffonade basil, 1 tablespoon balsamic glaze, 1 teaspoon honey, 1/4 teaspoon sea salt, and black pepper. Gently toss to combine.
Let the mixture sit at room temperature for 10 minutes to marinate, allowing the strawberries to release their juices and the flavors to meld together.
Mix Ricotta Spread
In a small bowl, combine the ricotta cheese, lemon zest, 1 tablespoon honey, and a pinch of sea salt. Stir until smooth and well incorporated.
Set aside at room temperature until ready to assemble.
Toast Baguette Slices
Preheat your broiler to high (or oven to 425°F). Arrange the 24 baguette slices in a single layer on a baking sheet.
Using a pastry brush, lightly coat the top of each slice with extra-virgin olive oil. Broil on the middle rack for 3 to 4 minutes, watching closely, until the tops are golden and crisp.
Flip each slice, brush the other side lightly with olive oil, and broil for another 2 to 3 minutes until golden. Total cook time is about 6 to 8 minutes.
Remove from the broiler and immediately rub the top of each toast with the cut side of the halved garlic clove while still hot.
Assemble Bruschetta Bites
Using a small spoon or offset spatula, spread about 1 teaspoon of the honey-lemon ricotta onto each garlic-rubbed toast, covering it edge to edge. Spoon approximately 1 tablespoon of the marinated strawberry basil mixture on top of the ricotta on each slice, allowing a little of the juices to soak into the toast.
Garnish and Serve
Arrange the assembled bites on a serving platter. Drizzle a small amount of additional balsamic glaze over the tops in a thin stream for a finishing touch.
Garnish with a few extra small basil leaves if desired. Serve immediately for the best texture and flavor contrast between the crispy toast and fresh topping.
Per serving (2 bites) — values are estimates


3. Cucumber Mint Greek Yogurt Dip
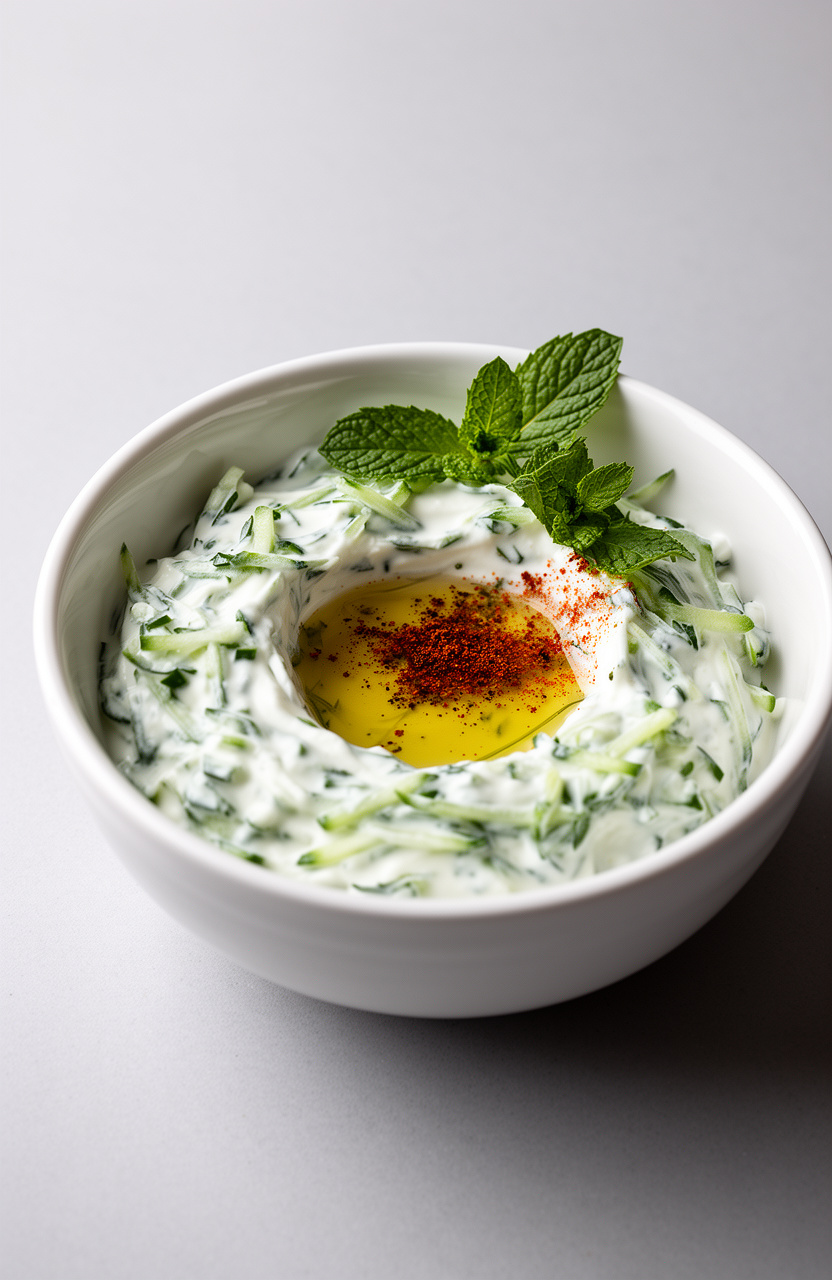
Shredded cucumber, drained until nearly dry, keeps this thick Greek yogurt dip cool and clean-tasting rather than watery, while minced garlic and chopped fresh mint cut through the dairy’s richness with a sharp, herby bite.
Cucumber Mint Greek Yogurt Dip
Garnish
- 🔪Box grater or food processor
- 🪣Fine mesh strainer or cheesecloth
- 🥣Large mixing bowl
- 🥣Small mixing bowl
- 🥄Rubber spatula
- 🔪Citrus zester or microplane
- 🔪Chef’s knife
- 🪵Cutting board
- 🥣Serving bowl
- 📄Plastic wrap
Grate and Drain Cucumber
Using the large holes of a box grater, grate the entire English cucumber (skin on) into a fine mesh strainer set over a small bowl. Sprinkle the grated cucumber with 1/4 teaspoon of the kosher salt, toss to combine, and let it sit for 5 minutes.
After resting, use your hands or a clean kitchen towel to firmly squeeze out as much liquid as possible from the cucumber. You should remove at least 2–3 tablespoons of liquid.
Discard the liquid and transfer the drained cucumber to a large mixing bowl.
Prepare Fresh Aromatics
While the cucumber drains, finely mince 2 cloves of garlic and finely chop 3 tablespoons of fresh mint leaves and 1 tablespoon of fresh dill (if using). Zest 1 lemon to yield 1 teaspoon of zest, then juice the same lemon to yield 2 tablespoons of fresh lemon juice.
Set all aromatics aside.
Combine All Ingredients
Add the 2 cups of Greek yogurt to the large mixing bowl with the drained cucumber. Add the minced garlic, chopped mint, fresh dill (if using), lemon zest, 2 tablespoons of lemon juice, 2 tablespoons of extra-virgin olive oil, the remaining 1/4 teaspoon of kosher salt, and 1/4 teaspoon of black pepper.
Using a rubber spatula, fold all ingredients together until thoroughly combined and uniform in texture.
Taste and Adjust Seasoning
Taste the dip and adjust seasoning as needed. Add more salt if the flavors seem flat, more lemon juice for brightness, or more fresh mint for a stronger herbal note.
The flavors will mellow and meld during chilling, so season slightly bolder than you think necessary at this stage.
Chill to Meld Flavors
Cover the bowl tightly with plastic wrap, pressing it gently against the surface of the dip to prevent a skin from forming. Refrigerate for at least 30 minutes to allow the flavors to fully meld and the dip to firm up slightly.
The dip can be made up to 24 hours in advance and stored covered in the refrigerator.
Garnish and Serve
When ready to serve, transfer the chilled dip to a serving bowl. Use the back of a spoon to create a shallow well in the center.
Drizzle 1–2 teaspoons of extra-virgin olive oil into the well, add a pinch of smoked paprika for color, and garnish with fresh mint sprigs. Serve immediately alongside warm pita bread, pita chips, sliced vegetables, or crackers.
Per serving (1/4 cup (about 60g)) — values are estimates
4. Smoked Salmon Avocado Rice Cakes
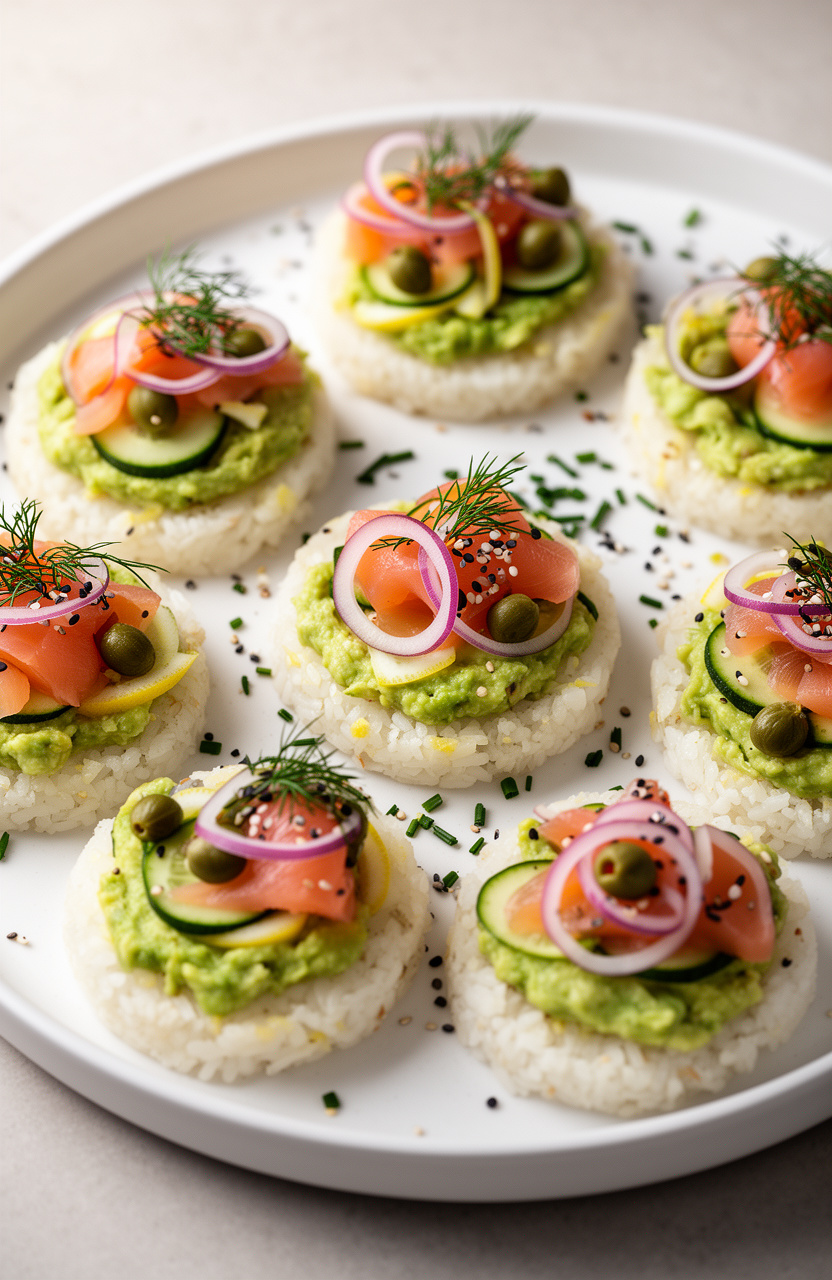
Creamy mashed avocado, sharpened with lemon juice and raw garlic, spreads thick over crisp rice cakes to create a clean visual contrast of pale green on white. The cool, buttery topping plays directly against the dry, airy crunch beneath each bite.
Smoked Salmon Avocado Rice Cakes
Base
Avocado Spread
Toppings
Garnish
- 🥣Medium mixing bowl
- 🫕Fork or potato masher
- 🥄Small spoon or offset spatula
- 🪵Cutting board
- 🔪Chef’s knife
- 🍴Citrus juicer
- 🍽️Serving platter
Prepare Avocado Spread
Scoop the flesh of 2 ripe avocados into a medium mixing bowl. Add 2 tablespoons fresh lemon juice, 1 minced garlic clove, 1/4 teaspoon fine sea salt, 1/4 teaspoon black pepper, and 1/4 teaspoon red pepper flakes.
Mash with a fork until mostly smooth with a few small chunks remaining for texture. Taste and adjust seasoning as needed.
The lemon juice will help prevent browning and brighten the flavor.
Prep All Toppings
Slice the 1/2 red onion into very thin half-moon rings and separate the layers. Slice the 1/4 English cucumber into thin rounds, approximately 1/8-inch thick.
Separate the smoked salmon slices and arrange them nearby for easy assembly. Drain and rinse the 2 tablespoons of capers and pat them dry with a paper towel.
Pick the fresh dill fronds from their stems and snip the chives into small pieces.
Spread Avocado Base
Lay all 12 rice cakes out on a large serving platter or flat work surface. Using a small spoon or offset spatula, spread approximately 1 to 1.5 tablespoons of the avocado mixture evenly onto each rice cake, covering the surface all the way to the edges.
Apply a generous layer so the toppings have something to anchor to.
Layer Smoked Salmon
Divide the 6 oz of smoked salmon evenly among the 12 rice cakes, folding or layering the slices slightly for an elegant look. Each rice cake should have approximately 1/2 oz of salmon.
Arrange the salmon so it covers most of the avocado layer without hanging too far over the edges.
Add Toppings and Garnish
Top each salmon-covered rice cake with 1 to 2 cucumber rounds, a few rings of red onion, and 3 to 4 capers. Sprinkle approximately 1/2 teaspoon of everything bagel seasoning over each rice cake.
Finish by scattering fresh dill fronds and snipped chives evenly across all 12 pieces. Tuck lemon wedges around the platter for guests to squeeze over their portions just before eating.
Plate and Serve
Arrange all 12 finished rice cakes on the serving platter in a single layer for an attractive presentation. Serve immediately for the best texture, as the rice cakes will begin to soften from the moisture of the avocado after about 20 minutes.
If preparing slightly ahead, keep the avocado spread and toppings separate and assemble no more than 10 minutes before serving.
Per serving (1 topped rice cake) — values are estimates


5. Radish Butter Herb Crostini
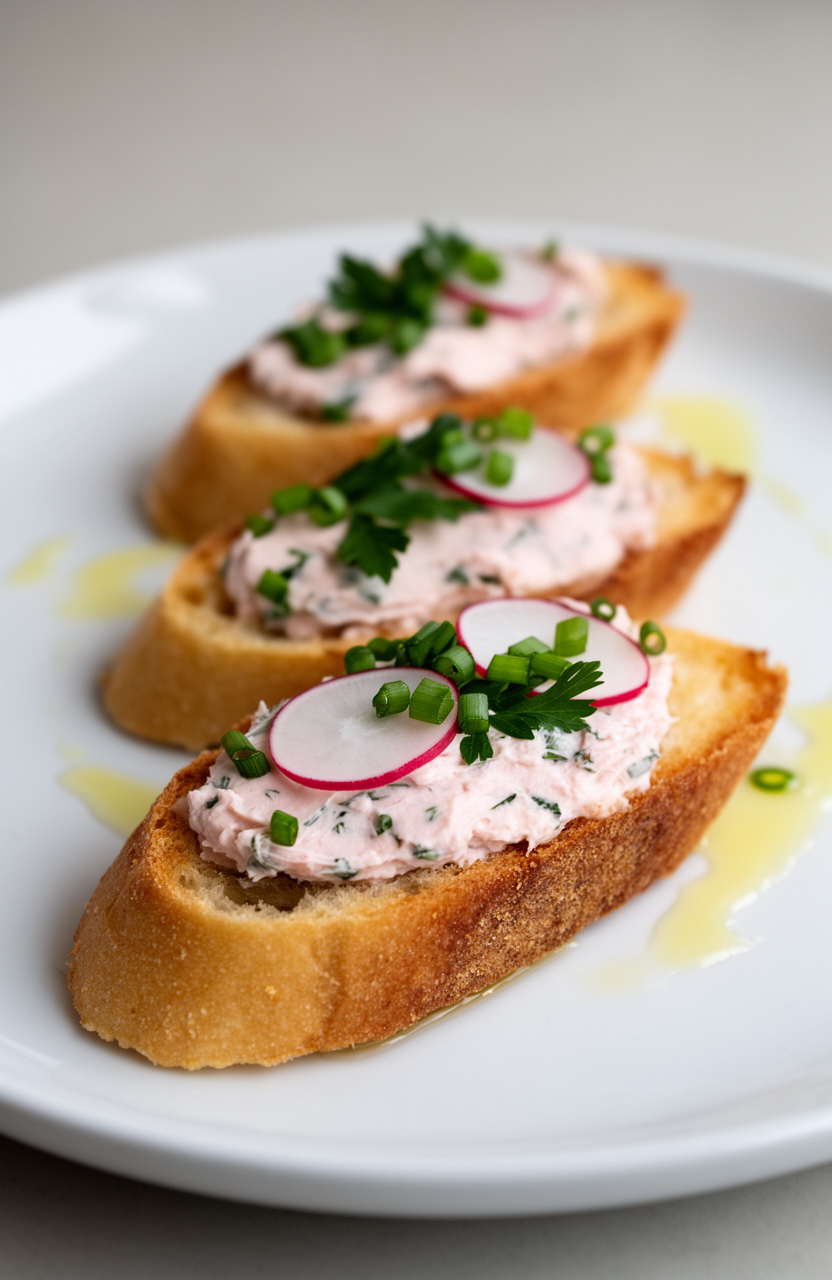
Crisp-edged baguette rounds toasted in olive oil get topped with a thick spread of softened butter worked with fresh herbs and thin-sliced radishes, where the cool, peppery bite of the radish cuts through the richness of the butter against the crunch of the bread.
Radish Butter Herb Crostini
Crostini
Radish Butter
Garnish
- 🥧Baking sheet
- 🖌️Pastry brush
- 🔪Box grater or microplane
- 🍴Clean kitchen towel or cheesecloth
- 🥣Medium mixing bowl
- 🥄Rubber spatula or fork
- 🔪Sharp knife
- 🪵Cutting board
- 🔪Mandoline slicer (optional, for thin radish slices)
- 🔥Oven
Preheat The Oven
Preheat your oven to 400°F (200°C). Position a rack in the center of the oven.
Line a large baking sheet with parchment paper or leave it unlined — either works well for crostini.
Prepare The Radish
Using the fine side of a box grater or a microplane, finely grate 6 medium radishes into a clean kitchen towel or several layers of cheesecloth. Gather the edges of the towel and squeeze firmly over the sink to remove as much moisture as possible.
You should have about 1/3 cup of grated radish after squeezing. This step is essential — excess moisture will make your butter watery and prevent it from spreading cleanly.
Make Radish Butter
In a medium mixing bowl, combine the 8 tablespoons of softened unsalted butter, squeezed grated radish, 2 tablespoons minced chives, 1 tablespoon minced parsley, 1 teaspoon minced dill, 1 grated garlic clove, 1 teaspoon lemon zest, 1/2 teaspoon fine sea salt, and 1/4 teaspoon black pepper. Using a rubber spatula or fork, mix vigorously until everything is evenly incorporated and the butter has a pale pink hue from the radish.
Taste and adjust seasoning if needed. Set aside at room temperature while you toast the bread — this allows the flavors to meld for about 5 minutes.
Brush And Toast Crostini
Arrange the 12 baguette slices in a single layer on the prepared baking sheet. Using a pastry brush, lightly coat the top of each slice with olive oil (use all 3 tablespoons, distributed evenly).
Sprinkle lightly with flaky sea salt. Place in the preheated 400°F oven and bake for 8 to 10 minutes, until the edges are golden and the tops are crisp and lightly browned.
Watch carefully after 8 minutes to prevent burning. Remove from the oven and let cool on the pan for 2 to 3 minutes — they will continue to crisp as they cool.
Slice Garnish Radishes
While the crostini bake, thinly slice 4 radishes into rounds using a sharp knife or mandoline slicer. Aim for slices about 1/16-inch thick so they are almost translucent and lay flat on the crostini.
Place the sliced radishes in a small bowl of ice water for 3 to 5 minutes to crisp them up, then drain and pat dry with a paper towel before garnishing.
Assemble The Crostini
Once the crostini have cooled slightly and are still warm (but not hot), spread a generous layer of the radish herb butter onto each slice — about 1 to 1.5 tablespoons per crostini, spreading all the way to the edges. The warmth of the bread will slightly soften the butter for easy spreading without melting it completely.
Garnish And Serve
Top each buttered crostini with 2 to 3 thin radish rounds, slightly overlapping. Scatter sliced chives over the top, add a small dill frond if using, and finish each piece with a pinch of flaky sea salt and a crack of fresh black pepper.
Arrange on a serving platter and serve immediately while the crostini retain their crunch.
Per serving (1 crostini) — values are estimates

6. Mango Tajín Fruit Skewers
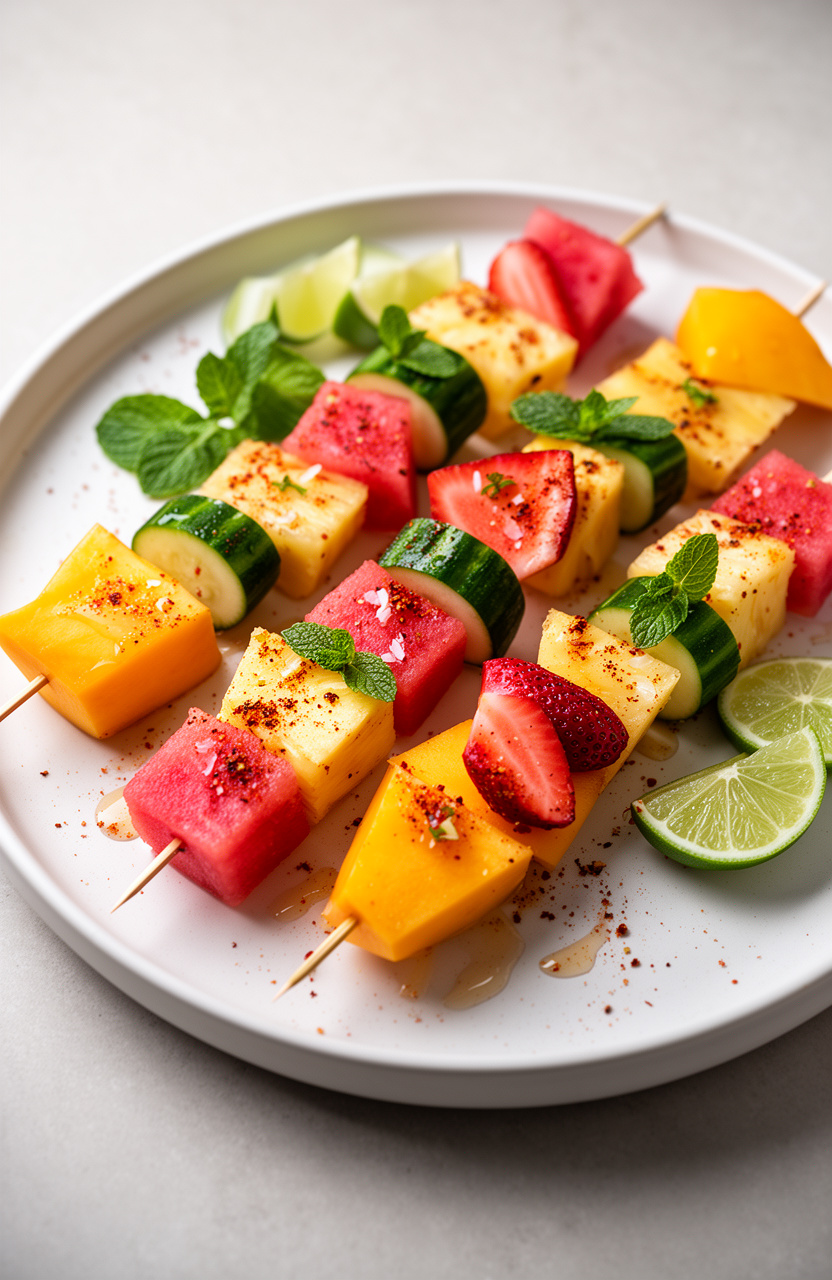
Chunks of ripe mango, juicy watermelon, pineapple, and cool cucumber threaded onto skewers make a visually striking platter of contrasting colors, then a heavy dusting of Tajín cuts through the sweetness with chile heat and lime-forward tartness.
Mango Tajín Fruit Skewers
Seasoning
Garnish
- 📍8 wooden or metal skewers (10-12 inch)
- 🪵Cutting board
- 🔪Sharp chef’s knife
- 🥣Small mixing bowl
- 🥄Pastry brush or spoon
- 🍽️Large serving platter
Prep the Skewers
If using wooden skewers, soak them in cold water for at least 10 minutes before assembling to prevent splintering. Pat them dry with a paper towel before use.
Set aside 8 skewers on your work surface.
Cut the Fruit
Peel and cut 2 large ripe mangoes into 1-inch cubes, yielding about 2 cups of fruit. Peel, core, and cut the pineapple into 1-inch chunks, yielding about 2 cups.
Cut the watermelon into 1-inch cubes, yielding about 4 cups. Slice the cucumber into 1/2-inch thick rounds.
Hull the strawberries and halve any that are larger than 1 inch. Arrange all prepared fruit on your cutting board, grouped by type for easy assembly.
Mix Lime Dressing
In a small mixing bowl, whisk together 2 tablespoons of fresh lime juice and 1 tablespoon of honey or agave nectar (if using) until fully combined. This light dressing will help the Tajín seasoning adhere to the fruit and add a bright citrus note.
Set aside.
Assemble the Skewers
Thread the fruit onto each skewer in a colorful, alternating pattern. A suggested order per skewer: 1 strawberry half, 2 mango cubes, 2 pineapple chunks, 2 watermelon cubes, and 2 cucumber rounds.
Repeat the pattern if the skewer allows. Leave about 1 inch of space at each end for easy handling.
Aim for 5-6 pieces of fruit per skewer for a generous appetizer portion.
Apply Lime Juice
Using a pastry brush or a spoon, lightly brush the assembled fruit skewers with the lime juice mixture, coating all sides of the fruit evenly. This step adds flavor and helps the Tajín seasoning stick to the surface of the fruit rather than sliding off.
Season with Tajín
Hold each skewer over the serving platter and sprinkle approximately 1 teaspoon of Tajín Clásico seasoning evenly over all sides of the fruit, rotating the skewer as you go to ensure full coverage. Adjust the amount to taste — use less for a milder flavor or more for extra heat and tang.
The chili-lime salt blend should visibly coat the fruit surface.
Plate and Serve
Arrange the finished skewers on a large serving platter. Garnish the platter with fresh mint leaves and lime wedges for squeezing.
Serve immediately at room temperature for the best flavor and texture. If not serving right away, refrigerate uncovered for up to 1 hour before adding the Tajín seasoning, as the salt will draw out moisture over time.
Per serving (1 skewer) — values are estimates

![GUSTO [12 Inch - 100 Count] Bamboo Skewers for Shish Kabob, Grilling, Fruits, Appetizers, and Cocktails (Formerly Comfy Package)](https://m.media-amazon.com/images/I/41-tZtiWrqL._SL500_.jpg)

7. Pea Shoot Hummus Flatbread

Pea shoots piled high on hummus-slathered flatbread make a striking green-on-cream contrast, with the tender, slightly grassy shoots and sweet thawed peas cutting through the earthy chickpea base. Toasted pine nuts add a dry, nutty crunch against the soft flatbread beneath.
Pea Shoot Hummus Flatbread
Garnish
- 🍳Cast iron skillet or grill pan
- 🥣Small mixing bowl
- 🪵Cutting board
- 🔪Chef’s knife
- 🔪Zester or microplane
- 🥢Tongs
- 🥄Spoon or offset spatula
Toast Pine Nuts
Place a dry cast iron skillet or grill pan over medium heat. Add 2 tablespoons of pine nuts and toast, stirring frequently, for 2–3 minutes until golden and fragrant.
Remove immediately and set aside to prevent burning.
Dress Pea Shoots
In a small mixing bowl, combine the 2 cups of pea shoots, 1/2 cup thawed peas, 1 tablespoon of lemon juice, 1 teaspoon of lemon zest, and 1 tablespoon of olive oil. Season lightly with flaky sea salt and freshly cracked black pepper.
Toss gently and set aside.
Char The Flatbreads
Return the cast iron skillet or grill pan to medium-high heat. Brush each flatbread lightly with the remaining 1 tablespoon of olive oil.
Place one flatbread at a time in the hot pan and cook for 1–2 minutes per side until lightly charred and warmed through. Repeat with the second flatbread.
Spread The Hummus
Place the warm charred flatbreads on a cutting board. Using a spoon or offset spatula, spread 1/2 cup of hummus evenly over each flatbread, leaving a 1/2-inch border around the edges.
Use the back of the spoon to create gentle swirls in the hummus.
Top And Garnish
Pile the dressed pea shoot and pea mixture evenly over both hummus-covered flatbreads. Arrange the thinly sliced radishes across the top.
Scatter the toasted pine nuts and fresh mint leaves over everything. Finish with a pinch of red pepper flakes, a drizzle of olive oil if desired, and a final sprinkle of flaky sea salt.
Slice And Serve
Cut each flatbread into 4–6 pieces using a sharp chef’s knife or pizza cutter. Arrange on a serving board or platter and serve immediately while the flatbread is still warm.
Per serving (1/2 flatbread with toppings) — values are estimates


8. Whipped Feta Asparagus Rollups
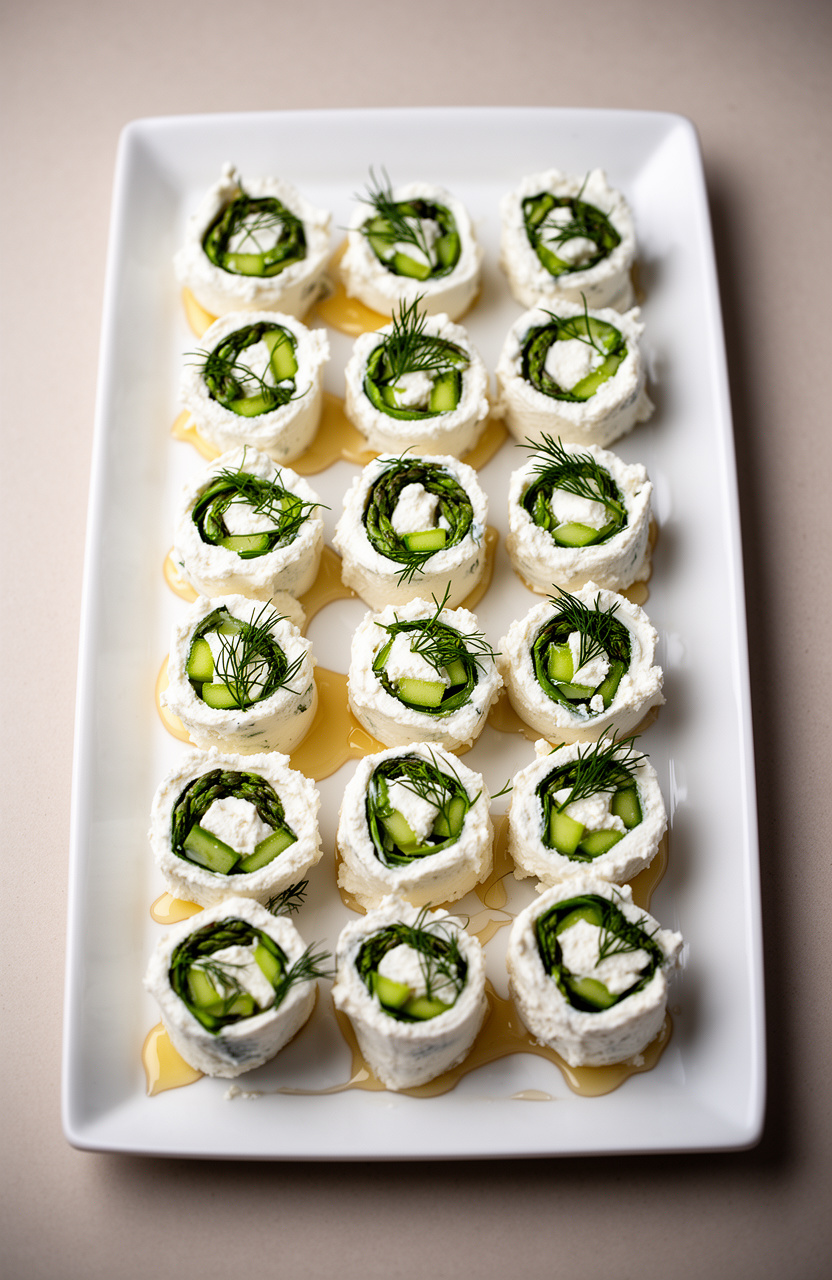
Blanched asparagus spears get wrapped in thin layers of flatbread slathered with whipped feta — block cheese blended smooth with cream cheese and lemon juice until it turns light and tangy — then sliced into tight, spiral cross-sections that show the bright green center against the white filling.
Whipped Feta Asparagus Rollups
Whipped Feta
Rollups
Garnish
- 🔌Food processor or stand mixer
- 🍳Large skillet or grill pan
- 🥢Tongs
- 🪵Cutting board
- 🔪Sharp knife
- 🥄Rubber spatula
- 📄Plastic wrap
- 🍽️Serving platter
Make Whipped Feta
Add the crumbled feta, softened cream cheese, 3 tablespoons extra-virgin olive oil, lemon juice, lemon zest, minced garlic, and red pepper flakes to a food processor. Process on high for 2 to 3 minutes, scraping down the sides halfway through, until the mixture is completely smooth and fluffy.
Season with freshly cracked black pepper to taste. Transfer to a bowl and set aside.
Blanch the Asparagus
Heat a large skillet or grill pan over medium-high heat. Toss the 24 trimmed asparagus spears with 1 tablespoon olive oil, 1/2 teaspoon kosher salt, and 1/4 teaspoon black pepper.
Cook the asparagus in the hot pan for 3 to 5 minutes, turning occasionally with tongs, until they are bright green, just tender, and lightly charred in spots. Remove from heat and spread on a cutting board to cool completely, about 5 minutes.
Spread the Tortillas
Lay one 10-inch flour tortilla flat on a clean work surface. Using a rubber spatula, spread approximately 3 to 4 tablespoons of the whipped feta mixture in an even layer across the entire surface of the tortilla, leaving a 1/2-inch border around the edge.
Sprinkle about 2 teaspoons of chopped sun-dried tomatoes and a pinch of fresh basil evenly over the feta layer. Repeat with the remaining 5 tortillas.
Add and Roll
Place 4 cooled asparagus spears horizontally across the bottom third of each prepared tortilla, with the tips pointing outward and the spears aligned parallel to each other. Starting from the bottom edge closest to the asparagus, roll the tortilla tightly and firmly around the asparagus, keeping the roll as compact as possible.
Press the seam side down to seal.
Chill the Rolls
Wrap each completed roll tightly in plastic wrap, twisting the ends to secure. Place all 6 wrapped rolls seam-side down on a plate or tray and refrigerate for 15 minutes.
Chilling helps the whipped feta set and makes slicing much cleaner and easier.
Slice and Serve
Unwrap the chilled rolls. Using a sharp knife, trim off the uneven ends of each roll, then slice each roll crosswise into 4 equal pieces, about 2 inches wide, for a total of 24 rollups.
Arrange cut-side up on a serving platter. Drizzle with honey if desired and garnish with fresh dill or microgreens.
Serve immediately or refrigerate covered for up to 4 hours before serving.
Per serving (1 rollup) — values are estimates


9. Honeydew Prosciutto Mint Cups
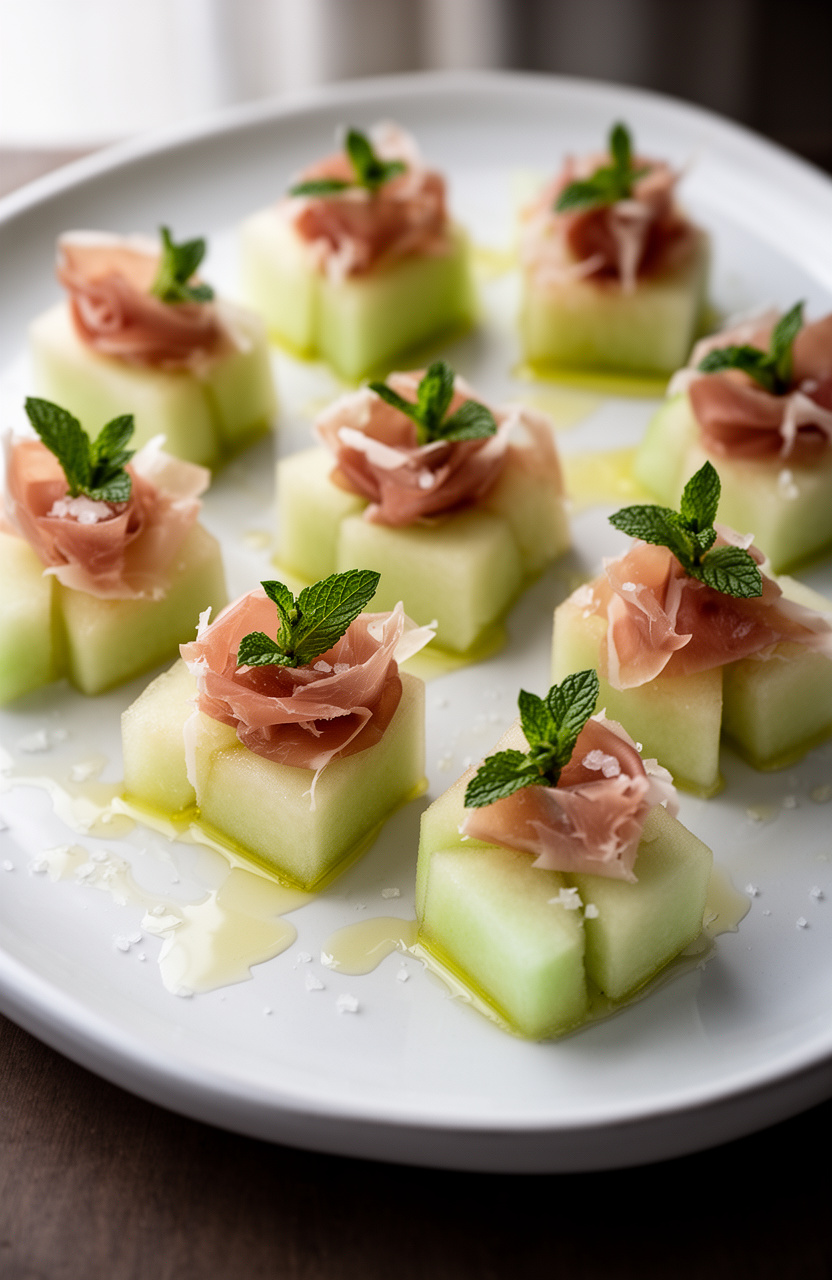
Hollowed honeydew rounds hold thin-draped prosciutto and torn mint, the melon’s cool sweetness cutting against the salt-cured pork while a drizzle of olive oil ties the two together with a faint grassy richness.
Honeydew Prosciutto Mint Cups
Dressing
Seasoning
- 🔪Sharp chef’s knife
- 🪵Cutting board
- 🍴Melon baller or 1.5-inch round cookie cutter
- 🥣Small mixing bowl
- 🥄Whisk
- 🥄Spoon or small cookie scoop
- 🍽️Serving platter or tray
- 🍴Paper towels
Prepare Melon Cups
Halve the honeydew melon lengthwise and scoop out all seeds with a large spoon. Slice the melon into 12 equal wedges.
Using a sharp knife, carefully cut the flesh away from the rind on each wedge, keeping the rind intact to use as a natural cup. Trim the bottom of each rind cup slightly so it sits flat without tipping.
Pat the rind cups dry with paper towels.
Dice Melon Flesh
Take the removed melon flesh and cut it into 1/2-inch cubes, yielding approximately 2 cups of diced melon. Place the cubes on a layer of paper towels and gently pat dry to remove excess moisture.
This prevents the dressing from becoming watered down. Set aside.
Prepare Prosciutto
Lay the prosciutto slices flat on a cutting board. Cut or tear each slice into roughly 1-inch irregular pieces.
For a more elegant presentation, loosely fold or ruffle each piece into a small rosette shape. Set aside at room temperature.
Whisk the Dressing
In a small mixing bowl, combine 2 tablespoons extra virgin olive oil, 1 tablespoon fresh lime juice, and 1 teaspoon honey. Whisk vigorously until the dressing is emulsified and slightly thickened, about 30 seconds.
Season with 1/4 teaspoon flaky sea salt and 1/4 teaspoon freshly cracked black pepper. Taste and adjust seasoning as needed.
Toss Melon and Mint
Add the diced honeydew melon and the 1/4 cup of fresh mint leaves (torn if large) to the bowl with the dressing. Gently toss to coat all pieces evenly.
If using crushed red pepper flakes, add a small pinch now for a subtle heat contrast with the sweet melon.
Chill the Filling
Cover the dressed melon and mint mixture and refrigerate for 15 minutes. This brief chill allows the flavors to meld together and ensures the filling is refreshingly cold when served.
Do not chill longer than 30 minutes or the mint may darken.
Assemble the Cups
Arrange the 12 melon rind cups on a serving platter. Using a spoon or small cookie scoop, fill each cup with approximately 2 to 3 tablespoons of the chilled melon and mint mixture.
Drape 1 to 2 ruffled pieces of prosciutto over the top of each filled cup, allowing them to cascade naturally over the edge.
Garnish and Serve
Tuck a small fresh mint sprig into each cup beside the prosciutto for a bright green garnish. Finish with an extra pinch of flaky sea salt over the assembled cups.
Serve immediately on a chilled platter for best flavor and texture. These cups are best enjoyed within 30 minutes of assembly.
Per serving (1 cup) — values are estimates


10. Edamame Lemon Zest Snack Bowl
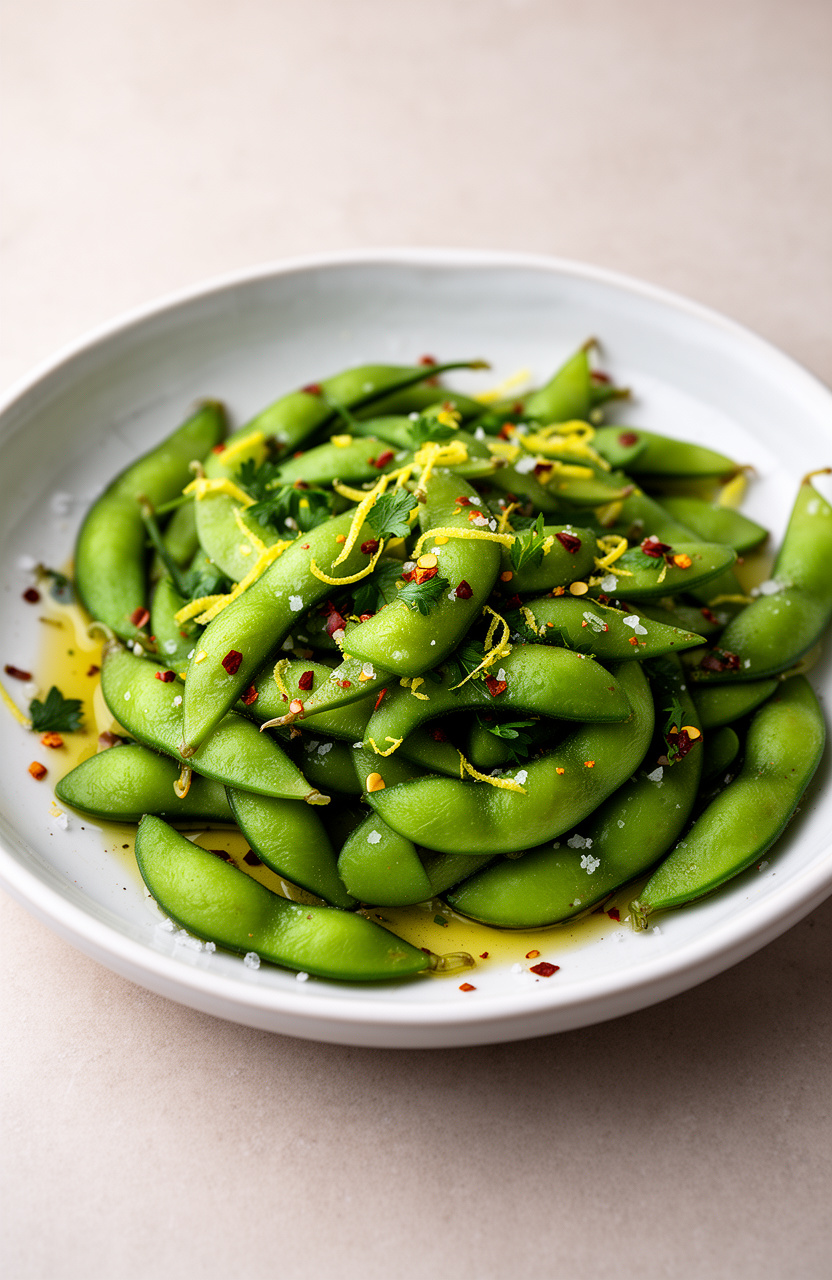
Bright green edamame pods, boiled in heavily salted water until just tender, get tossed with flaky sea salt and a sharp hit of lemon zest that cuts through the natural buttery richness of the beans.
Edamame Lemon Zest Snack Bowl
Seasoning
Garnish
- 🫕Large pot
- 🪣Colander
- 🥣Large mixing bowl
- 🔪Microplane or zester
- 🥢Tongs or slotted spoon
- 🥣Serving bowl
Boil Salted Water
Fill a large pot with water and bring to a rolling boil over high heat. Add 1 tablespoon of salt to the boiling water to season the edamame as they cook.
Cook the Edamame
Add the 16 oz of frozen edamame in pods to the boiling salted water. Cook for 4 to 5 minutes until the pods are bright green and the beans inside are tender but still have a slight bite.
Do not overcook — they should remain vibrant and firm.
Drain and Dry
Drain the edamame immediately through a colander. Give the colander a few good shakes to remove excess water.
Transfer the drained edamame to a large mixing bowl.
Prepare Lemon Seasoning
While the edamame drains, use a microplane or zester to zest the large lemon directly over the mixing bowl to capture the aromatic oils. Then juice the same lemon to yield 2 tablespoons of fresh lemon juice.
Add the lemon juice, 1 tablespoon olive oil, 1 teaspoon garlic powder, 1/2 teaspoon red pepper flakes, and 1/4 teaspoon black pepper to the bowl.
Toss and Season
Add the hot drained edamame to the seasoning mixture in the bowl. Toss thoroughly with tongs or a large spoon until every pod is evenly coated with the lemon zest, oil, and spices.
Sprinkle over 1 tablespoon of flaky sea salt and toss once more to distribute.
Garnish and Serve
Transfer the seasoned edamame to a serving bowl. Scatter 1 tablespoon of freshly chopped parsley over the top for a pop of color and freshness.
Serve immediately while warm, with an empty side bowl for discarded pods.
Per serving (Approximately 1 cup edamame in pods (4 oz)) — values are estimates


11. Carrot Ribbon Spring Roll Bites
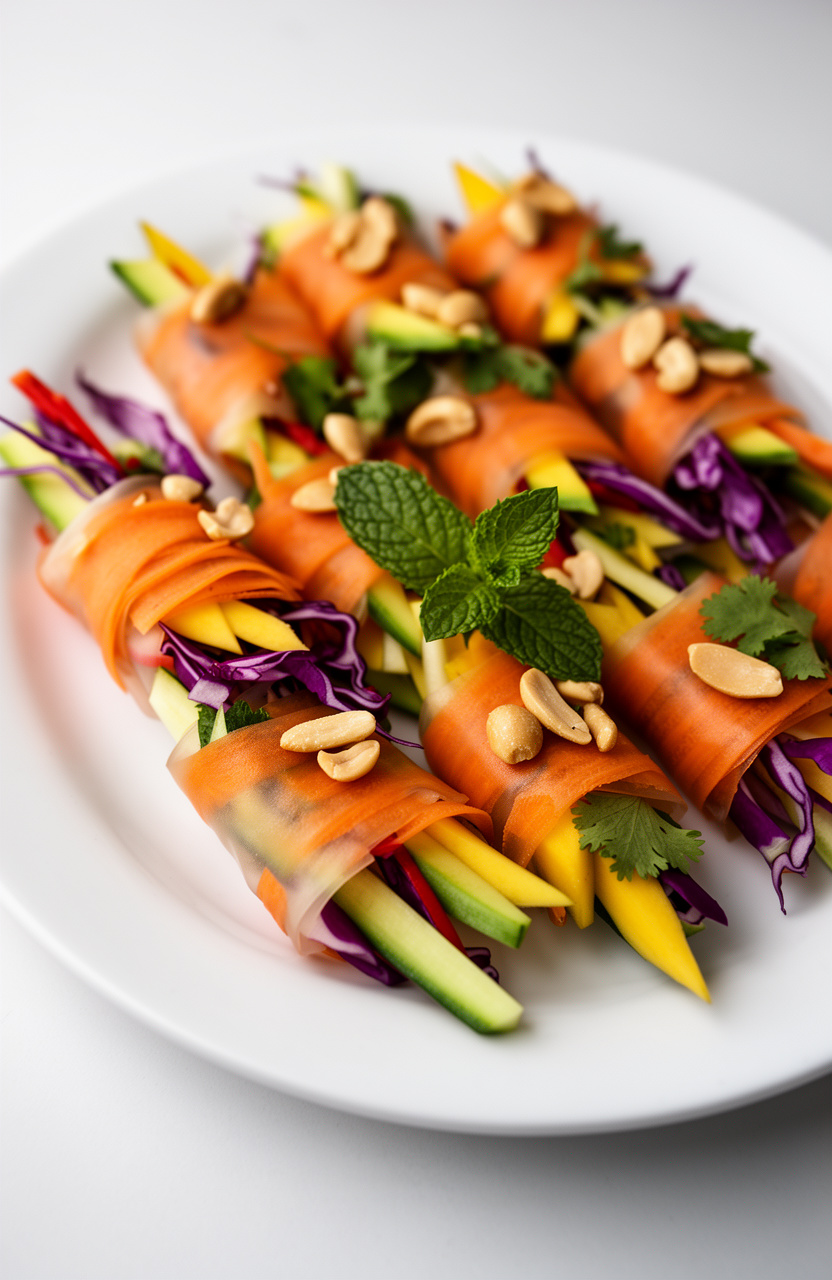
Peeled into long, translucent ribbons, carrots wrap around julienned cucumber and a sharp mix of red and purple cabbage, creating bites that crunch with every bite and deliver a cool, lightly sweet contrast against the crisp vegetal bite of the filling.
Carrot Ribbon Spring Roll Bites
Spring Roll Filling
Peanut Dipping Sauce
- 🔪Vegetable peeler
- 🔪Y-peeler or julienne peeler
- 🍽️Large shallow dish or pie plate
- 🪵Cutting board
- 🔪Sharp chef’s knife
- 🥣Small mixing bowl
- 🥄Whisk
- 🍽️Large serving platter
- 🍴Damp kitchen towel
- 🥣Small serving bowl (for sauce)
Prepare Carrot Ribbons
Using a Y-peeler or wide vegetable peeler, run the peeler firmly down the length of each carrot to create long, thin ribbons. Rotate the carrot as you work to peel ribbons from all sides.
You should get approximately 8 to 10 ribbons per carrot. Set ribbons aside on a clean kitchen towel.
Prep All Fillings
Julienne the cucumber into 3-inch matchstick pieces. Slice the avocado into thin strips.
Cut the mango into thin 3-inch julienne strips. Shred the red and purple cabbage finely if not pre-shredded.
Roughly chop the peanuts. Pick the mint and cilantro leaves from their stems.
Arrange all prepared fillings in separate piles on your cutting board for easy assembly.
Whisk Dipping Sauce
In a small mixing bowl, combine 3 tablespoons peanut butter, 2 tablespoons tamari, 1 tablespoon lime juice, 1 tablespoon rice vinegar, 1 tablespoon sesame oil, 1 teaspoon grated ginger, 1 teaspoon sriracha, and 1 tablespoon maple syrup. Whisk together until smooth.
Add warm water 1 tablespoon at a time, whisking between additions, until the sauce reaches a pourable, dippable consistency. Taste and adjust seasoning.
Set aside.
Soften Rice Paper
Fill a large shallow dish or pie plate with about 1 inch of warm water (approximately 100°F to 110°F — warm to the touch but not hot). Working one at a time, submerge a rice paper wrapper in the warm water for 10 to 15 seconds, rotating it so all sides are moistened.
The wrapper should feel pliable and slightly tacky but not fully soft — it will continue to soften as you work. Lay it flat on a clean, damp kitchen towel.
Layer and Roll
In the lower third of the softened rice paper, arrange a small bundle of 3 to 4 carrot ribbons horizontally. Top with a small pinch of red cabbage, a few cucumber sticks, 2 mango strips, 1 avocado slice, a few mint leaves, a few cilantro leaves, and a pinch of chopped peanuts.
Do not overfill — use about 2 to 3 tablespoons of filling total. Fold the bottom edge of the wrapper up and over the filling, then fold in both sides snugly, and roll forward tightly to seal.
Place seam-side down on the serving platter. Repeat with remaining wrappers and filling.
Chill Before Serving
Once all 16 spring roll bites are assembled and placed seam-side down on the platter, cover them loosely with a lightly dampened paper towel and then plastic wrap to prevent drying out. Refrigerate for 15 minutes to allow the rolls to firm up and the flavors to meld.
Do not chill for longer than 2 hours or the wrappers may become sticky and tough.
Slice and Serve
Remove the platter from the refrigerator. Using a sharp knife, slice each spring roll in half on a diagonal to reveal the colorful filling cross-section.
Arrange cut-side up on the serving platter for visual appeal. Serve immediately alongside the peanut dipping sauce in a small bowl.
Garnish the platter with extra mint leaves and a wedge of lime if desired.
Per serving (2 spring roll bites (1 serving)) — values are estimates


12. Blueberry Goat Cheese Phyllo Cups

Crispy, golden phyllo cups get filled with a whipped blend of tangy goat cheese and cream cheese, then finished with a drizzle of honey that pulls the sharp and sweet flavors into a clean, balanced bite.
Blueberry Goat Cheese Phyllo Cups
Filling
Topping
- 🥧Baking sheet
- 🥣Medium mixing bowl
- 🔌Electric hand mixer or stand mixer
- 🥄Rubber spatula
- 🛍️Piping bag or zip-top bag
- 🔪Zester or microplane
- 🥄Measuring spoons
- 🍽️Serving platter
Preheat the Oven
Preheat your oven to 350°F (175°C). Arrange the 15 frozen mini phyllo shells in a single layer on a baking sheet.
Do not thaw them before baking.
Crisp the Shells
Place the baking sheet with the phyllo shells in the preheated oven and bake for 5 minutes, until the shells are golden, crisp, and lightly toasted. Remove from the oven and allow them to cool completely on the baking sheet, about 5 minutes.
Make the Filling
In a medium mixing bowl, combine 4 oz of room-temperature goat cheese, 2 oz of room-temperature cream cheese, 1 tablespoon honey, 1 teaspoon fresh thyme leaves, 1/4 teaspoon lemon zest, and 1/8 teaspoon black pepper. Beat with an electric hand mixer on medium speed for about 1-2 minutes until the mixture is smooth, fluffy, and well combined.
Scrape down the sides of the bowl as needed.
Fill the Shells
Transfer the goat cheese filling to a piping bag fitted with a round tip, or use a zip-top bag with one corner snipped off. Pipe approximately 1 heaping teaspoon of the filling into each cooled phyllo shell, filling them just above the rim.
Alternatively, use a small spoon to fill each cup.
Top with Blueberries
Place 4-5 fresh blueberries on top of the goat cheese filling in each phyllo cup, gently pressing them in slightly so they sit securely on the creamy filling.
Garnish and Serve
Drizzle a small amount of honey and balsamic glaze over all the filled cups using a spoon or squeeze bottle. Sprinkle with a few extra fresh thyme leaves and a pinch of flaky sea salt over each cup.
Arrange on a serving platter and serve immediately for the crispiest shells.
Per serving (1 phyllo cup) — values are estimates


13. Shaved Fennel White Bean Crostini

Toasted baguette rounds get rubbed with olive oil until the cut edges turn deep golden and shatter-crisp, then piled with a rough-smashed cannellini spread and paper-thin fennel shavings that curl against the white bean base with a clean, anise-edged bite.
Shaved Fennel White Bean Crostini
Crostini
White Bean Spread
Shaved Fennel Topping
Garnish
- 🥧Baking sheet
- 🔪Mandoline slicer or sharp knife
- 🌀Food processor or blender
- 🥣Mixing bowl
- 🖌️Pastry brush
- 🔪Citrus zester or microplane
- 🪵Cutting board
- 🔪Chef’s knife
- 🥄Rubber spatula
- 🍳Small skillet
Preheat the Oven
Preheat your oven to 400°F (200°C). Line a large baking sheet with parchment paper or leave it unlined for crispier results.
Prepare the Baguette
Slice the French baguette on a slight diagonal into 1/2-inch rounds, yielding approximately 24 slices. Arrange the slices in a single layer on the prepared baking sheet.
Brush each slice generously with 3 tablespoons of extra-virgin olive oil using a pastry brush, then sprinkle lightly with flaky sea salt.
Bake the Crostini
Place the baking sheet in the preheated 400°F oven and bake for 8 to 10 minutes, flipping the slices once at the 5-minute mark, until the crostini are golden brown and crisp on both sides. Remove from the oven and allow to cool on the pan.
They will continue to crisp as they cool.
Toast the Garlic
While the crostini bake, heat a small skillet over medium-low heat for about 1 minute. Add 1 tablespoon of the olive oil for the spread and sauté the 2 minced garlic cloves for 2 to 3 minutes, stirring frequently, until fragrant and just lightly golden.
Remove from heat and let cool for 2 minutes before adding to the food processor.
Blend the White Beans
In the bowl of a food processor, combine the drained cannellini beans, toasted garlic with its oil, remaining 2 tablespoons of olive oil, 2 tablespoons fresh lemon juice, 1 teaspoon lemon zest, 1/2 teaspoon ground cumin, 1/2 teaspoon kosher salt, and 1/4 teaspoon black pepper. Process on high for 60 to 90 seconds, scraping down the sides as needed, until completely smooth and creamy.
If the spread is too thick, add water 1 tablespoon at a time and blend again until you reach a hummus-like consistency. Taste and adjust seasoning as needed.
Shave the Fennel
Trim the fennel bulb, removing the stalks and setting aside a small handful of the feathery fronds for garnish. Halve the bulb lengthwise and remove the tough core with a V-shaped cut.
Using a mandoline slicer set to 1/16-inch or a very sharp chef’s knife, shave the fennel into paper-thin slices. Place the shaved fennel in a mixing bowl.
Dress the Fennel
To the bowl of shaved fennel, add 1 tablespoon extra-virgin olive oil, 1 tablespoon fresh lemon juice, 1 teaspoon honey, 1/4 teaspoon flaky sea salt, and a pinch of red pepper flakes. Toss gently to coat all the fennel evenly.
Let the dressed fennel sit for 3 to 5 minutes to slightly soften and absorb the dressing.
Assemble the Crostini
Spread approximately 1 tablespoon of the white bean spread onto each cooled crostini, leaving a small border around the edge. Top each with a small mound of the dressed shaved fennel, about 1 teaspoon per piece.
Garnish with a few reserved fennel fronds, a scattering of fresh flat-leaf parsley, a light drizzle of extra-virgin olive oil, and a crack of fresh black pepper over the top.
Serve Immediately
Arrange the finished crostini on a serving platter and serve immediately while the crostini are still crisp. If preparing ahead, store the white bean spread and dressed fennel separately in the refrigerator for up to 2 days and assemble just before serving.
Per serving (2 crostini) — values are estimates


14. Watermelon Feta Mint Skewers
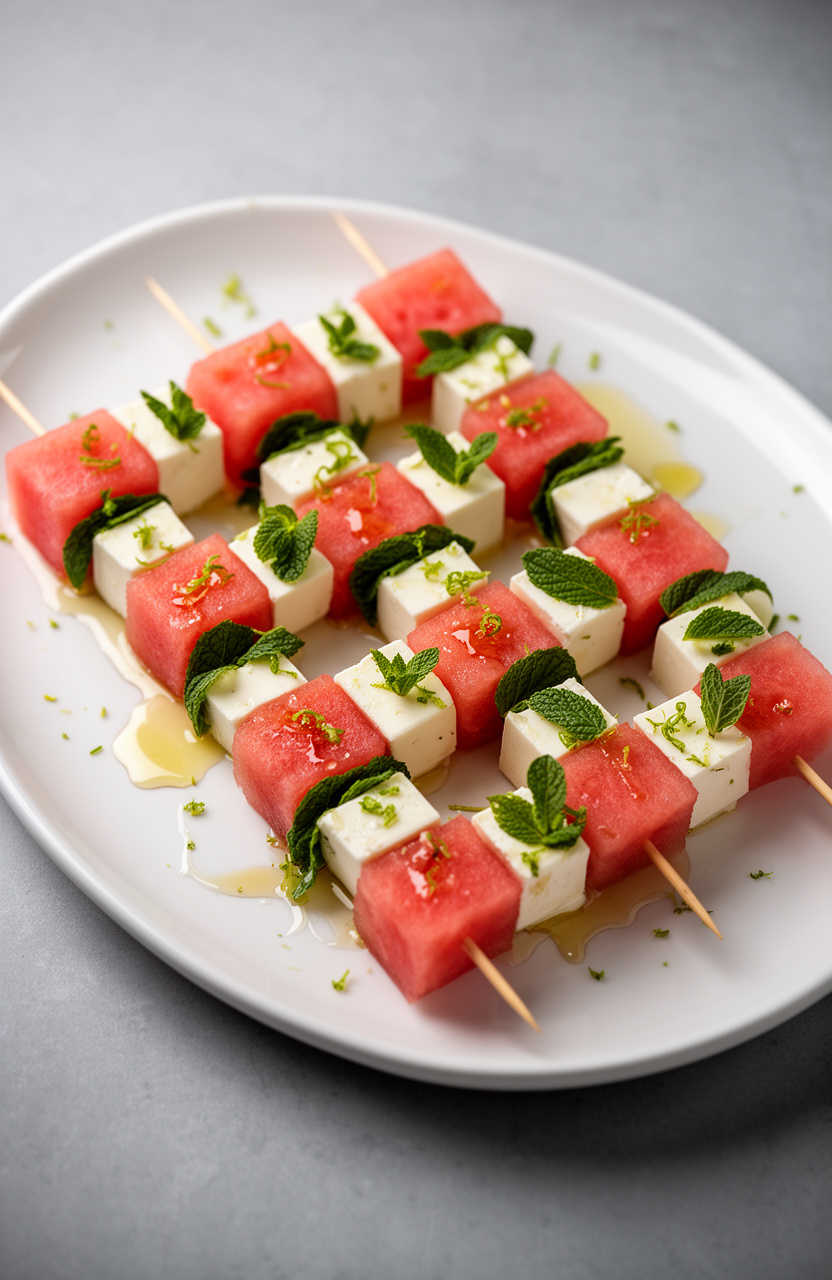
Juicy watermelon cubes and creamy, salt-forward feta get threaded onto skewers with whole mint leaves, then finished with a drizzle of olive oil that pulls the sweet, briny, and herbal notes into one clean bite.
Watermelon Feta Mint Skewers
Dressing
Garnish
- 📍12 six-inch bamboo or metal skewers
- 🔪Sharp knife
- 🪵Cutting board
- 🥣Small mixing bowl
- 🥄Whisk
- 🍽️Serving platter
- 🥄Pastry brush or small spoon
- 🔪Zester or microplane
Prepare the Watermelon
Using a sharp knife on a clean cutting board, cut the watermelon into uniform 1-inch cubes, aiming for 36 pieces. Remove any seeds you encounter.
Pat the cubes lightly with a paper towel to remove excess moisture — this helps the dressing adhere and prevents the skewers from becoming soggy. Set aside.
Cut the Feta
Carefully cut the block of feta cheese into 3/4-inch cubes, yielding approximately 24 pieces. Feta is crumbly, so use a gentle, deliberate slicing motion rather than pressing down.
If a few pieces break, they can still be threaded onto the skewer or crumbled over the finished platter as a garnish.
Whisk the Dressing
In a small mixing bowl, combine 2 tablespoons extra-virgin olive oil, 1 tablespoon honey, 1 tablespoon fresh lime juice, 1/4 teaspoon flaky sea salt, 1/4 teaspoon freshly cracked black pepper, and a pinch of red pepper flakes if using. Whisk vigorously until the honey is fully incorporated and the dressing is emulsified and smooth.
Taste and adjust seasoning as needed.
Assemble the Skewers
Thread each of the 12 skewers in the following pattern: one watermelon cube, one fresh mint leaf (folded in half), one feta cube, one mint leaf (folded in half), one watermelon cube, one mint leaf, and one final watermelon cube — ending with watermelon for visual appeal. Repeat for all 12 skewers, placing them on the serving platter as you go.
Drizzle and Season
Using a pastry brush or small spoon, lightly drizzle the honey-lime dressing evenly over all assembled skewers, making sure each skewer gets a little coating on the watermelon and feta. Sprinkle lightly with an extra pinch of flaky sea salt and freshly cracked black pepper.
Chill Before Serving
Transfer the platter of assembled skewers to the refrigerator and chill for 15 minutes before serving. This allows the flavors to meld together and keeps the watermelon crisp and refreshing.
Do not chill longer than 1 hour, as the mint may darken and the watermelon may release excess liquid.
Garnish and Serve
Just before serving, use a microplane or zester to zest 1 lime over the entire platter for a burst of citrus aroma. Tuck a few extra fresh mint leaves around the skewers on the platter for decoration.
Serve immediately while cold and fresh.
Per serving (1 skewer) — values are estimates
15. Herbed Cottage Cheese Endive Boats
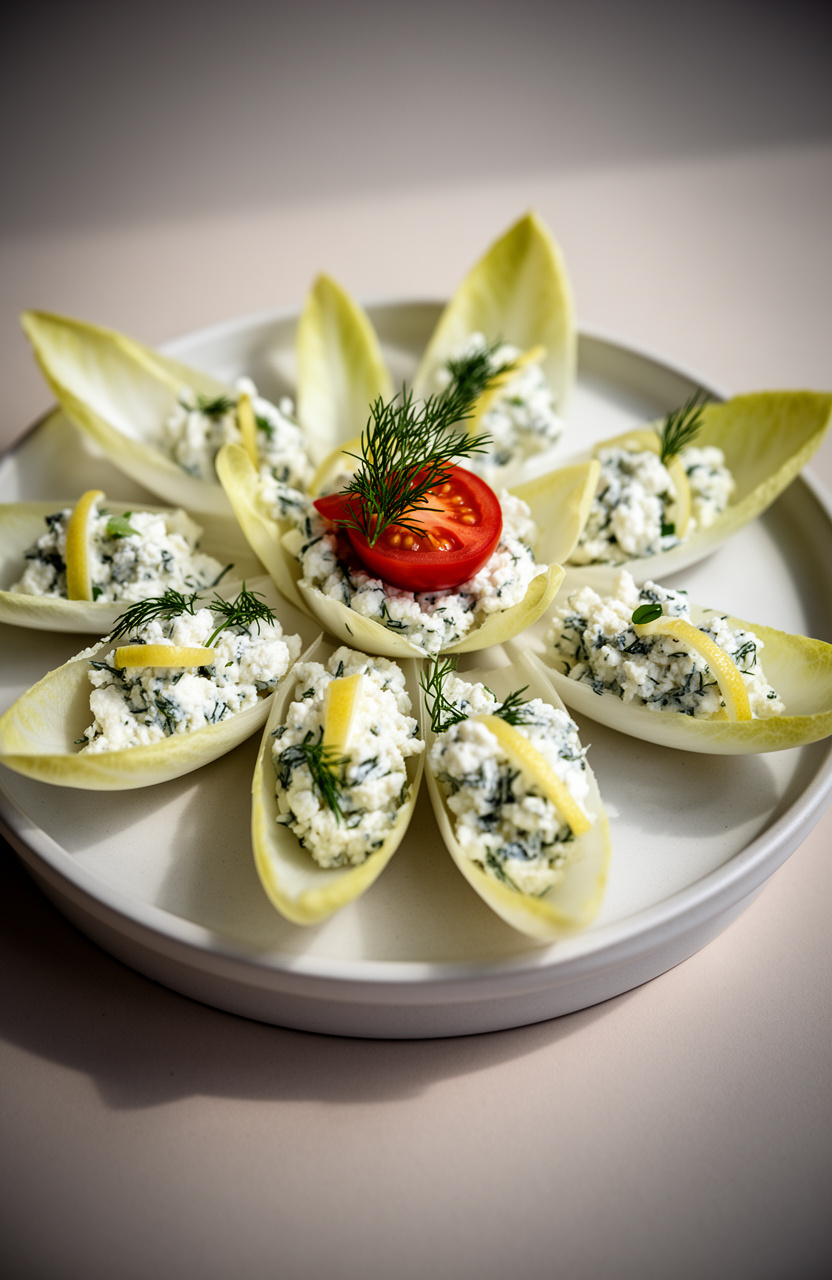
Drained cottage cheese packed with chopped chives, dill, and parsley sits in crisp, pale endive leaves, giving each bite a cool, herby creaminess against that slight bitter crunch. Draining pulls out excess liquid, keeping the filling thick enough to hold its shape without sliding.
Herbed Cottage Cheese Endive Boats
Filling
Boats
Garnish
- 🥣Medium mixing bowl
- 🥄Rubber spatula or spoon
- 🔪Zester or fine grater
- 🔪Chef’s knife
- 🪵Cutting board
- 🪣Small strainer or cheesecloth (optional, for draining cottage cheese)
- 🍽️Serving platter
- 🛍️Piping bag or zip-lock bag (optional)
Drain Cottage Cheese
If your cottage cheese is particularly watery, place it in a fine-mesh strainer set over a bowl and let it drain for 10 minutes to achieve a thicker, scoopable consistency. This step is optional but recommended for a cleaner presentation.
Mix Herbed Filling
In a medium mixing bowl, combine 2 cups cottage cheese, 2 tablespoons chives, 2 tablespoons dill, 2 tablespoons parsley, 1 tablespoon fresh lemon juice, 1 teaspoon lemon zest, 1 minced garlic clove, 1/4 teaspoon onion powder, 1/2 teaspoon kosher salt, 1/4 teaspoon black pepper, and 1 tablespoon extra-virgin olive oil. Stir gently until all herbs are evenly distributed throughout the cottage cheese.
Taste and Adjust
Taste the herbed cottage cheese mixture and adjust seasoning as needed — add more lemon juice for brightness, salt for depth, or extra herbs to intensify the flavor. The filling should taste vibrant and well-seasoned.
Chill the Filling
Cover the bowl with plastic wrap and refrigerate the herbed cottage cheese filling for 20 minutes. This resting time allows the flavors to meld together and the garlic to mellow, resulting in a more cohesive, flavorful filling.
Prepare Endive Leaves
While the filling chills, trim the base of each endive head and carefully separate the leaves one by one, working from the outside in. You should get approximately 8 usable boat-shaped leaves per head, totaling about 24 leaves.
Rinse the leaves under cold water, then pat them completely dry with paper towels. Arrange them concave-side up on a large serving platter.
Fill the Boats
Remove the herbed cottage cheese from the refrigerator. Using a spoon or a piping bag fitted with a round tip, fill each endive leaf with approximately 1 to 1.5 tablespoons of the cottage cheese mixture, placing it neatly in the center of the leaf and leaving the tip of the endive exposed.
Garnish and Serve
Top each filled endive boat with a halved cherry tomato or a quarter-slice of cucumber. Finish with a small sprig of fresh dill, a pinch of flaky sea salt, and a light dusting of smoked paprika for color and subtle smokiness.
Serve immediately for the best texture and freshness.
Per serving (4 endive boats) — values are estimates