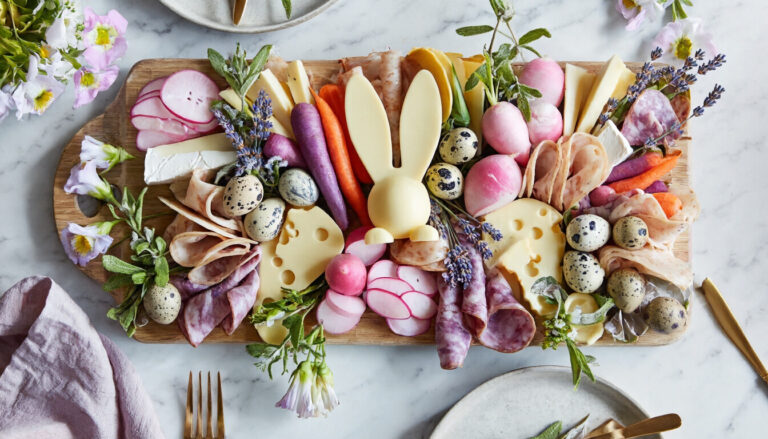
15 Easter Side Dishes for the Perfect Holiday Dinner
Easter dinner deserves a spread that feels as bright and celebratory as the holiday itself — and the right side dishes make all the difference.
From honey glazed roasted carrots to lemon asparagus with parmesan, this list is packed with fresh, seasonal flavors that pair beautifully with any main.
You’ll also find crowd-pleasing classics like scalloped potatoes au gratin and deviled egg potato salad — the kind of dishes that disappear fast at the table.
Bookmark this list now so your Easter menu is stress-free and ready to go when the holiday rolls around.
1. Honey Glazed Roasted Carrots
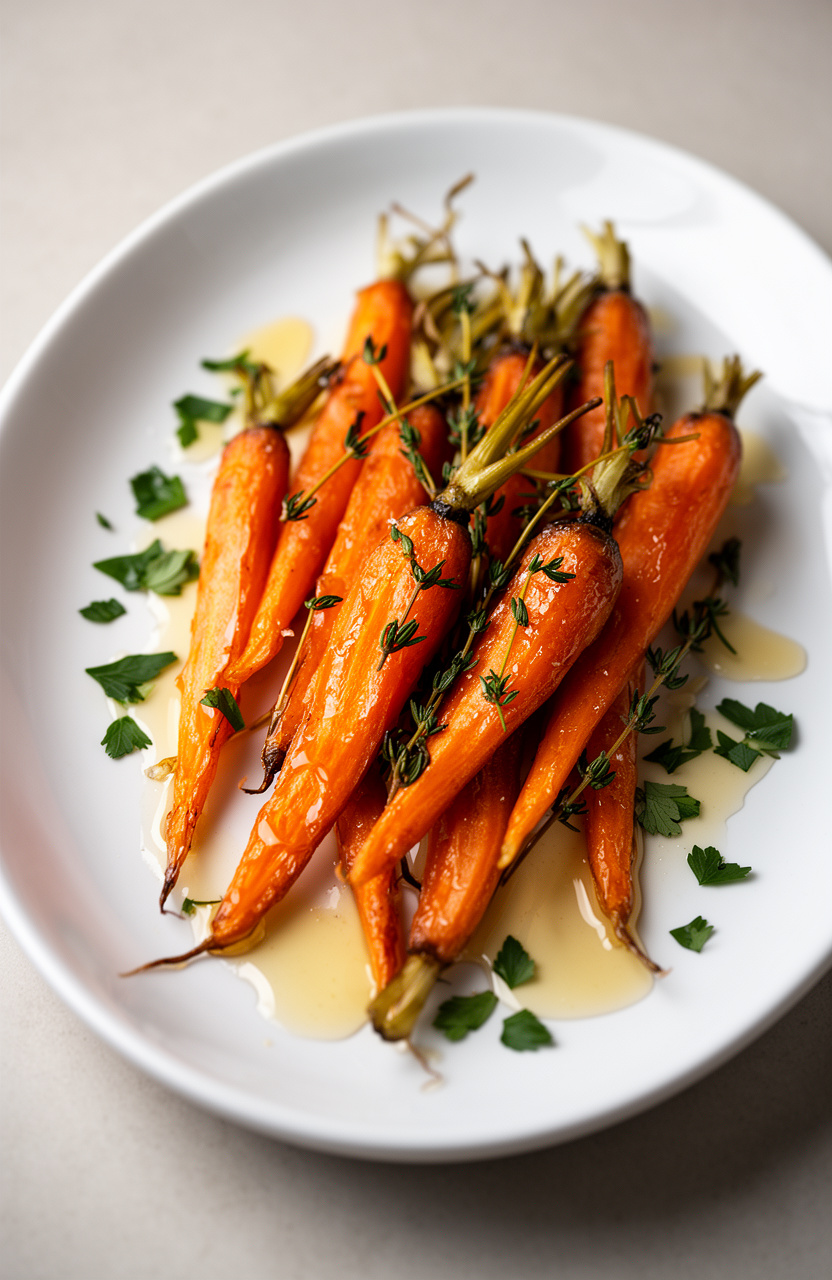
Whole carrots roasted in a honey and butter glaze develop a deeply caramelized coating that’s sticky and rich on the outside while staying tender and naturally sweet at the center.
Honey Glazed Roasted Carrots
Garnish
- 🥧Large rimmed baking sheet
- 📄Parchment paper
- 🥣Small mixing bowl
- 🥄Whisk
- 🔪Vegetable peeler
- 🔪Sharp chef’s knife
- 🪵Cutting board
- 🖌️Pastry brush
- 🍽️Serving platter
Preheat Oven
Preheat your oven to 400°F (200°C). Line a large rimmed baking sheet with parchment paper and set aside.
This ensures even roasting and easy cleanup.
Prep the Carrots
Peel 2 pounds of whole carrots and trim the tops, leaving about 1 inch of the green stem on if desired for presentation. If carrots are thick (wider than 1 inch in diameter), halve them lengthwise so they cook evenly.
Arrange them in a single layer on the prepared baking sheet.
Make the Glaze
In a small mixing bowl, whisk together 3 tablespoons melted unsalted butter, 3 tablespoons honey, 1 tablespoon olive oil, 1 teaspoon garlic powder, 1/2 teaspoon kosher salt, and 1/4 teaspoon freshly ground black pepper until fully combined and smooth.
Coat the Carrots
Using a pastry brush or spoon, coat the carrots generously and evenly with the honey butter glaze, turning them to ensure all sides are covered. Reserve about 1 tablespoon of the glaze for brushing halfway through roasting.
Roast the Carrots
Place the baking sheet in the preheated 400°F oven and roast for 12 minutes. Remove the pan, brush the carrots with the reserved glaze, then return to the oven and continue roasting for an additional 13 minutes, for a total of 25 minutes, until the carrots are fork-tender and caramelized with golden edges.
Garnish and Serve
Remove the carrots from the oven and transfer them to a serving platter. Sprinkle with 1/2 teaspoon fresh thyme leaves and 1 tablespoon finely chopped flat-leaf parsley.
Drizzle any pan juices over the top and serve immediately while warm.
Per serving (1 serving) — values are estimates
Editor’s Choice


2. Spring Pea and Mint Risotto
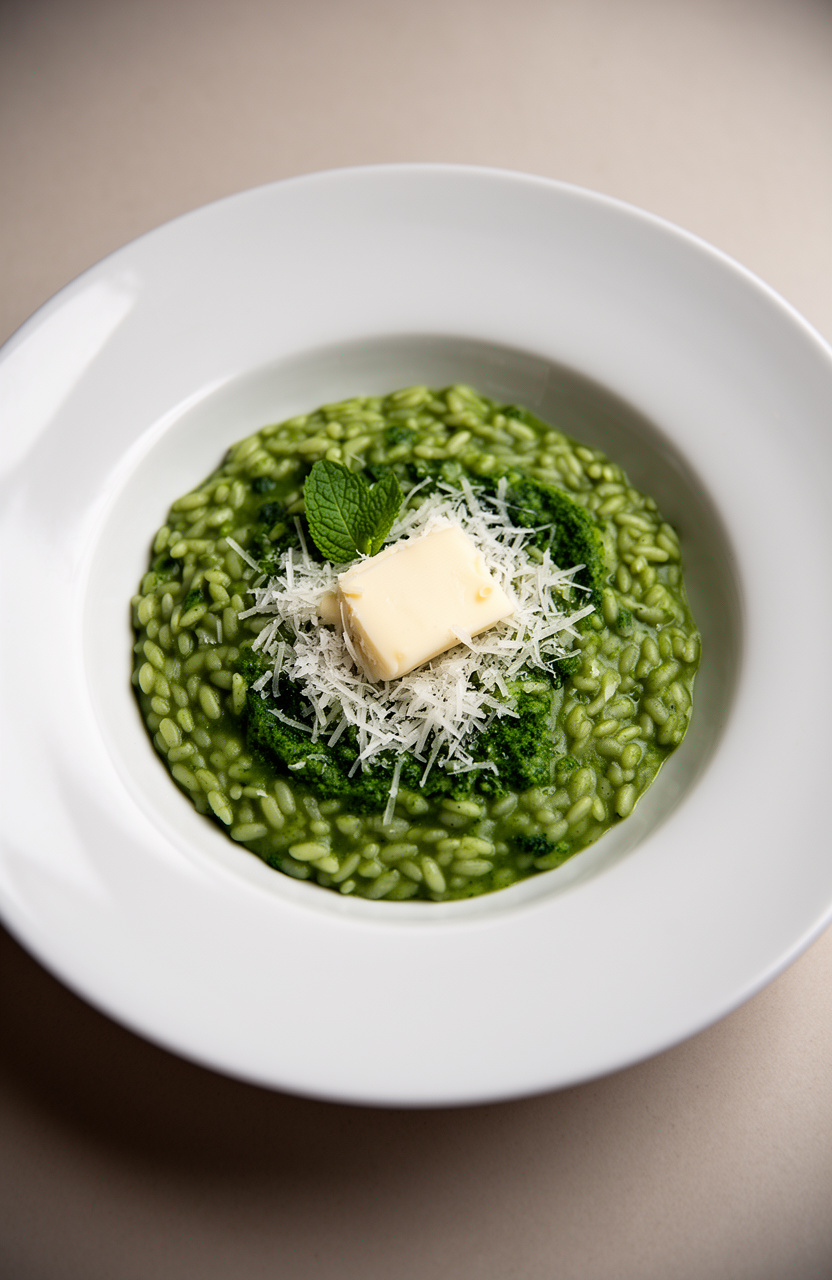
Fresh peas and bright mint stirred into slowly ladled, warm broth give this risotto a clean, springlike flavor that a simple steamed vegetable side can’t match. The gradual absorption technique coaxes the starch from the rice into a silky, creamy texture that holds the delicate sweetness of the peas in every bite.
Spring Pea and Mint Risotto
Garnish
- 🫕Large heavy-bottomed saucepan or Dutch oven (4–5 quart)
- 🫕Medium saucepan
- 🥄Ladle
- 🥄Wooden spoon or silicone spatula
- 🔪Chef’s knife
- 🪵Cutting board
- 🔪Microplane or fine grater
- 🥄Measuring cups and spoons
- 🌀Blender or immersion blender
Warm the Broth
Pour the 6 cups of broth into a medium saucepan and bring to a gentle simmer over medium-low heat. Once simmering, reduce the heat to low to keep it warm throughout the cooking process.
Keeping the broth hot is essential for even, creamy risotto.
Prepare Pea Purée
Set aside 1/2 cup of the peas for the pea purée. Place the remaining 1 1/2 cups of peas in a small bowl and set aside.
For the purée, blanch the reserved 1/2 cup peas in boiling salted water for 2 minutes, then transfer immediately to an ice bath for 1 minute. Drain and blend with 2 tablespoons of warm broth until smooth.
Season lightly with salt and set aside.
Sauté the Aromatics
In your large heavy-bottomed saucepan or Dutch oven, heat 1 tablespoon of butter and 2 tablespoons of olive oil over medium heat. Once the butter is melted and foaming subsides, add the finely diced onion.
Cook, stirring frequently, for 5 to 6 minutes until the onion is soft and translucent but not browned. Add the minced garlic and cook for 1 more minute until fragrant.
Toast the Rice
Add the 1 1/2 cups of Arborio rice to the pan. Stir constantly with a wooden spoon for 2 minutes, coating every grain with the butter and oil mixture.
The edges of the rice should become slightly translucent while the center remains opaque — this toasting step builds flavor and helps the rice release starch evenly.
Deglaze with Wine
Pour in the 1/2 cup of dry white wine and stir continuously until it is completely absorbed by the rice, about 1 to 2 minutes. The sizzle and steam from the wine will deglaze any fond from the bottom of the pan, adding depth of flavor.
Add Broth Gradually
Begin adding the warm broth one ladle at a time (approximately 1/2 cup per addition). Stir constantly and wait until each addition is nearly fully absorbed before adding the next ladle.
Continue this process for approximately 20 to 22 minutes, adjusting heat as needed to maintain a steady, gentle bubble. The risotto is ready when the rice is al dente — tender with a slight bite — and the mixture is creamy and flows slowly like lava.
Stir in the Peas
With the last ladle of broth, stir in the reserved 1 1/2 cups of whole peas. Cook for 2 minutes, stirring gently, until the peas are just heated through and bright green.
Remove the pan from the heat.
Finish and Emulsify
Off the heat, stir in the remaining 1 tablespoon of cold butter, the 1/2 cup of grated Parmigiano-Reggiano, the pea purée, chopped fresh mint, lemon juice, and lemon zest. Stir vigorously for 1 minute — this technique, called ‘mantecatura,’ emulsifies the butter and cheese into the rice for an ultra-creamy texture.
Season with 3/4 teaspoon kosher salt and 1/2 teaspoon black pepper, adjusting to taste.
Plate and Serve
Divide the risotto immediately among four warm shallow bowls. Top each serving with extra grated Parmigiano-Reggiano, a few fresh mint leaves, a drizzle of extra-virgin olive oil, and a pinch of red pepper flakes if desired.
Serve immediately, as risotto waits for no one.
Per serving (1 serving) — values are estimates
Highly Recommended


3. Scalloped Potatoes Au Gratin
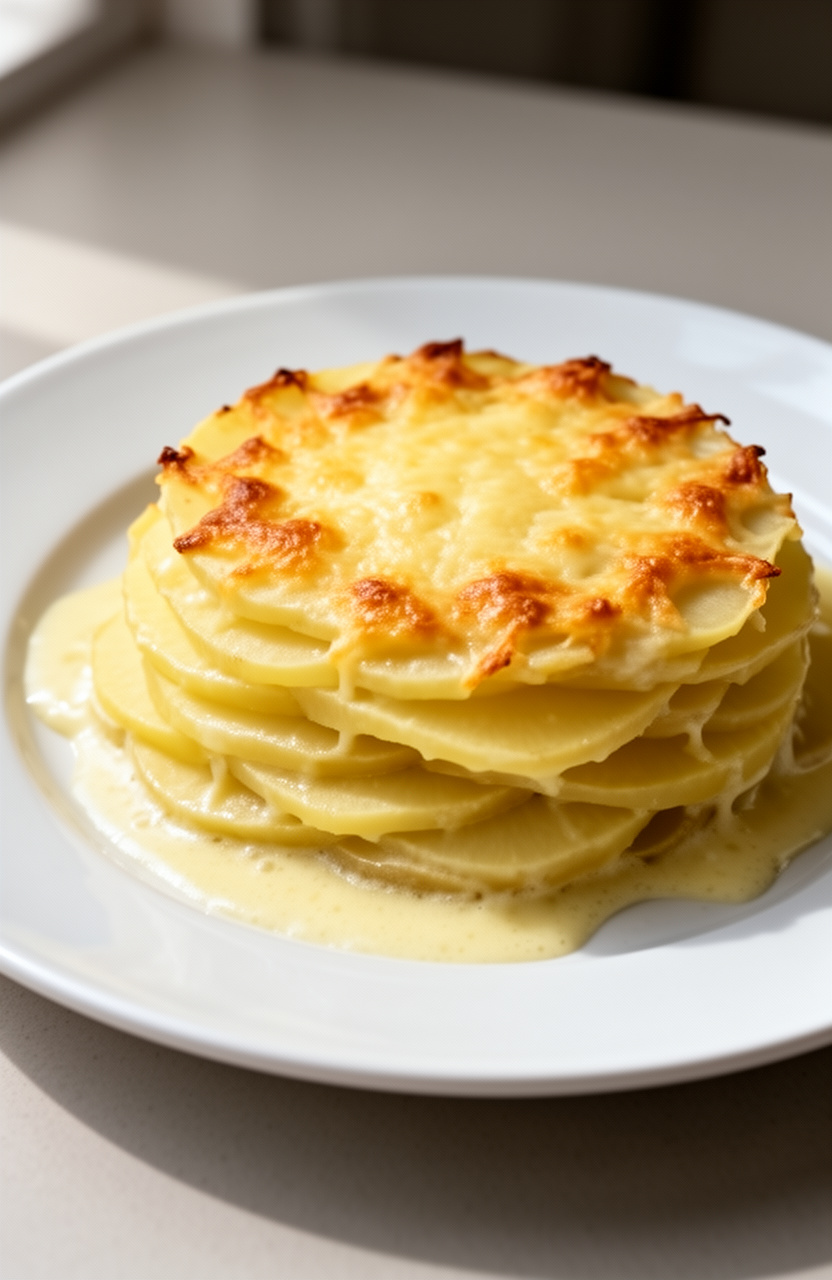
Yukon Gold potatoes sliced paper-thin and layered with sautéed onion, garlic, and a rich butter sauce bake into a dish that goes far deeper in flavor than a basic potato bake. The starchy layers absorb the savory, garlicky cream as they cook, turning tender while the top crisps into a golden, bubbling crust.
Scalloped Potatoes Au Gratin
Sauce
Cheese
Topping
Garnish
Prep
- 🍰9×13-inch baking dish
- 🫕Large heavy-bottomed saucepan
- 🔪Mandoline slicer or sharp chef’s knife
- 🥄Wooden spoon or silicone spatula
- 🥄Measuring cups and spoons
- 🔪Box grater
- 📄Aluminum foil
- 🪵Cutting board
- 🥄Whisk
Preheat and Prep
Preheat your oven to 375°F (190°C). Grease a 9×13-inch baking dish thoroughly with cooking spray or softened butter, making sure to coat the sides as well.
Set aside.
Slice Potatoes
Peel the potatoes and slice them uniformly to 1/8-inch thickness using a mandoline slicer or a sharp chef’s knife. Uniform slices are critical for even cooking.
Place the sliced potatoes in a bowl of cold water to prevent browning while you prepare the sauce.
Sauté Aromatics
In a large heavy-bottomed saucepan, melt 3 tablespoons of butter over medium heat. Add the finely diced onion and cook, stirring occasionally, for 4 to 5 minutes until softened and translucent.
Add the minced garlic and cook for 1 additional minute until fragrant.
Build the Roux
Sprinkle 3 tablespoons of flour over the cooked onion and garlic mixture. Stir constantly with a wooden spoon or whisk for 1 to 2 minutes to cook out the raw flour taste, forming a light roux.
The mixture should turn slightly golden and smell nutty.
Make Cream Sauce
Slowly pour in the 2 cups of warmed whole milk, whisking constantly to prevent lumps. Once the milk is fully incorporated, add the 1 cup of heavy cream.
Continue to whisk and cook over medium heat for 3 to 4 minutes until the sauce thickens enough to coat the back of a spoon.
Add Cheese and Season
Remove the saucepan from heat. Season the sauce with 1 teaspoon kosher salt, 1/2 teaspoon black pepper, 1/4 teaspoon nutmeg, and 1/4 teaspoon dry mustard powder.
Stir in 1 cup of the shredded sharp cheddar and all of the Gruyere cheese until fully melted and smooth. Taste and adjust seasoning as needed.
Layer the Potatoes
Drain the potato slices and pat them dry with paper towels. Arrange one-third of the potato slices in an even, slightly overlapping layer across the bottom of the prepared baking dish.
Pour one-third of the cheese sauce evenly over the potatoes. Sprinkle with a pinch of fresh thyme leaves.
Repeat this layering process two more times, finishing with the remaining cheese sauce on top.
Top with Cheese
Scatter the remaining 1/2 cup of shredded sharp cheddar and 1/4 cup of grated Parmesan evenly over the top layer of sauce. Cover the baking dish tightly with aluminum foil.
Bake Until Golden
Place the covered baking dish in the preheated 375°F oven and bake for 50 minutes. Then, carefully remove the foil and continue baking uncovered for an additional 35 to 40 minutes, until the top is deeply golden and bubbly and a knife or fork slides easily through all the potato layers with no resistance.
Total bake time is approximately 1 hour and 30 minutes.
Rest and Serve
Remove the dish from the oven and let it rest uncovered at room temperature for 10 minutes before serving. This resting period allows the sauce to set slightly, making it easier to serve clean portions.
Garnish with fresh thyme leaves just before serving.
Per serving (1 serving (approximately 1 cup)) — values are estimates
Highly Recommended


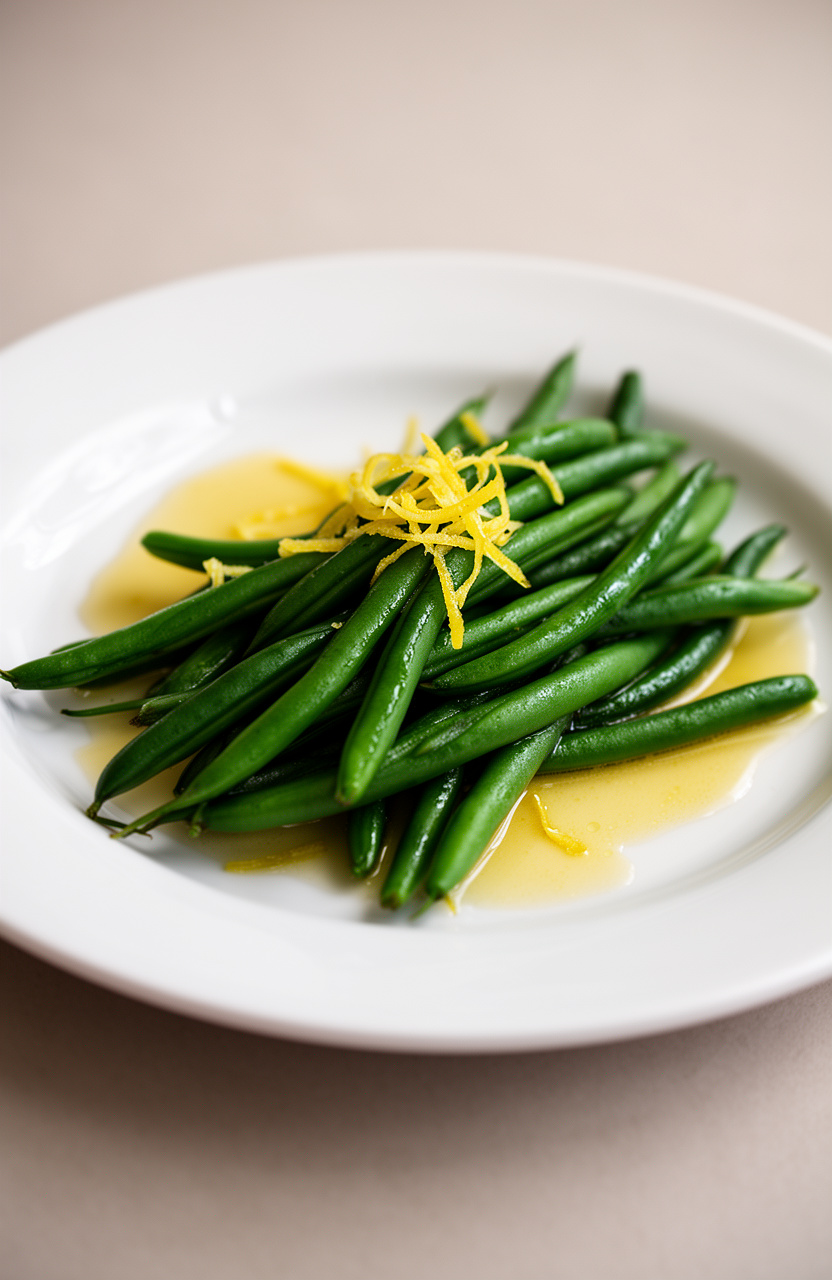
4. Lemon Asparagus with Parmesan
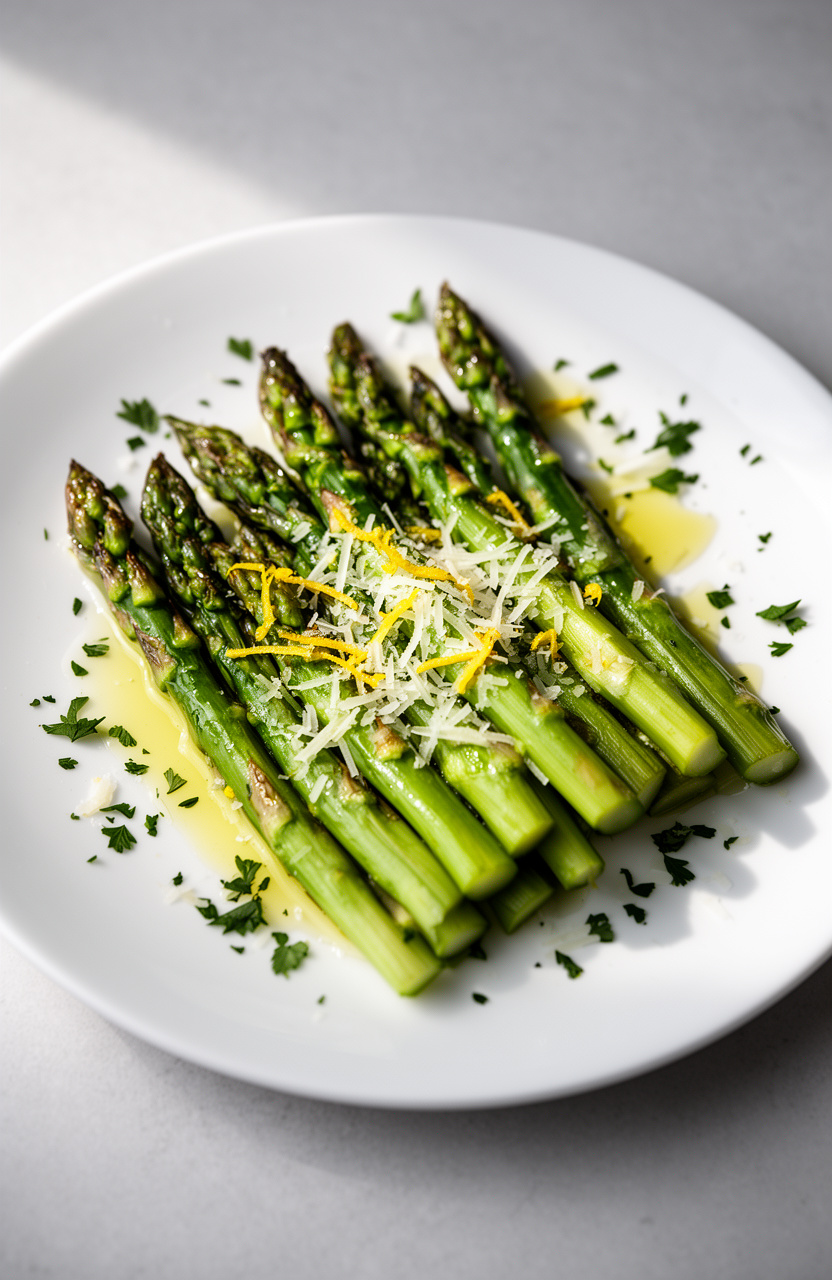
Fresh asparagus trimmed and tossed in olive oil with minced garlic and bright lemon zest delivers a depth of flavor that a plain steamed vegetable simply can’t match. The spears stay crisp-tender at the center while the tips blister slightly, and a finish of salty Parmesan adds a savory, nutty contrast to the citrusy bite.
Lemon Asparagus with Parmesan
Topping
- 🍳Large skillet or sauté pan (12-inch)
- 🔪Microplane or fine grater
- 🍴Citrus juicer
- 🥢Tongs
- 🪵Cutting board
- 🔪Chef’s knife
- 🔪Vegetable peeler or hands for trimming asparagus
Prep the Asparagus
Rinse the asparagus under cold water and pat dry with paper towels. Hold each spear at both ends and bend gently until it snaps naturally — this removes the woody, tough end.
Alternatively, line the spears up and trim about 1 to 1.5 inches off the bottom ends with a knife. If the spears are thick, use a vegetable peeler to peel the lower 2 inches of each stalk.
Prepare Aromatics
Using a Microplane or fine grater, zest the lemon directly over a small bowl to catch all the aromatic oils. Then cut the lemon in half and juice it, removing any seeds.
Set the zest and juice aside separately. Mince the 3 garlic cloves finely and chop the parsley.
Grate the Parmigiano-Reggiano and set all components aside so you are ready to move quickly once cooking begins.
Sauté the Garlic
Heat a large 12-inch skillet over medium-high heat for about 1 minute until hot. Add 2 tablespoons of extra-virgin olive oil and swirl to coat the pan.
Add the minced garlic and red pepper flakes (if using) and sauté for 30 seconds, stirring constantly, until fragrant but not browned.
Cook the Asparagus
Add the trimmed asparagus spears to the skillet in a single layer. Season immediately with 1/2 teaspoon sea salt and 1/4 teaspoon black pepper.
Cook, turning the spears with tongs every 1 to 2 minutes, for a total of 5 to 7 minutes. Thin spears will be done closer to 5 minutes; thick spears may need the full 7 minutes.
The asparagus is ready when it is bright green, tender-crisp, and lightly blistered in spots.
Add Lemon Juice
Reduce the heat to low. Pour 3 tablespoons of fresh lemon juice over the asparagus and toss with tongs to coat.
Cook for an additional 30 seconds to allow the juice to slightly reduce and glaze the spears. Remove the pan from the heat.
Finish and Serve
Transfer the asparagus to a serving platter. Immediately sprinkle the lemon zest evenly over the top, followed by the 1/2 cup of freshly grated Parmigiano-Reggiano.
The residual heat will gently melt the cheese. Scatter the chopped fresh parsley over everything.
Serve immediately while hot.
Per serving (1 serving (approximately 4-5 spears)) — values are estimates
Our Best Picks


5. Deviled Egg Potato Salad
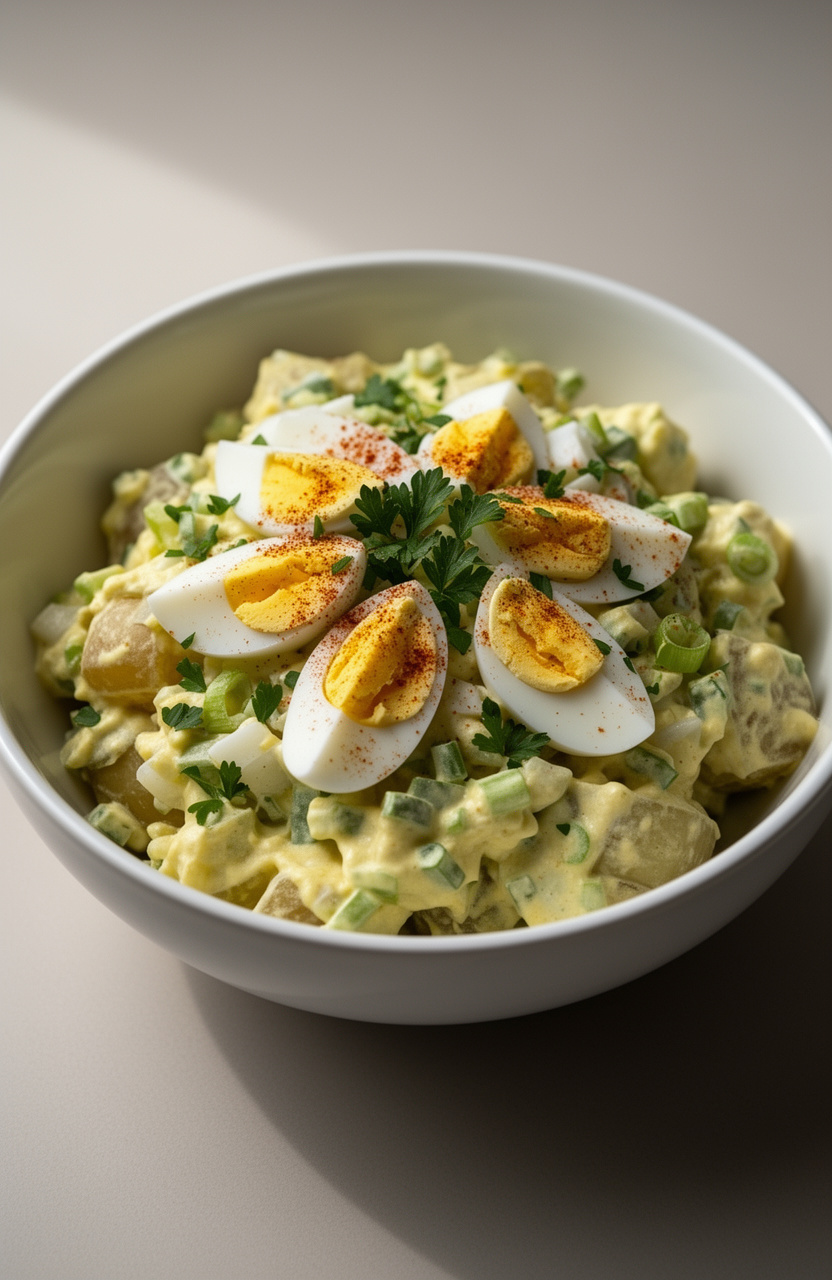
Boiling Yukon Gold potatoes until just fork-tender keeps them sturdy enough to hold their shape once folded into the creamy dressing. Mayonnaise, hard-boiled eggs, and a touch of salt deliver the tangy, rich flavor of classic deviled eggs layered into every bite of potato.
Deviled Egg Potato Salad
Dressing
Mix-Ins
Garnish
- 🫕Large pot (6-quart)
- 🫕Medium saucepan
- 🥣Large mixing bowl
- 🥣Small mixing bowl
- 🪣Colander
- 🥄Slotted spoon
- 🔪Chef’s knife
- 🪵Cutting board
- 🥄Whisk
- 🥄Rubber spatula
- 🥄Measuring cups and spoons
Boil the Potatoes
Fill a large pot with cold water and add a generous pinch of salt. Add the peeled and cubed Yukon Gold potatoes and bring to a boil over high heat.
Once boiling, reduce heat to medium and cook for 12 to 15 minutes, or until the potatoes are fork-tender but not falling apart. Drain in a colander and spread the potatoes on a baking sheet or large plate to cool for 10 minutes.
Hard-Boil the Eggs
While the potatoes cook, place the 6 eggs in a medium saucepan and cover with cold water by 1 inch. Bring to a full boil over high heat, then immediately remove from heat, cover with a lid, and let the eggs sit in the hot water for 12 minutes.
Transfer the eggs to a bowl of ice water and let them cool for 10 minutes. Peel the eggs and set aside.
Separate Yolks and Whites
Slice the peeled hard-boiled eggs in half lengthwise. Remove the yolks and place them in a small mixing bowl.
Set aside 4 egg white halves for garnish if desired, then roughly chop the remaining egg whites into 1/2-inch pieces and set aside.
Make the Dressing
Using a fork, mash the egg yolks until smooth and crumbly. Add the 1/2 cup mayonnaise, 2 tablespoons yellow mustard, 2 tablespoons apple cider vinegar, 1 tablespoon sweet pickle relish, 1 teaspoon sugar, 1/2 teaspoon garlic powder, 1/4 teaspoon black pepper, 1/4 teaspoon smoked paprika, and 1 teaspoon salt.
Whisk everything together until the dressing is completely smooth and creamy.
Combine the Salad
Place the cooled potato cubes in a large mixing bowl. Add the chopped egg whites, 3 stalks of finely diced celery, and 3 thinly sliced green onions.
Pour the egg yolk dressing over the top and gently fold everything together with a rubber spatula until the potatoes are evenly coated. Be careful not to mash the potatoes.
Season and Chill
Taste the potato salad and adjust seasoning with additional salt, pepper, or vinegar as needed. Transfer to a serving bowl, smooth the top, and garnish with a sprinkle of smoked paprika and 2 tablespoons of chopped fresh parsley.
If reserved, arrange the egg white halves decoratively on top. Cover tightly with plastic wrap and refrigerate for at least 2 hours before serving to allow the flavors to meld.
Serve and Enjoy
Remove the potato salad from the refrigerator about 10 minutes before serving. Give it a gentle stir, add a final dusting of smoked paprika, and serve cold.
Leftovers can be stored in an airtight container in the refrigerator for up to 3 days.
Per serving (1 serving (approximately 1.5 cups)) — values are estimates
Shop Our Must-Haves


6. Brown Butter Haricots Verts
Haricots verts get far more depth here than a basic steamed green bean, thanks to butter cooked until golden and nutty before it ever touches the pan. Sliced garlic softens in that browned butter alongside the blanched beans, and a squeeze of lemon cuts through the richness with a clean, bright finish.
Brown Butter Haricots Verts
Garnish
- 🫕Large pot (4-quart or larger)
- 🥣Large bowl with ice water
- 🪣Colander
- 🍳Large skillet or sauté pan (12-inch)
- 🥄Wooden spoon or silicone spatula
- 🔪Microplane or zester
- 🔪Chef’s knife
- 🪵Cutting board
- 🥢Tongs
- 🍴Paper towels
Boil Salted Water
Fill a large pot with water and bring to a rolling boil over high heat. Add 1 tablespoon of kosher salt — the water should taste pleasantly salty, like the sea.
This seasons the beans from the inside out and helps preserve their vibrant green color.
Prepare Ice Bath
While the water comes to a boil, prepare an ice bath by filling a large bowl with cold water and a generous handful of ice cubes. Set it near the stove.
This will stop the cooking immediately and lock in the beans’ bright green color and crisp texture.
Blanch the Beans
Add the trimmed haricots verts to the boiling water and blanch for exactly 2 to 3 minutes. The beans should be bright green and just barely tender with a pleasant snap — they will finish cooking briefly in the brown butter, so err on the side of slightly underdone.
Taste one to check.
Shock and Dry Beans
Using tongs or a spider strainer, immediately transfer the blanched haricots verts to the ice bath and let them cool for 2 minutes until completely cold. Drain thoroughly in a colander, then spread the beans on paper towels and pat them very dry.
Excess moisture will cause the brown butter to splatter.
Brown the Butter
Place a large 12-inch skillet over medium heat. Add the 4 tablespoons of unsalted butter and let it melt completely, swirling the pan occasionally.
Continue cooking for 3 to 4 minutes, swirling frequently, until the butter foams, the foam subsides, and the milk solids at the bottom turn a deep golden-amber color. You will smell a rich, nutty aroma — this is beurre noisette.
Watch it carefully at this stage as it can go from brown to burnt very quickly.
Toast the Garlic
Immediately add the thinly sliced garlic to the brown butter and cook, stirring constantly, for 30 seconds until fragrant and just barely golden. Do not let the garlic burn.
The residual heat of the pan will continue to cook it.
Toss Beans in Butter
Add the dried haricots verts to the skillet and toss well with tongs to coat every bean in the brown butter. Cook over medium heat for 2 minutes, tossing frequently, until the beans are heated through and glistening.
Season with 1 teaspoon of flaky sea salt and 1/4 teaspoon of freshly ground black pepper.
Finish with Lemon
Remove the skillet from the heat. Drizzle 1 tablespoon of fresh lemon juice over the beans and add the lemon zest.
Toss to combine — the lemon juice will sizzle and lift any remaining browned bits from the pan, adding even more flavor. Taste and adjust seasoning as needed.
Plate and Serve
Transfer the haricots verts to a warm serving platter. Scatter the toasted sliced almonds over the top and garnish with the freshly chopped flat-leaf parsley.
Serve immediately while hot and glossy.
Per serving (1 serving (approximately 4 oz beans)) — values are estimates
Most Loved Products

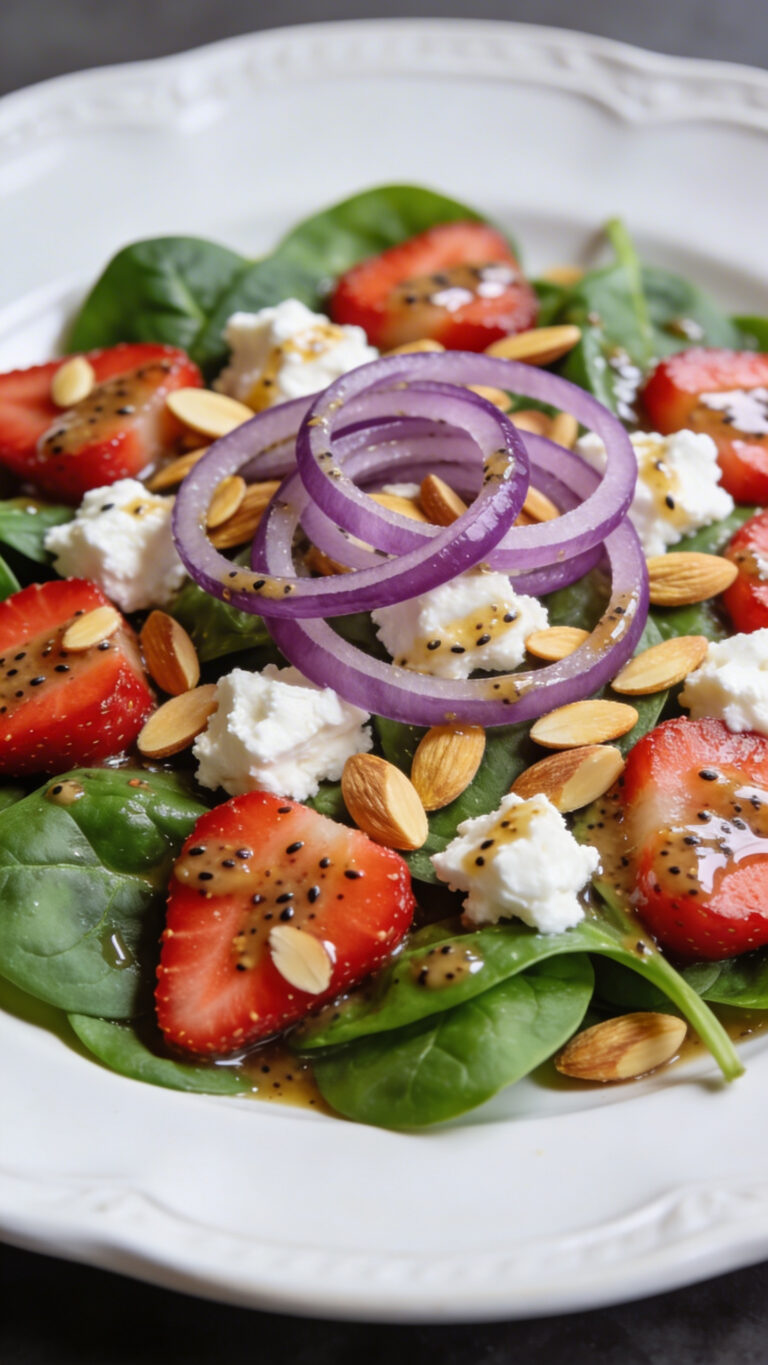
7. Strawberry Spinach Poppy Seed Salad
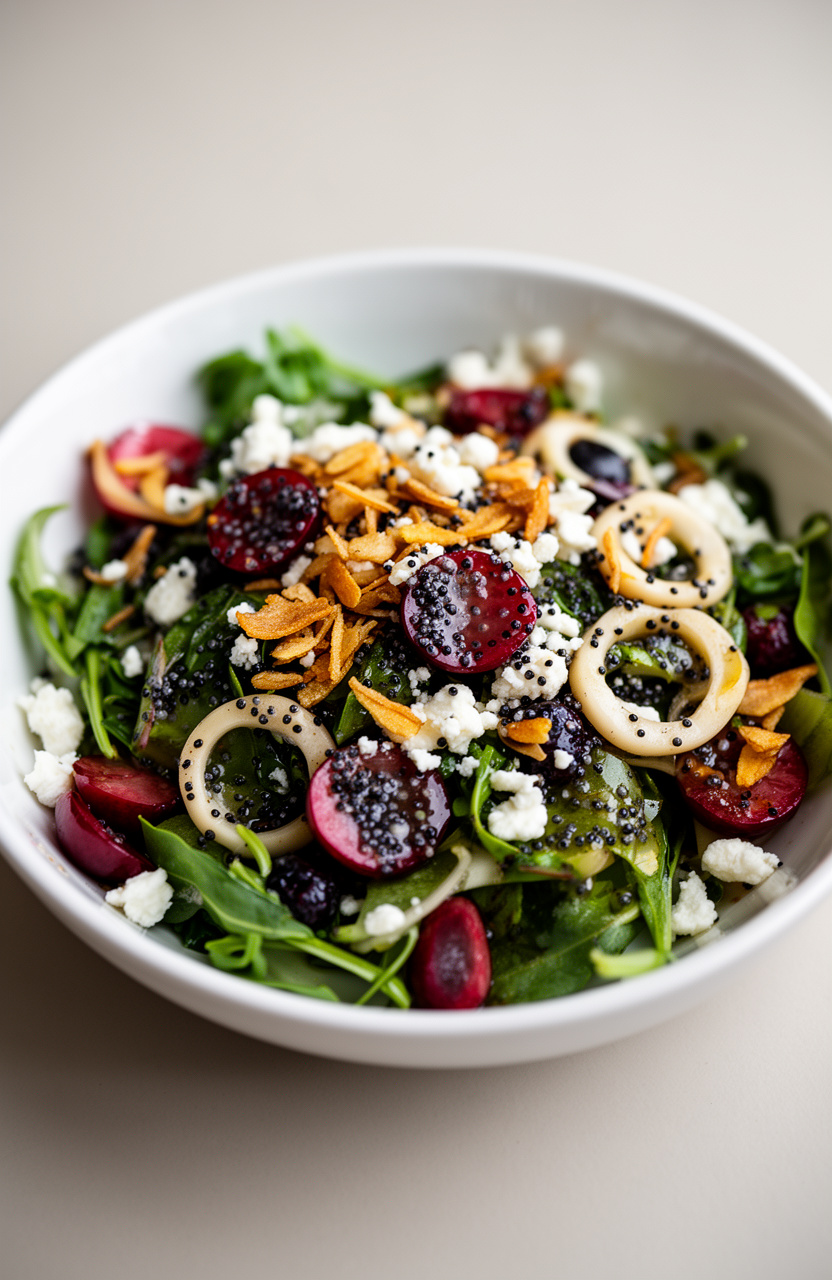
Toasted almonds add a warm, nutty crunch to layers of tender baby spinach, sweet sliced strawberries, and sharp red onion, with a poppy seed dressing tying the bright, contrasting flavors together in every forkful.
Strawberry Spinach Poppy Seed Salad
Salad
Dressing
- 🥣Large salad bowl
- 🥣Small mixing bowl
- 🥄Whisk
- 🥄Measuring cups and spoons
- 🔪Chef’s knife
- 🪵Cutting board
- 🥢Salad tongs
- 🍳Dry skillet or frying pan
Toast the Almonds
Toast the sliced almonds in a dry skillet over medium heat, stirring frequently, for 3 to 4 minutes until golden and fragrant. Watch them closely as they can burn quickly.
Remove from heat and transfer immediately to a plate to cool completely.
Prep the Produce
Hull and slice the strawberries into 1/4-inch thick slices. Thinly slice the red onion into half-moon rings.
If the onion flavor is too sharp for your preference, soak the sliced onion in cold water for 5 minutes, then drain and pat dry.
Make the Dressing
In a small mixing bowl, combine 1/3 cup extra virgin olive oil, 3 tablespoons apple cider vinegar, 2 tablespoons honey, and 1 tablespoon Dijon mustard. Whisk vigorously until the mixture is fully emulsified and smooth, about 1 minute.
Stir in 1 1/2 tablespoons poppy seeds, 1/4 teaspoon sea salt, and 1/4 teaspoon black pepper. Taste and adjust sweetness or acidity as desired.
Assemble the Salad
Add 6 cups of baby spinach to a large salad bowl. Layer the sliced strawberries and red onion rings evenly over the spinach.
Scatter the toasted almonds and crumbled feta cheese across the top.
Dress and Toss
Drizzle about two-thirds of the poppy seed dressing evenly over the salad. Using salad tongs, gently toss all ingredients together until the spinach and toppings are lightly and evenly coated.
Add more dressing as needed, one tablespoon at a time, to suit your preference. Serve immediately.
Plate and Serve
Divide the salad evenly among 4 chilled plates or shallow bowls. Ensure each serving has a generous portion of strawberries, almonds, and feta.
Drizzle any remaining dressing directly over each plated serving if desired. Serve immediately for the best texture and freshness.
Per serving (1 serving) — values are estimates
Top Picks Today


8. Creamy Dill Cucumber Salad
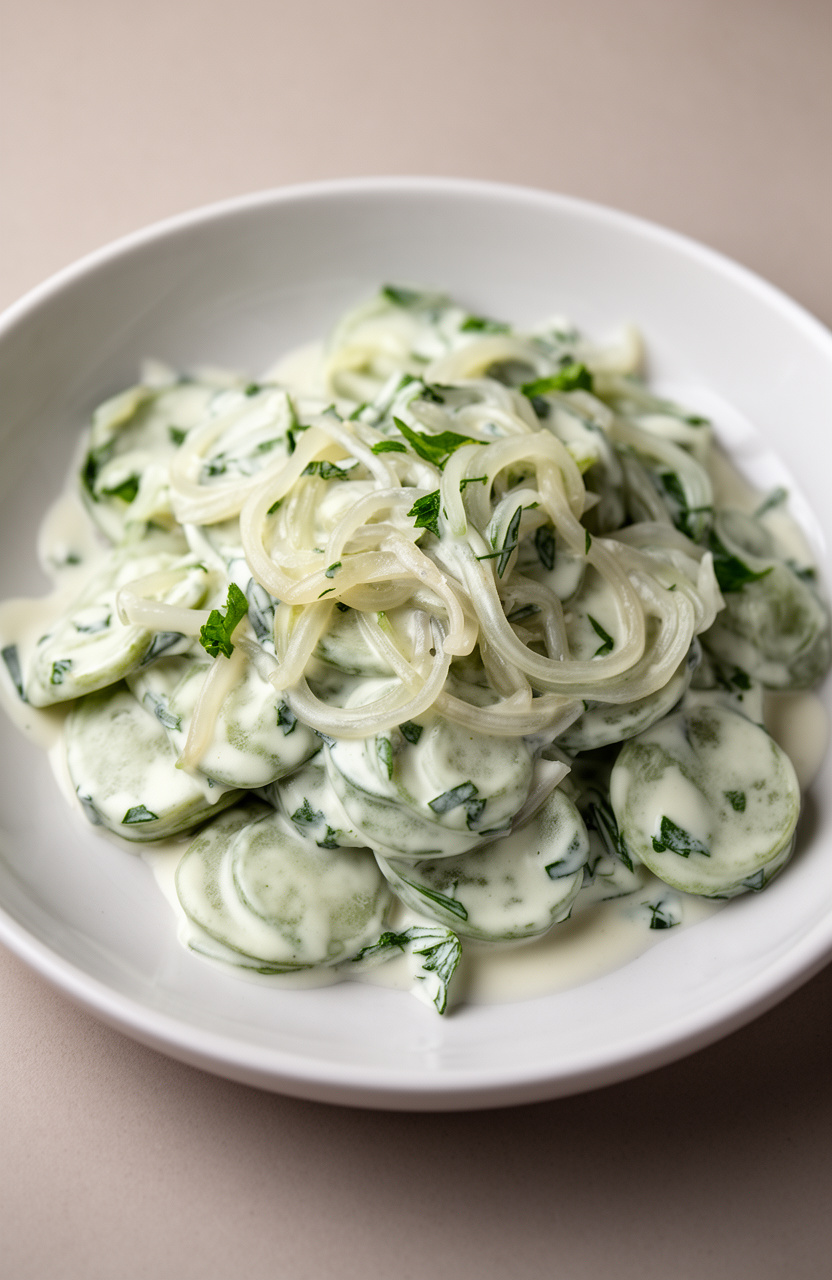
Thinly sliced English cucumbers are salted first to draw out excess moisture, keeping the final salad crisp rather than watery. Full-fat sour cream and fresh dill coat every slice in a tangy, herbaceous dressing that’s balanced by the sharp bite of thinly sliced red onion.
Creamy Dill Cucumber Salad
Dressing
- 🔪Mandoline slicer or sharp chef’s knife
- 🥣Large mixing bowl
- 🪣Colander or fine-mesh strainer
- 🥣Small mixing bowl
- 🥄Whisk
- 🍴Clean kitchen towels or paper towels
- 🪵Cutting board
- 🍴Microplane or garlic press
- 🥣Serving bowl or platter
- 🥄Measuring cups and spoons
Slice the Cucumbers
Wash and dry the 3 large English cucumbers. Using a mandoline slicer set to 1/8-inch thickness, or a sharp chef’s knife, slice the cucumbers into very thin, uniform rounds.
Thin, even slices are key to achieving the classic Eastern European texture for this salad.
Salt and Drain
Place the cucumber slices into a large colander set over a bowl or in the sink. Sprinkle 1 teaspoon of fine sea salt evenly over the cucumbers and toss gently to coat.
Let the cucumbers sit and release their excess moisture for 15 minutes. This step is essential to prevent a watery dressing later.
Prep the Onion
While the cucumbers are draining, peel and slice the red onion into very thin half-moon shapes. If you find raw onion too sharp, soak the sliced onion in a small bowl of cold water for 10 minutes, then drain and pat dry.
This mellows the bite while keeping the flavor.
Whisk the Dressing
In a small mixing bowl, combine 3/4 cup sour cream, 2 tablespoons white wine vinegar, 1 tablespoon granulated sugar, 1 tablespoon extra-virgin olive oil, 1 finely grated garlic clove, 1/4 teaspoon onion powder, and 1/2 teaspoon freshly ground black pepper. Whisk vigorously until the dressing is completely smooth and the sugar has dissolved, about 1 minute.
Taste and adjust seasoning if needed.
Squeeze Out Moisture
After 15 minutes, take small handfuls of the salted cucumbers and squeeze them firmly over the sink to remove as much liquid as possible. Transfer the squeezed cucumbers to a large dry mixing bowl.
Repeat until all cucumbers are pressed. Pat them lightly with paper towels if they still feel wet.
Toss the Salad
Add the drained red onion slices and 1/4 cup of finely chopped fresh dill to the large bowl with the squeezed cucumbers. Pour the creamy dill dressing over the top.
Using clean hands or two large spoons, toss everything together gently but thoroughly until every cucumber slice is evenly coated with the dressing.
Chill to Meld
Cover the bowl tightly with plastic wrap or transfer the salad to an airtight container. Refrigerate for at least 2 hours before serving.
This chilling time allows the flavors to meld together and the dressing to fully infuse into the cucumbers, which is what gives this Eastern European salad its characteristic depth of flavor.
Plate and Serve
Remove the salad from the refrigerator and give it one final gentle toss. Transfer to a chilled serving bowl or platter.
Garnish with a few fresh dill sprigs and an optional light crack of black pepper. Serve cold as a side dish alongside grilled meats, pierogies, or roasted potatoes.
The salad keeps well refrigerated for up to 2 days.
Per serving (1 serving (approximately 1 cup)) — values are estimates
Recommended for You


9. Roasted Garlic Mashed Potatoes
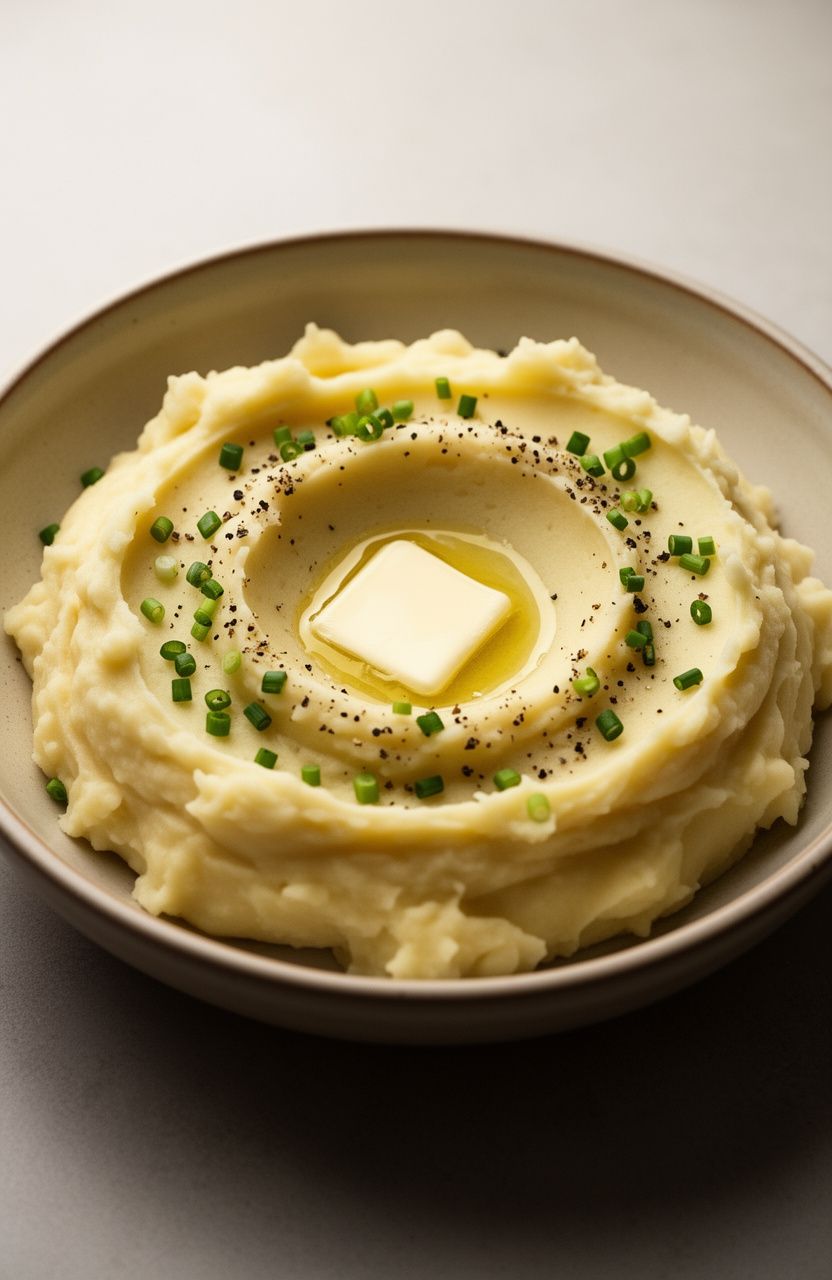
Roasting a whole head of garlic until the cloves turn soft and caramelized pulls out a deep, mellow sweetness that raw or sautéed garlic simply can’t deliver. Squeezed into mashed Yukon Golds, it melts into the creamy, buttery base and adds a rich, nutty depth to every bite.
Roasted Garlic Mashed Potatoes
Roasted Garlic
Garnish
- 📄Aluminum foil
- 🥧Baking sheet
- 🫕Large pot
- 🪣Colander
- 🫕Potato masher or hand mixer
- 🫕Small saucepan
- 🔪Knife and cutting board
- 🥄Measuring cups and spoons
- 🥣Serving bowl
Roast the Garlic
Preheat your oven to 400°F (200°C). Slice off the top 1/4 inch of the garlic head to expose the cloves.
Place the garlic head cut-side up on a small piece of aluminum foil, drizzle with 1 teaspoon of olive oil, and wrap tightly. Place on a baking sheet and roast for 40 to 45 minutes, until the cloves are deeply golden, soft, and fragrant.
Remove from the oven and let cool for 10 minutes before handling.
Boil the Potatoes
While the garlic roasts, peel and cut 2 pounds of Yukon Gold potatoes into 1-inch chunks. Place them in a large pot and cover with cold water by at least 1 inch.
Add 1 tablespoon of salt to the water. Bring to a boil over high heat, then reduce to a steady simmer and cook for 18 to 20 minutes, until the potatoes are completely tender and a fork slides through them easily with no resistance.
Prepare Garlic Paste
While the potatoes cook, warm 3/4 cup of whole milk in a small saucepan over low heat until steaming but not boiling, about 3 to 4 minutes. Keep warm on the lowest heat setting.
Once the roasted garlic is cool enough to handle, squeeze the softened cloves out of their skins into a small bowl and mash them into a smooth paste with a fork.
Drain and Dry
Drain the cooked potatoes thoroughly in a colander, then return them to the hot pot. Place the pot back on the burner over low heat for 1 to 2 minutes, shaking occasionally, to evaporate any excess moisture.
This step ensures your mashed potatoes are fluffy rather than watery.
Mash and Season
Add 4 tablespoons of butter pieces to the hot potatoes and mash with a potato masher until the butter is fully melted and incorporated. Stir in the roasted garlic paste, then gradually pour in the warm milk, stirring between additions, until you reach your desired consistency.
Fold in 1/4 cup of sour cream, 1 teaspoon of salt, and 1/2 teaspoon of black pepper. Taste and adjust seasoning as needed.
Garnish and Serve
Transfer the roasted garlic mashed potatoes to a warm serving bowl. Make a small well in the center and add 1 tablespoon of butter, allowing it to melt into the potatoes.
Garnish with 2 tablespoons of freshly chopped chives and a crack of black pepper. Serve immediately while hot.
Per serving (1 serving (approximately 1 cup)) — values are estimates
Editor’s Choice


10. Spring Vegetable Quiche Bites

Buttery shortcrust pastry cups cradle a silky egg custard packed with softened leek and tender asparagus pieces, baked until the filling just sets with a slight wobble and the pastry edges turn golden and crisp.
Spring Vegetable Quiche Bites
Crust
Filling
Custard
Topping
Equipment
- 🍰24-cup mini muffin tin (each cup approximately 1.75-inch diameter)
- 🍴3-inch round cookie or pastry cutter
- 🍳Large skillet or sauté pan
- 🥣Medium mixing bowl
- 🥄Whisk
- 🍴Liquid measuring cup with pour spout
- 🫙Rolling pin
- 🍴Lightly floured work surface
- 🥄Small spatula or offset spatula
- 🪜Wire cooling rack
- 🥄Wooden spoon or silicone spatula
- 🖌️Pastry brush
- 🔪Sharp knife and cutting board
Preheat and Prep
Preheat your oven to 375°F (190°C). Grease a 24-cup mini muffin tin generously with non-stick cooking spray or softened butter, making sure to coat the sides and rims of each cup thoroughly to prevent sticking.
Cut and Line
Lightly flour a clean work surface. Unroll or roll out the shortcrust pastry sheet to approximately 1/8-inch thickness.
Using a 3-inch round cookie or pastry cutter, stamp out 24 circles. Gently press each pastry circle into a greased muffin cup, pressing it up the sides to form a small shell.
Prick the bottom of each shell twice with a fork. Place the tin in the refrigerator to rest while you prepare the filling.
Sauté Vegetables
Melt 1 tablespoon of unsalted butter in a large skillet over medium heat. Add the sliced leek and cook, stirring frequently, for 3 minutes until softened and translucent.
Add the asparagus pieces and cook for an additional 3 minutes until just tender but still bright green. Stir in the thawed peas and chopped baby spinach, cooking for about 1 minute until the spinach wilts.
Season lightly with a pinch of salt and pepper. Remove from heat and allow the vegetable mixture to cool for 5 minutes.
Make Custard
In a medium mixing bowl, whisk together the 3 large eggs, 3/4 cup heavy cream, and 1/4 cup whole milk until fully combined and smooth. Season the custard with 1/2 teaspoon fine sea salt, 1/4 teaspoon black pepper, and 1/8 teaspoon freshly grated nutmeg.
Whisk once more to incorporate. Stir in half of the grated Gruyère cheese (about 1/4 cup) and the chopped fresh tarragon.
Fill the Shells
Remove the prepared pastry-lined muffin tin from the refrigerator. Divide the cooled vegetable mixture evenly among the 24 pastry shells, filling each about halfway.
Using a liquid measuring cup or a small ladle, carefully pour the egg custard mixture over the vegetables in each shell, filling each cup to within 1/8 inch of the top rim. Sprinkle the remaining 1/4 cup of grated Gruyère evenly over all the filled cups.
Bake Quiche Bites
Transfer the filled muffin tin carefully to the preheated 375°F (190°C) oven. Bake for 22 to 25 minutes, until the custard is just set with a very slight jiggle in the center, the pastry is golden brown around the edges, and the cheese topping is lightly golden.
Begin checking at 22 minutes to avoid overbaking.
Rest and Serve
Remove the tin from the oven and allow the quiche bites to rest in the pan for 5 minutes — this helps them firm up and makes removal easier. Using a small offset spatula or a butter knife, carefully loosen the edges of each quiche bite and lift them out onto a wire cooling rack.
Garnish with freshly snipped chives and serve warm or at room temperature.
Per serving (1 serving (6 quiche bites)) — values are estimates
Most Loved Products


11. Maple Bacon Brussels Sprouts
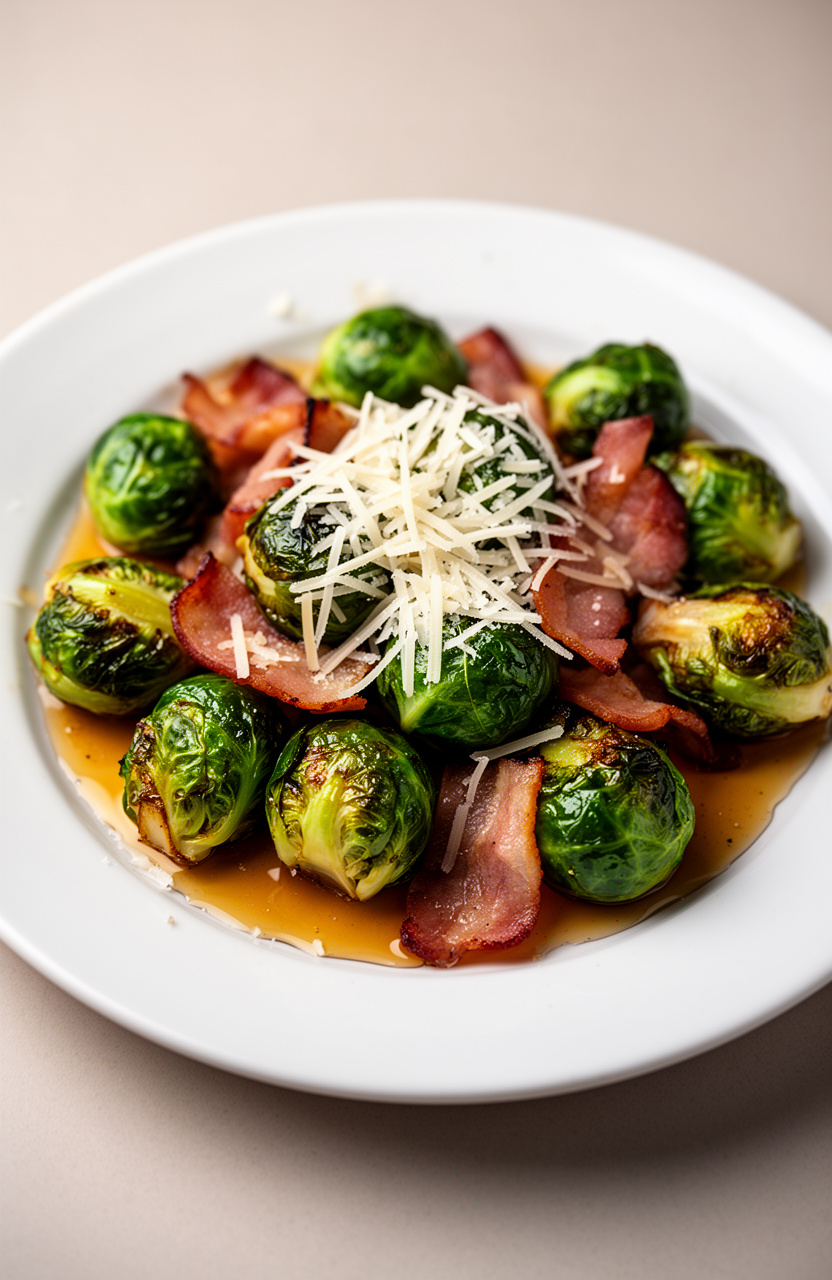
Roasting halved Brussels sprouts alongside thick-cut bacon pieces lets the oven do the heavy lifting, crisping the bacon while the cut sides of the sprouts caramelize and char at the edges. A drizzle of pure maple syrup ties it together, adding a sticky sweetness that plays directly against the smoky, salty bacon fat coating every sprout.
Maple Bacon Brussels Sprouts
Garnish
- 🥧Large rimmed baking sheet
- 🍳Large skillet or oven-safe pan
- 🪵Cutting board
- 🔪Chef’s knife
- 🥣Mixing bowl
- 🥢Tongs
- 🥄Measuring spoons
Preheat Oven
Preheat your oven to 400°F (200°C). Line a large rimmed baking sheet with foil for easy cleanup, or leave it unlined for better browning.
Prep Brussels Sprouts
Trim the stem ends off the Brussels sprouts and remove any yellowed outer leaves. Halve each sprout lengthwise through the stem so they lay flat.
Rinse and pat completely dry with paper towels — dry sprouts roast better and get crispier edges.
Render Bacon
In a large skillet over medium heat, cook the bacon pieces for about 5 minutes, stirring occasionally, until the fat is rendered and the bacon is just starting to crisp but not fully cooked through. Use tongs or a slotted spoon to transfer the bacon to a plate, leaving the rendered bacon fat in the skillet.
Season Sprouts
In a large mixing bowl, toss the halved Brussels sprouts with the olive oil, rendered bacon fat (about 1 tablespoon from the pan), garlic powder, kosher salt, black pepper, and red pepper flakes if using. Toss well to coat every sprout evenly.
Arrange on Pan
Spread the seasoned Brussels sprouts in a single layer on the prepared baking sheet, cut-side down. This ensures maximum caramelization on the flat surface.
Scatter the partially cooked bacon pieces evenly over and around the sprouts.
Roast Sprouts
Roast in the preheated 400°F oven for 20 minutes, until the sprouts are tender and the cut sides are deeply golden brown. Remove the pan from the oven.
Add Maple Glaze
In a small bowl, stir together the maple syrup and apple cider vinegar. Drizzle this mixture evenly over the roasted Brussels sprouts and bacon on the pan, then toss gently with tongs to coat.
Return the pan to the oven and roast for an additional 5 minutes, until the maple glaze is caramelized and sticky.
Finish and Serve
Remove from the oven and transfer to a serving platter. Immediately sprinkle with freshly grated Parmesan cheese.
Taste and adjust seasoning with a pinch of salt if needed. Serve hot as a side dish.
Per serving (1 serving) — values are estimates
Recommended for You
12. Herbed Couscous with Roasted Beets
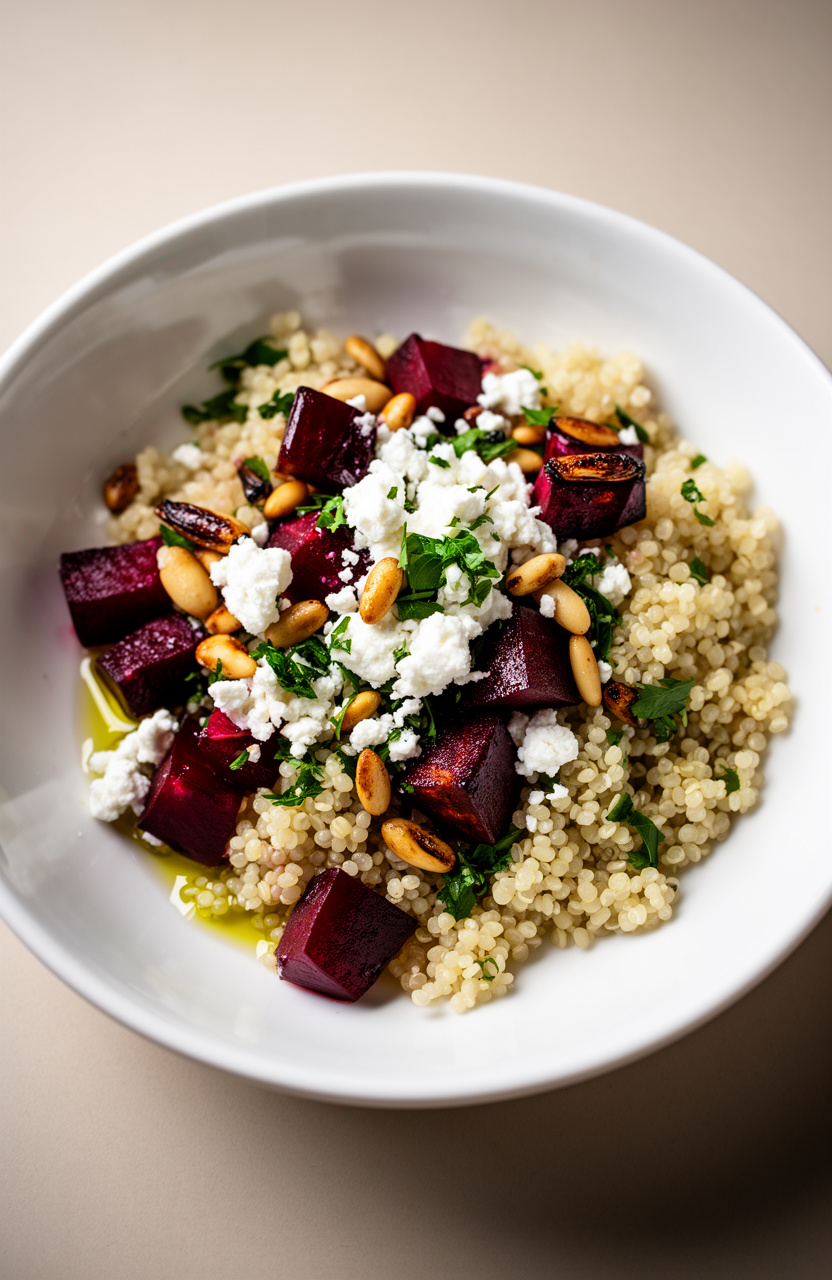
Roasting beets until they’re fork-tender and caramelized at the edges brings out an earthy sweetness that raw or steamed beets can’t match. Fluffy couscous, fresh herbs, and a drizzle of olive oil pull the dish together with bright, clean contrast against the beets’ deep, roasted flavor.
Herbed Couscous with Roasted Beets
Roasted Beets
Couscous
Herbs And Finishing
Dressing
- 🥧Rimmed baking sheet
- 📄Aluminum foil
- 🫕Medium saucepan with lid
- 🥣Large mixing bowl
- 🥣Small mixing bowl
- 🥄Whisk
- 🔪Chef’s knife and cutting board
- 🥄Rubber spatula or fork
- 🥄Measuring cups and spoons
- 🔪Citrus zester or microplane
Prep the Beets
Preheat your oven to 400°F (200°C). Line a rimmed baking sheet with aluminum foil.
Cut the scrubbed beets into 3/4-inch cubes and place them on the prepared baking sheet. Drizzle with 2 tablespoons of olive oil, 1/2 teaspoon kosher salt, and 1/4 teaspoon black pepper.
Toss well to coat evenly and spread into a single layer.
Roast the Beets
Roast the beets in the preheated oven for 35 to 40 minutes, flipping once halfway through at the 20-minute mark, until they are tender when pierced with a fork and have caramelized edges. Remove from the oven and set aside to cool slightly.
Toast Pine Nuts
While the beets are roasting, toast the pine nuts. Place them in a small dry skillet over medium-low heat and cook, stirring frequently, for 3 to 4 minutes until golden and fragrant.
Immediately transfer to a plate to stop cooking and prevent burning. Set aside.
Cook the Couscous
Prepare the couscous. In a medium saucepan, bring 1 3/4 cups of vegetable broth, 1 tablespoon olive oil, and 1/2 teaspoon kosher salt to a boil over medium-high heat.
Once boiling, stir in 1 1/2 cups of dry couscous. Remove the pan from heat immediately, cover tightly with a lid, and let it steam for 5 minutes.
Fluff and Cool
After 5 minutes, uncover the couscous and fluff it thoroughly with a fork, breaking up any clumps. Transfer the fluffed couscous to a large mixing bowl and let it cool for about 5 minutes so it is warm but not steaming hot before adding the herbs.
Whisk the Dressing
Make the lemon herb dressing. In a small bowl, whisk together 3 tablespoons extra-virgin olive oil, 2 tablespoons fresh lemon juice, 1 teaspoon lemon zest, 1 minced garlic clove, 1 teaspoon honey, and 1/4 teaspoon ground cumin until well combined.
Season with salt and black pepper to taste.
Combine Herbs and Couscous
Pour the dressing over the warm couscous and toss to combine. Add the chopped parsley, mint, dill, and sliced green onions.
Toss everything together until the herbs are evenly distributed throughout the couscous.
Assemble and Serve
Gently fold in the roasted beet cubes, being careful not to overmix — a few light folds will add a beautiful pink swirl to the couscous without turning it entirely red. Top with crumbled feta cheese and toasted pine nuts.
Taste and adjust seasoning with additional salt, pepper, or lemon juice as needed. Serve warm or at room temperature.
Per serving (1 serving) — values are estimates
Our Best Picks
13. Buttery Pull-Apart Dinner Rolls
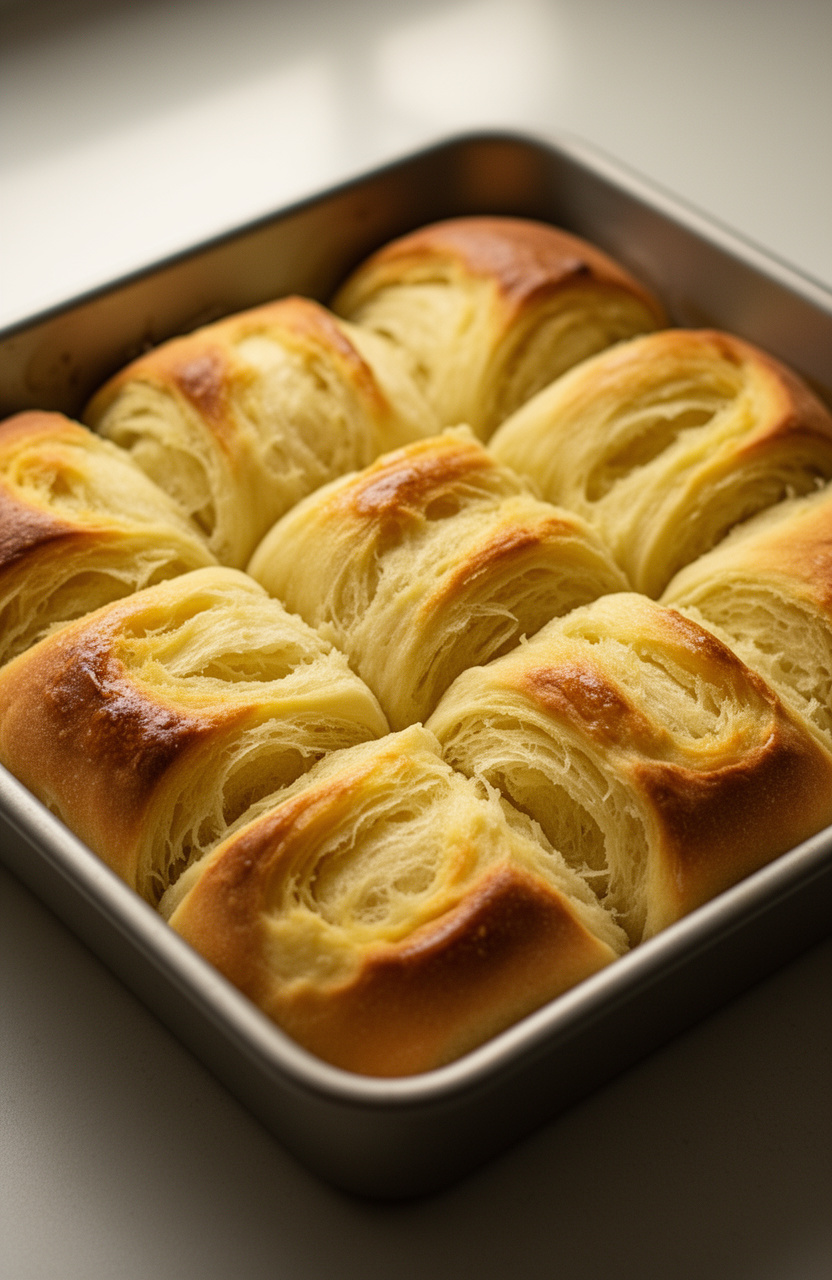
Activating yeast in warmed whole milk gives these pull-apart rolls a light, pillowy crumb that tears away in soft, buttery layers with a faintly sweet, golden crust.
Buttery Pull-Apart Dinner Rolls
Dough
Topping
- 🔌Stand mixer with dough hook attachment
- 🫕Small saucepan or microwave-safe bowl
- 🌡️Instant-read thermometer
- 🍰8×8-inch square baking pan
- 🖌️Pastry brush
- 🥣Large mixing bowl
- 📄Plastic wrap or clean kitchen towel
- 🔪Bench scraper or sharp knife
- 🪜Wire cooling rack
Activate the Yeast
Warm 3/4 cup whole milk in a small saucepan over low heat or in the microwave in 15-second intervals until it reaches 110°F on an instant-read thermometer. Pour the warm milk into the bowl of your stand mixer.
Sprinkle in 2 1/4 teaspoons active dry yeast and 1 tablespoon of the granulated sugar. Stir gently and let stand for 5 to 10 minutes until the mixture is foamy and fragrant, confirming the yeast is active.
If no foam forms, discard and start again with fresh yeast.
Mix the Dough
Add the remaining 1 tablespoon granulated sugar, 1 large room-temperature egg, and 3/4 teaspoon fine sea salt to the yeast mixture. Attach the dough hook to the stand mixer and add 2 cups all-purpose flour.
Mix on low speed (speed 2) for 2 minutes until a shaggy dough forms. Increase to medium speed and mix for 1 minute.
Incorporate the Butter
With the mixer running on medium speed, add the 3 tablespoons of softened, cubed unsalted butter one piece at a time, waiting about 20 seconds between each addition to allow it to incorporate fully. Once all the butter is added, increase the speed to medium-high and knead for 6 to 8 minutes until the dough is smooth, elastic, and pulls cleanly away from the sides of the bowl.
The dough will be slightly tacky but should not stick aggressively to your fingers. If it is too sticky, add flour 1 tablespoon at a time.
First Proof
Lightly grease a large mixing bowl with a small amount of neutral oil or cooking spray. Shape the dough into a smooth ball and place it in the bowl, turning once to coat.
Cover tightly with plastic wrap or a clean kitchen towel. Place in a warm, draft-free spot (such as a turned-off oven with just the light on) and let the dough rise for 1 hour, or until it has doubled in size.
Shape the Rolls
Grease an 8×8-inch square baking pan generously with butter or cooking spray. Punch down the risen dough on a lightly floured surface to release the gas.
Using a bench scraper or sharp knife, divide the dough into 12 equal pieces, each weighing approximately 35 to 40 grams. To shape each roll, flatten a piece of dough, then fold the edges toward the center and pinch to seal, rolling it seam-side down on the work surface in a circular motion under your cupped hand until a tight, smooth ball forms.
Arrange the 12 rolls in the prepared pan in a 3×4 grid, spacing them evenly so they are just touching.
Second Proof and Preheat
Cover the pan loosely with plastic wrap or a clean kitchen towel. Allow the rolls to proof at room temperature for 30 minutes, or until they have puffed up and are touching each other snugly.
While the rolls proof, preheat your oven to 375°F (190°C) and position a rack in the center of the oven.
Brush and Bake
Once the rolls have proofed and the oven is fully preheated to 375°F, brush the tops of the rolls generously with about half of the 3 tablespoons of melted unsalted butter using a pastry brush. Place the pan on the center rack and bake for 22 to 25 minutes, until the tops are deep golden brown and the internal temperature of the center roll reads at least 190°F on an instant-read thermometer.
Finish and Serve
Remove the pan from the oven and immediately brush the hot rolls with the remaining melted butter, ensuring every surface is well coated for maximum flavor and shine. Sprinkle evenly with 1/2 teaspoon flaky sea salt and the optional 1 tablespoon of freshly chopped parsley.
Allow the rolls to rest in the pan for 5 minutes before transferring to a wire cooling rack or serving directly from the pan. Pull apart and serve warm.
Per serving (3 rolls (1 serving)) — values are estimates
Our Best Picks


14. Caramelized Onion Green Bean Casserole
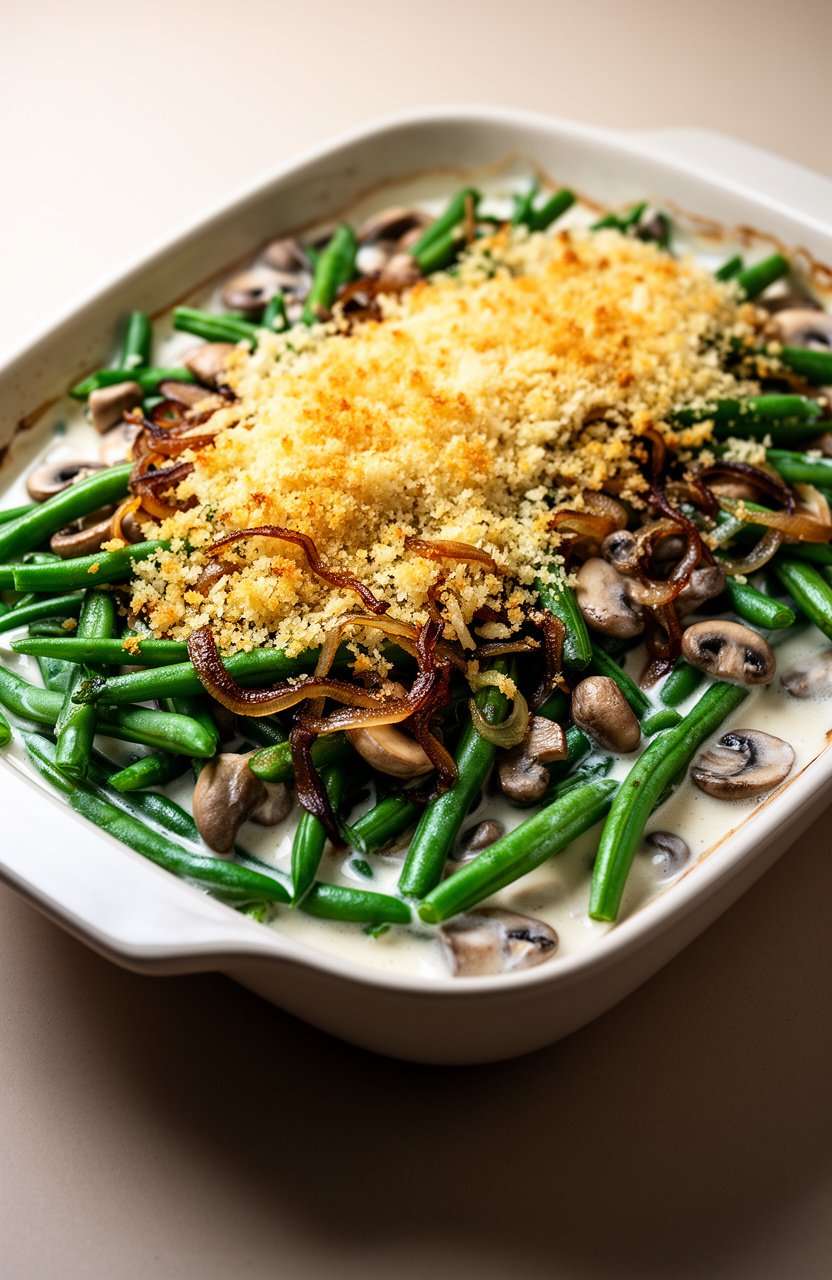
Blanching fresh green beans before they hit the pan keeps them vibrant and tender-crisp, while slow-cooked caramelized onions melt into a rich, jammy layer that replaces the canned soup shortcut most versions rely on.
Caramelized Onion Green Bean Casserole
Caramelized Onions
Cream Sauce
Topping
- 🍳Large skillet or sauté pan (12-inch)
- 🫕Large pot for blanching
- 🪣Colander
- 🍰2-quart baking dish (9×13-inch)
- 🥄Whisk
- 🥄Wooden spoon or silicone spatula
- 🪵Cutting board
- 🔪Chef’s knife
- 🥣Mixing bowl
- 🥄Measuring cups and spoons
Blanch Green Beans
Preheat your oven to 375°F (190°C). Bring a large pot of salted water to a boil.
Add the trimmed and cut green beans and blanch for 4 minutes until bright green and slightly tender but still crisp. Drain immediately in a colander and rinse under cold running water to stop cooking.
Set aside.
Caramelize the Onions
In a large skillet over medium-low heat, melt 3 tablespoons of butter with 1 tablespoon of olive oil. Add the thinly sliced onions, 1 teaspoon of sugar, and 1/2 teaspoon of kosher salt.
Stir to coat. Cook, stirring every 5 minutes, for 40 to 45 minutes until the onions are deeply golden brown and caramelized.
If the onions start to stick or burn, add a splash of water and scrape up the browned bits. Remove from heat and set aside.
Sauté Mushrooms and Garlic
In the same skillet (wiped clean) over medium heat, melt 2 tablespoons of butter. Add the sliced cremini mushrooms and cook, stirring occasionally, for 5 to 6 minutes until the mushrooms release their moisture and turn golden brown.
Add the minced garlic and cook for 1 minute until fragrant.
Build the Cream Sauce
Sprinkle 3 tablespoons of all-purpose flour over the mushroom mixture and stir constantly for 1 to 2 minutes to cook out the raw flour taste. Slowly pour in the warmed whole milk and chicken or vegetable broth, whisking constantly to prevent lumps.
Continue to cook over medium heat, stirring frequently, for 4 to 5 minutes until the sauce thickens enough to coat the back of a spoon. Season with 1/2 teaspoon kosher salt, 1/2 teaspoon black pepper, 1/4 teaspoon nutmeg, and 1 teaspoon Worcestershire sauce.
Remove from heat and stir in the sour cream until smooth.
Assemble the Casserole
Fold the blanched green beans and three-quarters of the caramelized onions into the cream sauce, stirring gently until everything is evenly coated. Transfer the mixture to a lightly greased 2-quart baking dish and spread into an even layer.
Scatter the remaining caramelized onions over the top.
Prepare the Topping
In a small mixing bowl, combine 1 cup of panko breadcrumbs, 2 tablespoons of melted butter, 1/4 cup of grated Parmesan cheese, and 1/2 teaspoon of garlic powder. Stir until the breadcrumbs are evenly coated with butter.
Sprinkle the breadcrumb mixture evenly over the top of the casserole.
Bake Until Golden
Place the casserole in the preheated 375°F oven and bake for 25 minutes until the topping is golden brown and crispy and the sauce is bubbling around the edges. If the topping browns too quickly, loosely tent with foil for the last 5 minutes.
Remove from the oven and let rest for 5 minutes before serving.
Per serving (1 serving) — values are estimates
Highly Recommended

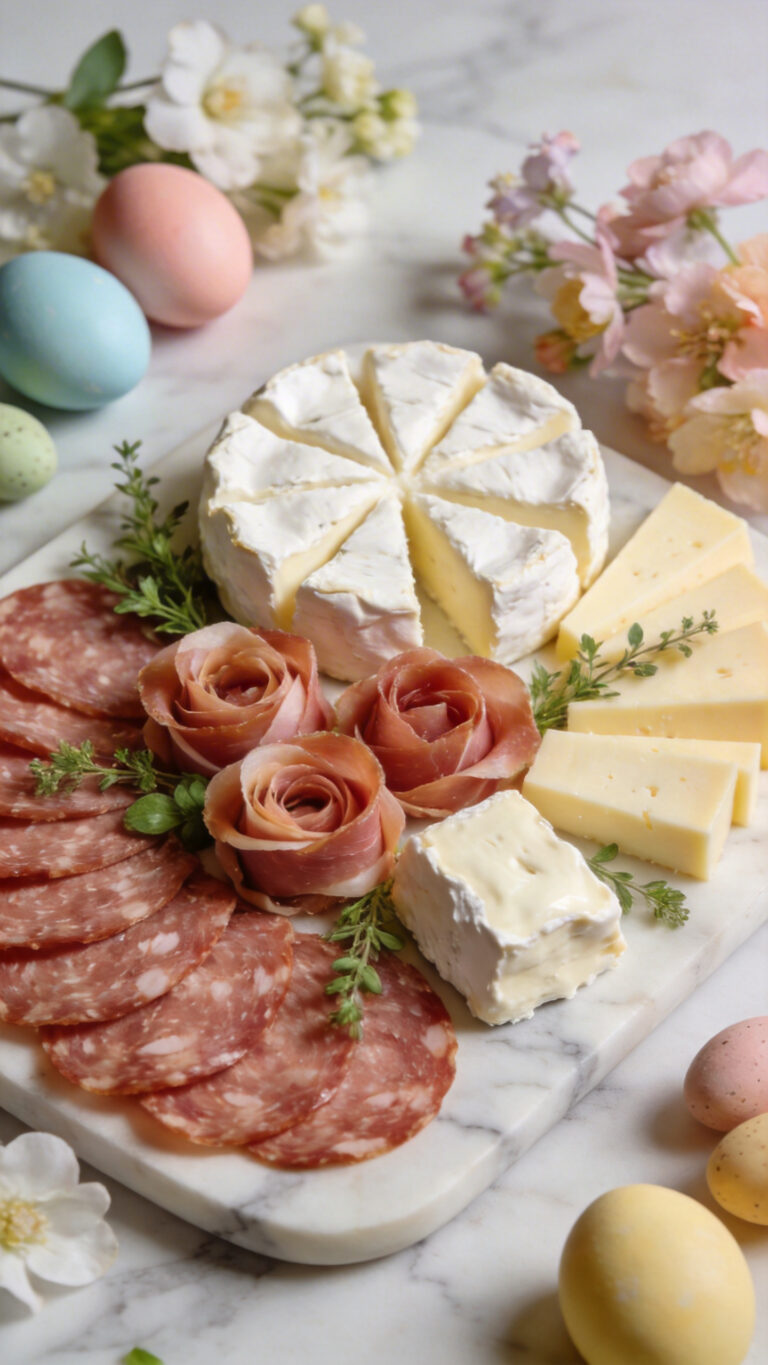
15. Prosciutto Wrapped Melon Skewers
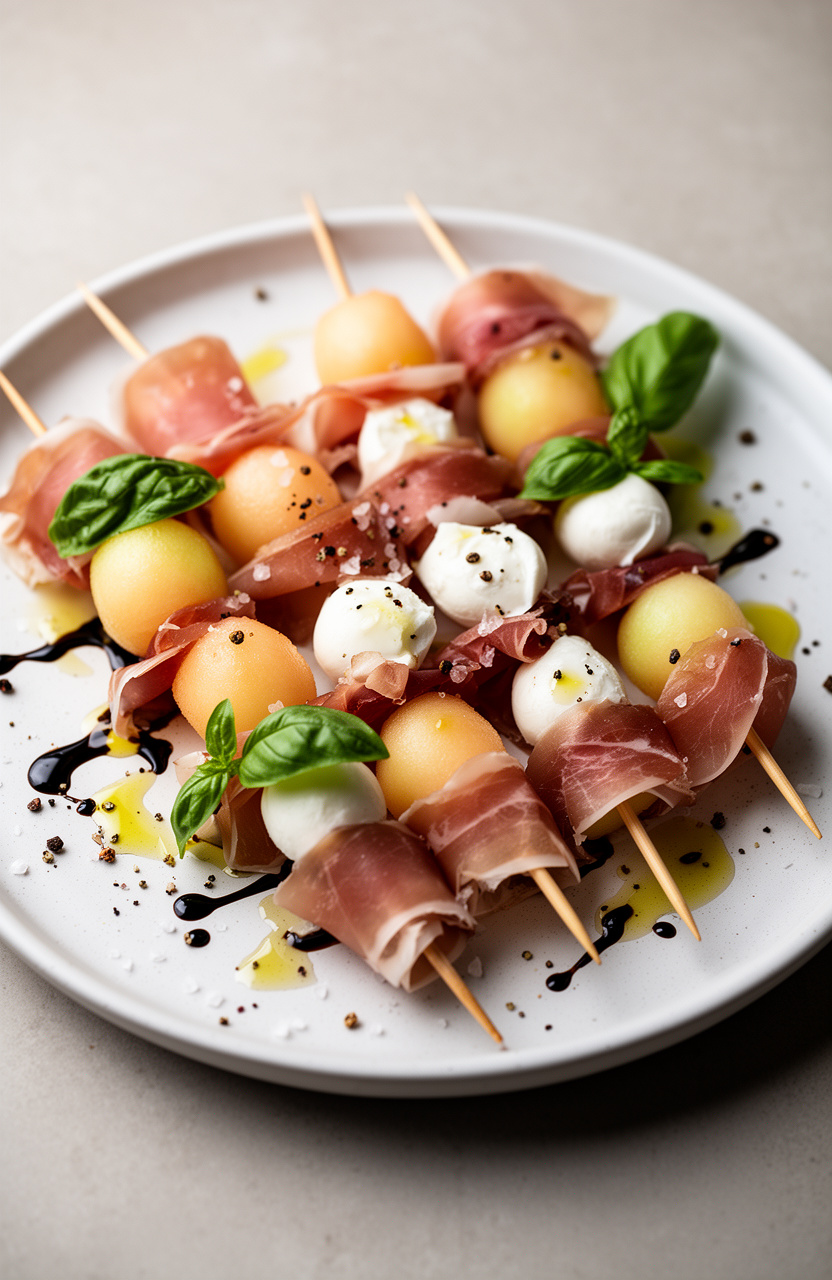
Cantaloupe and honeydew cubes are threaded onto skewers with fresh mozzarella pearls, then wrapped in thin ribbons of prosciutto di Parma that cling to the fruit’s cool, juicy surface. The salty, paper-thin cured meat plays directly against the honeyed sweetness of both melons, with the soft, milky mozzarella rounding out every bite.
Prosciutto Wrapped Melon Skewers
Garnish
- 🔪Melon baller or sharp knife
- 🪵Cutting board
- 📍16 short wooden or bamboo skewers (6-inch)
- 🍽️Large serving platter
- 🥄Small drizzle spoon or squeeze bottle
Prepare the Melon
Using a melon baller, scoop the cantaloupe and honeydew into uniform balls, aiming for about 16 balls from each melon (32 total). Alternatively, cut the melon flesh into 1-inch cubes using a sharp knife.
Place the melon pieces on a paper towel-lined tray and pat gently dry — this helps the prosciutto adhere and prevents slipping on the skewer.
Prep the Prosciutto
Lay the prosciutto slices flat on your cutting board. Cut each slice lengthwise into 2 long strips, giving you approximately 24 strips total.
You will use about 16 strips for wrapping; reserve the rest for filling in any gaps or for serving alongside.
Wrap the Melon
Take one strip of prosciutto and wrap it snugly around one melon ball, tucking the end underneath so it stays in place. Repeat with the remaining melon balls and prosciutto strips until all 16 are wrapped.
If some strips are short, use a half-strip just to cover the visible melon surface.
Assemble the Skewers
Assemble each skewer by threading one prosciutto-wrapped cantaloupe ball, followed by one fresh mozzarella pearl, and then one prosciutto-wrapped honeydew ball onto a 6-inch wooden skewer. Press gently so the components sit snugly together.
Repeat to build all 16 skewers.
Plate and Serve
Arrange the finished skewers on a large serving platter in a single layer or slightly overlapping. Tuck small fresh basil leaves between the skewers for color and aroma.
Drizzle the entire platter with 2 tablespoons of extra-virgin olive oil and 1 tablespoon of aged balsamic glaze. Finish with a light sprinkle of flaky sea salt and 1/4 teaspoon of freshly cracked black pepper.
Serve immediately at room temperature for the best flavor.
Per serving (4 skewers) — values are estimates
Our Best Picks
![200PCS Bamboo Skewers for Appetizers, [6 Inch] Long Cocktail Picks Fancy Toothpicks for Appetizers, Flat Paddle Wooden Skewers Food Sticks for Party Drinks Fruit BBQ, Charcuterie Boards Accessories](https://m.media-amazon.com/images/I/51ibWjKKeZL._SL500_.jpg)


From bright spring salads to warm, comforting sides, this collection has everything you need to round out your Easter table. Pin or save your favorites now so they’re ready when you need them — then pick one to make this year and let us know in the comments which dish you’re bringing to dinner!